一、App弹窗异常处理
问题:在进行App测试的时候会有很多不固定不定时的弹窗出现,比如更新、广告、通知弹窗等等;
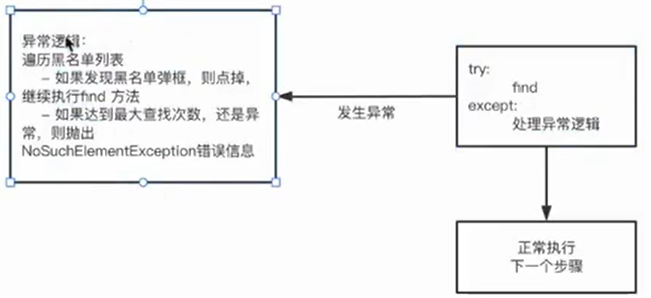
处理:将可预见的一些弹窗添加到一个黑名单中,在每次查找元素时如果发生异常,那就去遍历黑名单,将黑名单中的弹窗都处理之后再进行正常定位;
思路:
案例:
- 场景:
- 1、未登录情况下打开雪球app;
- 2、点击一键登录模拟弹窗;
- 3、定位点击上证指数;—需要封装定位方法处理掉模拟的弹窗才可以定位到上证指数;

import time
from appium import webdriver
from appium.options.common import AppiumOptions
from appium.webdriver.common.appiumby import AppiumBy

# 定义一个弹窗黑名单--登录右上角x
black_list = [(AppiumBy.ID,"com.xueqiu.android:id/iv_action_back")]

# 封装自己的定位方法
def my_find(driver: webdriver,locator: tuple):
    # 定位元素的时候由于弹窗的存在可能会发送异常,那就捕获异常
    try:
        return driver.find_element(*locator)
    except Exception as e:
        print(f"定位出现异常:{locator}")
        # 产生了异常那说明遇到了弹窗,那就遍历黑名单进行弹窗处理
        for black in black_list:
            # 定位每一个黑名单中弹窗,然后将其关闭
            # 定位的时候还是可能会出现异常,那就用find_elements方法定位,该方法如果定位不到不会抛出异常
            pops = driver.find_elements(*black)
            # 如果定位到了就关闭第一个弹窗
            if len(pops) > 0:
                pops[0].click()
                print("干掉黑名单中弹窗")
                # 关闭掉弹窗之后继续定位
                return my_find(driver,locator)
        else:
            # 如果遍历了黑名单处理之后还是定位不到元素,那说明定位元素真出了问题,那就抛出异常
            print("定位元素真出了问题")
            raise e
if __name__ == '__main__':
    # capability配置
    caps = {}
    caps["platformName"] = "Android"
    caps["appium:platformVersion"] = "6.0.1"
    caps["appium:deviceName"] = "127.0.0.1:7555"
    caps["appium:appPackage"] = "com.xueqiu.android"
    caps["appium:appActivity"] = ".view.WelcomeActivityAlias"
    caps["appium:automationName"] = "UiAutomator2"
    caps["appium:unicodeKeyboard"] = "true"
    caps["appium:restKeyboard"] = "true"
    caps["appium:noReset"] = "true"
    # appium服务器地址
    appium_server_url = 'http://127.0.0.1:4723'
    driver = webdriver.Remote(appium_server_url, options=AppiumOptions().load_capabilities(caps=caps))
    driver.implicitly_wait(10)

    # 点击一键登录进入登录页面模拟弹窗
    driver.find_element(AppiumBy.ID,"com.xueqiu.android:id/rl_bottom_login").click()

    # 定位上涨指数
    szzs_locator = (AppiumBy.XPATH,'//*[@text="上证指数"]')
    my_find(driver,szzs_locator).click()
    time.sleep(3)
    driver.quit()
    print("结束")
使用装饰器优化
import time
from appium import webdriver
from appium.options.common import AppiumOptions
from appium.webdriver.common.appiumby import AppiumBy

# 定义一个弹窗黑名单--登录右上角x
black_list = [(AppiumBy.ID,"com.xueqiu.android:id/iv_action_back")]

# 定义一个装饰器,对需要处理黑名单的定位方法进行装饰
def black_wrapper(func):
    def inner(*args,**kwargs):
        # driver是通过*args进行接收
        driver = args[0]
        # 定位元素的时候由于弹窗的存在可能会发送异常,那就捕获异常
        try:
            return func(*args,**kwargs)
        except Exception as e:
            print(f"定位出现异常:{args[1]}")
            # 产生了异常那说明遇到了弹窗,那就遍历黑名单进行弹窗处理
            for black in black_list:
                # 定位每一个黑名单中弹窗,然后将其关闭
                # 定位的时候还是可能会出现异常,那就用find_elements方法定位,该方法如果定位不到不会抛出异常
                pops = driver.find_elements(*black)
                # 如果定位到了就关闭第一个弹窗
                if len(pops) > 0:
                    pops[0].click()
                    print("干掉黑名单中弹窗")
                    # 关闭掉弹窗之后继续定位
                    return func(*args,**kwargs)
            else:
                # 如果遍历了黑名单处理之后还是定位不到元素,那说明定位元素真出了问题,那就抛出异常
                print("定位元素真出了问题")
                raise e
    return inner

# 封装自己的定位方法,使用装饰器进行黑名单处理
@black_wrapper
def my_find(driver: webdriver,locator: tuple):
    return driver.find_element(*locator)
if __name__ == '__main__':
    # capability配置
    caps = {}
    caps["platformName"] = "Android"
    caps["appium:platformVersion"] = "6.0.1"
    caps["appium:deviceName"] = "127.0.0.1:7555"
    caps["appium:appPackage"] = "com.xueqiu.android"
    caps["appium:appActivity"] = ".view.WelcomeActivityAlias"
    caps["appium:automationName"] = "UiAutomator2"
    caps["appium:unicodeKeyboard"] = "true"
    caps["appium:restKeyboard"] = "true"
    caps["appium:noReset"] = "true"
    # appium服务器地址
    appium_server_url = 'http://127.0.0.1:4723'
    driver = webdriver.Remote(appium_server_url, options=AppiumOptions().load_capabilities(caps=caps))
    driver.implicitly_wait(10)

    # 点击一键登录进入登录页面模拟弹窗
    driver.find_element(AppiumBy.ID,"com.xueqiu.android:id/rl_bottom_login").click()

    # 定位上涨指数
    szzs_locator = (AppiumBy.XPATH,'//*[@text="上证指数"]')
    my_find(driver, szzs_locator).click()
    time.sleep(3)
    driver.quit()
    print("结束")
二、AndroidWebview处理
1、 先了解什么是Hybrid(混合)?
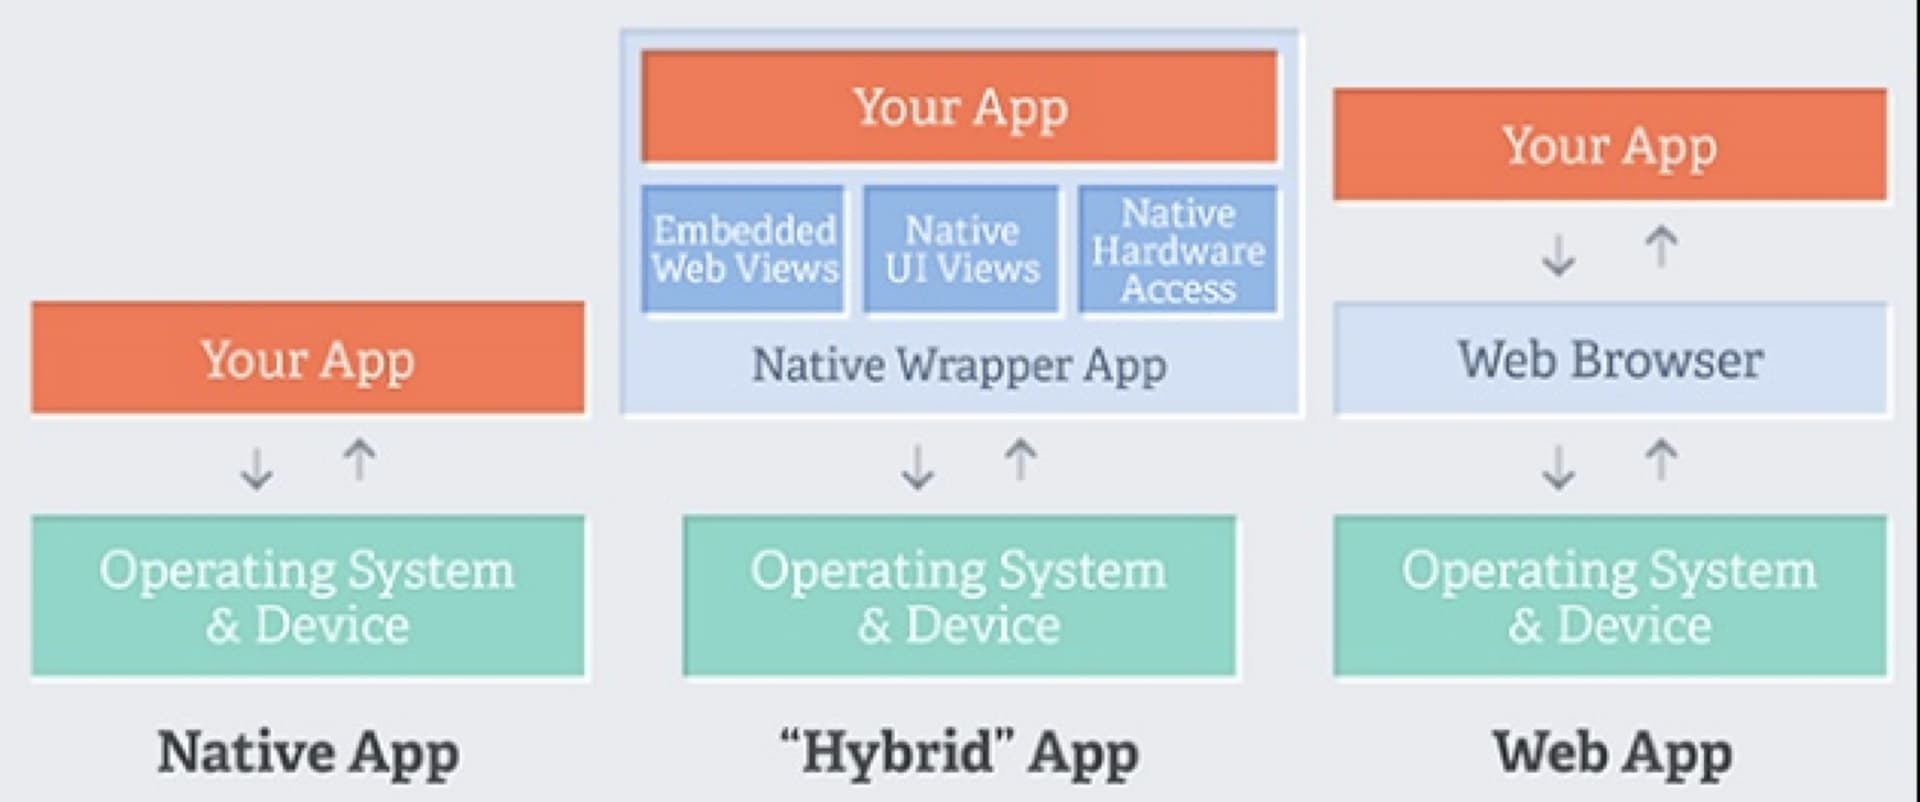
移动混合应用程序的App,即在移动应用程序中嵌入了Webview,通过Webview访问网页。
移动应用和Webview分别属于两个不同的上下文,移动应用默认的Context为”NATIVE_APP”,Webview默认的Context为”WEBVIEW_被测进程名称”。
在测试Webview中的网页内容时,需要切换到Webview的Context下。(就相当于在app中开启了一个新的页面。)
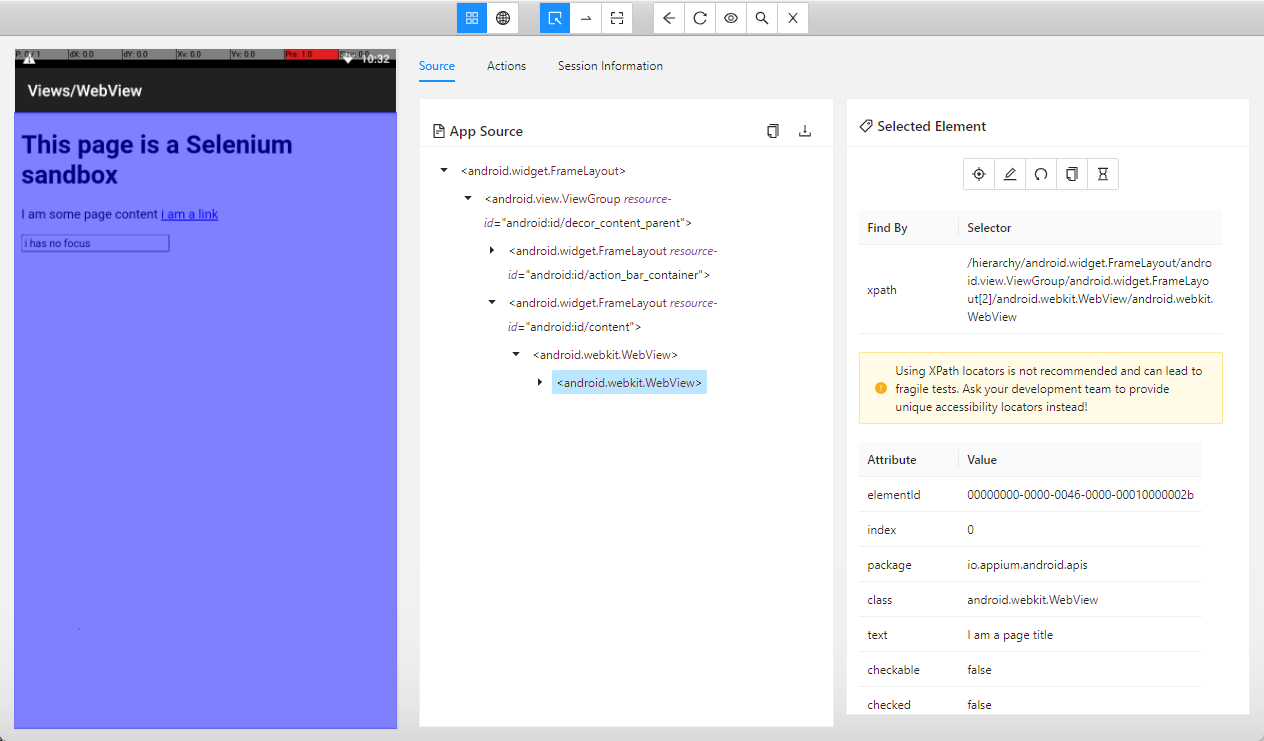
2、认识android webview
如果组件的class属性为:android.webkit.WebView那就是webview;
webview内部的元素不能直接定位到,需要获取上行文之后切换到webview才能正常定位;
3、webview调试开关
- 在app的代码中为了安全和性能起见,会在代码中设置webview是否可调试;
if (Build.VERSION.SDK_INT >= Build.VERSION_CODES.KITKAT) {
    WebView.setWebContentsDebuggingEnabled(true);
}

//适合正式上线的app,至于debug开启的时候,才开启webview的调试
if (Build.VERSION.SDK_INT >= Build.VERSION_CODES.KITKAT) {
    if (0 != (getApplicationInfo().flags & ApplicationInfo.FLAG_DEBUGGABLE))
    { WebView.setWebContentsDebuggingEnabled(true); }
}
- 各平台 webview 组件的调试开关
| 平台 webview 组件调试开关 | 应用 webview 组件调试开关状态 | 可调试 |
|---|---|---|
| as 模拟器 android 6.0 默认开启 | 默认开启 |
|
| as 模拟器 android 7.0 及以上默认关闭 | 关闭 | |
| as 模拟器 android 7.0 及以上默认关闭 | 开启 |
|
| 真机默认关闭 | 开启 |
|
| 真机默认关闭 | 关闭 | |
| 微信小程序内核 某些老版本默认开启 |
|
|
| 微信小程序内核 默认关闭 |
4、 webview 分析方法
- 打开 webview 调试开关
- 打开带有 webview 的页面
- 打开浏览器的分析工具–TODO
- chrome://inspect
- [推荐] edge://inspect
- firefox about:debugging
5、webview自动化测试方法
| 方式 | 技术栈 | 优点 | 缺点 |
|---|---|---|---|
| 原生自动化 | uiautomator、appium、atx | 简单不依赖 webview 调试开关开启 | 不易维护 |
| web 自动化 | selenium、chromedriver、minitest | 易维护 | 不适合混合开发,依赖 webview 调试开关开启 |
| 混合自动化 | appium | 易维护,通用 | 技术复杂,依赖 webview 调试开关开启 |
Hybrid App Auto技术原理
- 底层使用多个引擎管理自动化测试用例
- 涉及到
WebView的页面使用chromedriver自动化webview组件 - 使用 native 方式自动化 native 控件
webview获取并切换上下文
- 获取所有的上下文 :
driver.contexts,第一个是原生 NATIVE,剩下的为 weview,[‘NATIVE_APP’, ‘WEBVIEW_io.appium.android.apis’] - 获得当前的上下文:
driver.current_context:# NATIVE_APP - 切换上下文 :
driver.switch_to.context(‘WEBVIEW_XXXX’)
手机自带浏览器webview测试
1、 chromedriver 安装:对应手机自带浏览器的chromedriver
- 获取自带浏览器包名:
adb shell pm list package | findstr browser - 通过浏览器包名获取对应版本号:
adb shell pm dump com.android.browser | findstr version

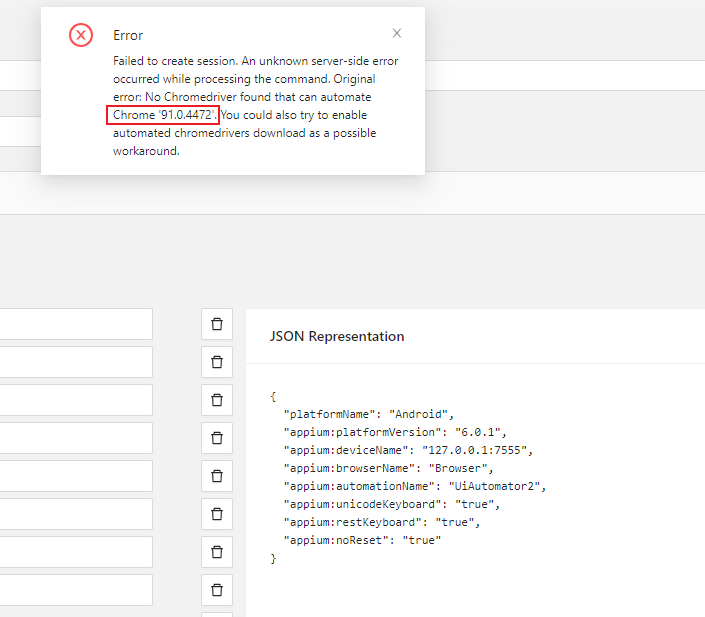
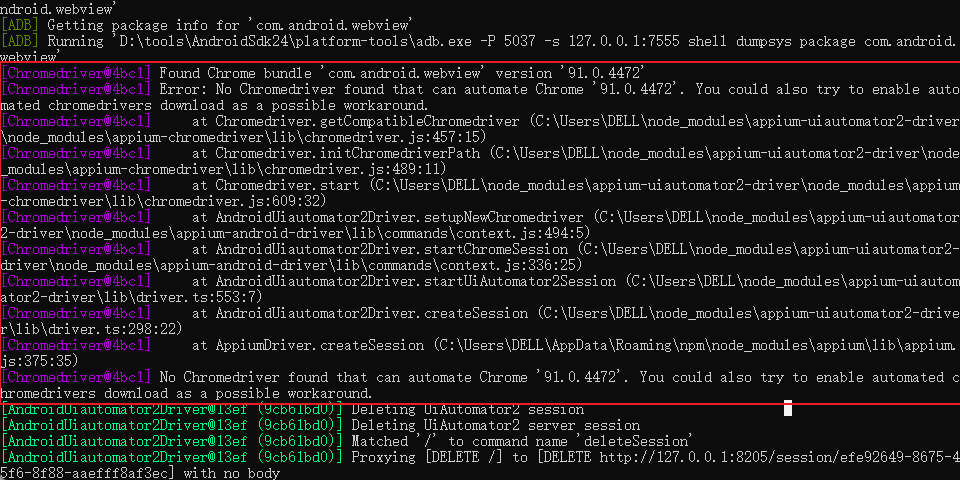
- 说明:通过以上方式拿不到具体的版本号,直接在appium-inspector中启动app,根据报错信息获取需要的driver版本号;
{
  "platformName": "Android",
  "appium:platformVersion": "6.0.1",
  "appium:deviceName": "127.0.0.1:7555",
  "appium:browserName": "Browser",
  "appium:automationName": "UiAutomator2",
  "appium:unicodeKeyboard": "true",
  "appium:restKeyboard": "true",
  "appium:noReset": "true",
}
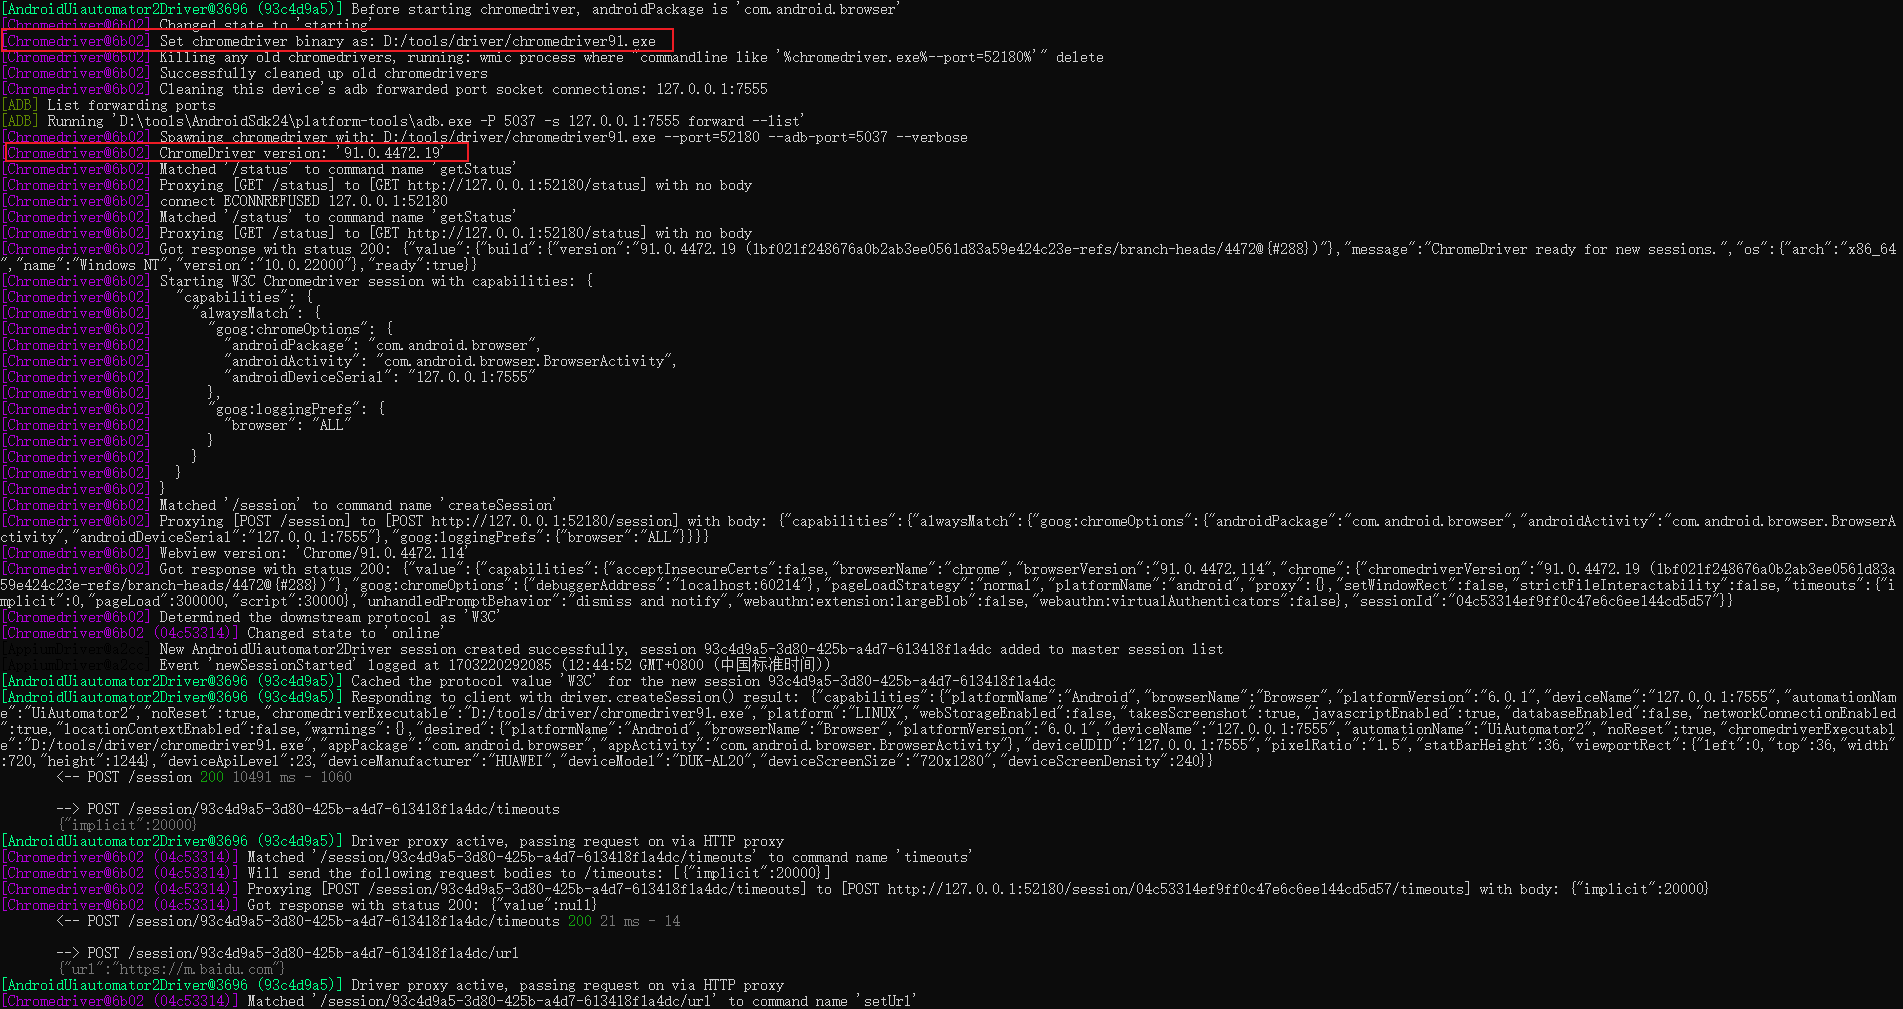
- 拿到版本号之后,capability增加配置项
"appium:chromedriverExecutable": "D:/tools/driver/chromedriver91.exe"即可启动手机再带浏览器;
{
  "platformName": "Android",
  "appium:platformVersion": "6.0.1",
  "appium:deviceName": "127.0.0.1:7555",
  "appium:browserName": "Browser",
  "appium:automationName": "UiAutomator2",
  "appium:unicodeKeyboard": "true",
  "appium:restKeyboard": "true",
  "appium:noReset": "true",
  "appium:chromedriverExecutable": "D:/tools/driver/chromedriver91.exe"
}
- 国内 chromedriver 下载地址
- 如果未安装
chromedriver会报错:No Chromedriver found that can automate Chrome 'x.x.xxxx'. You could also try to enable automated chromedrivers download server feature. See ... for more details - 安装的
chromedriver版本不对报错:unknown error: Chrome version must be >= xx.x.x.xxxx
2、chromedriver 版本选择正确
- chromedriver 版本与 chrome webview 版本存在绑定关系
-
appium有版本判断,版本不对会出错 -
app内置webview组件可能会跟系统默认自带的webview组件不一致,以app使用的webview为准
3、appium capability 参数配置
-
chromedriverExecutable: 手动指定chromedriver可执行文件集合的目录,如果不手动指定就需要把下载的chromedriver放到appium查找chromedriver的默认路径;
-
chromedriverChromeMappingFile: 允许显式指定版本对应关系 -
showChromedriverLog: 让appium日志展示chromedriver的日志方便排查
import time
from appium import webdriver
from appium.options.common import AppiumOptions

# capability配置
caps = {}
caps["platformName"] = "Android"
caps["appium:platformVersion"] = "6.0.1"
caps["appium:deviceName"] = "127.0.0.1:7555"
# 手机自带浏览器直接使用一下方式启动
caps["appium:browserName"] = "Browser"
caps["appium:automationName"] = "UiAutomator2"
caps["appium:noReset"] = "true"
# 手动指定 chromedriver 可执行文件集合的目录
caps["appium:chromedriverExecutable"] = "D:/tools/driver/chromedriver91.exe"
# appium服务器地址
appium_server_url = 'http://127.0.0.1:4723'
driver = webdriver.Remote(appium_server_url, options=AppiumOptions().load_capabilities(caps=caps))
driver.implicitly_wait(20)

# 浏览器访问手机百度
driver.get("https://m.baidu.com")
time.sleep(3)

# 获取上下文
contexts = driver.contexts
print(f"所有的上下文:{contexts}") # 所有的上下文:['NATIVE_APP', 'CHROMIUM']
current_content = driver.current_context
print(f"当前上下文:{current_content}") # 当前上下文:CHROMIUM
-
说明,如果是app需要注意以下事项:
-
1、应用代码需要打开webview开关
- 如果webview开关未打开,使用 chrome://inspect是无法查看页面元素的,使用driver.contexts也无法获取webview的上下文;
-
2、下载并配置app中webview需要的chromedriver;–TODO,appium2.x到底要不要下chromedriver?
-
6、app-webview案例
- 所用apk(ApiDemos-debug.apk)下载安装:
- 链接:百度网盘 请输入提取码
- 提取码:kff6
说明:这个案例压根就没有切换context,为什么还是能定位到,why?—TODO
import time
from appium import webdriver
from appium.options.common import AppiumOptions
from appium.webdriver.common.appiumby import AppiumBy
# 封装一个滑动定位方法
def swip_find(driver:webdriver,locator:tuple,max_nums=5):
"""
滑动屏幕定位元素
:param driver: webdriver对象
:param locator: 需要查找的元素定位器
:param max_nums: 最大的屏幕滑动次数,默认5次
:return: 返回定位到的元素
"""
# 为了提高滑动查找速度,将隐式等待时间设置短一点
driver.implicitly_wait(1)
# 通过循环反复滑动查找
for n in range(max_nums):
# 如果第一屏没找到元素会抛出异常,捕获异常之后滑动到下一屏继续查找
try:
ele = driver.find_element(*locator)
# 找到了就返回该元素,并且把隐式等待时间恢复原来设置
driver.implicitly_wait(10)
print("元素找到")
return ele
except:
# 出现异常说明这一屏没有,那就滑动屏幕一次
print(f"没有找到元素,开始滑动,滑动第{n}次")
# 获取屏幕宽高
size = driver.get_window_size()
print(f"手机屏幕宽高为:{size}")
# 获取手机宽度
width = size.get("width")
# 获取手机高度
height = size.get("height")
# 滑动的坐标,x轴为屏幕的中间,也就是宽的一般,y轴为从底部0.8*height,滑动到顶部0.2*height
start_x = width/2
start_y = 0.8*height
end_x = width/2
end_y = 0.2*height
# 滑动操作,滑动的速度为2s滑完一次
driver.swipe(start_x,start_y,end_x,end_y,duration=2000)
# 滑动次数结束后把隐式等待时间恢复原来设置
driver.implicitly_wait(10)
# 如果代码执行到这里,说明上面的return没有执行,说明元素没有找到,那就抛出异常
from selenium.common import NoSuchElementException
raise NoSuchElementException(f"滑动后元素{locator}未找到")
# capability配置
caps = {}
caps["platformName"] = "Android"
caps["appium:platformVersion"] = "6.0.1"
caps["appium:deviceName"] = "127.0.0.1:7555"
caps["appium:appPackage"] = "io.appium.android.apis"
caps["appium:appActivity"] = ".ApiDemos"
caps["appium:automationName"] = "UiAutomator2"
# 能输入中文
caps["appium:unicodeKeyboard"] = "true"
# 使用键盘输入
caps["appium:restKeyboard"] = "true"
# app不清楚缓存
caps["appium:noReset"] = "true"
# 配合noReset使用,不然无法启动app
caps["appium:forceAppLaunch"] = True
# 配合driver.quit()使用,不然无法退出app
caps["appium:shouldTerminateApp"] = True
# 让 appium 日志展示 chromedriver 的日志方便排查
caps["appium:showChromedriverLog"] = "true"
# 手动指定webview对应的chromedriver路径--不指定这个也能定位到,无语
# caps["appium:chromedriverExecutable"] = "D:/tools/driver/chromedriver91.exe"
server_url = "http://127.0.0.1:4723"
driver = webdriver.Remote(server_url,options=AppiumOptions().load_capabilities(caps=caps))
driver.implicitly_wait(10)
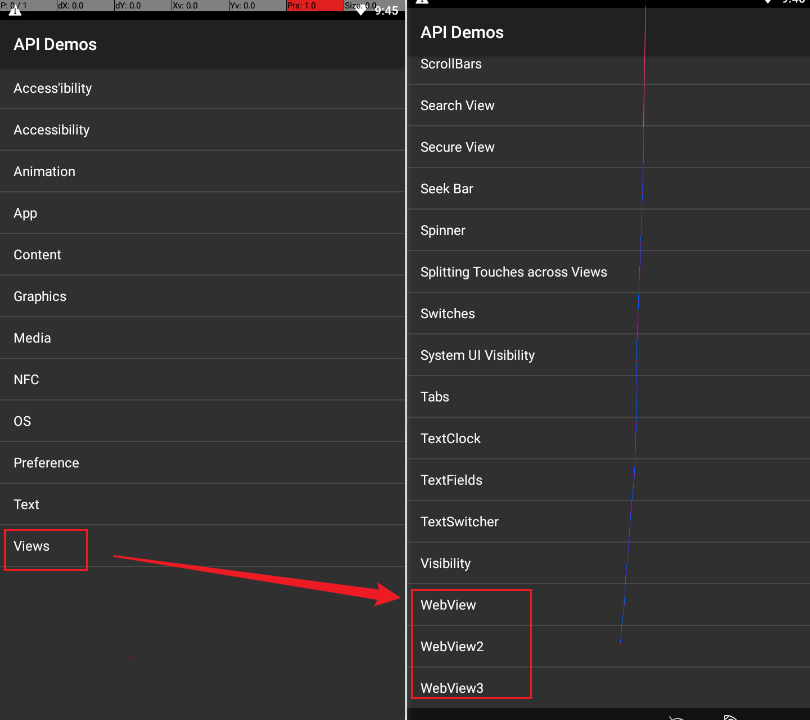
# 点击views
driver.find_element(AppiumBy.XPATH,'//*[@text="Views"]').click()
# 滑动页面点击WebView
webview_locator = (AppiumBy.XPATH,'//*[@text="WebView"]')
webview_ele = swip_find(driver=driver,locator=webview_locator,max_nums=5)
webview_ele.click()
# 获取上下文
contexts = driver.contexts
print(f"全部上下文:{contexts}") # 全部上下文:['NATIVE_APP', 'WEBVIEW_io.appium.android.apis']
print(f"当前上下文:{driver.current_context}") # 当前上下文:NATIVE_APP
# 直接定位webview中的元素试试---表示不理解,居然可以定位到
driver.find_element(AppiumBy.XPATH,'//*[@text="i am a link"]').click()
# 获取页面结果
result = driver.find_element(AppiumBy.XPATH,'//*[@class="android.view.View"]').text
print(f"result={result}") # result=I am some other page content
time.sleep(3)
driver.quit()
三、微信小程序自动化测试-minium –TODO
1、minium简介
- 为小程序专门开发的自动化框架
- 可以进行小程序 UI 自动化测试
- 可以进行源码函数的 mock
- 可以直接跳转到小程序某个页面并设置页面数据
特点:
- 支持一套脚本,iOS & Android & 模拟器,三端运行
- 提供丰富的页面跳转方式,看不到也能去得到
- 可以获取和设置小程序页面数据,让测试不止点点点
- 可以直接触发小程序元素绑定事件
- 支持往 AppSerive 注入代码片段执行
- 可以调用部分 wx 对象上的接口
- 支持 Mock wx 对象上的接口
- 支持 Hook wx 对象上的接口
- 通过 suite 方式管理用例,config 管理运行设备
minium 与 Appium 对比
| 项目 | minium | Appium |
|---|---|---|
| 是否开源 | 是 | 是 |
| 是否跨平台 | 是 | 是 |
| 支持语言 | Python,JavaScript | Java, Python, JavaScript 等 |
| 底层原理 | 小程序调试基础库 | WebSocket 协议,CS 架构 |
| 实施成本 | 低 | 高 |
| 作用范围 | 渲染层和逻辑层 | 渲染层 |
| 持续集成 | 支持 | 支持 |
| 社区支持 | 腾讯 | thoughtworks 公司 |
运行环境
- 安装 python3.8(以上版本)
- 微信开发者工具下载:
- 安装 minium 库
pip3 install https://minitest.weixin.qq.com/minium/Python/dist/minium-latest.zip
- 环境检查
minitest -v
2、 minium 基本使用
- Minium:负责初始化整个自动化框架
- Minium():初始化函数
- App:提供小程序应用层面的各种操作, 包括页面跳转, 获取当前页面, 页面栈等功能
- screen_shot():截图
- go_home():跳转到小程序首页
- redirect_to(): 直接打开某个页面
- Page:提供了小程序页面内包括 set data, 获取控件, 页面滚动等功能
- get_element(‘css 或 xpath 表达式’):在当前页面查询控件
- click():点击元素
- input(‘输入值’):输入
- inner_text:获取元素文本
- attribute():获取元素属性
元素定位
- 只支持 CSS, XPath 表达式
| 选择器 | 样例 | 样例描述 |
|---|---|---|
| .class | .intro | 选择所有拥有 class=“intro” 的组件 |
| #id | #firstname | 选择拥有 id=“firstname” 的组件 |
| tagname | view | 选择所有 view 组件 |
| tagname, tagname | view, checkbox | 选择所有文档的 view 组件和所有的 checkbox 组件 |
元素定位表达式
- 通过 css/xpath 表达式定位:
get_element(selector) - 通过标签中间文本定位:
get_element(selector, inner_text) - 父结点定位子结点:
get_element("selector").get_element("selector")
元素属性
| 方法名 | 说明 |
|---|---|
| size | 元素的宽高 |
| inner_text | 元素标签中间的文字 |
元素操作
| 方法名 | 说明 |
|---|---|
| click() | 点击操作 |
| input() | 输入 |
| get_element() | 获取元素 |
| attribute() | 获取元素属性 |
关键数据验证
| 方法名 | 说明 |
|---|---|
| screen_shot(test_screen.png) | 截图 |
| logger.info(日志) | 日志 |
3、总结
- 优点:官方开源,使用便捷,
- 缺点:定制化差,必须要源码
- 适用场景:
- 必须要有项目源码
- 产品不能太复杂
四、appium问题分析定位
-
定位问题思路
- 1、代码报的错误
- 2、appium server 服务器报的错误
- 3、手机端 捕获 appium相关的日志
-
客户端日志分析
-
服务端日志分析
appium -g appium2.log |tee- -g:将日志写入到后面的文件中;
- | tee:将日志同时定向到文件和屏幕;
-
手机端日志分析
五、 图像匹配的自动化测试
1、概述
价值与用途
-
解决特殊场景的自动化测试问题
- 不可识别控件,自定义控件、图片控件、滑块
- 安全性较高控件,比如安全键盘
- 特殊渲染引擎,比如游戏 app
-
作为常规自动化测试的补充
- 图像识别速度较慢
- 游戏控件通过自定义可以实现控件识别
基于图像匹配的自动化测试框架
- airtest,适合纯游戏自动化测试场景
- appium,适合常规与特殊控件的结合场景
- sikuliX,老牌工具
appium 图像匹配能力支持
-
appium 1.8 版本新增
- 在appium2.x之后,改为 images-plugin插件
-
基于 opencv + 匹配算法
-
图像匹配相关的 API
-
自动化相关的 API
2、 images-plugin插件
在进行App自动化测试的过程中,由于页面的复杂性,需要根据页面的技术实现,通过上下文来切换不同的定位类型,给定位元素的稳定性带来了不小的挑战;图像识别技术则不依赖于页面本身是用什么技术实现的,只要能识别图片上的元素即可定位,从而成了未来探索的一个方向。appium提供了一些方法利用图像识别来定位元素和图像对比。
此插件支持的 -image 定位器策略,可以通过appium指定想要定位的元素的图片文件,如果appium可以找到与你的图片匹配的屏幕区域,它会将有关该区域的信息包装为标准WebElement并将其发送回appium客户端。
(1)images-plugin环境准备
-
安装appium images plugin插件:
- 在cmd执行命令:
appium plugin install images

- 在cmd执行命令:
-
查看已安装的appium插件:
appium plugin list --installed

-
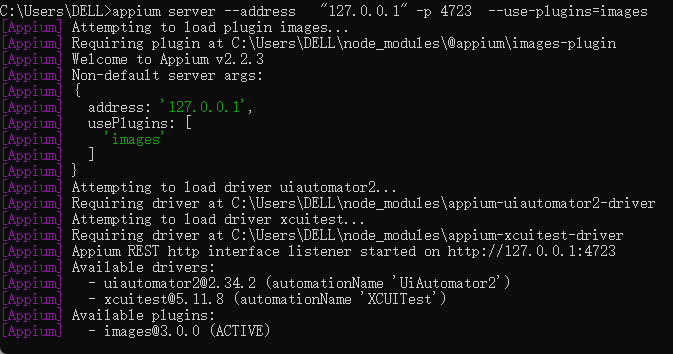
启动 appium server 时指定使用image插件:
appium server --address "127.0.0.1" -p 4723 --use-plugins=images
(2) settings 设置
由于通过图像查找元素依赖于图像分析软件与appium的截图功能,以及你提供的图片,appium提供了一些设置,帮助你调节此功能,在某些情况下可能加快匹配速度或使其更准确。
| 设置名称 | 描述 | 可能的值 | 默认值 |
|---|---|---|---|
| imageMatchThreshold | OpenCV 匹配阈值,低于该阈值将被视为查找失败。基本上,可能性范围介于 0(这意味着不应使用阈值)和 1(这意味着参考图像必须是精确的像素对像素匹配)之间。两者之间的确切值没有绝对意义。例如,需要大幅调整参考图像大小的匹配项将比其他匹配强度更低。建议您尝试默认设置,如果找不到匹配的元素,则逐步降低阈值。如果匹配的元素错误,请尝试增加阈值。 | 从 0 到 1 的数字 | 0.4 |
| fixImageFindScreenshotDims | Appium知道屏幕尺寸,最终这些尺寸与决定点击屏幕的位置有关。如果检索到的屏幕截图(通过 Appium 的本机方法或外部来源)与屏幕尺寸不匹配,则此设置指示 Appium 将调整屏幕截图的大小以匹配,确保在正确的坐标处找到匹配的元素。如果您知道没有必要,请关闭此设置,Appium 将放弃检查,这可能会加快速度。 | true或false | true |
| fixImageTemplateSize | 如果参考图像/模板大于要匹配的基础图像,OpenCV 将不允许匹配该图像/模板。您发送的参考图像的尺寸可能大于 Appium 检索到的屏幕截图。在这种情况下,匹配将自动失败。如果将此设置设置为 ,Appium 将调整模板大小,以确保其至少小于屏幕截图的大小。true | true或false | false |
| fixImageTemplateScale(修复图像模板缩放) | Appium 会调整基础图像的大小以适合其窗口大小,然后再将它们与 OpenCV 匹配。如果将此设置设置为 ,Appium 会将您发送的参考图像缩放为相同的比例,就像 Appium 缩放基本图像以适合窗口大小一样。例如,iOS屏幕截图是像素基础图像。窗口大小为 。Appium 将基础图像重新缩放到窗口大小,使用 .参考图像基于屏幕截图大小,图像绝不会与窗口大小比例匹配。此设置允许 Appium 使用 .appium-base-驱动程序#306true750 × 1334375 x 6670.50.5 | true或false | false |
| defaultImageTemplateScale | 默认情况下,Appium 不会调整模板图像的大小(值为 1.0)。虽然,存储缩放的模板图像可能有助于节省存储大小。例如,一个可以表示 1080 × 126 像素区域 x 270 × 32 像素的模板图像(defaultImageTemplateScale 的值应设置为 4.0)。查看 appium-base-driver#307 了解更多详情。 | 例如, , ,0.510.0100 | 1.0 |
| checkForImageElement陈旧 | 在匹配图像元素和选择点击图像元素之间,该元素可能不再存在。Appium 确定这一点的唯一方法是在点击之前立即尝试重新匹配模板。如果重新匹配失败,您将得到一个 ,正如您所期望的那样。将其设置为跳过检查,可能会加快速度,但可能会遇到过时的元素问题,而没有异常让您知道您这样做了。StaleElementExceptionfalse | true或false | true |
| autoUpdateImageElementPosition | 匹配的图像可能会在找到它和您点击它之间改变位置。与之前的设置一样,如果 Appium 在重新匹配中确定位置发生了变化,则可以自动调整其位置。 | true或false | false |
| imageElementTapStrategy | 为了点击找到的图像元素,Appium 必须使用其触摸动作策略之一。可用的策略是 W3C Actions API 或较旧的 MJSONWP TouchActions API。除非您使用的驱动程序出于某种原因不支持 W3C 操作 API,否则请坚持使用默认值。 | w3cActions或touchActions | w3cActions |
| getMatchedImageResult | Appium 不存储匹配的图像结果。虽然,将结果存储在内存中可能有助于调试哪个区域是否与按图像查找匹配。Appium 根据属性 API 将图像返回为 。visual | true或false | false |
使用driver.update_settings({“参数”,boolen})api进行当前会话配置:
driver.update_settings({"getMatchedImageResult": True})
driver.update_settings({"fixImageTemplatescale": True}
(3)图片处理api
-
图片定位;
-
图片操作;
-
图片对比;
-
基本步骤:
- 1、先将需要处理的图片截图或者是原图保存;
- 2、将图片进行base64编码处理;
- 3、调用对应api对图片进行操作
A、图片定位
-
原理:通过appium指定想要定位的元素的图片base64编码文件,如果appium可以找到与你的图片匹配的屏幕区域,它会将有关该区域的信息包装为标准WebElement并将其发送回appium客户端;
-
api:
driver.find_element(AppiumBy.IMAGE, b64_data)- b64_data是图片的base64编码;
B、图片操作
clickisDisplayedgetSizegetLocationgetLocationInViewgetElementRect-
getAttribute-
visualreturns matched image as base64 data ifgetMatchedImageResultistrue -
scorereturns the similarity score as a float number in range[0.0, 1.0]sine Appium 1.18.0
-
C、图片对比ImagesComparison类
-
match_images_features(self, base64_image1: bytes, base64_image2: bytes, **opts: Any) → Dict[str, Any]:–根据特征进行图像匹配;
-
find_image_occurrence(self, base64_full_image: bytes, base64_partial_image: bytes, **opts: Any) → Dict[str, Union[bytes, Dict]]:–按模板执行图像匹配,以查找在完整图像中可能出现的部分图像;
-
get_images_similarity( self, base64_image1: bytes, base64_image2: bytes, **opts: Any ) → Dict[str, Union[bytes, Dict]]:–执行图像匹配以计算它们之间的相似度分数;
E、案例
- 所用apk(ApiDemos-debug.apk)下载安装:
- 链接:百度网盘 请输入提取码
- 提取码:kff6

# capability配置
import base64
import time
from appium import webdriver
from appium.options.common import AppiumOptions
from appium.webdriver.common.appiumby import AppiumBy
from appium.webdriver.extensions.images_comparison import ImagesComparison

# capability配置
caps = {}
caps["platformName"] = "Android"
caps["appium:platformVersion"] = "6.0.1"
caps["appium:deviceName"] = "127.0.0.1:7555"
caps["appium:appPackage"] = "io.appium.android.apis"
caps["appium:appActivity"] = ".ApiDemos"
caps["appium:automationName"] = "UiAutomator2"
# 能输入中文
caps["appium:unicodeKeyboard"] = "true"
# 使用键盘输入
caps["appium:restKeyboard"] = "true"
# app不清楚缓存
caps["appium:noReset"] = "true"
# 配合noReset使用,不然无法启动app
caps["appium:forceAppLaunch"] = True
# 配合driver.quit()使用,不然无法退出app
caps["appium:shouldTerminateApp"] = True
#  让 appium 日志展示 chromedriver 的日志方便排查
caps["appium:showChromedriverLog"] = "true"

server_url = "http://127.0.0.1:4723"
driver = webdriver.Remote(server_url,options=AppiumOptions().load_capabilities(caps=caps))
driver.implicitly_wait(10)

# 上下文设置
# Appium知道屏幕尺寸,最终这些尺寸与决定点击屏幕的位置有关
driver.update_settings({"fixImageFindScreenshotDims":True})
# Appium 将调整模板大小,以确保其至少小于屏幕截图的大小
driver.update_settings({"fixImageTemplateSize":True})
# Appium 会调整基础图像的大小以适合其窗口大小,然后再将它们与 OpenCV 匹配
driver.update_settings({"fixImageTemplateScale":True})

# 点击Graphics
driver.find_element(AppiumBy.XPATH,'//*[@text="Graphics"]').click()
# 点击BitmapMesh
driver.find_element(AppiumBy.XPATH,'//*[@text="BitmapMesh"]').click()

# 点击耳朵
with open("ear.png","rb") as png_file:
    ear_base64 = base64.b64encode(png_file.read()).decode("utf-8")
driver.find_element(AppiumBy.IMAGE,ear_base64).click()
time.sleep(1)

# 点击鼻子
with open("nose.png","rb") as png_file:
    nose_base64 = base64.b64encode(png_file.read()).decode('UTF-8')
driver.find_element(AppiumBy.IMAGE,nose_base64).click()
time.sleep(1)

# 点击花
with open("flower.png","rb") as png_file:
    flower_base64 = base64.b64encode(png_file.read()).decode('UTF-8')
flower = driver.find_element(AppiumBy.IMAGE, flower_base64)
flower.click()
time.sleep(1)

# 图片比较--TODO
with open("no_flower.png","rb") as png_file:
    no_flower = base64.b64encode(png_file.read())
with open("have_flower.png","rb") as png_file:
    have_flower = base64.b64encode(png_file.read())
similarity_result = driver.get_images_similarity(no_flower,have_flower)
print(f"similarity_result={similarity_result}")

# 图片匹配--TODO
with open("flower.png","rb") as png_file:
    flower_base64 = base64.b64encode(png_file.read())
occurrence_result = driver.find_image_occurrence(flower_base64,have_flower)
print(f"occurrence_result={occurrence_result}")

time.sleep(2)
driver.quit()
