In a previous edition of Appium Pro, we sketched out some options for measuring various network metrics for your mobile apps. In this edition, we spin the situation around, and ask: how can we simulate specific network speeds or conditions, in order to then test some other aspect of our app’s behavior? For example, we might want to know how long a certain user flow takes when they are on a 3G network vs an LTE network.
If we want to automate a real device with specific network conditions, then we either need to put the device physically into those conditions (geographical location, mobile network provider, mobile network speed, etc…), or simulate it by connecting the device via wifi to a router which has some network shaping software on it. In either case, it’s not something that’s easy to attempt “at home”.
Virtual devices (like iOS simulators or Android emulators) are a different story, however! They share the same network as the virtual device host, which at least in the case of iOS is guaranteed to be a macOS machine. On macOS, which we assume we’re using for this article, we have a few different ways to simulate a variety of network conditions for the entire system, which also ends up changing the network conditions for the iOS simulator or the Android emulator.
The Network Link Conditioner
Apple actually provides a special Preference Pane that allows you to adjust the network speed of your computer. It’s called the Network Link Conditioner, and you can download it following these instructions. When you’ve installed it, it looks like this:
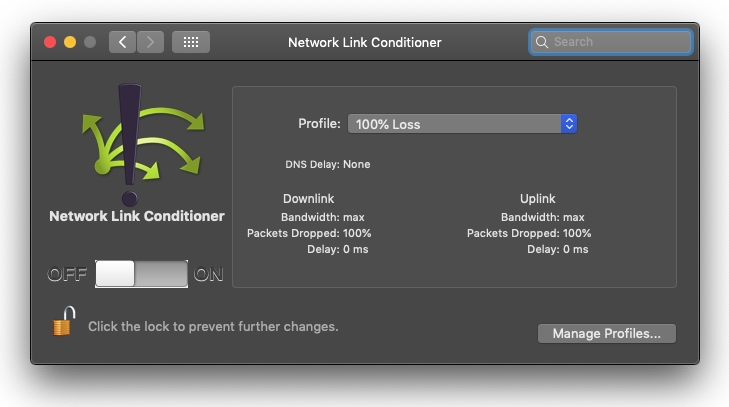
Using this interface, you can manually select a certain network profile and toggle it off and on again. You can even, for example, select a profile which has 100% packet loss, meaning no network connectivity at all. This is useful to test your app’s behavior in situations where the user loses connectivity, perhaps even in the middle of a user flow.
dnctl and pfctl
The Network Link Conditioner is nice, but it’s not easily scriptable. However, it is just a thin GUI that calls out to some command-line applications installed on every Mac, which we can also just use directly:
-
dnctl: this is the control interface for thedummynetnetwork shaping software. We use it to define network configurations based on their bandwidth, packet loss, and delay. -
pfctl: this is the control interface for the packet filter device (i.e., the system-internal firewall). We can have it obey dummynet rules and turn it on, which actually enables the network shaping for the host.
Here’s how we might use these in combination to set a 3G network speed:
down_bandwidth="780Kbit/s"
down_packets_dropped="0.0"
down_delay="100"
up_bandwidth="330Kbit/s"
up_packets_dropped="0.0"
up_delay="100"
(cat /etc/pf.conf && echo "dummynet-anchor \"conditioning\"" && echo "anchor \"conditioning\"") | sudo pfctl -f -
sudo dnctl pipe 1 config bw "$down_bandwidth" plr "$down_packets_dropped" delay "$down_delay"
sudo dnctl pipe 2 config bw "$up_bandwidth" plr "$up_packets_dropped" delay "$up_delay"
echo "dummynet out quick proto tcp from any to any pipe 1" | sudo pfctl -a conditioning -f -
echo "dummynet in quick proto tcp from any to any pipe 2" | sudo pfctl -a conditioning -f -
sudo pfctl -e
What’s going on here?
- We decide what our upload and download characteristics should be for a 3G connection.
- We create an “anchor” in our
pf.conffile so our firewall changes are localized. - We create two dummynet pipes, one for downloads and one for uploads, based on our 3G parameters.
- We tell the firewall to use our dummynet rules for uploading and downloading TCP traffic, to and from any hosts.
- We make sure to enable the firewall in case it’s not already running.
It’s a lot! And it’s not all–we also need to make sure to reset our changes when we’re done, otherwise our host’s internet will be permanently altered:
sudo dnctl -q flush
sudo pfctl -f /etc/pf.conf
It’s a bit ugly, but it is entirely automatable (recognizing however that sudo access is required). I’ve gone ahead and taken the liberty of compiling all of this into a bash script that does network conditioning. It encodes all the same options as the Network Link Conditioner preference pane (i.e., if you tell it to use “LTE” speeds, it will do the exact same thing that the preference pane does under the hood). Here’s how you use it:
# start the network conditioning with 3G speeds (could also be LTE, etc...--see script for list)
sudo ./network.sh start 3G

# stop it when we're done
sudo ./network.sh stop
A bonus is that this script is runnable from within a test script! Here’s an example of how I use this script to see how long the Appium Pro takes to load on Mobile Safari, at full speed versus at 3G speed:
private void loadPage() {
long startTime = System.nanoTime();
driver.get("https://appiumpro.com");
long endTime = System.nanoTime();
long msElapsed = (endTime - startTime) / 1000000;
System.out.println("Time elapsed: " + msElapsed);
}

private void setNetworkMode(String mode) throws Exception {
new ProcessExecutor().command(NET_SCRIPT, "start", mode).exitValueNormal().execute();
}

private void stopNetworkConditioning() throws Exception {
new ProcessExecutor().command(NET_SCRIPT, "stop").exitValueNormal().execute();
}

@Test
public void testPageLoadWithNormalNetwork() {
loadPage();
}

@Test
public void testPageLoadWith3GNetwork() throws Exception {
setNetworkMode("3G");
try {
loadPage();
} finally {
stopNetworkConditioning();
}
}
Here I’ve simply defined NET_SCRIPT to be the path to the network conditioning script, and also made sure to put my stopNetworkConditioning method in a finally block so that we guarantee it is reset even if we get an error during the actual test step execution. Feel free to check out the full code example on GitHub.
That’s it! Again, we’re dealing with a pretty limited scenario here, since this trick only works with virtual devices, and it also affects the system network speeds (so if you’re trying to stream video while running your test, you may notice some unpleasant side effects). But it’s a quick and easy way to see how your app behaves in a variety of network conditions, without needing any specialized proxy software or other services.
(For those times where you want real-world network feedback on real devices, you’ll want to check out a service that offers geographically-based devices attached to networks of different speeds).
