pytest基本介绍
pytest是一个非常成熟的全功能的Python测试框架,主要特点有以下几点:
- 简单灵活,容易上手;
- 支持参数化;
- 能够支持简单的单元测试和复杂的功能测试,还可以用来做selenium/appnium等自动化测试、接口自动化测试(pytest+requests);
- pytest具有很多第三方插件,并且可以自定义扩展,比较好用的如pytest-selenium(集成selenium)、pytest-html(html测试报告生成)、pytest-rerunfailures(失败case重复执行)、pytest-xdist(多CPU分发)、allure-pytest(生成测试报告)等;
- 测试用例的skip和xfail处理;
- 可以很好的和jenkins集成;
- pytest默认执行顺序是按照case顺序位置先后执行的;
- pytest.ini和conftest.py文件要放在执行的同级目录(根目录)
识别case的规则
- 如果pytest命令行有指定目录,则从该目录中开始查找测试用例文件,如果没有指定,则从当前运行目录开始查找文件。注意,该查找是递归查找,子目录中的文件也会被查找到。
- 并不是能够查找到目录下的所有文件,只有符合命名规则的文件才会被查找。默认规则是以test_开头或者以_test结尾的.py文件。
- 在测试文件中查找Test开头的类,以及类中以test_开头的方法,查找测试文件中test_开头的函数
setup&teardown使用
- 模块级(setup_module/teardown_module)开始于模块始末调用,全局的
- 函数级(setup_function/teardown_function)只对函数用例生效,在函数始末调用(不在类中,在类外部)
- 类级(setup_class/teardown_class)在类始末调用
- 方法级(setup_method/teardown_method)在方法始末调用(在类中)
- 方法级(setup/teardown)在方法始末调用(在类中)
- yield:yield前相当于setup,yield后相当于teardown,scpoe="module"与yield组合,相当于setup_module和teardown_module
注意调用顺序:setup_module>setup_class>setup_method>setup>teardown>teardown_method>teardown_class>teardown_module
安装以及常用的插件
pytest安装
pip install pytest
生成html报告
pip install pytest-html
pytest --html=path/to/html/report.html
如果不添加–self-contained-html参数,生成报告的css文件是独立的,分享的时候容易数据丢失
失败后重跑
pip install pytest-rerunfailures
命令行参数:
pytest --reruns 重试次数 (--reruns-delay 次数之间间隔)
pytest --reruns 2 运行失败的用例可以执行2次
pytest --reruns 2 --reruns-delay 5 运行失败的用例可以执行2次,每次间隔5秒
pytest.main(['-vs', 'test_demo.py',"--reruns", "3"])
只对部分用例使用重新运行机制
pip install flaky
@pytest.mark.flaky(reruns=5, reruns_delay=2)
#reruns=5, reruns_delay=2:最多失败重跑5次 & 如果失败则延迟2秒后重跑(可以不传)

@flaky(max_runs=3, min_passes=2)
#第一次执行失败了,将会再次重复执行它3次,如果这3次中有2次成功了,则认为这个测试通过了。
通过allure生成报告
pip install allure-pytest
并发执行case
pip install pytest-xdist
#多个cpu并发执行用例,需要在pytest后添加参数-n,如果参数为auto,则会自动检测系统cpu个数。如果参数为数字,则指定运行测试用例的处理器进程数
命令行参数:
pytest -n auto
pytest -n [num]
# 配置在pytes.ini文件内用法
[pytest]
addopts = -n 3
yaml参数化
pip install PyYAML
此外还有很多很好的第三方插件,到http://plugincompat.herokuapp.com/ 和 https://pypi.python.org/pypi?%3Aaction=search&term=pytest-&submit=search查找
执行指定case
pytest.main()    #执行所有case
pytest.main(['-vs', 'TestCalc.py::TestCalc'])    #执行TestCalc.py文件内TestCalc类下所有case
pytest.main(['-vs', 'TestCalc.py::TestCalc::test_division_seven'])    #执行TestCalc.py文件内TestCalc类下名字为test_division_seven的case
pytest.main(['参数','xxx'])    pytest.main()内必须是list格式,在低版本已不支持str
执行case时可选参数
-v:                                        #打印详细运行的日志信息
-s:     pytest -s xxx.py                   #输出case中print的内容
-m:    pytest -m “tag名称”         #运行指定tag名称的用例,也就是运行有@pytest.mark.[标记名]这个标记的case
-k:     # pytest -k “类名、方法名、类名 and not 方法名”         #运行指定case的用例
-x:                                            #遇到失败的case就是停止执行
--lf:                                         #只重新运行上次运行失败的用例(或如果没有失败的话会全部跑)
--ff:                                         #运行所有测试,但首先运行上次运行失败的测试(这可能会重新测试,从而导致重复的fixture setup/teardown)
--maxfail=num:                          #当用例失败个数达到num时,停止运行
--collect-only:   #收集测试用例,展示出哪些用例会被执行(只是展示不会执行case)
--junit-xml:--junit-xml=path/name.xml        #在指定目录或当前目录下生成xml格式的报告(需要在pytest.ini文件内声明格式:junit_family=xunit2)
--steup-show                                #完整展示每个用例的fixture调用顺序
命令行执行:
pytest test_quick_start.py --junit-xml=report.xml

main执行:
pytest.main(["-s", "TestCalc.py", "-m", "div", "--junit-xml=report.xml"])
pytest.main(["-vsx", "TestCalc.py", "-m", "div"])
用例标签tags:@pytest.mark.{marker_name}
@pytest.mark.{marker_name}自定义一个mark,然后pytest -v -m {marker_name}只运行标记了{marker_name}的函数,pytest -v -m "not {marker_name}"来运行未标记{marker_name}的。
注意:必须在pytest.ini文件内声明标签,不然则会告警PytestUnknownMarkWarning
pytest.ini
markers =
         div
         tag
语法:
@pytest.mark.smoke

@pytest.mark.get
$pytest -m 'smoke'
  仅运行标记smoke的函数
$pytest -m 'smoke and get'
  运行标记smoke和get的函数
$pytest -m 'smoke or get'
  运行标记smoke或get的函数
$pytest -m 'smoke and not get'
    运行标记smoke和标记不是get的函数
跳过用例:@pytest.mark.skip @pytest.mark.skipif
skip和skipif可以标记无法在某些平台上运行的测试功能,或者您希望失败的测试功能。要给跳过的测试添加理由和条件,应当使用skipif。
区别:
使用skip和skipif标记,测试会直接跳过,而不会被执行
skip和skipf区别:skip无条件跳过;skipif,有条件的跳过
语法:
@pytest.mark.skipif() or @pytest.mark.skip(msg="xxx")     #msg=跳过的原因
@pytest.mark.skipif(return_F() == True, reason="xxx")
可以将 pytest.mark.skip 和 pytest.mark.skipif 赋值给一个标记变量在不同模块之间共享这个标记变量 若有多个模块的测试用例需要用到相同的 skip 或 skipif ,可以用一个单独的文件去管理这些通用标记,然后适用于整个测试用例集
skipmark = pytest.mark.skip(reason="不能在window上运行")
skipifmark = pytest.mark.skipif(sys.platform == 'win32', reason="不能在window上运行")

@skipmark
class TestSkip_Mark(object):
    @skipifmark
    def test_function(self):
        print("测试标记")
    def test_def(self):
        print("测试标记")

@skipmark
def test_skip():
    print("测试标记")
#执行结果

collecting ... collected 3 items
07skip_sipif.py::TestSkip_Mark::test_function SKIPPED [ 33%]
Skipped: 不能在window上运行 07skip_sipif.py::TestSkip_Mark::test_def SKIPPED [ 66%]
Skipped: 不能在window上运行 07skip_sipif.py::test_skip SKIPPED [100%]
Skipped: 不能在window上运行
 ============================= 3 skipped in 0.04s ==============================
参数化@pytest.mark.parametrize(“a,b,expected”, testdata)
语法:
#入单个参数
@pytest.mark.parametrize('参数名',lists)
#传入两个参数
@pytest.mark.parametrize('参数1','参数2',[(
              参数1_data[0],参数2_data[0]),(
              参数1_data[1],参数2_data[1])]
传三个或者更多也是这样传。list的每个元素都是一个元祖,元祖里的每个元素和按参数顺序一一对应。
@pytest.mark.parametrize("a,b,c", [(1, 2, 0.5), (1, 1, 1)])    # 参数a,b,c均被赋予两个值,函数会运行两遍
@pytest.mark.parametrize("a,b,c", return_data())                 # 使用函数返回值的形式传入参数值
@pytest.mark.div
def test_division_seven(self, a, b, c):
    result = self.calc.division(a, b)
    assert c == result
多次使用parametrize
场景:用户登录,需要输入不同的用户名、密码多种组合
@pytest.mark.parametrize("name", [1,2])
@pytest.mark.parametrize("password", [8,10,11])
def test_login(name,password):
    print(f"测试数据组合name:{name},password:{password}")
方法名作为参数
parametrize源码:
def parametrize(self, argnames, argvalues, indirect=False, ids=None, scope=None):
indirect=True,pytest会把argnames当做函数去执行,讲argvalues当做参数传入到argnames这个函数里
使用:
test_user_date = ['Tome','Jerry']
@pytest.fixture(scope='module')
def login(request):
    user = request.parm
    print(f"登录用户:{user}")
    return user
@pytets.mark.parametrize('login',test_user_date,indirect=True)
def test_login(login):
    a = login
    print(f"测试用例中login的返回值:{a}")
# 此时login为函数,pytest将test_user_date的参数传入login
执行结果:
test_login[Tome]
test_login[Jerry]
将数据放在yml文件内进行参数化
yml文件:
- [1,2,0.5]
- [1,2,0.5]
单独写一个方法去读yaml文件然后return,参数化时,使用函数返回值得形式传入参数
def return_date():
    with open(r'E:\Hogwarts_project\hogwarts\H_pytest\date\case_date.yml,encoding="UTF-8"') as f:
        f = yaml.safe_load(f)
    return f
自定义执行顺序
(安装pytest-ordering)自定义执行顺序,还可以指定某个case最后一个执行、倒数第几个执行,详见https://pytest-ordering.readthedocs.io/en/develop/或者源码
# 第一个执行
@pytest.mark.run(order=1)
def test_add_two(self):
    result = self.calc.add(-1, 5)
    assert 4 == result
还可以在conftest文件内复写pytest源码内的pytest_collection_modifyitems方法,按需设置顺序
def pytest_collection_modifyitems(session, config, items: list):
    for item in items:
        if 'one' in item.nodeid:
            item.add_marker(pytest.mark.one)
        elif 'two' in item.nodeid:
            item.add_marker(pytest.mark.two)
pytest.main(['-vs', "TestCalc.py", "-m" "one"])    #只执行one标签的case
给用例名称中含有“one”的case加上one标签;给用例名称中含有“two”的case加上two标签;
def pytest_collection_modifyitems(session, config, items: list):
    items.reverse()
# 倒序执行case
自定义识别case的规则—在pytest.ini文件内配置
python_files = 'abc_*.py'    #文件名以abc_开头
python_classes = 'Login*'    #类的名称以Login开头
python_functions = 'case*'   #方法的名称以case开头
addopts = -v                 #更改默认命令行,默认显示case
fixture
fixture是pytest特有的功能,它用pytest.fixture标识,定义在函数前面。在你编写测试函数的时候,你可以将此函数名称做为传入参数,pytest将会以依赖注入方式,将该函数的返回值作为测试函数的传入参数。
fixture有明确的名字,在其他函数,模块,类或整个工程调用它时会被激活。 fixture是基于模块来执行的,每个fixture的名字就可以触发一个fixture的函数,它自身也可以调用其他的fixture。 我们可以把fixture看做是资源,在你的测试用例执行之前需要去配置这些资源,执行完后需要去释放资源。比如module类型的fixture,适合于那些许多测试用例都只需要执行一次的操作。 fixture还提供了参数化功能,根据配置和不同组件来选择不同的参数。
fixture主要的目的是为了提供一种可靠和可重复性的手段去运行那些最基本的测试内容。比如在测试网站的功能时,每个测试用例都要登录和退出,利用fixture就可以只做一次,否则每个测试用例都要做这两步也是冗余。
把一个函数定义为Fixture很简单,只能在函数声明之前加上“@pytest.fixture”。其他函数要来调用这个Fixture时,会先执行fixture,只用把它当做一个输入的参数即可
class TestCalc:
    @pytest.fixture()
    def login(self):
        print("登录")

    def test_division_four(self,login):    #调用fixture,执行test_division_four方法时,会先调用fixture
        result = self.calc.division(-2.2222, -3.33333)
        assert 0.67 == result
- fixture作用范围
- scope参数可以是session, module,class,function;默认为function
- session 会话级别(通常这个级别会结合conftest.py文件使用,所以后面说到conftest.py文件的时候再说)
- module 模块级别: 模块里所有的用例执行前执行一次module级别的fixture
- class 类级别 :每个类执行前都会执行一次class级别的fixture
- function :前面实例已经说了,这个默认是默认的模式,函数级别的,每个测试用例执行前都会执行一次function级别的fixture
- 级别顺序(执行顺序)session>module>class>function
注意autouse默认为false,如果为ture,则自动调当前方法
@pytest.fixture(scope='function', autouse=True)        #autouse默认False
def login(self):
    print("登录")
fixture实现teardown
通过yield方法实现,它的作用其实和return差不多,也能够返回数据给调用者,唯一的不同是被掉函数执行遇到yield会停止执行,接着执行调用处的函数,调用出的函数执行完后会继续执行yield关键后面的代码
注意:fixture如果未设置autouse则yield激活的teardown,只会在调用fixture的方法后执行teardown;如果想在每个方法执行结束都调用teardown,则需要设置autouse;autouse默认False
@pytest.fixture(scope='function', autouse=True)
def login(self):
    print("登录")
    ms = "quit"
    yield ms
    print("yield")
生成allure报告(需本地安装allure,并且安装依赖包allure-pytest)
进入测试脚本目录:命令行执行pytest test_xxx.py(测试脚本) --alluredir=./result    #保存本次测试的结果数据
生成报告:allure serve ./result(上一步指定的目录)
allure generate./result/ -o ./report/ --clean    #将./result/目录下的测试数据生成html测试报告到./report路径下, --clean选项的目的是先请空测试报告目录,再生成新的测试报告
conftest.py文件
fixture scope为session级别,是可以跨.py模块调用的,也就是当我们有多个.py文件的用例时,如果多个用例只需要调用一次fixture,可以将scope=“session”,并且写到conftest.py文件
规则:
conftest.py文件名为固定的,不可更改
conftest.py文件不能被其他文件导入
conftest.py文件需要和运行的用例在同一个包下,并且有__init__.py文件
使用时不需要导入conftest.py文件,pytest会自动识别到这个软件
放到项目的跟目录下可以全局调用,放在某个packge下,就在这个packge下有效
conftest结合fixture的使用
conftest中fixture的scope参数为session,所有测试.py文件执行前执行一次
conftest中fixture的scope参数为module,每一个测试.py文件执行前都会执行一次
conftest文件中的fixture conftest中fixture的scope参数为class,每一个测试文件中的测试类执行前都会执行一次
conftest文件中的fixture conftest中fixture的scope参数为function,所有文件的测试用例执行前都会执行一次conftest文件中的fixture
conftest层级关系
项目目录;web_conf_py是项目工程名称
│  conftest.py
│  __init__.py
│
├─baidu
│  │  conftest.py
│  │  test_1_baidu.py
│  │  test_2.py
│  │  __init__.py
│
├─blog
│  │  conftest.py
│  │  test_2_blog.py
│  │  __init__.py
- web_conf_py下的conftest.py起到全局作用
- web_conf_py/baidu下的conftest.py对于baidu的package下的目录起作用
- web_conf_py/blog下的conftest.py对于blog的package下的目录起作用
conftest应用场景
- 每个接口需共用到的token
- 每个接口需共用到的测试用例数据
- 每个接口需共用到的配置信息
- 等等等…
pytest断言
- assert xx 判断xx为真
- assert not xx 判断xx不为真
- assert a in b 判断b包含a
- assert a == b 判断a等于b
- assert a != b 判断a不等于b
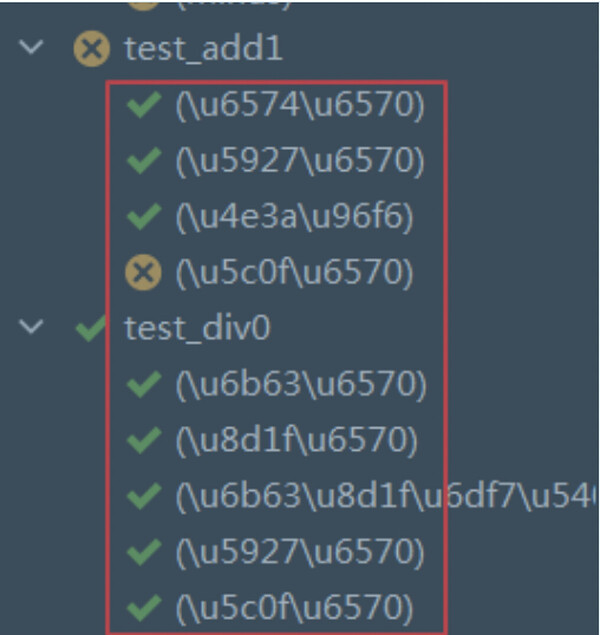
pytest执行结果case标题有中文时显示编码不正确
解决方法:重写pytest_collection_modifyitems hook函数,在conftest.py内添加以下代码
def pytest_collection_modifyitems(items):
    for item in items:
        item.name = item.name.encode('UTF-8').decode('unicode_escape')
        item._nodeid = item._nodeid.encode('UTF-8').decode('unicode_escape')

