一、接口请求体-文件
1.1 简介
- 在计算机科学领域中,文件(File)是用于存储数据的一种常见形式。文件通常被组织在存储设备(如硬盘、闪存驱动器、光盘等)上,它是可以包含文本、图像、视频、音频或其他类型的数据。
1.2 使用场景
- 在进行自动化测试过程中,可能会碰到需要上传一个图片或文件的接口,即头部的
Content-type为multipart/form-data;boundary=...类型的接口,这时可以使用Python的Requests方法。
1.3 files参数格式
-
files为字典类型数据,上传的文件为键值对的形式:入参的参数名作为键,参数值是一个元组,内容为以下格式(文件名,打开并读取文件,文件的
content-type类型)。 -
除了上传的文件,接口其他参数不能放入files中,使用data进行传递即可。
#上传图片
files = {
    "file": ("攀登者.png", open("C:/Users/A/Desktop/攀登者.png", "rb"), "imags/png")
}
#上传表格文件
files = {
    "file": ("test.xlsx", open("D:\\test.xlsx", "rb"), "application/octet-stream")
}
| 名称 | 类型 | 是否必须 | 描述 |
|---|---|---|---|
| file | File | 是 | 文件 |
| title | String | 是 | 文件名称 |
| fileType | String | 是 | 文件类型:doc, docx, txt, pdf, png, gif, jpg, jpeg, tiff, html, rtf, xls, txt |
1.4 演示代码
-
Python
- 在Python中使用files参数上传文件,files要求传递的参数内容为字典格式,key值为上传的文件名,value通常要求传递一个二进制模式的文件流。
import requests
import pprint

def req():

    files = {
        "file": ("攀登者.png", open("C:/Users/A/Desktop/攀登者.png", "rb"), "imags/png")
    }


    r = requests.post("https://httpbin.ceshiren.com/post",files=files)
    assert r.status_code == 200

    pprint.pprint(r.json())
req()
-
Java
-
Content-type类型multipart/form-data
-
创建本地文件
- hogwarts.txt
-
调用方法
-
multiPart()- 参数:String name
- 参数:File file
-
-
package ch02_multipart;

import io.restassured.RestAssured;
import org.junit.jupiter.api.Test;

import java.io.File;

import static io.restassured.RestAssured.given;
import static io.restassured.specification.ProxySpecification.host;

/**
 * 测试通过multipart/form-data方式上传文件和JSON数据。
 */
public class TestMultipart {

    /**
     * 上传本地文件和JSON数据到远程服务器,并通过HTTPS代理服务器转发请求。
     * <p>
     * 此测试用例将上传一个本地文件和一段JSON数据到https://httpbin.ceshiren.com/post,
     * 并验证响应状态码是否为200。
     */
    @Test
    void testUploadFile() {

        // 创建一个File对象,指向要上传的本地文件
        File myFile = new File("src/test/resources/hogwarts.txt");

        // 配置代理服务器,指定主机和端口
        RestAssured.proxy = host("127.0.0.1").withPort(8888);
        // 允许使用不安全的HTTPS连接,避免SSL握手错误
        RestAssured.useRelaxedHTTPSValidation();

        given()
                .multiPart("hogwarts", myFile)  // 添加文件到multipart请求中
                .multiPart("ceshiren", "{\"hogwarts\": 666}", "application/json")  // 添加JSON数据到multipart请求中
                .log().headers()  // 打印请求头信息
                .log().body()  // 打印请求体信息
                .when()
                .post("https://httpbin.ceshiren.com/post")  // 发送POST请求
                .then()
                .statusCode(200);  // 断言响应状态码为200,表示请求成功
    }
}
二、接口请求体-form表单
2.1 简介
- 在自动化测试过程中,Form请求代表请求体为表单类型,其特点为:数据量不大,数据层级不深的情况,使用键值对传递,Form请求头中的
Content-type通常对应为application/x-www-form-urlencoded。碰到这种类型的接口,使用Python的Requests方法。
2.2 使用场景
- 在进行搜索、登录时,可以使用form表单进行填写数据。
2.3 演示代码
-
Python
- 在Python中,可以使用data参数传输表单数据,data参数以字典的形式、字典以键值对的形式出现。
import requests
import pprint
def req():
    data = {
        "school": "hogwarts"
    }
    r = requests.post("https://httpbin.ceshiren.com/post",data=data)
    pprint.pprint(r.json())
req()
运行结果:
{
  "args": {},
  "data": "",
  "files": {},
  "form": {
    "school": "hogwarts"
  },
  ...省略...
  "json": None,
  "origin": "36.112.118.254, 182.92.156.22",
  "url": "https://httpbin.ceshiren.com/post"
}
-
Java
- 调用
formParam()方法
- 调用
package ch03_form;

import io.restassured.RestAssured;
import org.junit.jupiter.api.Test;

import static io.restassured.RestAssured.given;
import static io.restassured.specification.ProxySpecification.host;

/**
 * 测试使用表单参数发送POST请求。
 */
public class TestFormParam {

    /**
     * 使用表单参数发送POST请求并通过HTTPS代理服务器转发请求。
     * <p>
     * 此测试用例将向https://httpbin.ceshiren.com/post发送一个包含表单参数的POST请求,
     * 并验证响应状态码是否为200。
     */
    @Test
    void testFormParam() {

        // 配置本地代理服务器,方便监听请求信息
        RestAssured.proxy = host("127.0.0.1").withPort(8888);
        // 允许使用不安全的HTTPS连接,避免SSL握手错误
        RestAssured.useRelaxedHTTPSValidation();

        // 构建并发送POST请求
        given()
                .formParam("username", "hogwarts")  // 添加表单数据
                .log().headers()  // 打印请求头信息
                .log().body()  // 打印请求体信息
                .when()
                .post("https://httpbin.ceshiren.com/post")  // 发送POST请求
                .then()
                .statusCode(200);  // 断言响应状态码为200,表示请求成功
    }
}
- 调用
formParams()方法
package ch03_form;

import io.restassured.RestAssured;
import org.junit.jupiter.api.Test;

import static io.restassured.RestAssured.given;
import static io.restassured.specification.ProxySpecification.host;

/**
 * 测试使用多个表单参数发送POST请求。
 */
public class TestFormParams {

    /**
     * 使用多个表单参数发送POST请求并通过HTTPS代理服务器转发请求。
     * <p>
     * 此测试用例将向https://httpbin.ceshiren.com/post发送一个包含多个表单参数的POST请求,
     * 并验证响应状态码是否为200。
     */
    @Test
    void testFormParams() {

        // 配置本地代理服务器,方便监听请求信息
        RestAssured.proxy = host("127.0.0.1").withPort(8888);
        // 允许使用不安全的HTTPS连接,避免SSL握手错误
        RestAssured.useRelaxedHTTPSValidation();

        // 构建并发送POST请求
        given()
                .formParams("username", "hogwarts", "password", "666")  // 添加多个表单数据
                .log().headers()  // 打印请求头信息
                .log().body()  // 打印请求体信息
                .when()
                .post("https://httpbin.ceshiren.com/post")  // 发送POST请求
                .then()
                .statusCode(200);  // 断言响应状态码为200,表示请求成功
    }
}
三、接口请求体-xml
3.1 简介
-
在做接口自动化时,可能会遇到一种接口,它的参数数据是通过xml进行传递的。
-
post请求相对于get请求多一个body不分,body部分常见的数据类型有以下四种(注意是常见的,并不是只有四种):application/x-www-form-urlencodedapplication/jsontext/xmlmultipart/form-data
-
其中,xml是可扩展标记语言,是用于描述数据、存储数据、传输(交换)数据,与HTML类似,xml使用标签来标识数据的结构和内容,用户可以定义自己需要的标记。
3.2 应用场景
- 当进行数据交换、信息配置时,就可以使用xml来进行传输。
3.3 text/xml的数据类型
- 首先要确定
post请求的body部分类型是XML格式:
<?xml version="1.0" encoding = "UTF-8"?>
<COM>
<REQ name="北京-hogwarts">
<USER_ID>bjhongge</USER_ID>
<COMMODITY_ID>123456</COMMODITY_ID>
<SESSION_ID>abcdefg123</SESSION_ID>
</REQ>
</COM>
- python代码示例
import requests
import pprint
xml = """<?xml version=“1.0” encoding = “UTF-8”?>
<COM>
<REQ name="北京-hogwarts">
<USER_ID>bjhogwarts</USER_ID>
<COMMODITY_ID>123456</COMMODITY_ID>
<SESSION_ID>abcdefg123</SESSION_ID>
</REQ>
</COM>"""

headers = {'Content-Type': 'application/xml'}
# 遇到编码报错时候,对body进行encode
r = requests.post('https://httpbin.ceshiren.com/post', data=xml.encode('utf-8'), headers=headers)
pprint.pprint(r.json())
- Java代码示例
import org.apache.commons.io.IOUtils;
import org.junit.jupiter.api.Test;

import java.io.IOException;

import static io.restassured.RestAssured.given;

public class TestReq {
    String xml = """
            <?xml version="1.0" encoding = "UTF-8"?>
            <COM>
                <REQ name="北京-hogwarts">
                    <USER_ID>bjhogwarts</USER_ID>
                    <COMMODITY_ID>123456</COMMODITY_ID>
                    <SESSION_ID>abcdefg123</SESSION_ID>
                </REQ>
            </COM>
            """;

    @Test
    void testXML() throws IOException {
        String reqBody = IOUtils.toString(xml.getBytes(), "UTF-8");

        given()
                .contentType("application/xml")  // 定制请求内容媒体类型
                .body(reqBody)  // 定制请求体数据
                .when()
                .post("https://httpbin.ceshiren.com/post")  // 发送请求
                .then()
                .log().body(); // 打印响应体信息
    }

}
- 从文件中读取XML数据
-
xml格式的数据写到代码里,不直观也不利于后期维护,可以把xml格式数据单独写入文件,再用open函数去读取:

-
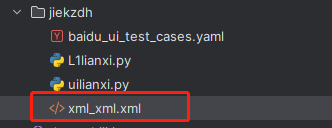
新建一个xml_xml.xml文件,写入内容如下:

-
Python:用open函数去读xml内容。
-
import requests
import pprint
with open('xml_xml.xml', encoding='utf-8')as fp:
    xml=fp.read()

headers = {'Content-Type': 'application/xml'}
# 遇到编码报错时候,对body进行encode
r = requests.post('https://httpbin.ceshiren.com/post', data=xml.encode('utf-8'), headers=headers)
pprint.pprint(r.json())
- Java:用IOUtils工具类读取xml内容:
import org.apache.commons.io.IOUtils;
import org.junit.jupiter.api.Test;

import java.io.File;
import java.io.FileInputStream;
import java.io.IOException;

import static io.restassured.RestAssured.given;

public class TestReq {
    @Test
    void testXML() throws IOException {
        // 定义请求体数据:源自文件对象
        File file = new File("src/test/resources/xml_xml.xml");
        FileInputStream fis = new FileInputStream(file);
        String reqBody = IOUtils.toString(fis, "UTF-8");

        given()
                .contentType("application/xml")  // 定制请求内容媒体类型
                .body(reqBody)  // 定制请求体数据
                .when()
                .post("https://httpbin.ceshiren.com/post")  // 发送请求
                .then()
                .log().body(); // 打印响应体信息
    }
}
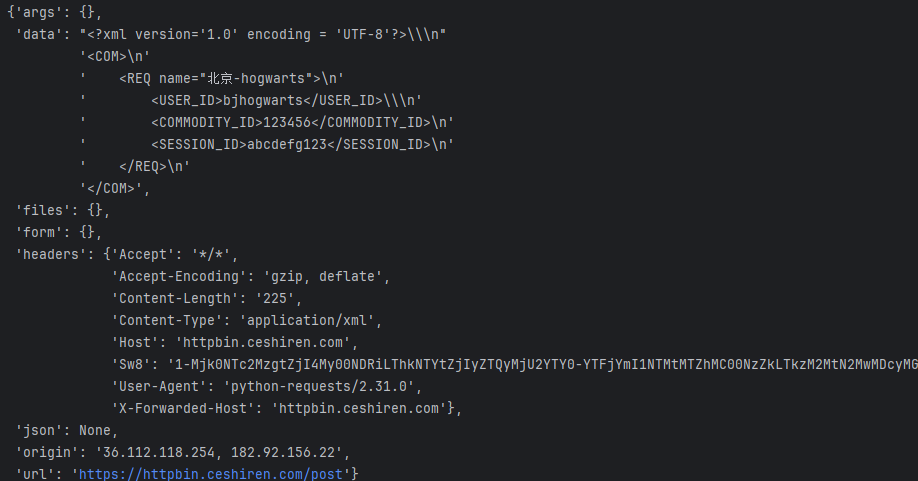
- 打印结果


