一、Allure2报告中添加附件-图片
1.1 附件类型
TEXT = ("text/plain", "txt")
CSV = ("text/csv", "csv")
TSV = ("text/tab-separated-values", "tsv")
URI_LIST = ("text/uri-list", "uri")

HTML = ("text/html", "html")
XML = ("application/xml", "xml")
JSON = ("application/json", "json")
YAML = ("application/yaml", "yaml")
PCAP = ("application/vnd.tcpdump.pcap", "pcap")

PNG = ("image/png", "png")
JPG = ("image/jpg", "jpg")
SVG = ("image/svg-xml", "svg")
GIF = ("image/gif", "gif")
BMP = ("image/bmp", "bmp")
TIFF = ("image/tiff", "tiff")

MP4 = ("video/mp4", "mp4")
OGG = ("video/ogg", "ogg")
WEBM = ("video/webm", "webm")

PDF = ("application/pdf", "pdf")
1.2 背景
-
应用场景:
- 在做UI自动化测试时,可以将页面截图,或者出错的页面进行截图,将截图添加到测试报告中展示,辅助定位问题。
-
解决方案:
- Python:使用
allure.attach或者allure.attach.file()添加图片。 - Java:直接通过注释或调用方法添加。
- Python:使用
1.3 Python方法一
- 语法:
allure.attach.file(source, name, attachment_type, extension)
- 参数解释:
- source:文件路径,相当于传一个文件;
- name:附件名字;
- attachment_type:附件类型,是
allure.attachment_type其中的一种(支持PNG、JPG、BMP、GIF等) - extension:附件的扩展名。
import allure

class TestWithAttach:
    def test_pic(self):
        allure.attach.file("pic.png",
                           name="图片",
                           attachment_type=allure.attachment_type.PNG,
                           extension="png")

1.4 Python方法二
- 语法:
allure.attach(body, name=None, attachment_type=None, extension=None)
- 参数解释:
- body:要写入附件的内容;
- name:附件名字;
- attachment_type:附件类型,是allure.attachment_type中的一种(支持PNG、JPG、BMP、GIF等);
- extension:附件的扩展名。
import allure

class TestWithAttach:
    def test_pic2(self):
        with open("./img/logo.png",mode="rb") as f :
            file = f.read()
            allure.attach(file,"页面截图",allure.attachment_type.PNG)

1.5 裂图的原因以及解决办法
-
图片上传过程中,出现了网络中断,或者传输过程中出现了错误。
- 解决方法:重新上传图片。
-
Allure报告中的图片大小超过了Allure的限制。
- 解决方法:调整图片大小。
-
图片本身存在问题。
- 解决方法:检查图片格式和文件本身。
二、Allure2报告中添加附件-日志
2.1 背景
-
应用场景:
- 报告中添加详细的日志信息,有助于分析定位问题。
-
解决方案:
-
Python:使用Python自带的logging模块生成日志,日志会自动添加到测试报告中;
-
Java:直接通过注解或调用方法添加。
-
2.2 方法
- 日志配置,在测试报告中使用logger对象,生成对应级别的日志。
# 创建一个日志模块: log_util.py
import logging
import os

from logging.handlers import RotatingFileHandler

# 绑定绑定句柄到logger对象
logger = logging.getLogger(__name__)
# 获取当前工具文件所在的路径
root_path = os.path.dirname(os.path.abspath(__file__))
# 拼接当前要输出日志的路径
log_dir_path = os.sep.join([root_path, f'/logs'])
if not os.path.isdir(log_dir_path):
    os.mkdir(log_dir_path)
# 创建日志记录器,指明日志保存路径,每个日志的大小,保存日志的上限
file_log_handler = RotatingFileHandler(os.sep.join([log_dir_path, 'log.log']), maxBytes=1024 * 1024, backupCount=10 , encoding="utf-8")
# 设置日志的格式
date_string = '%Y-%m-%d %H:%M:%S'
formatter = logging.Formatter(
    '[%(asctime)s] [%(levelname)s] [%(filename)s]/[line: %(lineno)d]/[%(funcName)s] %(message)s ', date_string)
# 日志输出到控制台的句柄
stream_handler = logging.StreamHandler()
# 将日志记录器指定日志的格式
file_log_handler.setFormatter(formatter)
stream_handler.setFormatter(formatter)
# 为全局的日志工具对象添加日志记录器
# 绑定绑定句柄到logger对象
logger.addHandler(stream_handler)
logger.addHandler(file_log_handler)
# 设置日志输出级别
logger.setLevel(level=logging.INFO)
- 代码输出到用例详情页面。
- 运行用例:
pytest --alluredir ./results --clean-alluredir(注意不要加-vs)
@allure.feature("功能模块2")
class TestWithLogger:
    @allure.story("子功能1")
    @allure.title("用例1")
    def test_case1(self):
        logger.info("用例1的 info 级别的日志")
        logger.debug("用例1的 debug 级别的日志")
        logger.warning("用例1的 warning 级别的日志")
        logger.error("用例1的 error 级别的日志")
        logger.fatal("用例1的  fatal 级别的日志")

- 日志展示在Test Body标签下,标签下可展示多个子标签,代表不同的日志输出渠道:
- log子标签:展示日志信息;
- stdout子标签:展示print信息;
- stderr子标签:展示终端输出的信息。

2.3 Allure2报告中添加日志展示功能禁用
- 禁用日志,可以使用命令行参数控制:
--allure-no-capture
pytest test_allure_log.py --alluredir ./results --clean-alluredir --allure-no-capture

三、Allure2报告中添加附件-html
3.1 背景
-
应用场景:
- 可以定制测试报告页面效果,可以将HTML类型的附件,显示在报告页面上。
-
解决方法:
- Python:使用
allure.attach()添加html代码; - Java:直接通过注解或调用方法添加。
- Python:使用

3.2 方法
-
语法:
allure.attach(body, name, attachment_type, extension)
-
参数解释:
- body:要写入附件的内容(HTML代码块);
- name:附件的名字;
- attachment_type:附件类型,是
allure.attachment_type中的一种; - extension:附件的扩展名。
class TestWithAttach:
    def test_html(self):
        allure.attach('<head></head><body> a page </body>',
                      '附件是HTML类型',
                      allure.attachment_type.HTML)

    def test_html_part(self):
        allure.attach('''html代码块''',
                      '附件是HTML类型',
                      allure.attachment_type.HTML)

四、Allure2报告中添加附件-视频
4.1 背景
-
应用场景:
- 在做UI自动化时,可以将页面截图,或者出错的页面进行截图,将截图添加到测试报告中展示,辅助定位问题。
-
解决方案:
- Python:使用
allure.attach.file()添加视频; - Java:直接通过注解或调用方法添加。
- Python:使用
4.2 方法
-
语法:
allure.attach.file(source, name, attachment_type, extension)
-
参数解释:
- source:文件路径,相当于一个文件;
- name:附件名字;
- attachment_type:附件类型,是
allure.attachment_type中的一种; - extension:附件的扩展名。
import allure

class TestWithAttach:
    def test_video(self):
        allure.attach.file("xxx.mp4",
                           name="视频",
                           attachment_type=allure.attachment_type.MP4,
                           extension="mp4")

五、Allure2报告定制
5.1 背景
- 应用场景:
- 针对不同的项目,可能需要对测试报告展示的效果进行定制,比如修改页面的logo、项目标题,或者添加定制功能等。

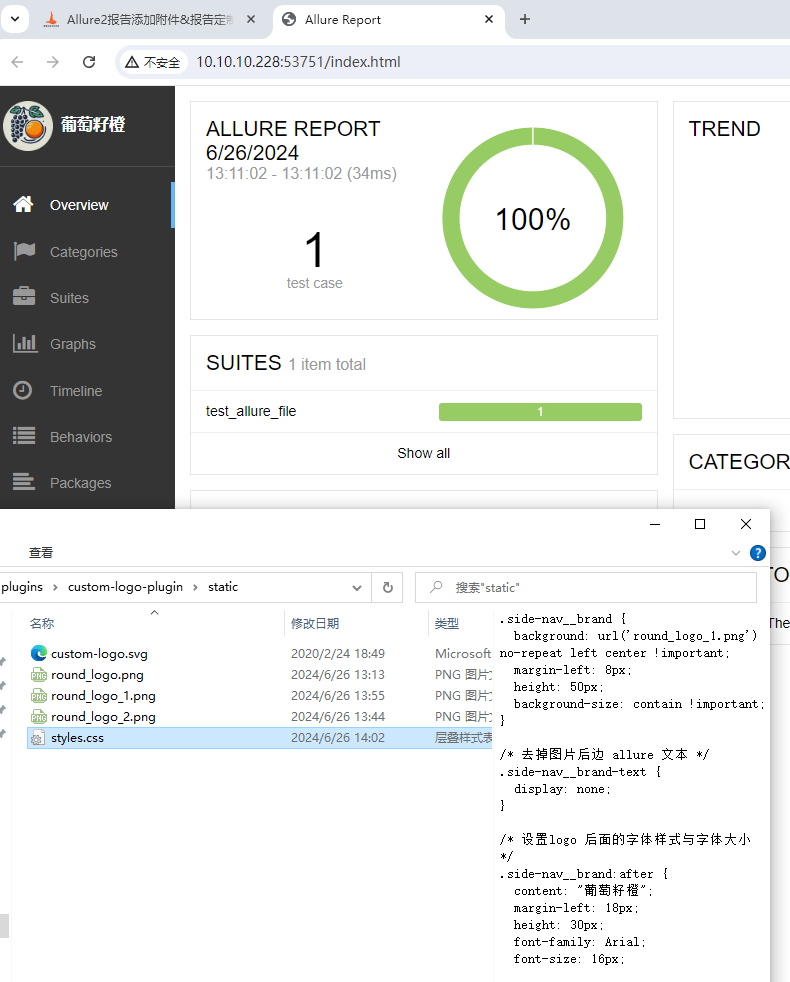
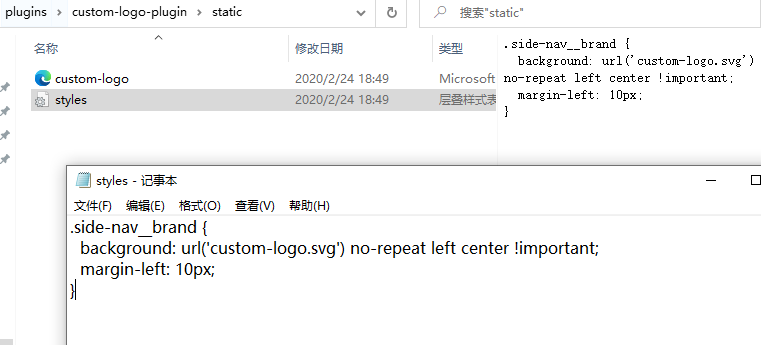
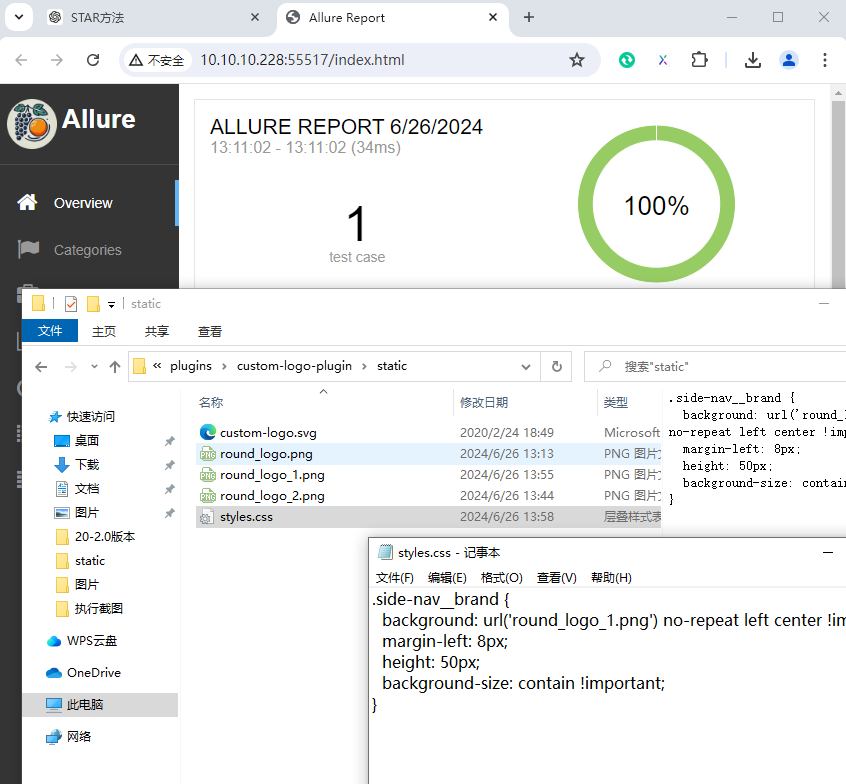
5.2 Allure2报告定制-页面logo
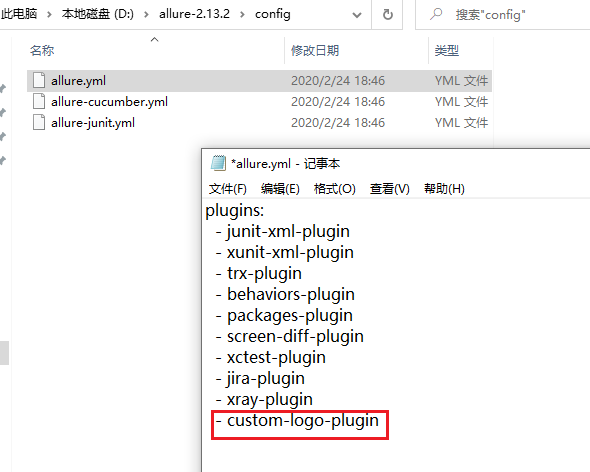
-
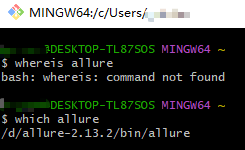
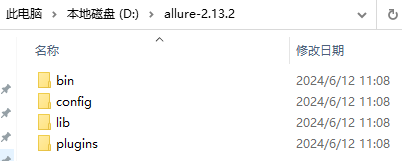
在
config文件夹中,修改allure.yml文件,添加logo插件- custom-logo-plugin(在allure安装路径下,可以通过where allure或者which allure查看allure安装路径);
-
在
plugins\custom-logo-plugin\static文件夹中,编辑style.css文件,配置logo图片。
/* 打开 styles.css 文件,
目录在:/xxx/allure-2.13.2/plugins/custom-logo-plugin/static/styles.css,
将内容修改为:*/

.side-nav__brand {
  background: url("logo.png") no-repeat left center !important;
  margin-left: 10px;
  height: 40px;
  background-size: contain !important;
}
5.3 Allure2报告定制-页面标题
- 编辑
style.css文件,添加修改标题对应的代码。
/* 去掉图片后边 allure 文本 */
.side-nav__brand-text {
  display: none;
}

/* 设置logo 后面的字体样式与字体大小 */
.side-nav__brand:after {
  content: "霍格沃兹测试学社";
  margin-left: 18px;
  height: 20px;
  font-family: Arial;
  font-size: 13px;
}