一,简介
- Allure 是由 Java 语⾔开发的⼀个轻量级,灵活的测试报告⼯具。
- Allure 多平台的 Report 框架。
- Allure ⽀持多语⾔,包括 python、JaveScript、PHP、Ruby 等。
- 可以为开发/测试/管理等人员提供详尽的的测试报告,包括测试类别、测试步骤、日志、图片、视频等。
- 可以为管理层提供高水准的统计报告。
- 可以集成到 Jenkins 生成在线的趋势汇总报告
- 报告展示地址:github 地址:https://github.com/allure-framework/allure2
二,Allure安装
- 安装 Java,需要配置环境变量。
- 安装 Allure ,需要配置环境变量。
- 安装插件
- pom依赖导入
<properties>
        <maven.compiler.encoding>UTF-8</maven.compiler.encoding>
        <maven.compiler.version>3.10.1</maven.compiler.version>
        <maven-surefire-plugin.version>3.0.0-M5</maven-surefire-plugin.version>
        <maven.compiler.source>11</maven.compiler.source>
        <maven.compiler.target>11</maven.compiler.target>
        <!-- 对应junit Jupiter的版本号;放在这里就不需要在每个依赖里面写版本号,导致对应版本号会冲突 -->
        <junit.jupiter.version>5.9.2</junit.jupiter.version>
        <!-- log日志 -->
        <slf4j.version>2.0.6</slf4j.version>
        <logback.version>1.4.5</logback.version>
        <!-- yaml对应解析 -->
        <jackson.version>2.14.2</jackson.version>
        <!-- hamcrest断言 -->
        <hamcrest.version>2.2</hamcrest.version>
        <!-- allure报告 -->
        <allure.version>2.21.0</allure.version>
        <allure.maven.version>2.12.0</allure.maven.version>
        <aspectj.version>1.9.19</aspectj.version>
        <allure.cmd.download.url>
            https://repo.maven.apache.org/maven2/io/qameta/allure/allure-commandline
        </allure.cmd.download.url>
    </properties>

    <!--    物料清单 (BOM)-->
    <dependencyManagement>
        <dependencies>
            <!--当使用 Gradle 或 Maven 引用多个 JUnit 工件时,此物料清单 POM 可用于简化依赖项管理。不再需要在添加依赖时设置版本-->
            <dependency>
                <groupId>org.junit</groupId>
                <artifactId>junit-bom</artifactId>
                <version>${junit.jupiter.version}</version>
                <type>pom</type>
                <scope>import</scope>
            </dependency>
        </dependencies>
    </dependencyManagement>
    <dependencies>
        <!-- junit5 -->
        <!-- 创建 Junit5 测试用例的 API-->
        <dependency>
            <groupId>org.junit.jupiter</groupId>
            <artifactId>junit-jupiter</artifactId>
            <!--对应添加的依赖的作用范围-->
            <scope>test</scope>
        </dependency>
        <!-- 兼容 JUnit4 版本的测试用例-->
        <dependency>
            <groupId>org.junit.vintage</groupId>
            <artifactId>junit-vintage-engine</artifactId>
            <scope>test</scope>
        </dependency>
        <!--suite套件依赖 -->
        <dependency>
            <groupId>org.junit.platform</groupId>
            <artifactId>junit-platform-suite</artifactId>
            <scope>test</scope>
        </dependency>

        <!-- log日志 -->
        <dependency>
            <groupId>org.slf4j</groupId>
            <artifactId>slf4j-api</artifactId>
            <version>${slf4j.version}</version>
            <scope>compile</scope>
        </dependency>
        <dependency>
            <groupId>ch.qos.logback</groupId>
            <artifactId>logback-classic</artifactId>
            <version>${logback.version}</version>
            <scope>compile</scope>
        </dependency>

        <!--        allure报告-->
        <dependency>
            <groupId>io.qameta.allure</groupId>
            <artifactId>allure-junit5</artifactId>
            <version>${allure.version}</version>
        </dependency>
        <!-- https://mvnrepository.com/artifact/org.aspectj/aspectjweaver -->
        <dependency>
            <groupId>org.aspectj</groupId>
            <artifactId>aspectjweaver</artifactId>
            <version>${aspectj.version}</version>
        </dependency>

        <!--        yaml文件解析-->
        <dependency>
            <groupId>com.fasterxml.jackson.core</groupId>
            <artifactId>jackson-databind</artifactId>
            <version>${jackson.version}</version>
        </dependency>
        <dependency>
            <groupId>com.fasterxml.jackson.dataformat</groupId>
            <artifactId>jackson-dataformat-yaml</artifactId>
            <version>${jackson.version}</version>
        </dependency>

    </dependencies>

    <build>
        <plugins>
            <plugin>
                <groupId>org.apache.maven.plugins</groupId>
                <artifactId>maven-compiler-plugin</artifactId>
                <version>${maven.compiler.version}</version>
                <configuration>
                    <source>11</source>
                    <target>11</target>
                    <!-- 设置编码为 UTF-8 -->
                    <encoding>${maven.compiler.encoding}</encoding>
                </configuration>
            </plugin>
            <plugin>
                <groupId>org.apache.maven.plugins</groupId>
                <artifactId>maven-surefire-plugin</artifactId>
                <version>${maven-surefire-plugin.version}</version>
                <configuration>
                    <argLine>
                        -javaagent:"${settings.localRepository}/org/aspectj/aspectjweaver/${aspectj.version}/aspectjweaver-${aspectj.version}.jar"
                    </argLine>
                    <includes>
                        <!--  <include>**/*Test</include>-->
                        <!--  <include>**/Test*</include>-->
                    </includes>
                    <systemProperties>
                        <property>
<!--                            配置Allure结果存储路径-->
                            <name>allure.results.directory</name>
                            <value>${project.build.directory}/allure-results</value>
                        </property>
                    </systemProperties>
                </configuration>
                <dependencies>
                    <dependency>
                        <groupId>org.junit.jupiter</groupId>
                        <artifactId>junit-jupiter-engine</artifactId>
                        <version>${junit.jupiter.version}</version>
                    </dependency>
                    <dependency>
                        <groupId>org.junit.vintage</groupId>
                        <artifactId>junit-vintage-engine</artifactId>
                        <version>${junit.jupiter.version}</version>
                    </dependency>
                </dependencies>
            </plugin>
            <plugin>
<!--                Allure报表依赖-->
                <groupId>io.qameta.allure</groupId>
                <artifactId>allure-maven</artifactId>
                <version>${allure.maven.version}</version>
                <configuration>
                    <reportVersion>${allure.version}</reportVersion>
                    <allureDownloadUrl>${allure.cmd.download.url}/${allure.version}/allure-commandline-${allure.version}.zip</allureDownloadUrl>
                </configuration>
            </plugin>
        </plugins>
    </build>
</project>
- 命令验证插件是否安装成功:
-
mvn clean allure:report :在当前项目下下载allure相关的jar包,在项目下生成一个.allure的文件夹
-
mvn clean test :执行测试用例
-
mvn allure:report :在项目target/allure-results路径下,生成测试结果报告
-
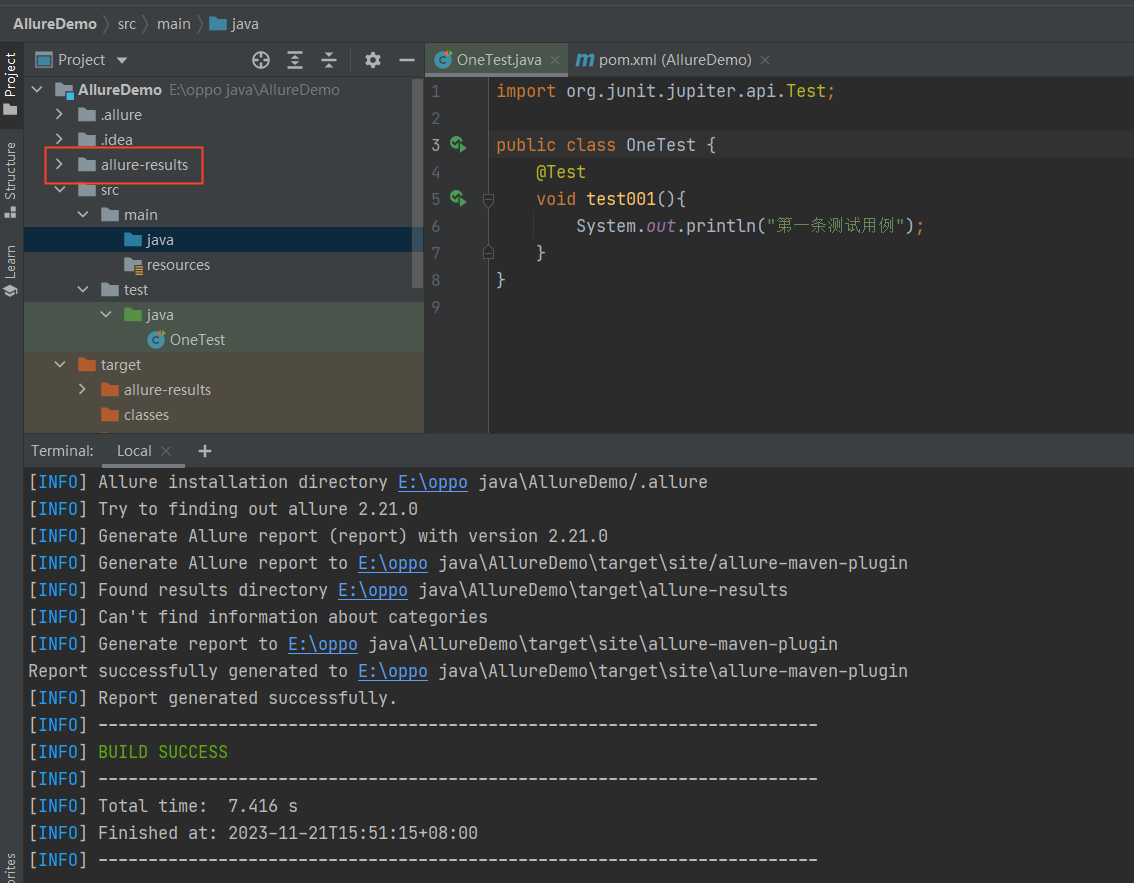
如果用IDEA执行测试用例,则结果是在项目的allure-results目录路径下生成中间结果json文件
-
mvn allure:serve : allure渲染报告,自动打开浏览器查看
-
三,Allure运行方式
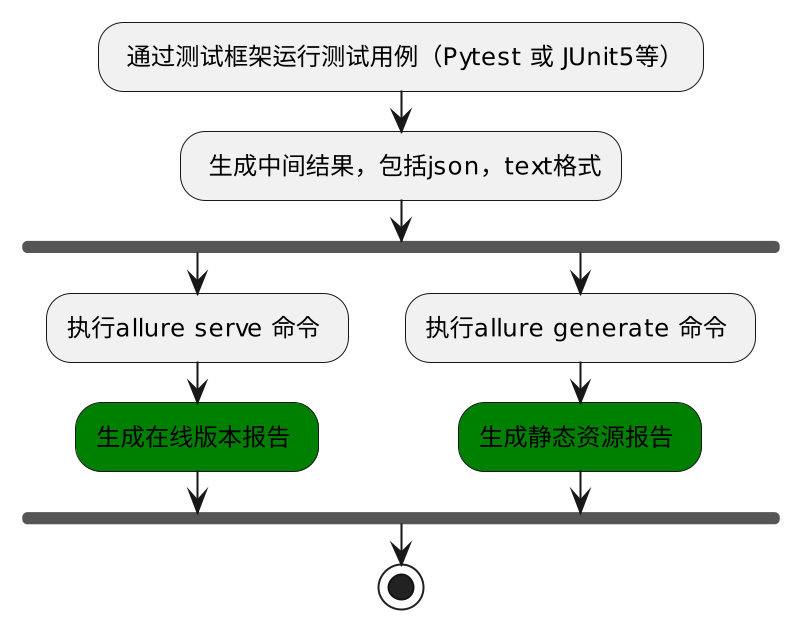
3.1 生成测试报告流程
3.2 通过mvn命令生成在线报告
-
mvn clean test allure:report 在测试执行期间收集结果,mvn命令行使用 maven插件安装
-
mvn allure:serve 生成在线的测试报告,mvn 直接找target/allure-results目录,每次执行都会覆盖前一次的执行结果
-
如果运行mvn命令没有在target下面生成allure-results目录,那么在src/test/resources路径下配置allure配置文件
allure.properties,指名allure报告生成路径。

allure.results.directory=target/allure-results
3.2 通过allure命令生成在线报告(生成报告页面不会打maven的标识)
- mvn clean test 执行测试用例结果
- allure serve ./allure-results 测试完成后查看实际报告,在线查看报告,会直接打开默认浏览器展示当前报告(打开的是IDEA执行结果的报告)
- allure serve target/allure-results (打开的是执行mvn clean test命令的测试结果报告)
3.2 生成静态资源文件报告
-
应用场景:希望能够随时打开报告
-
生成带有index.html 的结果报告
- allure generate ./target/allure-results (项目下会自动生成一个allure-report目录)
- allure generate 可以指定输出路径,也可以清理上次的报告记录。
- allure generate ./result -o ./report --clean (生成报告,指定输出路径,清理报告。./report 为自定义报告目录路径,执行命令后会在项目自动生成对应目录报告)
- -o / –output 输出报告的路径。
- -c / –clean 如果报告路径重复。
-
打开报告
- allure open ./allure-report
- allure open -h 127.0.0.1 -p 8883 ./report/(打开报告,指定IP地址和端口)
- -h / –host 主机 IP 地址,此主机将用于启动报表的 web 服务器。
- -p / –port 主机端口,此端口将用于启动报表的 web 服务器,默认值:0。
四,Allure报告常用注解
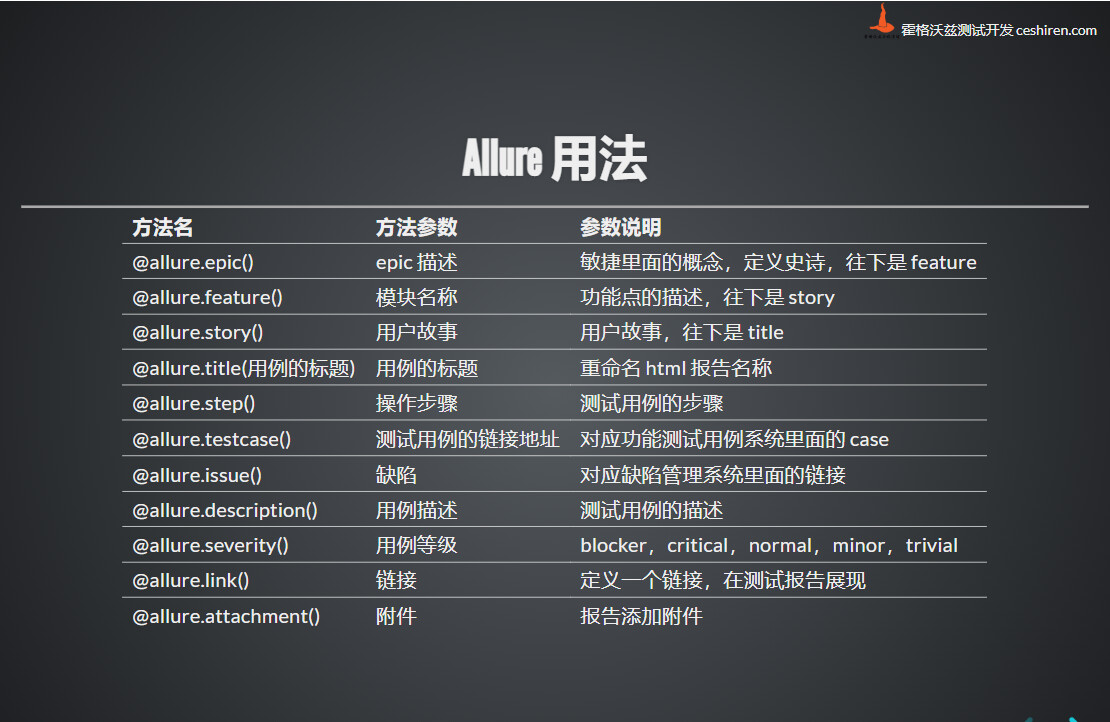
4.1 常用注解说明
4.2 @DisplayName 注解添加用例标题
import org.junit.jupiter.api.DisplayName;
import org.junit.jupiter.api.DynamicTest;
import org.junit.jupiter.api.Test;
import org.junit.jupiter.api.TestFactory;
import org.junit.jupiter.params.ParameterizedTest;
import org.junit.jupiter.params.provider.Arguments;
import org.junit.jupiter.params.provider.CsvSource;
import org.junit.jupiter.params.provider.MethodSource;

import java.util.Arrays;
import java.util.List;
import java.util.stream.Collectors;
import java.util.stream.Stream;

import static org.junit.jupiter.api.Assertions.assertEquals;
import static org.junit.jupiter.api.Assertions.assertTrue;


@DisplayName("测试用例")
public class OneTest {

    //1,直接设置标题
    @Test
    @DisplayName("加法计算")
    void add(){
        int res = 8+7;
        assertEquals(15,res,"加法计算结果失败");
    }

    //2,参数化设置用例标题
    @DisplayName("参数化标题 - 测试字符串长度")
    @ParameterizedTest
    @CsvSource({"hello,5", "foo,3", "hogwarts,8"})
    void testStr(String str,int expected){
        assertEquals(expected,str.length());
    }

    @DisplayName("参数化标题 - 减法计算")
    @ParameterizedTest(name ="{0} -{1} = {2}")
    @MethodSource
    void subTest(int a ,int b, int res){
        int result = a -b;
        assertEquals(res,result, () -> a +"-"+b +"的计算结果失败");
    }

    public static Stream<Arguments> subTest(){
        return Stream.of(
                Arguments.arguments(2,2,0),
                Arguments.arguments(3,5,-2),
                Arguments.arguments(8,1,7)
        );
    }

    //3,动态设置测试用例标题
    @DisplayName("动态更新测试标题")
    @TestFactory
    List<DynamicTest> dynamicTestList(){
        List<String> list = Arrays.asList("apples","banana","orange");
        return list.stream().map(str ->DynamicTest.dynamicTest("动态测试字符串长度:" +str, () ->{
//            assertEquals(5,str.length());
            assertTrue(str.length() > 5);
        })).collect(Collectors.toList());
    }
}
4.3 @step 添加用例步骤
- 优点:添加详细的用例步骤说明可以提高用例的可阅读性
- 添加用例步骤的两种方法:
- 使用
Allure.step()方法添加
- 使用
import io.qameta.allure.Allure;
import org.junit.jupiter.api.DisplayName;
import org.junit.jupiter.api.Test;
import static org.junit.jupiter.api.Assertions.assertEquals;

@DisplayName("用例步骤方法")
public class StepMethodTest {

    @Test
    @DisplayName("加法验证")
    void add(){
        Allure.step("输入数字3");
        int a = pressDigit(3);
        Allure.step("输入数字5");
        int b = pressDigit(5);
        Allure.step("计算结果");
        int result = a +b ;
        Allure.step("验证结果是否正确");
        assertEquals(8,result,"计算错误");

    }
    private int pressDigit(int digit){
        return digit;
    }

}
- 使用
@Step注解添加
import io.qameta.allure.Step;
import org.junit.jupiter.api.DisplayName;
import org.junit.jupiter.api.Test;
import static org.junit.jupiter.api.Assertions.assertEquals;

@DisplayName("步骤注解验证")
public class StepAnTest {
    @Test
    @DisplayName("减法步骤验证")
    void testSub() {
        int a =  pressDigit(6);
        int b = pressDigit(2);
        int result = subtract(a, b);
        assertEquals(4, result, "计算错误");
    }

    @Step("输入数字")
    private int pressDigit(int digit){
        return digit;
    }

    @Step("减法计算")
    public int subtract(int x , int y){
        return x-y;
    }
}
- step注解不生效的原因
-
- 没有正确引入依赖。
-
- 没有使用
JUnit5或TestNG测试框架。
- 没有使用
-
- 没有正确使用
@Step注解。
- 没有正确使用
-
- 未在
Allure报告中启用步骤。
- 未在
-
4.4 @Link 、@Issue 添加用例链接
- 应用场景:将报告与 bug 管理系统或测试用例管理系统集成,可以添加超链接
*两种添加方法- 通过注解方式添加
- 使用方法添加
注解添加:
-
@Link和@Links单独使用可以加多个注解,但是两个一起使用,各自只能加一个注解 -
@Issue经常用来添加bug管理链接 - 在 Allure 报告中生成可点击的 Issue 链接,需要在
allure.properties文件中配置 Issue 链接模板:src/test/resources目录下创建allure.properties文件,并添加配置allure.link.issue.pattern=https://jira.example.org/browse/{},{}会被替换为具体的 Issue ID、
    @Link(name="百度首页",url="https://www.baidu.com",type = "deplink")
    @Links({
            @Link(name="腾讯首页",url="https://www.tencent.com/zh-cn/",type = "depplink"),
            @Link(name="allure文档",url="https://blog.51cto.com/u_15009374/3147978",type = "mylink")
    })

   @Issue("case01")
   @Issues({
           @Issue("bug01"),
           @Issue("bug02")
    })
方法添加:
Allure.link(String name, String url, LinkType type);
Allure.issue(String name, String url);
4.5 添加用例分类
-
应用场景:可以为项目,以及项目下的不同模块对用例进行分类管理。也可以运行某个类别下的用例。
-
报告展示:类别会展示在测试报告的
Behaviors栏目下。 -
Allure 提供了三个注解:
-
@Epic:敏捷里面的概念,定义史诗,往下是 feature。 -
@Feature:功能点的描述,理解成模块往下是 story。 -
@Story:故事 story 是 feature 的子集。
-
import io.qameta.allure.*;
import org.junit.jupiter.api.DisplayName;
import org.junit.jupiter.api.Test;

import static org.junit.jupiter.api.Assertions.assertEquals;

//Epic - 在测试报告中看到用例所在的项目,或者定义一个项目的需求
@Epic("购物平台")
//@Epic("登录系统")
@Epics({
        @Epic("用户登录"),
        @Epic("用户操作")
})

//Feature - 表示被测系统的不同功能模块或特性。
@Feature("登录成功")
@Features({
        @Feature("登录失败"),
        @Feature("登录错误")
})
@DisplayName("用例分类验证")
public class EpicTest {

    //Story - 定义具体的需求、用户故事或场景等。
    @Story("加法验证")
    @Stories({
            @Story("子功能1"),
            @Story("子功能2")
    })
    @Test
    @DisplayName("加法计算")
    void testSum() {
        assertEquals(8,5+3);
    }

    @Story("减法验证")
    @Test
    @DisplayName("减法计算")
    void testMultipleSteps() {
        assertEquals(2,5-3);
    }

    @Story("乘法验证")
    @Test
    @DisplayName("乘法计算")
    void testSum2() {
        assertEquals(15,5*3);
    }

}
4.6 添加用例描述
- Allure 支持两种方法:
- 方法一:使用
@Description注解添加。 - 方法二:使用
Allure.description()方法添加。(两种都使用的情况下,方法二优先级更高) - 用例描述仅支持在方法上添加
- 方法一:使用
4.7 @Severity 添加用例优先级
-
应用场景:用例执行时,希望按照严重级别执行测试用例
-
Allure 对严重级别的定义分为 5 个级别:
- Blocker级别:中断缺陷(客户端程序无响应,无法执行下一步操作)。
- Critical级别:临界缺陷( 功能点缺失)。
- Normal级别:普通缺陷(数值计算错误)。
- Minor级别:次要缺陷(界面错误与UI需求不符)。
- Trivial级别:轻微缺陷(必输项无提示,或者提示不规范)。
-
使用
@Severity注解添加用例优先级
@Severity(SeverityLevel.<LEVEL>)

** 可以在类 和方法上添加
** 改优先级并不是用例执行的优先级,只是标注用例的严重级别,不影响用例执行顺序
4.8 添加用例标签
- 正常测试用例添加标签
@Tag(在类和方法上都可以添加)。 - 用例跳过添加标签:
@DisabledIf。 - 用例预期失败添加标签:
assumeFalse()。
import org.junit.jupiter.api.Assumptions;
import org.junit.jupiter.api.DisplayName;
import org.junit.jupiter.api.Tag;
import org.junit.jupiter.api.Test;
import org.junit.jupiter.api.condition.DisabledIf;

@DisplayName("标签测试类")
@Tag("top1")
public class TagDemoTest {

    @Test
    @Tag("你好")
    @Tag("世界")
    void TagTest() {
            System.out.println("reTest");
    }

 //通过@DisabledIf实现跳过用例
    @Test
    @DisabledIf("good")
          //里面的参数good方法返回为true,才会跳过test方法不执行,并且结果默认为通过
    void test() {
        System.out.println("执行te");
    }
    boolean good(){
        return 2 + 2 != 5;
    }

    //通过assumeFalse()实现预期失败用例:good1方法结果为true,则跳过test1方法不执行
    @Test
    void test1() {
        System.out.println("执行good1");
        Assumptions.assumeFalse(this::good1, "这是一个预期失败的用例");
    }
    boolean good1(){
        return 5 >2;
    }
}
4.9 allure支持记录失败重试功能
- 重试功能可以使用 maven surefire 相关的插件命令。
mvn clean test allure:report -Dsurefire.rerunFailingTestsCount=重试次数
**重试次数=3,则一共会执行失败用例4次。
- 重试的结果信息,会展示在详情页面的”Retries” 选项卡中。
4.10 allure报告添加附件@Attachment
4.10.1 常用附件类型配置
TEXT = ("text/plain", "txt")
CSV = ("text/csv", "csv")
TSV = ("text/tab-separated-values", "tsv")
URI_LIST = ("text/uri-list", "uri")

HTML = ("text/html", "html")
XML = ("application/xml", "xml")
JSON = ("application/json", "json")
YAML = ("application/yaml", "yaml")
PCAP = ("application/vnd.tcpdump.pcap", "pcap")

PNG = ("image/png", "png")
JPG = ("image/jpg", "jpg")
SVG = ("image/svg-xml", "svg")
GIF = ("image/gif", "gif")
BMP = ("image/bmp", "bmp")
TIFF = ("image/tiff", "tiff")

MP4 = ("video/mp4", "mp4")
OGG = ("video/ogg", "ogg")
WEBM = ("video/webm", "webm")

PDF = ("application/pdf", "pdf")
4.10.2 添加附件 - 图片
- 应用场景:在做 UI 自动化测试时,可以将页面截图,或者出错的页面进行截图,将截图添加到测试报告中展示,辅助定位问题。
- Allure 支持两种方法:注解方式添加和调用方法添加。
import io.qameta.allure.Allure;
import io.qameta.allure.Attachment;
import org.junit.jupiter.api.DisplayName;
import org.junit.jupiter.api.Test;

import java.io.FileInputStream;
import java.io.IOException;
import java.nio.file.Files;
import java.nio.file.Paths;

import static org.junit.Assert.assertEquals;

@DisplayName("添加附件测试")
public class PicTest {
    @Test
    @DisplayName("注解方式添加图片")
    void picTest() throws IOException {
        byte[] contents = Files.newInputStream(Paths.get("moon.jpeg")).readAllBytes();
        atachPic(contents,"月亮图");

    }

    @Attachment(value="{pngName}", type="image/jpeg",fileExtension ="jpeg" )
    public byte[] atachPic(byte[] contents ,String pngName){
        return contents;
    }


    @Test
    @DisplayName("allure方法添加图片")
    void pictureTest() throws IOException {
        Allure.addAttachment("月亮截图","image/jpeg",
                Files.newInputStream(Paths.get("moon.jpeg")),"jpeg");
    }
}
- 出现裂图的原因以及解决办法
- 图片上传过程中出现了网络中断或者传输过程中出现了错误。
——解决方案:重新上传图片。 - Allure 报告中的图片大小超过了 Allure 的限制。
——解决方案:调整图片大小,在allure.propertites文件配置。 - 图片本身存在问题。
——解决方案:检查图片格式和文件本身。
- 图片上传过程中出现了网络中断或者传输过程中出现了错误。
4.10.3 添加附件 - 日志
- 应用场景:报告中添加详细的日志信息,有助于分析定位问题。
- Allure 支持两种方法:
- 注解方式添加。 (包括 String类型添加 和 byte类型添加 )
- 调用方法添加。 (包括 String类型添加 和 InputStream类型添加 )
import io.qameta.allure.Allure;
import io.qameta.allure.Attachment;
import org.junit.jupiter.api.DisplayName;
import org.junit.jupiter.api.Test;

import java.io.*;
import java.nio.file.Files;
import java.nio.file.Paths;

@DisplayName("添加附件 - 日志文件测试")
public class LogDemoTest {

    @DisplayName("注解添加文本 - String类型")
    @Test
    public void testAllureWithTxtAttachment() throws IOException {
        File file = new File("message.txt");
        BufferedReader bufferedReader = new BufferedReader(new FileReader(file));
        StringBuilder sb = new StringBuilder();
        String line;
        while((line= bufferedReader.readLine()) != null){
            sb.append(line);
            sb.append(System.lineSeparator());
        }
        attachTxtFile(sb.toString(),"String类型添加文本");
        System.out.println(sb.toString());
    }

    @Attachment(value = "{fileNames}", type = "text/plain")
    public static String attachTxtFile(String txtContent,String fileNames) {
        return txtContent;
    }

    @DisplayName("注解添加文本 - byte[]类型")
    @Test
    public void testAllureWithByte() throws IOException {
        byte[] contents = Files.readAllBytes(Paths.get("message.txt"));
        attachTxtByte(contents,"byte数组添加文本");
    }

    @Attachment(value = "{fileNames}", type = "text/plain")
    public static byte[] attachTxtByte(byte[] contents,String fileNames) {
        return contents;
    }

    @DisplayName("方法添加文本 - String类型")
    @Test
    public void testAllureWithMethod() throws IOException {
        File file = new File("message.txt");
        BufferedReader bufferedReader = new BufferedReader(new FileReader(file));
        StringBuilder sb = new StringBuilder();
        String line;
        while((line= bufferedReader.readLine()) != null){
            sb.append(line);
            sb.append(System.lineSeparator());
        }
        Allure.addAttachment("方法添加String文本","text/plain",sb.toString(),".txt");
    }

    @DisplayName("方法添加文本 - stream流文本")
    @Test
    public void testAllureWithStream() throws IOException {
        Allure.addAttachment("方法添加stream流文本","text/plain",Files.newInputStream(Paths.get("message.txt")),".txt");
    }
}
4.10.4 添加附件 - html
- 应用场景:可以定制测试报告页面效果,可以将 HTML 类型的附件显示在报告页面上
- Allure 支持两种方法:注解添加和方法添加
import io.qameta.allure.Allure;
import org.junit.jupiter.api.DisplayName;
import org.junit.jupiter.api.Test;

import java.io.BufferedReader;
import java.io.File;
import java.io.FileReader;
import java.io.IOException;
import java.nio.file.Files;
import java.nio.file.Paths;

public class HtmlTest {

    @DisplayName("注解添加html")
    @Test
    public void testAllureWithHtmlAttachment() throws IOException {
        File file = new File("test.html");
        BufferedReader bufferedReader = new BufferedReader(new FileReader(file));
        StringBuilder sb = new StringBuilder();
        String line;
        while((line= bufferedReader.readLine()) != null){
            sb.append(line);
            sb.append(System.lineSeparator());
        }
        attachHtmlFile(sb.toString(),"注解添加html文本");
        System.out.println(sb.toString());
    }

    @Attachment(value = "{htmlName}", type = "text/html")
    private String attachHtmlFile(String contents, String htmlName) {
        return contents;
    }


    @DisplayName("方法添加html")
    @Test
    public void testAllureWithHtml() throws IOException {
        Allure.addAttachment("方法添加html文本","text/html", Files.newInputStream(Paths.get("test.html")),".html");
    }

}
4.10.5 添加附件 - 视频
- 应用场景:在做 UI 自动化测试时,可以将页面截图,或者出错的页面进行截图,将截图添加到测试报告中展示,辅助定位问题。
- Allure 支持两种方法:注解添加和方法添加
import io.qameta.allure.Allure;
import io.qameta.allure.Attachment;
import org.junit.jupiter.api.DisplayName;
import org.junit.jupiter.api.Test;

import java.io.IOException;
import java.nio.file.Files;
import java.nio.file.Paths;

public class Mp4Test {

    @DisplayName("注解上传MP4视频")
    @Test
    public void testMp4() throws IOException {
        byte[] contents = Files.newInputStream(Paths.get("allure.mp4")).readAllBytes();
        attachMp4File(contents,"allure报告录制");
    }

    @Attachment(value = "{mp4Names}", type = "video/mp4")
    public static byte[] attachMp4File(byte[] contents,String mp4Names) {
        return contents;
    }


    @DisplayName("方法上传MP4视频")
    @Test
    public void testMp4WithMethod() throws IOException {
        Allure.addAttachment("方法上传视频","video/mp4",Files.newInputStream(Paths.get("allure.mp4")),".mp4");
    }
}
五,Allure报告定制
- 应用场景:针对不同的项目可能需要对测试报告展示的效果进行定制,比如修改页面的 logo、修改项目的标题或者添加一些定制的功能等等。
5.1 修改页面logo
5.1.1 修改当前项目的页面logo
-
在当前项目的.allure文件夹下,修改
allure.yml文件,添加 logo 插件custom-logo-plugin
-
找到custom-logo-plugin插件,在static文件夹下放入需要替换的logo图片,然后修改style.css文件为下面内容即可(这种修改方式只针对mvn命令生成的报告才会更改,非mvn命令的报告不会变)

.side-nav__brand {
  background: url("cat.jpeg") no-repeat left center !important;
  margin-left: 10px;
  height: 40px;
  background-size: contain !important;
}
5.1.2 修改全局的页面logo
-
使用where allure /which allure命令查看allure安装路径
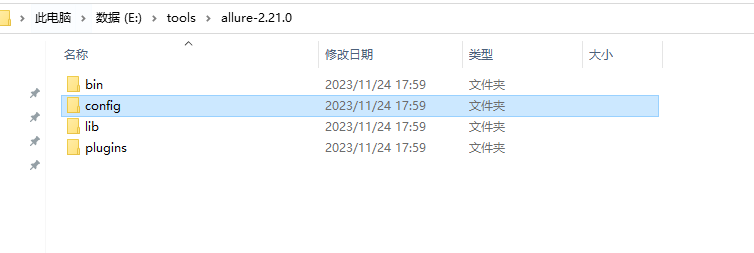
-
在该目录下进行修改logo,修改步骤同上(这里的修改mvn和allure命令都会生效)
5.1 修改页面标题
- 编辑 styles.css 文件(路径同上),添加修改标题对应的代码。
/* 去掉图片后边 allure 文本 */
.side-nav__brand-text {
  display: none;
}

/* 设置logo 后面的字体样式与字体大小 */
.side-nav__brand:after {
  content: "霍格沃兹学社";
  margin-left: 18px;
  height: 20px;
  font-family: Arial;
  font-size: 13px;
}
