一,Junit5测试套件@Suite
-
JUnit5通过@Suite注解使用套件 - 不需要再声明
@RunWith(JUnitPlatform.class) - 如果项目是从
Junit4进行迁移,仍然需要@RunWith(JUnitPlatform.class)
1.1 对应依赖导入
    <dependency>
        <groupId>org.junit.platform</groupId>
        <artifactId>junit-platform-suite</artifactId>
       <version>1.8.2</version>
        <scope>test</scope>
    </dependency>
1.2 Suite注解说明

1.3 代码示例
对应的测试包和测试类:
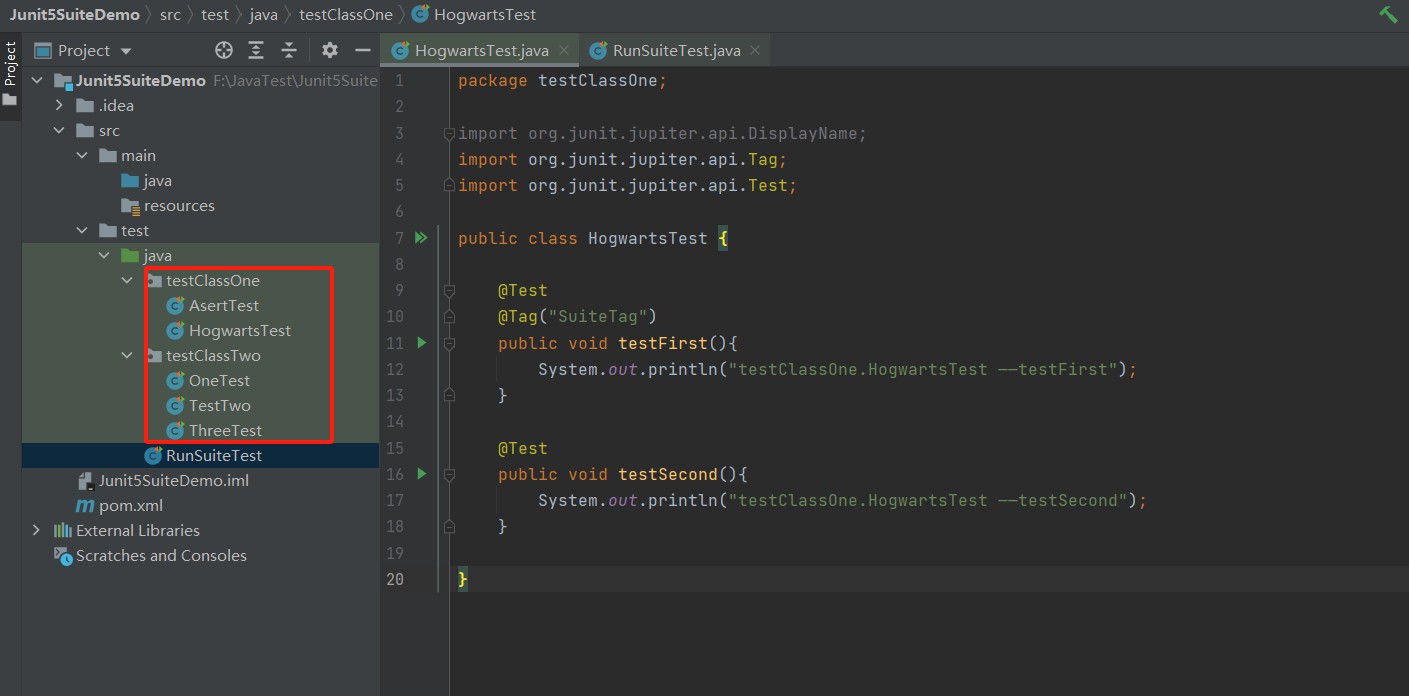
测试套件:
import org.junit.platform.suite.api.*;

//Suite基本注解
@Suite
@SuiteDisplayName("Test Suite测试套件")                //自定义Suite套件的显示名称
//@SelectClasses(AsertTest.class)                    //选择需要执行的单个测试类
//@SelectClasses({OneTest.class, TwoTest.class})     //可以选择多个测试类,参数类型为集合{}
//@SelectPackages("testClassOne")                    //选择需要执行的测试包,参数类型为String
@SelectPackages({"testClassOne","testClassTwo"})     //可以选择多个测试包,参数类型为集合{}
//@IncludePackages("testClassOne")                   //必须和SelectPackages结合使用,并且满足SelectPackages条件的包名才能执行
//@ExcludePackages("testClassOne")                   //满足SelectPackages条件的包名,然后过滤ExcludePackages中的包名
//@IncludeClassNamePatterns({"testClassOne.*","testClassTwo.*Test"})      //满足SelectPackages条件的包名,对应正则表达式匹配的class测试类执行
//@ExcludeClassNamePatterns("testClassTwo.*Test")      //满足SelectPackages条件的包名,对应正则表达式匹配的class测试类不被执行
//@IncludeTags({"SuiteTag","SuiteTag1"})                 //满足SelectPackages条件的包名,包含对应标签的测试类被执行
@ExcludeTags("SuiteTag")                               //满足SelectPackages条件的包名,包含对应标签的测试类不被执行


public class RunSuiteTest {

}
二,多断言处理
2.1 集中断言使用方式
- 拆开多个测试方法,每个测试方法进行一个断言。(会造成大量重复代码,此方案被否)
- 使用assertAll软断言,即使一个断言失败,仍会进行进行余下的断言,然后统一输出所有断言结果。
- 声明
ArrayList<Executable>进行集中断言
2.2 代码示例
import org.junit.jupiter.api.Test;
import org.junit.jupiter.api.function.Executable;
import java.util.ArrayList;
import static org.junit.jupiter.api.Assertions.assertAll;
import static org.junit.jupiter.api.Assertions.assertEquals;

public class AssertListTest {

    @Test
    void addTest(){
        assertAll(
                () ->assertEquals(9,2+7),
                () ->assertEquals(3,2+1));
    }

    @Test
    void listTest(){
        //声明ArrayList<Executable>进行断言
        ArrayList<Executable> arr = new ArrayList<>();
        for(int i=0; i<5; i++){
            int res = 1 + i;
            arr.add(
                    //将中间结果保存到list中,以备后面统一断言
                    () -> assertEquals(3, res));

        }
        assertAll(arr.stream());
    }
}
三,高级断言hamcrest
3.1 导入依赖
<dependency>
    <groupId>org.hamcrest</groupId>
    <artifactId>hamcrest</artifactId>
    <version>2.2</version>
    <scope>test</scope>
</dependency>
3.2 常用断言匹配
package hamcrestDemo;

import org.junit.jupiter.api.Test;

import java.util.ArrayList;
import java.util.Arrays;
import java.util.List;
import static org.hamcrest.MatcherAssert.assertThat;
import static org.hamcrest.Matchers.*;
import static org.hamcrest.Matchers.hasItems;

public class HamcrestDemoTest {

    // is(T):将一个对象作为参数来检查相等性
    // is(Matcher<T>): 使用另一个匹配器,使相等性语句更具表现力
    @Test
    void IsForMatch(){
        String str = "hamcrest core Is match";
        assertThat(str,is("hamcrest core Is match"));
        assertThat(str,is(equalTo("hamcrest core Is match")));
    }

    //equalTo(T): 将一个对象作为参数并检查其与另一个对象的相等性
    //经常与 is(Matcher<T>) 一起使用
    @Test
    void EuqalToMatch(){
        String str = "equalTo match";
        List<String> list = Arrays.asList("equalTo","match");
        Object obj = 100;

        assertThat(str,equalTo("equalTo match"));
        assertThat(str,is(equalTo(list)));
        assertThat(obj,equalToObject(100));
        assertThat(str,equalToObject("equalTo match"));
    }

    //not(T): 接受一个对象作为参数,检查给定对象的不相等性
    //not(Matcher<T>): 接受另一个匹配器
    @Test
    void notForMatch(){
        String str = "hamcrest core not match";
        assertThat(str,not("hamcrest other match"));
        assertThat(str,not(equalToObject("hamcrest other match")));
        assertThat(str,is(not(instanceOf(Integer.class))));
    }

    //hasItem(T)/hasItem(Matcher<? extends T>) : 检查参数是否与给定对象或匹配器匹配,是否包含
    //使用hasItems也可以对多个项目进行断言,其中一个包含,则为true
    @Test
    void HasItemMatch(){
        List<String> list = Arrays.asList("java", "hamcrest", "JUnit5");
        assertThat(list,hasItem("java"));
        assertThat(list, hasItem(isA(String.class)));
        assertThat(list, hasItems("java","JUnit5"));
        assertThat(list, hasItems(isA(String.class),endsWith("est")));

    }

    //allOf(Matcher<? extends T>…): 断言实际对象是否与所有指定条件匹配
    @Test
    void AllOfForMatch(){
        String testString = "Achilles is powerful";
        assertThat(testString, allOf(
                startsWith("Achi"), endsWith("ul"), containsString("Achilles")));

    }

    //anyOf(Matcher<? extends T>…): 检查的对象匹配任何指定的条件,则匹配
    @Test
    void AnyOfForMatch(){
        String testString2 = "Hector killed Achilles";
        assertThat(testString2, anyOf(startsWith("Heca"), containsString("killed")));
    }

    //both(Matcher<? extends T>):和 and 配合使用,两个指定条件都匹配检查对象时匹配
    @Test
    void BothForMatch(){
        String str = "daenerys targaryen";
        assertThat(str,both(startsWith("dae")).and(endsWith("yen")));
    }

    //either(Matcher<? extends T>):和 or 配合使用,任一指定条件与检查对象匹配时匹配
    @Test
    void UsingBothForMatch(){
        String testString = "daenerys targaryen";
        assertThat(testString, either(startsWith("tar")).or(containsString("targaryen")));

    }

}
四,yaml数据驱动
-
使用Jackson读取yaml文件数据
-
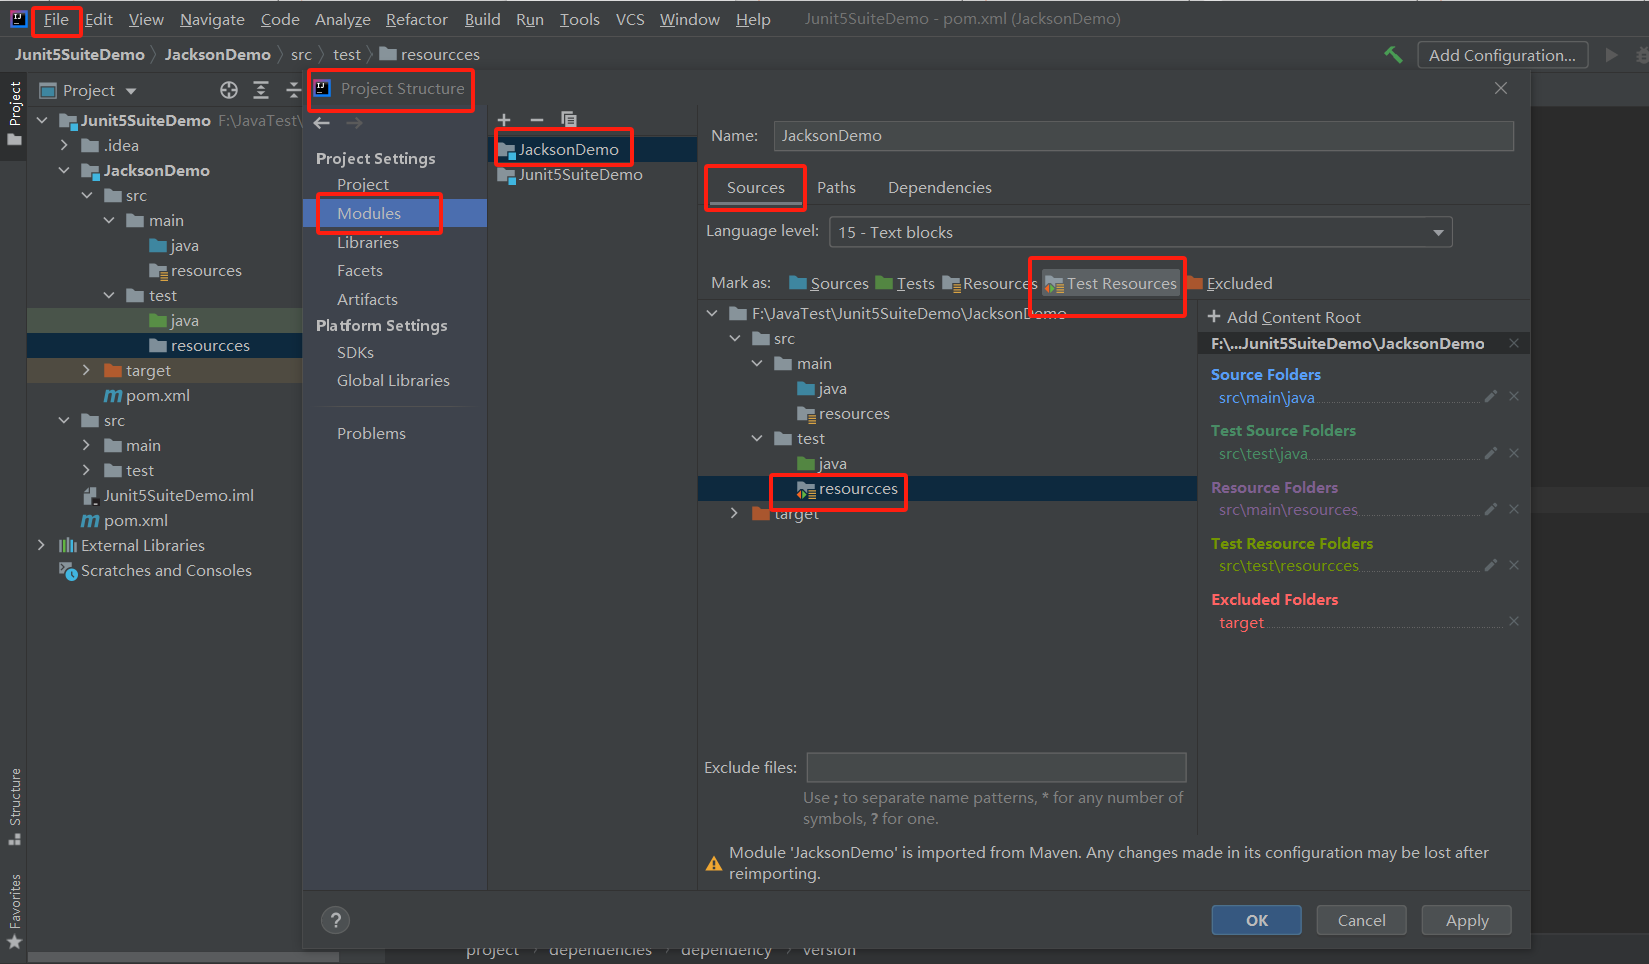
yaml文件存放目录:src/test/resources目录下面,
resources目录配置:点击file - 选择Project Structure - 选择Modules - 右边选择你需要修改的模块名称,在sources栏下面找到新建的resources目录,然后点击Test Resources,点击保存,目录就设置好了。
4.1 导入maven依赖
<properties>
        <maven.compiler.source>15</maven.compiler.source>
        <maven.compiler.target>15</maven.compiler.target>
        <jackson.version>2.13.1</jackson.version>
    </properties>

    <dependencies>
        <!--yaml文件解析-->
        <dependency>
            <groupId>com.fasterxml.jackson.core</groupId>
            <artifactId>jackson-databind</artifactId>
            <version>${jackson.version}</version>
        </dependency>
        <dependency>
            <groupId>com.fasterxml.jackson.dataformat</groupId>
            <artifactId>jackson-dataformat-yaml</artifactId>
            <version>${jackson.version}</version>
        </dependency>
        <dependency>
            <groupId>com.fasterxml.jackson.datatype</groupId>
            <artifactId>jackson-datatype-jsr310</artifactId>
            <version>${jackson.version}</version>
        </dependency>
    </dependencies>
4.2 直接解析list文件
-
在Resources目录下面新建一个yaml文件 - orderlist.yaml,里面存放的数据类型为list。
-
解析list文件,见下记代码
import com.fasterxml.jackson.core.type.TypeReference;
import com.fasterxml.jackson.databind.ObjectMapper;
import com.fasterxml.jackson.dataformat.yaml.YAMLFactory;
import org.junit.jupiter.api.Test;
import java.io.File;
import java.io.IOException;
import java.math.BigDecimal;
import java.util.HashMap;
import java.util.List;
import static org.hamcrest.MatcherAssert.assertThat;
import static org.hamcrest.Matchers.*;
import static org.junit.jupiter.api.Assertions.assertAll;


public class yamlTest {
    @Test
    public void orderlistTest() throws IOException {
        //创建ObjectMapper对象
        ObjectMapper mapper = new ObjectMapper(new YAMLFactory());
        //获取文件数据类型信息
        TypeReference<List<HashMap<String,Object>>> typeReference = new TypeReference<List<HashMap<String, Object>>>() {
        };
        //读取文件内容
        List<HashMap<String,Object>> hashMaps = mapper.readValue(new File("src/test/resources/orderlist.yaml"),
                typeReference);

//        System.out.println(hashMaps);

        hashMaps.forEach(hashMap ->{
            assertAll(
                    () ->assertThat(hashMap.get("item").toString(), startsWith("No")),
                    () -> assertThat(Integer.parseInt(hashMap.get("quantity").toString()),
                            is(greaterThan(9))),
                    () -> assertThat(new BigDecimal(hashMap.get("unitPrice").toString()),
                            is(closeTo(new BigDecimal(1.0),new BigDecimal(4.00))))
            );
        });

    }
}
4.3 新建一个实体类,来解析文件数据
*使用alt+insert 快捷键批量城市getter和setter方法,以及构造方法(点击Constructors)
- 新建一个实体类,成员变量与yaml的key不一致
(成员变量与yaml的key不一致的情况下,打印的数据key会是实体类重新定义的key)
import com.fasterxml.jackson.annotation.JsonProperty;

import java.math.BigDecimal;
import java.time.LocalDate;

//定义一个实体类,成员变量与yaml的key不一致
@Data
public class OrderList {
    @JsonProperty("item")
    private String items;
    @JsonProperty("quantity")
    private  int number;
    @JsonProperty("unitPrice")
    private BigDecimal price;
    @JsonProperty("orderDate")
    private LocalDate data;

    public OrderList() {
    }

    public OrderList(String items, int number, BigDecimal price, LocalDate data) {
        this.items = items;
        this.number = number;
        this.price = price;
        this.data = data;
    }

    public String getItems() {
        return items;
    }

    public void setItems(String items) {
        this.items = items;
    }

    public int getNumber() {
        return number;
    }

    public void setNumber(int number) {
        this.number = number;
    }

    public BigDecimal getPrice() {
        return price;
    }

    public void setPrice(BigDecimal price) {
        this.price = price;
    }

    public LocalDate getData() {
        return data;
    }

    public void setData(LocalDate data) {
        this.data = data;
    }

    @Override
    public String toString() {
        return "OrderList{" +
                "items='" + items + '\'' +
                ", number=" + number +
                ", price=" + price +
                ", data=" + data +
                '}';
    }

}
- 新建一个实体类,成员变量与yaml的key一致(更推荐使用这种实体类的形式)
import lombok.Data;
import java.math.BigDecimal;
import java.time.LocalDate;

@Data
public class OrderLine {
    private String item;
    private int quantity;
    private BigDecimal unitPrice;
    private LocalDate orderDate;

    public OrderLine() {
    }

    public OrderLine(String item, int quantity, BigDecimal unitPrice, LocalDate orderDate) {
        this.item = item;
        this.quantity = quantity;
        this.unitPrice = unitPrice;
        this.orderDate = orderDate;
    }

    public String getItem() {
        return item;
    }

    public void setItem(String item) {
        this.item = item;
    }

    public int getQuantity() {
        return quantity;
    }

    public void setQuantity(int quantity) {
        this.quantity = quantity;
    }

    public BigDecimal getUnitPrice() {
        return unitPrice;
    }

    public void setUnitPrice(BigDecimal unitPrice) {
        this.unitPrice = unitPrice;
    }

    public LocalDate getOrderDate() {
        return orderDate;
    }

    public void setOrderDate(LocalDate orderDate) {
        this.orderDate = orderDate;
    }

    @Override
    public String toString() {
        return "OrderLine{" +
                "item='" + item + '\'' +
                ", quantity=" + quantity +
                ", unitPrice=" + unitPrice +
                ", orderDate=" + orderDate +
                '}';
    }

}
- 通过实体类解析yaml数据
@Test
    void orderListTest() throws IOException {
        ObjectMapper mapper = new ObjectMapper(new YAMLFactory());
        //功能上等价的便捷方法: mapper.registerModules(mapper.findModules());
        //我们需要使用 findAndRegisterModules方法,以便 Jackson正确处理我们的日期,Jackson也可以自动搜索所有模块,不需要我们手动注册
        mapper.findAndRegisterModules();
        //获取数据类型为实体类名OrderList
        TypeReference<List<OrderList>> typeReference = new TypeReference<List<OrderList>>() {
        };
        List<OrderList> mapList = mapper.readValue(new File("src/test/resources/orderlist.yaml"),typeReference);
        System.out.println(mapList);

        mapList.forEach(orderList ->{
            assertAll(
                    () ->assertThat(orderList.getItem(),startsWith("No.")),
                    () ->assertThat(orderList.getQuatity(),is(greaterThan(9))),
                    () ->assertThat(orderList.getUnitPrice(),is(closeTo(new BigDecimal(1.0),new BigDecimal(4.0))))
            );
        });
    }
五,JUnit5结合数据驱动 - excel解析
- 推荐使用Apache POI解析Excel
1,导入依赖
    <!-- https://mvnrepository.com/artifact/org.apache.poi/poi -->
    <dependency>
        <groupId>org.apache.poi</groupId>
        <artifactId>poi</artifactId>
        <version>5.2.2</version>
    </dependency>
    <!-- https://mvnrepository.com/artifact/org.apache.poi/poi-ooxml -->
    <dependency>
        <groupId>org.apache.poi</groupId>
        <artifactId>poi-ooxml</artifactId>
        <version>5.2.2</version>
    </dependency>
2,poi解析
- 获取文件名后缀
- 查看文件是否存在
- 获取工作薄对象
Workbook- 如果是
xls结尾用HSSF - 如果是
xlsx结尾用XSSF - 使用输入流的形式打开文件获取工作薄对象
- 直接使用file打开文件获取工作薄对象
- 如果是
- 读取第一个
sheet - 获取行
- 读取每一行的单元格内容
- 最后关闭流
import org.apache.poi.hssf.usermodel.HSSFWorkbook;
import org.apache.poi.ss.usermodel.*;
import org.apache.poi.xssf.usermodel.XSSFWorkbook;
import org.junit.jupiter.api.Test;
import java.io.File;
import java.io.FileInputStream;
import java.text.SimpleDateFormat;
import java.util.ArrayList;
import java.util.HashMap;
import java.util.List;
import java.util.Map;

import static org.hamcrest.MatcherAssert.assertThat;
import static org.hamcrest.Matchers.anyOf;
import static org.hamcrest.Matchers.endsWithIgnoringCase;
import static org.junit.jupiter.api.Assertions.assertTrue;

public class PoiDemoTest {

    @Test
    void poiTest(){
        try  {
            //1,获取文件名后缀
            String pathname = "src/test/resources/order.xls";
            String excelType = pathname.substring(pathname.lastIndexOf(".") + 1, pathname.length());
            //判断文件后缀是否正确
            assertThat("文件不是excel文件", excelType, anyOf(endsWithIgnoringCase("xls"), endsWithIgnoringCase("xlsx")));
            //2,判断文件是否存在
            File file = new File(pathname);
            assertTrue(file.exists(),"文件excel不存在!");

            //3,获取文件Workbook
            FileInputStream fileInputStream = new FileInputStream(file);
            Workbook workbook = null;
            //xls结尾的文件用HSSF,xlsx结尾的用XSSF
            if (excelType.equalsIgnoreCase("xls")) {
                workbook = new HSSFWorkbook(fileInputStream);
            } else if(excelType.equalsIgnoreCase("xlsx")){
                workbook = new XSSFWorkbook(fileInputStream);
            }
            //获取当前工作簿有多少个sheet表格
            int numberOfSheets = workbook.getNumberOfSheets();
            //4,读取第一个sheet表格,对应sheet是从0开始
            Sheet sheet = workbook.getSheetAt(0);
            //获取当前sheet有多少行
            int numberOfRows = sheet.getPhysicalNumberOfRows();
            //一个sheet对应的数据结构对象map<行号,行的内容>
            Map<Integer, List<Object>> data = new HashMap<>();
            //5,读取每一行的数据
            //行号
            int i=0;
            for(Row row :sheet){
                //把每行的数据添加到列表里
                data.put(i,new ArrayList<>());
//                System.out.println(row);    //打印读取到的是行的对象,而非对象内容
                //每一行是row,是一个list,获取一行有多少个单元格
                int numberOfCells = row.getPhysicalNumberOfCells();
//                System.out.println("每行有多少个单元格:"+ numberOfCells );
                //每行的每个单元格是cell
                for(Cell c:row){
//                    System.out.println(c);          //打印每一行每一个单元格的数据内容
                    List<Object> list = data.get(i);
                    //单元格类型枚举值为STRING时,将使用Cell接口的getRichStringCellValue()方法读取内容:
                    //文本格式的内容读取
                    switch(c.getCellType()){
                        case STRING:
//                            String string = c.getRichStringCellValue().getString();
//                            list.add(string);
                            list.add(c.getRichStringCellValue().getString());
                            break;
                            //NUMERIC - 数字,日期
                        case NUMERIC:
                            if(DateUtil.isCellDateFormatted(c)) {
                                //日期型以年-月-日格式存储
                                SimpleDateFormat fmt = new SimpleDateFormat("yyyy-MM-dd");
                                list.add(fmt.format(c.getDateCellValue()));
                            }else{
                                list.add(c.getNumericCellValue());
                            }
                            break;
                        case BOOLEAN:
                            list.add(c.getBooleanCellValue());
                            break;
                        case FORMULA:
                            list.add(c.getCellFormula());

                            break;
                        default:
                            list.add(" ");
                    }
                }
                i++;
            }
            System.out.println("data : "+ data);
            //关闭流
            workbook.close();

        }catch(Exception e){
            e.printStackTrace();
        }
    }
}
六,JUnit5结合数据驱动 - csv解析
1,pom依赖导入
<properties>
        <maven.compiler.source>11</maven.compiler.source>
        <maven.compiler.target>11</maven.compiler.target>
        <jackson.version>2.13.1</jackson.version>
    </properties>

<dependency>
    <groupId>com.fasterxml.jackson.dataformat</groupId>
    <artifactId>jackson-dataformat-csv</artifactId>
    <version>${jackson.version}</version>
</dependency>

<dependency>
    <groupId>com.fasterxml.jackson.datatype</groupId>
    <artifactId>jackson-datatype-jsr310</artifactId>
    <version>${jackson.version}</version>
</dependency>
2,解析csv文件
import com.fasterxml.jackson.databind.MappingIterator;
import com.fasterxml.jackson.dataformat.csv.CsvMapper;
import com.fasterxml.jackson.dataformat.csv.CsvSchema;
import org.junit.jupiter.api.Order;
import org.junit.jupiter.api.Test;

import java.io.File;
import java.io.IOException;

public class CsvDemoTest {
    //带header的csv文件解析
    @Test
    void csvReadHeader() throws IOException {
        //带着header读取(会把item等列名一并读取出来)
        CsvSchema columns = CsvSchema.emptySchema().withHeader();
        CsvMapper csvMapper = new CsvMapper();
        //功能上等价的便捷方法: mapper.registerModules(mapper.findModules());
        //我们需要使用 findAndRegisterModules方法,以便 Jackson正确处理我们的日期,不加的话解析日期会报错
        csvMapper.findAndRegisterModules();
        //成员变量与header名一致的情况下读取
        MappingIterator<OrderLine> orderLines = csvMapper.readerFor(OrderLine.class).
                with(columns).readValues(new File("src/test/resources/csv/orderLine.csv"));
        System.out.println(orderLines.readAll());
        //打印结果:[OrderLine{item='No. 9 Sprockets', quantity=12, unitPrice=1.23, orderDate=2019-04-17}, OrderLine{item='No. Widget (10mm)', quantity=10, unitPrice=3.45, orderDate=2022-01-16}]

        //成员变量与header名不一致的情况下读取
        MappingIterator<OrderList> orderList = csvMapper.readerFor(OrderList.class).
                with(columns).readValues(new File("src/test/resources/csv/orderList.csv"));
        System.out.println(orderList.readAll());
        //打印结果:[OrderList{items='No. 9 Sprockets', number=12, price=1.23, data=2019-04-17}, OrderList{items='No. Widget (10mm)', number=10, price=3.45, data=2022-01-16}]
    }


    //跳过header,readerForMapOf直接声明类型解析
    @Test
    void csvReadWithoutHeader() throws IOException {
        //第一行header不解析,自行加上列名
        CsvSchema schema = CsvSchema.builder().setSkipFirstDataRow(true)
                .addColumn("item",CsvSchema.ColumnType.STRING)
                .addColumn("quantity",CsvSchema.ColumnType.NUMBER)
                .addColumn("unitPrice",CsvSchema.ColumnType.NUMBER)
                .addColumn("orderDate",CsvSchema.ColumnType.STRING)
                .build();
        CsvMapper csvMapper = new CsvMapper();
        MappingIterator<Object> orderLineMappingIterator = csvMapper.readerForMapOf(String.class)
                .with(schema)
                .readValues(new File("src/test/resources/csv/orderLine.csv"));
        System.out.println(orderLineMappingIterator.readAll());
        //打印数据结果:[{item=No. 9 Sprockets, quantity=12, unitPrice=1.23, orderDate=2019-04-17}, {item=No. Widget (10mm), quantity=10, unitPrice=3.45, orderDate=2022-01-16}]
    }


    //没有header的csv文件解析
    @Test
    void csvReadNoHeader() throws IOException {
        CsvSchema schema = new CsvSchema.Builder()
                .addColumn("item")
                .addColumn("quantity")
                .addColumn("unitPrice")
                .addColumn("orderDate")
                .build();

        CsvMapper csvMapper = new CsvMapper();
        csvMapper.findAndRegisterModules();
        //成员变量与header名一致的情况下读取
        MappingIterator<Object> mappingIterator = csvMapper.readerFor(OrderLine.class)
                .with(schema)
                .readValues(new File("src/test/resources/csv/data.csv"));
        System.out.println(mappingIterator.readAll());
        //打印结果:[OrderLine{item='No. 9 Sprockets', quantity=12, unitPrice=1.23, orderDate=2019-04-17}, OrderLine{item='No. Widget (10mm)', quantity=10, unitPrice=13.45, orderDate=2022-01-16}]

        //成员变量与header名一致的情况下读取
        MappingIterator<Object> mappingIterator1 = csvMapper.readerFor(OrderList.class)
                .with(schema)
                .readValues(new File("src/test/resources/csv/data.csv"));
        System.out.println(mappingIterator1.readAll());
        //打印结果:[OrderList{items='No. 9 Sprockets', number=12, price=1.23, data=2019-04-17}, OrderList{items='No. Widget (10mm)', number=10, price=13.45, data=2022-01-16}]

        //readerForMapOf 直接声明类型解析
        MappingIterator<Object> mappingIterator2 = csvMapper.readerForMapOf(String.class)
                .with(schema)
                .readValues(new File("src/test/resources/csv/data.csv"));
        System.out.println(mappingIterator2.readAll());
        //打印结果:[{item=No. 9 Sprockets, quantity=12, unitPrice=1.23, orderDate=2019-04-17}, {item=No. Widget (10mm), quantity=10, unitPrice=13.45, orderDate=2022-01-16}]
    }
}
七,JUnit5结合数据驱动 - json文件解析
1,pom文件依赖导入
<dependency>
    <groupId>com.fasterxml.jackson.core</groupId>
    <artifactId>jackson-databind</artifactId>
    <version>${jackson.version}</version>
</dependency>
2,示例代码
import com.fasterxml.jackson.core.JsonFactory;
import com.fasterxml.jackson.core.JsonProcessingException;
import com.fasterxml.jackson.core.type.TypeReference;
import com.fasterxml.jackson.databind.ObjectMapper;
import org.apache.poi.ss.formula.functions.T;
import org.aspectj.weaver.ast.Or;
import org.junit.jupiter.api.Test;

import java.io.File;
import java.io.IOException;
import java.util.HashMap;
import java.util.List;

public class JsonDemoTest {
    //1,直接声明类型,解析list类型的json文件
    @Test
    void orderMap() throws IOException {
        ObjectMapper mapper = new ObjectMapper(new JsonFactory());
        TypeReference<List<HashMap<String,Object>>> typeReference = new TypeReference<List<HashMap<String, Object>>>() { };
        List<HashMap<String,Object>> hashMapList = mapper.readValue(new File("src/test/resources/order.json"),typeReference);
        System.out.println(hashMapList.toString());
        //打印结果:[{unitPrice=1.23, item=No. 9 Sprockets, quantity=12, orderDate=2019-04-17}, {unitPrice=3.45, item=No. Widget (10mm), quantity=10, orderDate=2022-01-16}]
    }

    //2,声明实体类,解析list类型的json文件
    @Test
    void OrderLineData() throws IOException {
        ObjectMapper mapper = new ObjectMapper(new JsonFactory());
        mapper.findAndRegisterModules();
        TypeReference<List<OrderLine>> typeReference = new TypeReference<List<OrderLine>>() { };
        List<OrderLine> orderLines = mapper.readValue(new File("src/test/resources/order.json"),typeReference);
        System.out.println(orderLines);
        //打印结果:[OrderLine{item='No. 9 Sprockets', quantity=12, unitPrice=1.23, orderDate=2019-04-17}, OrderLine{item='No. Widget (10mm)', quantity=10, unitPrice=3.45, orderDate=2022-01-16}]
    }

    // 3,解析一个HashMap的json文件数据
    @Test
    void listJson() throws IOException {
        //直接声明类型
        ObjectMapper mapper = new ObjectMapper(new JsonFactory());
        TypeReference<HashMap<String,Object>> typeReference = new TypeReference<HashMap<String, Object>>() { };
        HashMap<String,Object> objectHashMap = mapper.readValue(new File("src/test/resources/list.json"),typeReference);
        System.out.println(objectHashMap);
        //打印结果:{date=2019-04-17, orderNo=A001, orderLines=[{item=No. 9 Sprockets, quantity=12, unitPrice=1.23}, {item=No. Widget (10mm), quantity=40, unitPrice=3.45}], customerName=Customer, Joe}

        //声明一个实体类Order,解析json文件
        TypeReference<Order> typeReference1 = new TypeReference<Order>() { };
        mapper.findAndRegisterModules();
        Order order = mapper.readValue(new File("src/test/resources/list.json"),typeReference1);
        System.out.println(order);
        //打印结果:Order{orderNo='A001', date=2019-04-17, customerName='Customer, Joe', orderLines=[OrderLine{item='No. 9 Sprockets', quantity=12, unitPrice=1.23, orderDate=null}, OrderLine{item='No. Widget (10mm)', quantity=40, unitPrice=3.45, orderDate=null}]}
    }
}
八,Junit5执行并行策略
1,用例准备(同一模块3个测试类)
import org.junit.jupiter.api.RepeatedTest;
import org.junit.jupiter.api.Test;
import org.junit.jupiter.api.parallel.Execution;
import org.junit.jupiter.api.parallel.ExecutionMode;

public class ParallelOneTest {
    @Test()
//    @RepeatedTest()
    @Execution(ExecutionMode.CONCURRENT)
    void test1(){
        String name = Thread.currentThread().getName();    //线程名
        System.out.println(name + " => ParallelOneTest  —— test1");
    }

    @Test
    void test2(){
        String name = Thread.currentThread().getName();
        System.out.println(name + " => ParallelOneTest  —— test2");
    }
    @Test
    void test3(){
        String name = Thread.currentThread().getName();
        System.out.println(name +  " => ParallelOneTest  —— test3");
    }

}
import org.junit.jupiter.api.Test;

public class ParallelTwoTest {
    @Test
    void test01(){
        String name = Thread.currentThread().getName();
        System.out.println(name + " => ParallelTwoTest  —— test01");
    }

    @Test
    void tes02(){
        String name = Thread.currentThread().getName();
        System.out.println(name + " => ParallelTwoTest  —— test02");
    }

    @Test
    void test03(){
        String name = Thread.currentThread().getName();
        System.out.println(name + " => ParallelTwoTest  —— test03");
    }
}
import org.junit.jupiter.api.Test;

public class ParallelThreeTest {
    @Test
    void test001(){
        String name = Thread.currentThread().getName();
        System.out.println(name +  " => ParallelThreeTest  —— test001");
    }

    @Test
    void tes002(){
        String name = Thread.currentThread().getName();
        System.out.println(name + " => ParallelThreeTest  —— test002");
    }

    @Test
    void test003(){
        String name = Thread.currentThread().getName();
        System.out.println(name + " => ParallelThreeTest  —— test003");
    }
}
2,并行配置
-
全局并发配置:
junit.jupiter.execution.parallel.enabled的值设置为true -
局部并发配置:@RepeatedTest和@@Execution(ExecutionMode.CONCURRENT)
-
如果没有并发配置,默认就是主「
main」线程运行。 -
如果要开启并行,则需配置并行测试的
parallel参数。 -
注意:启用此属性只是并行执行测试所需的第一步。
- 如果启用,默认情况下测试类和方法仍将按顺序执行。
-
测试使用ForkJoin线程池
3,配置方式
(1)在JUnit5的配置文件「junit-platform.properties」进行配置 (最简单的方法)
- 在项目的
src/test/resources目录下创建JUnit5的配置文件:junit-platform.properties - 在配置文件加上配置:junit.jupiter.execution.parallel.enabled=true
(2)通过向 maven surefire 插件提供参数
<plugin>
                <groupId>org.apache.maven.plugins</groupId>
                <artifactId>maven-surefire-plugin</artifactId>
                <version>3.0.0-M5</version>
                <configuration>
                    <argLine>
                        -Djunit.jupiter.execution.parallel.enabled=true
                    </argLine>
                </configuration>
            </plugin>
(3)通过向 JVM 提供系统属性
mvn clean test -Djunit.jupiter.execution.parallel.enabled=true
4,并行执行模式
(1)执行模式可以使用以下两种模式:
- SAME_THREAD :强制在父级使用的同一线程中执行(单线程)。
- CONCURRENT :并发执行,除非资源锁强制在同一线程中执行。
- 默认情况下,所有的测试用例中的测试方法使用的是
SAME_THREAD执行模式。
(2)执行模式配置方法
- 使用属性配置,通过设置配置参数
junit.jupiter.execution.parallel.mode.default来更改默认值。在配置文件配置,全局生效。
#是否允许并行执行
junit.jupiter.execution.parallel.enabled=true
#支持方法级别多线程模式 - same_thread/concurrent
junit.jupiter.execution.parallel.mode.default = same_thread
#支持类级别多线程模式  - same_thread/concurrent
junit.jupiter.execution.parallel.mode.classes.default = concurrent
- 使用
@Execution注解单独更改对应的测试类及其子类或者测试方法的执行模式。- 配置文件的配置是全局生效
- 注解是针对具体测试类或测试方法
- 注解的优先级 高于 > 配置文件
 @Test()
    @RepeatedTest(6)     //RepeatedTest表示重复测试执行的次数
    @Execution(ExecutionMode.SAME_THREAD)
    void test1(){
        String name = Thread.currentThread().getName();
        System.out.println(name + " => ParallelOneTest  —— test1");
    }
5,并行策略
-
JUnit提供了两种实现(动态和固定)和一个自定义选项。 -
junit.jupiter.execution.parallel.config.strategy的值设为并行策略配置参数中的一种即可。- 并发策略的配置参数有3种:
dynamic、fixed、custom - 前两种
dynamic和fixed是JUnit平台提供的 开箱即用 的实现。 -
custom策略是通过自定义的模式来配置并行的线程池数量。
- 并发策略的配置参数有3种:
- 如果没有进行策略的相关配置,并行化策略默认为
dynamic
(1)dynamic 动态策略
- 文件配置策略:junit.jupiter.execution.parallel.config.strategy = dynamic
- 并发线程数 = max(1,CPU核数 * factor)
- factor系数设置:
-
dynamic对应的系数配置项为:junit.jupiter.execution.parallel.config.dynamic.factor - 系数默认值为1
-
#是否允许并行执行
junit.jupiter.execution.parallel.enabled=true
#支持方法级别多线程模式 - same_thread/concurrent
junit.jupiter.execution.parallel.mode.default = same_thread
#支持类级别多线程模式  - same_thread/concurrent
junit.jupiter.execution.parallel.mode.classes.default = concurrent

# dynamic 动态策略
junit.jupiter.execution.parallel.config.strategy = dynamic
junit.jupiter.execution.parallel.config.dynamic.factor=1
(2)fixed 固定策略
- 文件配置策略:junit.jupiter.execution.parallel.config.strategy = fixed
- 并发线程数为 设置的
junit.jupiter.execution.parallel.config.fixed.parallelism的value值
junit.jupiter.execution.parallel.config.strategy = fixed
junit.jupiter.execution.parallel.config.fixed.parallelism=3
(3)custom 自定义策略
- 文件配置策略:
junit.jupiter.execution.parallel.config.strategy = custom
junit.jupiter.execution.parallel.config.class=com.ceshiren.MyCustomStrategy
junit.jupiter.execution.parallel.config.custom.parallelism=3
- 通过实现 ParallelExecutionConfigurationStrategy 接口来配置并行的线程池数量。
- 所需的并行数 使用
ParallelExecutionConfigurationStrategy接口实现。
package com.ceshiren;

import org.junit.platform.commons.JUnitException;
import org.junit.platform.engine.ConfigurationParameters;
import org.junit.platform.engine.support.hierarchical.ParallelExecutionConfiguration;
import org.junit.platform.engine.support.hierarchical.ParallelExecutionConfigurationStrategy;

public class MyCustomStrategy implements ParallelExecutionConfigurationStrategy {

    @Override
    public ParallelExecutionConfiguration createConfiguration(ConfigurationParameters configurationParameters) {
        Integer count = configurationParameters.get("custom.parallelism", Integer::valueOf)
                .orElseThrow(() -> {
                    return new JUnitException(String.format("Configuration parameter '%s' must be set", "fixed.parallelism"));
                });
        return new ParallelExecutionConfiguration() {
            @Override
            public int getParallelism() {
                return count;
            }

            @Override
            public int getMinimumRunnable() {
                return count;
            }

            @Override
            public int getMaxPoolSize() {
                return count;
            }

            @Override
            public int getCorePoolSize() {
                return count;
            }

            @Override
            public int getKeepAliveSeconds() {
                return count;
            }
        };
    }
}
6,并行数据同步
- 背景:测试用例串行(即单线程)的时候,每次传值都能正常断言,但是并行时有时候会断言失败,
Unit5以@ResourceLock注解的形式为我们提供了共享资源的同步机制。
@ResourceLock相当于Java代码中的 synchronized 、@Synchronized
@ResourceLock注解为 测试类 和 测试方法 提供声明式同步机制。
@ResourceLock注解有两个参数
     一个是String指定唯一标识共享资源的值,资源值可以是预定义的或用户定义的
     一个是ResourceAccessMode指定访问资源的模式,访问模式可以是 READ 「只读」和 READ_WRITE「读和写」(默认是读写模式)
使用预定义资源
-
Resources.SYSTEM_PROPERTIES表示 Java 的系统属性。 -
Resources.SYSTEM_OUT代表当前进程的标准输出流。 -
Resources.SYSTEM_ERR表示当前进程的标准错误流。 -
Resources.LOCALE当前 JVM 实例的默认语言环境。 -
Resources.TIMEZONE当前 JVM 实例的默认时区。
package reourcesLock;

import org.junit.jupiter.api.Test;
import org.junit.jupiter.api.parallel.Execution;
import org.junit.jupiter.api.parallel.ExecutionMode;
import org.junit.jupiter.api.parallel.ResourceLock;
import org.junit.jupiter.api.parallel.Resources;

import java.util.Properties;

import static org.junit.jupiter.api.Assertions.assertEquals;
import static org.junit.jupiter.api.Assertions.assertNull;
import static org.junit.jupiter.api.parallel.ExecutionMode.CONCURRENT;
import static org.junit.jupiter.api.parallel.ResourceAccessMode.READ;
import static org.junit.jupiter.api.parallel.ResourceAccessMode.READ_WRITE;

@Execution(CONCURRENT)
public class RourcesLockTest {
    Properties properties;

    @BeforeEach
    void before(){
        properties = new Properties(System.getProperties());
    }

    @Test
    @ResourceLock(value= Resources.SYSTEM_PROPERTIES,mode=READ)
    void test1(){
        assertNull(System.getProperty("custom properties"));
    }

    @Test
    @ResourceLock(value= Resources.SYSTEM_PROPERTIES,mode=READ_WRITE)
    void test2(){
        System.setProperty("custom properties","ceshiren");
        assertEquals("ceshiren",System.getProperty("custom properties"));
    }

    @Test
    @ResourceLock(value= Resources.SYSTEM_PROPERTIES,mode=READ_WRITE)
    void test3(){
        System.setProperty("custom properties","hogwarts");
        assertEquals("hogwarts",System.getProperty("custom properties"));
    }
}
使用用户定义的资源值
- 自定义一个资源
package com.ceshiren.user;

import java.util.Collection;
import java.util.HashMap;
import java.util.Map;

public class UserDemo {
    static Map<Integer,String> global_user = new HashMap<>();

    public static String get(int id){
        return global_user.get(id);
    };

    public static void add(int id,String name){
        global_user.put(id,name);
    };

    public static void update(int id,String name){
        global_user.put(id,name);
    };

    public static void remove(int id){
        global_user.remove(id);
    };

    public static void clear(){
        global_user.clear();
    };

    public static Collection<String> getUser(){
        return global_user.values();
    }
}
- 使用自定义资源进行资源共享同步
package reourcesLock;

import com.ceshiren.user.UserDemo;
import org.junit.jupiter.api.BeforeEach;
import org.junit.jupiter.api.Test;
import org.junit.jupiter.api.parallel.Execution;
import org.junit.jupiter.api.parallel.ExecutionMode;
import org.junit.jupiter.api.parallel.ResourceLock;
import org.junit.jupiter.api.parallel.Resources;

import static org.junit.jupiter.api.Assertions.*;
import static org.junit.jupiter.api.parallel.ResourceAccessMode.READ;
import static org.junit.jupiter.api.parallel.ResourceAccessMode.READ_WRITE;

@Execution(ExecutionMode.CONCURRENT)
public class ResourcesLock2Test {
    //这里GLOBALE_USER的值为新增资源的包名+类名+参数名
    public static final String GLOBALE_USER = "com.ceshiren.user.UserDemo.name";

    @BeforeEach
    void before(){
        UserDemo.clear();
    }

    @Test
    @ResourceLock(value= GLOBALE_USER,mode=READ)
    void test01(){
        System.out.println(UserDemo.getUser());
       assertTrue( UserDemo.getUser().isEmpty());
    }

    @Test
    @ResourceLock(value= GLOBALE_USER,mode=READ_WRITE)
    void test02(){
        UserDemo.add(1,"semi");
        System.out.println(UserDemo.getUser());
        assertEquals("semi",UserDemo.get(1));
    }

    @Test
    @ResourceLock(value= GLOBALE_USER,mode=READ_WRITE)
    void test03(){
        UserDemo.add(1,"ceshiren");
        System.out.println(UserDemo.getUser());
        assertEquals("ceshiren",UserDemo.get(1));
    }

    @Test
    @ResourceLock(value= GLOBALE_USER,mode=READ_WRITE)
    void test04(){
        UserDemo.add(2,"hogwarts");
        System.out.println(UserDemo.getUser());
        UserDemo.remove(2);
        System.out.println(UserDemo.getUser());
        assertNull(UserDemo.get(2));
    }
}
