一、requests常见HTTP请求构造方法
| 方法 | 说明 |
|---|---|
| requests.request() | 构造一个请求,支撑以下各方法的基础方法。 |
| requests.get() | 构造 HTTP 协议中的 GET 请求。 |
| requests.post() | 构造 HTTP 协议中的 POST 请求。 |
| requests.put() | 构造 HTTP 协议中的 PUT 请求。 |
| requests.delete() | 构造 HTTP 协议中的 DELETE 请求。 |
底层设计:

1、各构造方法使用
(1) requests.request(method, url, **kwargs)
- method: 请求方法。
-
GET,OPTIONS,HEAD,POST,PUT,PATCH,DELETE。
-
- url: 接口 url。
- **kwargs:更多底层支持的参数。
import requests

def test_request():
    url = "https://litemall.hogwarts.ceshiren.com/wx/auth/login"
    method = "post"
    data = {"username": "user123", "password": "user123"}
    result = requests.request(url=url,json=data,method=method)
    print(result.json())
    print("*" * 20)
    print(type(result.json()))  # <class 'dict'>
    print("*" * 20)
    print(result.text)
    print("*" * 20)
    print(type(result.text))  # <class 'str'>
request源码解读:
- **kwargs:更多底层支持的参数。
- params:
in the query string,简单的说就是get请求的query类型数据参数–携带URL参数; - data:
in the body,post请求放在请求体中的form表单类型数据参数; - json:
in the body,post请求放在请求体中的json类型数据参数; - headers:字典格式请求头信息;
- cookies:致电各式cookie信息;
- files:字典格式上传文件类型参数;
- auth:元组类型的认证信息;
- timeout:元组或者浮点类型的超时时间;
- allow_redirects:是否允许重定向–默认值为True;
- proxies:字典类型的代理信息;
- verify:是否进行ssl安全验证–默认值为True;
- stream::(optional) if
False, the response content will be immediately downloaded; - cert:(optional) if String, path to ssl client cert file (.pem). If Tuple, (‘cert’, ‘key’) pair–请求中携带 ssl 证书;
- params:
def request(method, url, **kwargs):
    """Constructs and sends a :class:`Request <Request>`.

    :param method: method for the new :class:`Request` object: ``GET``, ``OPTIONS``, ``HEAD``, ``POST``, ``PUT``, ``PATCH``, or ``DELETE``.
    :param url: URL for the new :class:`Request` object.
    :param params: (optional) Dictionary, list of tuples or bytes to send
        in the query string for the :class:`Request`.
    :param data: (optional) Dictionary, list of tuples, bytes, or file-like
        object to send in the body of the :class:`Request`.
    :param json: (optional) A JSON serializable Python object to send in the body of the :class:`Request`.
    :param headers: (optional) Dictionary of HTTP Headers to send with the :class:`Request`.
    :param cookies: (optional) Dict or CookieJar object to send with the :class:`Request`.
    :param files: (optional) Dictionary of ``'name': file-like-objects`` (or ``{'name': file-tuple}``) for multipart encoding upload.
        ``file-tuple`` can be a 2-tuple ``('filename', fileobj)``, 3-tuple ``('filename', fileobj, 'content_type')``
        or a 4-tuple ``('filename', fileobj, 'content_type', custom_headers)``, where ``'content-type'`` is a string
        defining the content type of the given file and ``custom_headers`` a dict-like object containing additional headers
        to add for the file.
    :param auth: (optional) Auth tuple to enable Basic/Digest/Custom HTTP Auth.
    :param timeout: (optional) How many seconds to wait for the server to send data
        before giving up, as a float, or a :ref:`(connect timeout, read
        timeout) <timeouts>` tuple.
    :type timeout: float or tuple
    :param allow_redirects: (optional) Boolean. Enable/disable GET/OPTIONS/POST/PUT/PATCH/DELETE/HEAD redirection. Defaults to ``True``.
    :type allow_redirects: bool
    :param proxies: (optional) Dictionary mapping protocol to the URL of the proxy.
    :param verify: (optional) Either a boolean, in which case it controls whether we verify
            the server's TLS certificate, or a string, in which case it must be a path
            to a CA bundle to use. Defaults to ``True``.
    :param stream: (optional) if ``False``, the response content will be immediately downloaded.
    :param cert: (optional) if String, path to ssl client cert file (.pem). If Tuple, ('cert', 'key') pair.
    :return: :class:`Response <Response>` object
    :rtype: requests.Response
(2)requests.get(url, params=None, **kwargs)
- url: 接口 url。
- params:拼接在 url 中的请求参数–字典格式。
- **kwargs:更多底层支持的参数。
import requests

def test_get():
    url = "https://httpbin.ceshiren.com/get"
    params = {
        "get_key": "get_value"
    }
    # 由于https认证的问题导致抛出SSLError异常,所以传入参数verify=False使服务器不用验证SSL的证书验证;
    result = requests.get(url,params=params,verify=False)
    print(result.json())
(3) requests.post(url, data=None, json=None, **kwargs)
- url: 接口 url。
- data:表单格式请求体–字典格式。
- json:JSON 格式请求体-参数放在请求体中传递。
- **kwargs:更多底层支持的参数。
def test_post_data():
    # post请求使用data发送form表单数据格式参数
    url = "https://litemall.hogwarts.ceshiren.com/wx/auth/login"
    data = {"username": "user123", "password": "user123"}
    result = requests.post(url,data=data,verify=False)
    print(result.json())

def test_post_json():
    # 使用json发送json数据格式参数
    url = "https://litemall.hogwarts.ceshiren.com/wx/auth/login"
    data = {"username": "user123", "password": "user123"}
    result = requests.post(url,json=data,verify=False)
    print(result.json())
(4) requests.put(url, data=None, **kwargs)
- url: 接口 url。
- data:表单格式请求体–字典格式。
(optional) Dictionary, list of tuples, bytes, or file-like object to send in the body of the :class:Request - json:JSON格式请求体。
(optional) A JSON serializable Python object to send in the body of the :class:Request.:param \*\*kwargs: Optional arguments that request takes. - **kwargs:更多底层支持的参数。
def test_put():
    url = "https://httpbin.ceshiren.com/put"
    result = requests.put(url,verify=False)
    print(result.json())
(5) requests.delete(url, **kwargs)
- url: 接口 url。
- **kwargs:更多底层支持的参数。
def test_delete():
    url = "https://httpbin.ceshiren.com/delete"
    result = requests.delete(url,verify=False)
    print(result.json())
2、请求头信息构造
| 内容 | 含义 |
|---|---|
| Authorization | 表示客户端请求的身份验证信息 |
| Cookie | 表示客户端的状态信息,通常用于身份验证和会话管理 |
| Content-Type | 表示请求消息体的 MIME 类型 |
| User-Agent | 发送请求的客户端软件信息 |
3、请求体信息构造
| 类型 | 介绍 | Content-type |
|---|---|---|
| JSON(JavaScript Object Notation) | 轻量级的数据交换格式,最常见的一种类型。 | application/json |
| 表单数据(Form Data) | 以键值对的形式提交数据,例如通过 HTML 表单提交数据。 | application/x-www-form-urlencoded |
| XML(eXtensible Markup Language) | 常用的标记语言,通常用于传递配置文件等数据。 | application/xml或者text/xml |
| 文件(File) | 可以通过请求体上传文件数据,例如上传图片、视频等文件。 | 上传文件的 MIME 类型,例如 image/jpeg或者multipart/form-data |
| 纯文本(Text) | 纯文本数据,例如发送邮件、发送短信等场景 | text/plain |
| 其他格式 | 二进制数据、protobuf 等格式 |
4、响应结果类型
| 属性 | 含义 |
|---|---|
| response | 响应 Response 对象(通过发送请求得到的返回值) |
| response.status_code | HTTP 响应状态码 |
| response.headers | 返回一个字典,包含响应头的所有信息。 |
| response.text | 返回响应的内容,是一个字符串。 |
| response.url | 编码之后的请求的 url |
| response.content | 返回响应的内容,是一个字节流。 |
| response.raw | 响应的原始内容 |
| response.json() | 如果响应的内容是 JSON 格式,可以使用该方法将其解析成 Python字典 对象。 |
5、响应结果断言
-
为什么要断言响应体内容:验证API接口的返回结果是否符合预期。
- 业务场景上是否符合预期。
- 格式是否符合文档规范。
-
JSON 格式响应体内容断言:
- 多层嵌套的数据提取与断言: JSONPath;
- 整体结构响应断言: JSONSchema;
- 自行编写解析算法;
6、脚本优化-添加日志
log_urils.py
# 配置日志
import logging
import os

from logging.handlers import RotatingFileHandler

# 绑定绑定句柄到logger对象
logger = logging.getLogger(__name__)
# 获取当前工具文件所在的路径
root_path = os.path.dirname(os.path.abspath(__file__))
# 拼接当前要输出日志的路径
log_dir_path = os.sep.join([root_path, '..', f'/logs'])
if not os.path.isdir(log_dir_path):
    os.mkdir(log_dir_path)
# 创建日志记录器,指明日志保存路径,每个日志的大小,保存日志的上限
file_log_handler = RotatingFileHandler(os.sep.join([log_dir_path, 'log.log']), maxBytes=1024 * 1024, backupCount=10)
# 设置日志的格式
date_string = '%Y-%m-%d %H:%M:%S'
formatter = logging.Formatter(
    '[%(asctime)s] [%(levelname)s] [%(filename)s]/[line: %(lineno)d]/[%(funcName)s] %(message)s ', date_string)
# 日志输出到控制台的句柄
stream_handler = logging.StreamHandler()
# 将日志记录器指定日志的格式
file_log_handler.setFormatter(formatter)
stream_handler.setFormatter(formatter)
# 为全局的日志工具对象添加日志记录器
# 绑定绑定句柄到logger对象
logger.addHandler(stream_handler)
logger.addHandler(file_log_handler)
# 设置日志输出级别
logger.setLevel(level=logging.INFO)
使用log_urils
from testwechat.utils.log_utils import logger

# 输出日志
logger.info(response.json())
二、request库高级用法
1、接口请求体-文件
(1)上传文件接口的请求头及参数信息
- 请求头包含:
Content-Type:multipart/form-data或者boundary=XXX; - 请求参数:通过
files传递,参数格式看具体开发定义以及request源码中的参数要求,比如,文件名为键,字节格式的文件内容的键值对{"hogwarts_file",open("hogwarts.txt", "rb")}字典;
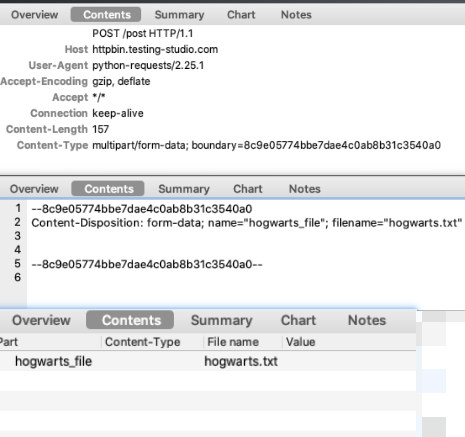
- 解决接口测试流程中文件上传的问题**
- 指定 name
- 指定 filename
- 指定 content-type
案例一: Dictionary of 'name': file-like-objects
def test_file_01():
    url = "https://httpbin.ceshiren.com/post"
    # 文件内容--Dictionary of ``'name': file-like-objects``
    files = {"note_01": open("E:/hogwartscode/requestproject/note.txt", "rb")}
    # 给定请求头信息告知内容为文件类型--Dictionary of ``'name': file-like-objects``
    headers = {"content-type":"multipart"}
    response = requests.request(method="post",url=url,files=files,headers=headers,verify=False)
    print(response.text)

案例二:can be a 2-tuple ('filename', fileobj)
def test_file_02():
    url = "https://httpbin.ceshiren.com/post"
    # 文件内容--can be a 2-tuple ``('filename', fileobj)
    files = {"note_02": ("note_new.txt",open("E:/hogwartscode/requestproject/note.txt", "rb"))}
    # 给定请求头信息告知内容为文件类型
    headers = {"content-type":"multipart"}
    response = requests.request(method="post",url=url,files=files,headers=headers,verify=False)
    print(response.text)

(2)接口请求体-XML
提示: request库没有对xml请求体做封装,所以在传递XML请求体的时候,需要进行以下操作;
- 请求体参数:
headers = {'Content-Type':'application/xml'}; - 请求参数传递,使用
data进行传递;
import requests

def test_xml():
    xml = """<?xml version='1.0' encoding='utf-8'?>
    <a>你好xml!</a>"""
    url = "https://httpbin.org/post"
    headers = {"Content-Type":"application/xml"}
    response = requests.request(url=url,method="post",data=xml,headers=headers)
    print(response.text)
复杂数据解析:
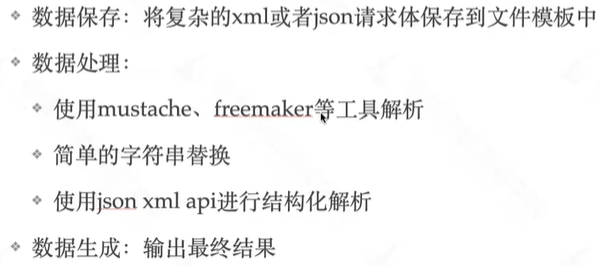
扩展:pystache模块:
- stache.json
{
  "userid": "zhangsan",
  "name": "{{name}}",
  "alias": "jackzhang",
  "mobile": "+86 13800000000",
  "department": [1, 2],
  "order":[10,40],
  "position": "产品经理",
  "gender": "1",
  "email": "zhangsan@gzdev.com",
  "biz_mail":"zhangsan@qyycs2.wecom.work",
  "is_leader_in_dept": [1, 0],
  "direct_leader":["lisi"],
  "enable":1,
  "avatar_mediaid": "2-G6nrLmr5EC3MNb_-zL1dDdzkd0p7cNliYu9V5w7o8K0",
  "telephone": "020-123456",
  "address": "广州市海珠区新港中路",
  "main_department": 1
  }
- test_stache.py
import pystache

def test_stache():
    filename = "E:/hogwartscode/requestproject/基本使用/method_usage/stache.json"
    with open(filename,'r',encoding='utf8') as f:
        # 读取json文件为字典
        template = json.loads(f.read())
        # 将字典强制类型转换为字符串
        data = str(template)
    # 将json文件中使用{{}}站位的变量进行替换
    result = pystache.render(data,{"name":"李四"})
    print(result)
- 结果:
{
'userid': 'zhangsan',
'name': '李四',
 'alias': 'jackzhang', 'mobile': '+86 13800000000', 'department': [1, 2], 'order': [10, 40], 'position': '产品经理', 'gender': '1', 'email': 'zhangsan@gzdev.com', 'biz_mail': 'zhangsan@qyycs2.wecom.work', 'is_leader_in_dept': [1, 0], 'direct_leader': ['lisi'], 'enable': 1, 'avatar_mediaid': '2-G6nrLmr5EC3MNb_-zL1dDdzkd0p7cNliYu9V5w7o8K0', 'telephone': '020-123456', 'address': '广州市海珠区新港中路', 'main_department': 1
}
3、cookie处理
- 传递cookie的两种方式:
- 通过请求头信息传递;
- 通过请求的关键字参数cookies传递;
4、代理配置
(1)使用场景
- debug脚本:测试脚本,更直观的排查请求错误,相当于编写代码时的 debug;
- 对比请求:获取没有错误的,真实的接口请求响应信息,通过代理获取自动化测试的请求响应,对比两次请求响应的区别;
(2)如何使用
- 设定代理格式;
- 通过 proxies 参数传递代理设置;
- 开启代理工具监听请求;
import requests

def test_proxies():
    url = "https://httpbin.ceshiren.com/post"
    # 设置代理信息
    proxies = {
        # 设置http请求的代理信息--注意:代理的地址是使用的代理工具的地址,比如这里使用的是Charles代理,Charles的端口号是8888
        "http":"http://127.0.0.1:8888",
        # 设置https请求的代理信息--注意:代理的地址是使用的代理工具的地址,比如这里使用的是Charles代理,Charles的端口号是8888
        "https":"http://127.0.0.1:8888"
    }
    response = requests.request(method="post",url=url,proxies=proxies,verify=False)
    print(response.text)
脚本请求响应信息:

Charles抓到的信息:

三、接口复杂数据断言
1、多层嵌套响应断言
(1)通过字典键获取值或者是列表的下标获取值,层层获取;
(2)通过JSONpath查找元素
A、JSONpath简介
- 在 JSON 数据中定位和提取特定信息的查询语言。
- JSONPath 使用类似于 XPath 的语法,使用路径表达式从 JSON 数据中选择和提取数据。
- 相比于传统的提取方式,更加灵活,并且支持定制化。
B、JSONpath语法
| 符号 | 描述 | 说明 |
|---|---|---|
| $ | 查询的根节点对象,用于表示一个 json 数据,可以是数组或对象 | 就是JSON数据对象,可以简单理解为$声明这是一个jsonpath |
| @ | 过滤器(filter predicate)处理的当前节点对象 | |
| * | 通配符 | 泛指所有 |
. |
获取子节点 | 一层一层的儿子节点 |
.. |
递归搜索,筛选所有符合条件的节点 | 一层一层的子孙节点循环遍历获取 |
| ?() | 过滤器表达式,筛选操作 | 这是一个过滤筛选表达式,括号中是筛选的条件,过滤条件使用@ |
[start:end] |
数组片段,区间为[start,end),不包含 end | 获取某个数组下标连续区间数据,不包含end |
[A]或[A,B] |
迭代器下标,表示一个或多个数组下标 | 获取数组某个下标数据 |
a、语法具体用法(练习):
| 要求 | jsonpath | 说明 |
|---|---|---|
| 获取所有书籍的作者 |
$.store.book..author或者$..book..author或者 $..author
|
|
| 获取 store 下面的所有内容 | $.store |
获取当前节点下 |
| 获取所有的价格 | $..price |
遍历所有子孙节点 |
| 获取第三本书 | $..book[2] |
指定某个下标 |
| 获取第一本和第三本书 | $..book[0,2] |
指定某些下标 |
| 获取第一本到第三本书 | $..book[0:3] |
某个下标连续区间 |
| 获取所有包含 isbn 的书籍 | $..book[?(@.isbn)] |
因为isbn是书的字段,所以先遍历获取所有的书,得到的是一个数组,而要找的字段是数字中元素的字段,所以要用[]来指定,之后就用过滤表达式进行筛选,而筛选的条件用@来指定:当前节点里面的isbn; |
| 获取所有价格小于 10 的书 | $..book[?(@.price<10)] |
先获取所有有price价格的数据,之后再对价格给与条件进行筛选;比较运算符有:>、 < 、==、 <=、 >= 、!=;成员运算符有:in 包含在内、nin不存在; |
| 获取所有书籍的数量 | $..book.length |
使用内置关键字获取相应属性,这里使用了length; |
演练环境:
jsonpath演练环境
json数据:
{
  "store": {
    "book": [
      {
        "category": "reference",
        "author": "Nigel Rees",
        "title": "Sayings of the Century",
        "price": 8.95
      },
      {
        "category": "fiction",
        "author": "Evelyn Waugh",
        "title": "Sword of Honour",
        "price": 12.99
      },
      {
        "category": "fiction",
        "author": "Herman Melville",
        "title": "Moby Dick",
        "isbn": "0-553-21311-3",
        "price": 8.99
      },
      {
        "category": "fiction",
        "author": "J. R. R. Tolkien",
        "title": "The Lord of the Rings",
        "isbn": "0-395-19395-8",
        "price": 22.99
      }
    ],
    "bicycle": {
      "color": "red",
      "price": 19.95
    }
  },
  "expensive": 10
}
C、第三方库jsonpath
- 语法:
jsonpath.jsonpath(源数据对象, jsonpath表达式); -
注意:
- 1、返回值的最外层是列表;
- 如果找到就返回列表数据;
- 如果没有找到就返回False;
- 2、目前python中jsonpath库不支持length获取数组的长度,如果要获取数组的长度,需要先获取到数组对象,然后通过python的
len()方法获取长度;
- 1、返回值的最外层是列表;
test_jsonpath.py
"""
litemall搜索商品接口:
url=https://litemall.hogwarts.ceshiren.com/wx/goods/list?keyword=%E5%BA%8A&page=1&limit=10&categoryId=0
method=get
需求:
1、获取搜索结果的商品数量
2、每个商品的名称
3、商品价格小于1000的商品名称
"""
import requests
from jsonpath import jsonpath

def test_jsonpath():
    url = "https://litemall.hogwarts.ceshiren.com/wx/goods/list"
    method = "get"
    params = {
        "keyword":"床",
        "page":1,
        "limit":10,
        "categoryId":0
    }
    response = requests.request(method=method,url=url,params=params)
    result = response.json()
    print(f"result={result}")
    # 1、获取搜索结果的商品数量
    numbers = jsonpath(result,"$.data.list.length")
    print(f"获取搜索结果的商品数量:{numbers}")  # False--目前python中的jsonpath库不支持length

    goods_list = jsonpath(result,"$.data.list")# [[{},{},{}]]
    print(f"获取搜索结果的商品数量:{len(goods_list[0])}")  # 先获取到数组(列表)对象,然后通过len()方法获取长度

    # 2、每个商品的名称
    names = jsonpath(result,"$..list..name")
    # ['床单27701', '床单277', '原素系列1.8米实木床', '原素系列实木床头柜', 'AB面独立弹簧床垫 进口乳胶', '安睡慢回弹记忆绵床垫', '300根水洗棉缎纹纯色床单', '300根水洗棉缎纹纯色床笠', '全棉澳毛床褥床垫 床笠款', '全棉针织素色床笠']
    print(f"每个商品的名称:{names}")

    # 3、商品价格小于1000的商品名称
    price_Less_1000 = jsonpath(result,"$..list[?(@.counterPrice<1000)]..name")
    # ['床单27701', '床单277', '安睡慢回弹记忆绵床垫', '300根水洗棉缎纹纯色床单', '300根水洗棉缎纹纯色床笠', '全棉澳毛床褥床垫 床笠款', '全棉针织素色床笠']
    print(f"商品价格小于1000的商品名称:{price_Less_1000}")
2、整体结构响应断言
(1) 针对于“大响应数据”如何断言
- 方式一:针对主要且少量的业务字段断言,5个左右。
- 方式二:其他字段不做数据正确性断言,只做类型与整体结构的校验。
- 方式三:与前面的版本进行 diff,对比差异化的地方。
(2) JSONSchema 简介
- 使用 JSON 格式编写的;
- 可以用来定义校验 JSON 数据的结构;
- 可以用来校验 JSON 数据的一致性;
- 可以用来校验 API 接口请求和响应;
A、使用步骤
- 预先生成对应结构的 Schema。
- 将实际获取到的响应与生成的 Schema 进行对比。
B、 JSONSchema 的生成
- 通过界面工具生成。
- 通过第三方库生成。
- 通过命令行工具生成。
C、界面工具生成
-
步骤:
- 复制 JSON 数据
- 粘贴到在线生成工具中
- 自动生成 JSON Schema 数据
- 在线工具链接:
链接一:https://app.quicktype.io
链接二:https://www.lddgo.net/string/generate-json-schema
D、Python第三方库genson生成
-
- 安装:
pip install genson。
- 安装:
-
- 调用方法生成对应的 JSONSchema 数据结构。
- 1、实例化jsonshema构造器;
- 2、有一个json对象;
- 3、传入被转换的json对象;
- 4、转换成schema数据;
- 5、看具体场景:将schema数据存入到文件;
import json
"""
json.dumps()把数据类型转换成json字符串---操作字符串
json.dump()把数据类型转换成字符串并存储在json文件中---操作文件流
json.loads()把json字符串转换成字典类型---操作字符串
json.load()把json文件打开从字符串转换成字典类型---操作文件流
"""
from genson import SchemaBuilder

def test_jsonschema():
    # 1、实例化jsonshema构造器
    builder = SchemaBuilder()

    # 2、有一个json对象,读取文件并转换成一个json对象
    with open("litemall_search.json", 'r',encoding='utf8') as f:
        json_object = json.load(f)  # load()操作的是文件流,loads()操作的是字符串,两个返回的都是python字典对象

    # 3、传入被转换的json对象
    builder.add_object(json_object)

    # 4、转换成schema数据
    schema = builder.to_schema()
    print(f"结果:{schema}")

    # 5、看具体场景:将schema数据存入到文件;--pycharm中json文件格式化快捷键:ctrl+alt+L
    with open("litemall_schame.json",'w',encoding='utf8') as f:
        json.dump(schema,f)
E、 JSONSchema 验证
- 对比验证python对象与生成的jsonshema的结构是否一致;
-
步骤:
-
- 安装:
pip install jsonschema。
- 安装:
-
- 调用
jsonschema.validate()进行验证。
- 1、如果校验通过,返回:None;
- 2、如果校验失败,抛出异常:可能schema语法有问题,可能json数据格式不符合schema规则;
- 调用
-
-
注意: 由于
validate()没有返回值,在实际使用过程中为了能够进行很好断言,通常添加异常处理返回True或False来重新封装;
import jsonschema
import json
from genson import SchemaBuilder

# 定义一个返回True和False的校验方法
def schema_validate(json_obj, schema):
    try:
        # 第一个参数是需要校验的json对象(字典),第二个参数是schema接口(字典)
        """
        结果:
        1、如果校验通过,返回:None;
        2、如果校验失败,抛出异常:可能schema语法有问题,可能json数据格式不符合schema规则;
        """
        jsonschema.validate(json_obj, schema)
        return True
    except :
        return False

def test_validate():
    # 读取文件获取json数据对象
    with open("litemall_search.json",'r',encoding='utf8') as f:
        json_obj = json.load(f)
        print(f"json_obj={json_obj}")

    # 读取文件获取schema数据对象
    with open("litemall_schame.json",'r',encoding='utf8') as f:
        schema = json.load(f)
        print(f"schema={schema}")
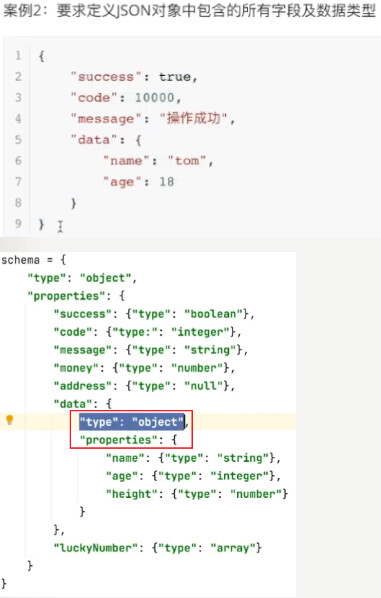
F、jsonshema语法
type关键字:

- integer;-整数;
- string;-字符串;
- object;-json对象,{}包裹起来,对应python中的dict;
- array;-数组,对应python中的list;–在校验array内部的值的时候用“items”关键字;
- number;-数字,整数/小数;
- null;-空值,对应python中None;
- boolean;-布尔值;
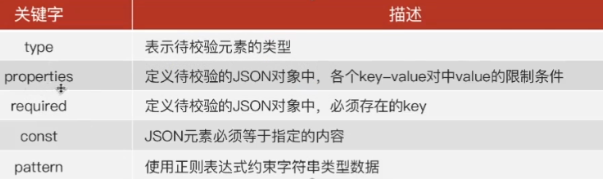
properties关键字
- 定义待校验的json对象中,各个key-value对中value的限制条件;

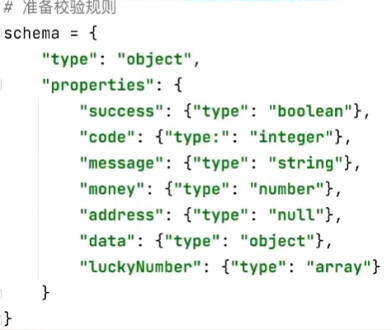
- properties嵌套使用:json内部还有json
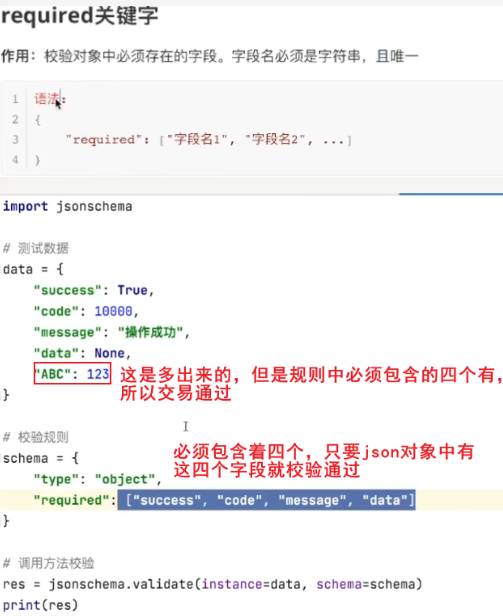
required关键字
- 定义待校验的JSON对象中,必须存在的key;–哪个对象必须包含什么字段required就和该对象的properties平级;
const关键字
- 用于校验json元素必须等于指定的内容,结合properties使用,不然也无法校验具体key对应的value;
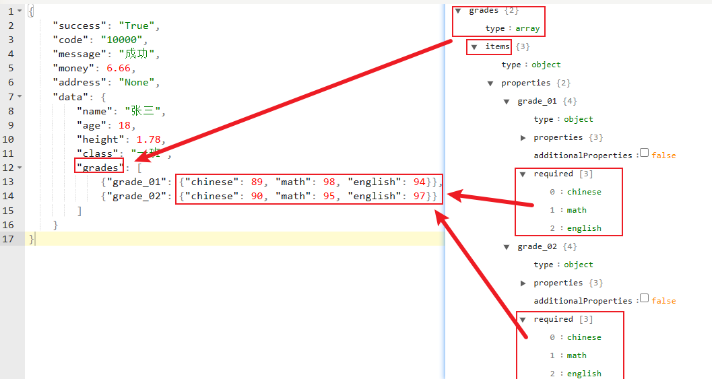
import jsonschema

# 准备数据
data = {
    "success": True,
    "code": 10000,
    "message": "成功",
    "money": 6.66,
    "address": None,
    "data": {
        "name": "张三",
        "age": 18,
        "height": 1.78,
        "class": "一班",
        "grades": [
            {"grade_01": {"chinese": 89, "math": 98, "english": 94}},
            {"grade_02": {"chinese": 90, "math": 95, "english": 97}}
        ]
    }
}

# 准备校验规则
schema = {
    "type": "object",
    "properties": {
        "success": {"const": True},
        "code": {"const": 10000},
        "message": {"const": "成功"},
        "money": {"const": 6.66},
        "address": {"const": None},
        "data": {"type": "object",
                 "properties": {
                     "name": {"const": "张三"},
                     "age": {"const": 18},
                     "height": {"const": 1.78},
                     "class": {"const": "一班"},
                     # array内部怎么校验
                     "grades": {"type": "array",
                                # 下面表示数组的value的类型校验
                                "items": {"type": "object",
                                          "properties": {
                                              "grade_01": {"type": "object",
                                                           "properties": {
                                                               "chinese": {"type": "number"},
                                                               "math": {"type": "number"},
                                                               "english": {"type": "number"},
                                                           },
                                                           "required:": ["chinese", "math", "english"]
                                                           },
                                              "grade_02": {"type": "object",
                                                           "properties": {
                                                               "chinese": {"type": "number"},
                                                               "math": {"type": "number"},
                                                               "english": {"type": "number"},

                                                           },
                                                           "required:": ["chinese", "math", "english"]
                                                           }
                                          }
                                          }
                                }
                 }
                 }
    },
    "required": ["success", "code"]
}

# 校验

result = jsonschema.validate(instance=data, schema=schema)
print(result)
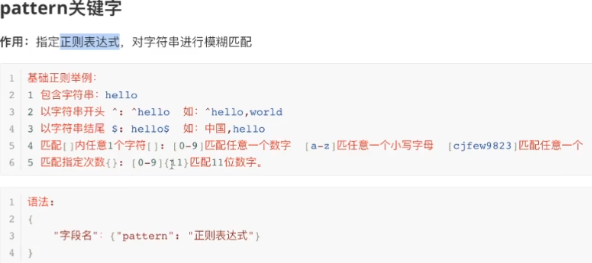
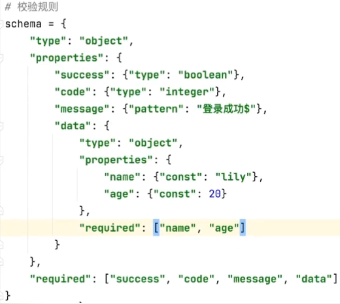
pattern关键字
综合案例

3、数据库操作与断言
(1) 接口测试响应如何验证才是真的验证通过
- 通过接口响应值验证;
- 通过查询数据库信息辅助验证;
(2) 接口测试数据清理
- 通过 Delete 接口删除;
- 自动化测试使用干净的测试环境,每次自动化测试执行完成之前或之后做数据还原。
(3) 数据库操作注意事项
- 直接对数据库做查询之外的操作是非常危险的行为;
- 权限管理严格的公司数据库权限给的非常低;
- 表结构复杂,随便删除数据会影响测试,甚至会导致系统出现异常;
4、多请求、响应类型断言封装设计
(1)多协议封装应用场景
- 问题:响应值不统一,断言比较困难
- json
- xml
- html
- 解决:获得的响应信息全部转换为结构化的数据进行处理
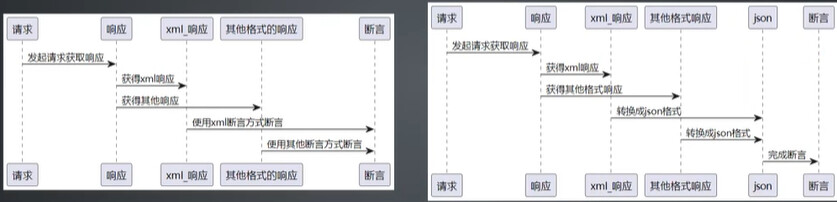
(2)xml转换成dict–xmltodict库
- 安装:
- 环境准备:
pip install xmltodict,一定要装 0.13.0及以上版本; - 依赖包版本: 0.13;
- 环境准备:
- 用法:
dict_res = xmltodict.parse(response.text);
(3)html转换成dict–html-to-json-enhanced库
- 安装:
pip install html-to-json-enhanced; - 用法:
response_dict = html_to_json_enhanced.convert(response.txt);
(4)封装
import requests
import html_to_json_enhanced
import xmltodict
from requests import Response

def resopnse_to_dict(response: Response):
    """
    将响应结果转换成字典(json)类型数据
    :param response: 响应Response对象
    :return: 字典类型响应结果
    """
    res_text = response.text
    # 判断响应文件信息是不是xml格式,也就是以<?xml开头
    if res_text.startswith("<?xml"):
        response_dict = xmltodict.parse(res_text)
    #  判断响应信息是不是html格式,也就是以<!DOCTYPE html>开头
    elif res_text.startswith("<!DOCTYPE html>"):
        # 注意:这个库得到的字典数据中键值都是单引号,如果放到json文件中可能会报错,但是不影响
        response_dict = html_to_json_enhanced.convert(res_text)
    # 说明既不是xml也不是html格式,那就直接转换成dict
    else:
        response_dict = response.json()
    return response_dict

# 测试响应结果xml类型转换成dict
def test_xmltodict():
    response = requests.get(url="https://www.nasa.gov/rss/dyn/lg_image_of_the_day.rss")
    print(response.text)
    result_dict = resopnse_to_dict(response)
    print(f"响应结果转换成字典类型数据result_dict={result_dict}")

# 测试响应结果html类型转换成dict
def test_htmltodict():
    response = requests.get(url="https://v2.vip.ceshiren.com/#/dashboard/course?type=%E4%BC%9A%E5%91%98%E8%AF%BE&identifier=pck28")
    print(response.text)
    result_dict = resopnse_to_dict(response)
    print(f"响应结果转换成字典类型数据result_dict={result_dict}")
(5)对于html/xml/lxml/html5lib等更多操作可以使用 beautifulsoup4
四、 接口鉴权的多种情况与解决方案
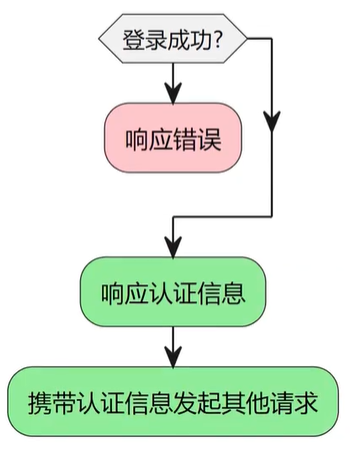
1、 接口鉴权通用的解决方案
- 认证信息的获取;
- 认证信息的携带;
2、 后端接口鉴权常用方法
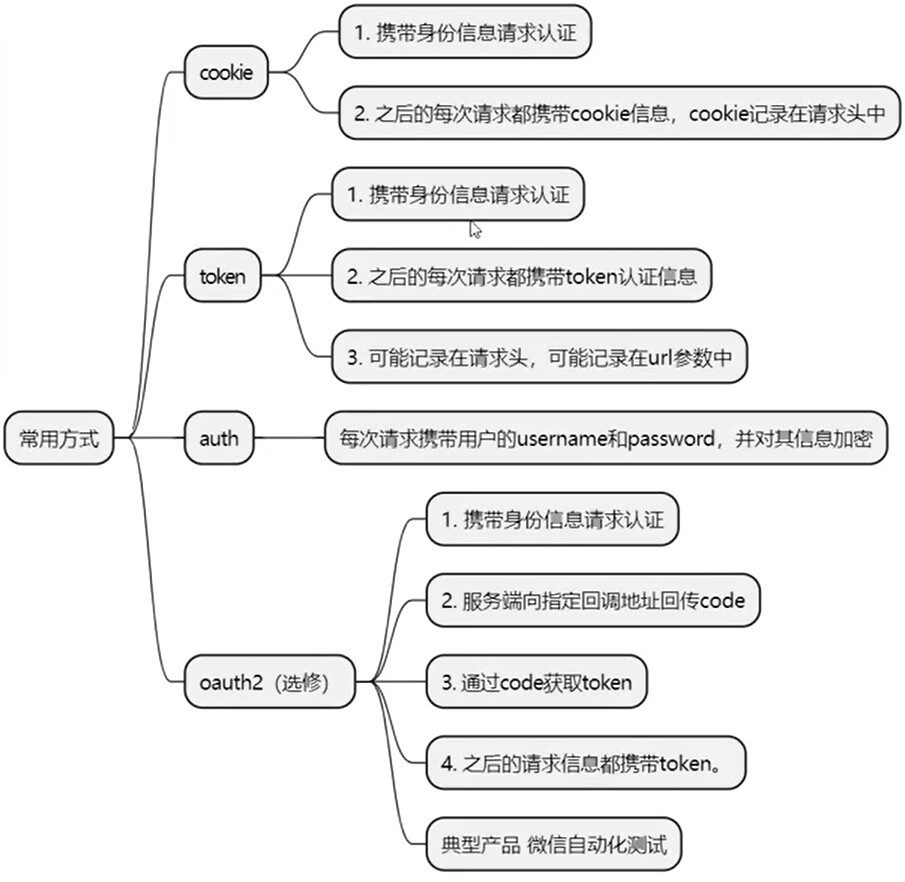
(1) cookie 鉴权
-
- cookie 的获取(根据接口文档获取);
-
- 发送携带 cookie 的请求;
- 方式一:在有确定cookies信息的情况下,可以直接使用cookies参数写入cookie值;
- 方式二:通过
Session()对象发送请求获取到cookies信息,之后用session对象发起请求就会携带上第一次获取的cookie信息;;
import requests


class TestCookie:
    def setup_class(self):
        self.proxy = {"http": "http://127.0.0.1:8080",
                      "https": "http://127.0.0.1:8080"}

    def test_cookies_by_write(self):
        # 简单场景,在有确定cookies信息的情况下,可以直接使用cookies参数写入cookie值
        url = "https://httpbin.ceshiren.com/cookies"
        requests.get(url, proxies=self.proxy, verify=False, cookies={"hogwarts": "ad"})

    def test_cookies_by_session(self):
        # 获取session 的实例,需要通过Session()保持会话,
        # 即为认证之后,之后所有的实例都会携带cookie
        # 可以模仿用户在浏览器的操作
        req = requests.Session()
        # 第一次登陆,植入cookie
        set_url = "https://httpbin.ceshiren.com/cookies/set/hogwarts/ad"
        req.get(set_url, proxies=self.proxy, verify=False)
        # 第二次请求的时候即可携带cookie信息
        url = "https://httpbin.ceshiren.com/cookies"
        req.get(url, proxies=self.proxy, verify=False)
(2) token 鉴权
- token 的获取(根据接口文档获取);
- 发送携带 token 的请求(根据接口文档获取);
案例:企业微信就是使用token
备注:corpid和corpsecret自行获取,代码中已被改动;
- test_department.py
import pytest
import requests
from jsonpath import jsonpath

from 接口自动化.L2.testwechat_02.utils.data_utils import get_data_from_yaml
from 接口自动化.L2.testwechat_02.utils.log_utils import logger


class TestDepartment_Setup:
    # 全局变量--数据文件
    filename = "E:/hogwartscode/homework/接口自动化/L2/testwechat_02/data/detartment.yaml"

    def setup_class(self):
        #获取access_token
        url = "https://qyapi.weixin.qq.com/cgi-bin/gettoken"
        method = "get"
        params = {
            "corpid": "wwc2fcc3ee3dsdf56340c",
            "corpsecret": "JB637mosWGjtVsN0sorjRsdfNiuL1CoKfjursgvWE3yKHg"
        }
        response = requests.request(method=method, url=url, params=params)
        logger.info(f"access_token={response.json()['access_token']}")
        self.access_token = response.json()["access_token"]

    @pytest.mark.parametrize("url,method,param,status_code,errmsg",get_data_from_yaml(filename)[0],ids=get_data_from_yaml(filename)[1])
    def test_department(self,url,method,param,status_code,errmsg):
        # 由于请求方法和参数类型不一样,需要做判断处理
        global response
        data_type = list(param.keys())[0]
        print(data_type)
        print(type(data_type))
        if data_type == "json_data":
            # post请求
            post_url = url + f"?access_token={self.access_token}"
            response = requests.request(method=method,url=post_url,json=param[data_type])
        elif data_type == "params":
            # get请求
            param[data_type]["access_token"] = self.access_token
            response = requests.request(method=method, url=url, params=param[data_type])
        # 输出日志信息
        logger.info(response.json())

        # 断言
        assert response.status_code == status_code
        assert jsonpath(response.json(),"$.errmsg")[0] == errmsg
- department.yaml
-
  - 创建部门
  - https://qyapi.weixin.qq.com/cgi-bin/department/create
  - post
  - json_data: {
                "name": "贵州研发中心",
                "name_en": "GZYF",
                "parentid": 1,
                "order": 1,
                "id": 2
              }
  - 200
  - created
-
  - 更新部门
  - https://qyapi.weixin.qq.com/cgi-bin/department/update
  - post
  - json_data: {
                "id": 2,
                "name": "贵州研发中心_new",
                "name_en": "GZYF",
                "parentid": 1,
                "order": 11
            }
  - 200
  - updated
-
  - 获取部门列表
  - https://qyapi.weixin.qq.com/cgi-bin/department/simplelist
  - get
  - params: {
            "id": 2
        }
  - 200
  - ok
-
  - 删除部门
  - https://qyapi.weixin.qq.com/cgi-bin/department/delete
  - get
  - params: {
            "id":2
            }
  - 200
  - deleted
(3) auth 鉴权
- 在基本 HTTP 身份验证中,请求包含格式为 的标头字段Authorization: Basic;
- 其中credentials是 ID 和密码的Base64编码,由单个冒号连接:。
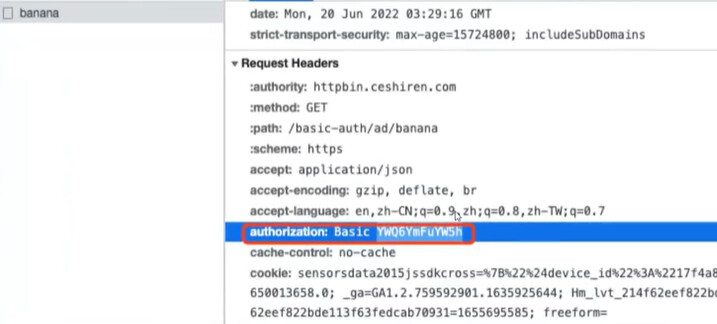
import requests
from requests.auth import HTTPBasicAuth


class TestVerify:
    def setup_class(self):
        self.proxy = {"http": "http://127.0.0.1:8080",
                      "https": "http://127.0.0.1:8080"}
    def test_basic_auth(self):
        # 表示访问一个需要BasicAuth认证的路径
        # username=用户名,password=密码
        # 如果不使用basic auth 则会失败
        r = requests.get("https://httpbin.ceshiren.com/basic-auth/username/password",
                         proxies=self.proxy, verify=False,
                         auth=HTTPBasicAuth("username", "password"))
五、接口加解密与多套被测环境处理
1、 接口解密
在得到响应后对响应做解密处理:
- 如果知道使用的是哪个通用加密算法的话,可以自行解决。
- 如果不了解对应的加密算法的话,可以让研发提供加解密的lib。
- 如果既不是通用加密算法、研发也无法提供加解密的lib的话,可以让加密方提供远程解析服务,这样算法仍然是保密的。
2、多套被测环境处理
(1) 实现方案-环境管理
- 使用环境管理文件;
- yaml;
- ini;
- 常量类;
- 使用不同的文件管理不同的环境;
- 在接口用例中只指定环境管理文件path,不指定url;
(2)环境切换
- 通过环境变量进行切换;
- 通过命令行参数进行切换;
A、通过环境变量进行切换
- 步骤:设置环境变量的具体实现;
- 1、准备环境管理yaml文件;
- 2、代码中通过os模块获取环境变量给定的yaml环境文件名,再读取这个yaml文件;
- 3、命令行输入命令设置环境变量;
os模块获取环境变量:
# 通过os模块获取环境变量给定的yaml环境文件名
now_env = os.getenv("wechat_env",default = "test")
# 读取这个yaml文件
url = yaml.safa_load(open(f"{now_env}.yaml"),'r',enconding = 'utf8')
命令行设置环境变量:
# 类linux 设置环境变量命令
export now_env=dev
# cmd 设置环境变量
set now_env=dev
# Windows powershell 设置环变量--注意:环境变量的值需要双引号
$env:now_env="dev"
案例:
online.py
base_url: https://httpbin.org/
test.py
base_url: https://httpbin.ceshiren.com/
test_environment_variable.py
"""
通过环境变量设置实现多环境切换:
1、通过多个环境对应的各自的yaml文件存储对应信息;
2、代码中获取通过命令行设置的环境变量值作为yaml文件名进行读取里面的数据,实现环境切换;
3、在命令行中设置环境变量;
"""
import os
import requests
import yaml

class TestEnvironmentVariable:

    def setup_class(self):
        # 获取命令行设置的环境变量,如果没有获取到就取默认值test
        environment = os.getenv(key="environment_variable",default="test")

        # 代码中获取通过命令行设置的环境变量值作为yaml文件名进行读取里面的数据,实现环境切换
        self.base_url = yaml.safe_load(open(f'../data/{environment}.yaml','r',encoding='utf8'))["base_url"]
        print(f"url={self.base_url}")

    # 如果是开发环境这个用例通过
    def test_test(self):
        path = "/get"
        response = requests.request(method="get",url=self.base_url+path,verify=False)
        print(response.json())
        # 断言
        assert response.json()['headers']['Host'] == 'httpbin.ceshiren.com'

    # 如果是测试环境这个用例通过
    def test_online(self):
        path = "/get"
        response = requests.request(method="get", url=self.base_url + path, verify=False)
        print(response.json())
        # 断言
        assert response.json()['headers']['Host'] == 'httpbin.org'
命令行执行命令:
# 设置环境变量
$env:environment_variable="test"
# 运行用例--注意:代码中当前路径是输入命令的路径
pytest -vs .\test_environmnet_variable.py
B、通过命令行参数进行切换
- 步骤:
- 1、在conftest.py文件中使用hook函数添加命令行参数;
- 2、在代码中实现从命令行获取参数;
- 3、在终端中使用自定义的命令行参数传递值实现环境切换;
案例:
online.py
base_url: https://httpbin.org/
test.py
base_url: https://httpbin.ceshiren.com/
conftest.py
# 定义全局变量用于存储命令行传递的参数及值
global_env = {}

# 添加命令行参数hook函数
def pytest_addoption(parser):
    # group 将下面所有的 option都展示在这个group下。
    mygroup = parser.getgroup("hogwarts")
    # 注册一个命令行选项
    mygroup.addoption("--httpbin_env",
     # 参数的默认值
    default='test',
    # 存储的变量,为属性命令,可以使用Option对象访问到这个值,暂用不到
    dest='my_env',
    # 参数的描述信息
    help='设置httpbin接口自动化测试默认的环境\n test:测试环境 \n online:线上环境'
     )

# Allow plugins and conftest files to perform initial configuration.
def pytest_configure(config):
    # config:pytest.Config config: The pytest config object.
    # getoption:Return command line option value
    # 获取命令行传递的值
    default_ev = config.getoption("--httpbin_env")
    tmp = {"httpbin_env": default_ev}
    # 将命令行传递的值通过字典存储,方便后续使用
    global_env.update(tmp)

test_commend_line.py
import requests
import yaml
from 多环境管理.testcase.conftest import global_env

class TestEnvironmentVariable:

    def setup_class(self):
        # 获取通过自定义命令行参数传递的值,如果没有通过命令行参数传递值,默认test环境
        default = global_env.get("httpbin_env", "online")
        print(default)
        print(type(default))
        print("*"*20)
        print(f'../data/{default}.yaml')

        # 代码中获取通过命令行传递的参数值作为yaml文件名进行读取里面的数据,实现环境切换
        self.base_url = yaml.safe_load(open(f'../data/{default}.yaml','r',encoding='utf8'))["base_url"]
        print(f"url={self.base_url}")

    # 如果是开发环境这个用例通过
    def test_test(self):
        path = "/get"
        response = requests.request(method="get",url=self.base_url+path,verify=False)
        print(response.json())
        # 断言
        assert response.json()['headers']['Host'] == 'httpbin.ceshiren.com'

    # 如果是测试环境这个用例通过
    def test_online(self):
        path = "/get"
        response = requests.request(method="get", url=self.base_url + path, verify=False)
        print(response.json())
        # 断言
        assert response.json()['headers']['Host'] == 'httpbin.org'
命令行执行命令:
# 运行用例并传入自定义命令行参数--注意:代码中当前路径是输入命令的路径
pytest -vs .\test_commend_line.py --httpbin_env=online
六、使用APIObject和类MVC设计模式封装测试框架
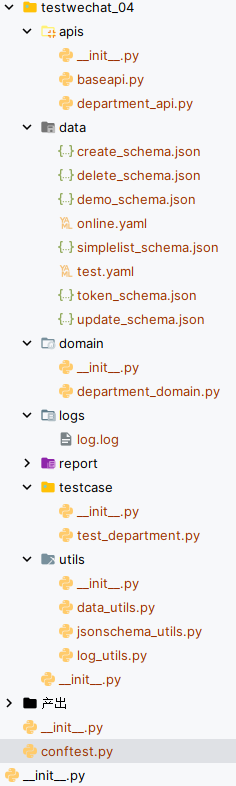
1、项目目录结构
-
testwechat_04:项目包;
-
apis:使用APIObject模式封装api包;
- baseapi.py:所有接口的公共方法及全局初始化类容封装;
- department_api.py:具体的接口封装;
-
data:数据文件目录;
- yaml文件:多环境切换配置文件;
- schema.json文件:用于jsonshema校验的schema数据json文件;
-
domain:模块功能抽象定义包;
- department_domain.py:提供模块功能接口,不做具体实现,谁要测试这个模块谁去实现;
-
logs:日志文件目录;
-
report:allure测试报告存放目录;
-
testcase:测试用例包;
-
utils:工具类包;
-
conftest.py:pytest配置文件,里面实现pytest的hook函数;
(1) conftest.py:pytest配置文件,里面实现pytest的hook函数

import pytest
import requests
from 接口自动化.L4.testwechat_04.utils.log_utils import logger

def pytest_collection_modifyitems(items):
    """
    测试用例收集完成时,将收集到的用例名name和用例标识nodeid的中文信息显示在控制台上
    """
    for i in items:
        i.name=i.name.encode("utf-8").decode("unicode_escape")
        i._nodeid=i.nodeid.encode("utf-8").decode("unicode_escape")

# 企业微信access_token的fixture

@pytest.fixture(scope="function")
def get_accesstoken():
    url = "https://qyapi.weixin.qq.com/cgi-bin/gettoken"
    method = "get"
    params = {
        "corpid" : "wwc2fcc3ee3xsdf56340c",
        "corpsecret" : "JB637mosWGsdfjtVsN0sodrjRNiuL1CoKfjursgvWE3yKHg"
    }
    response = requests.request(method=method,url=url,params=params)
    logger.info(f"access_token={response.json()['access_token']}")
    return response.json()["access_token"]

# 定义全局变量用于存储命令行传递的参数及值
global_env = {}

# 添加命令行参数hook函数
def pytest_addoption(parser):
    # group 将下面所有的 option都展示在这个group下。
    mygroup = parser.getgroup("hogwarts")
    # 注册一个命令行选项
    mygroup.addoption("--wechat_env",
     # 参数的默认值--如果不给默认值,默认会是None
    default='test',
    # 存储的变量,为属性命令,可以使用Option对象访问到这个值,暂用不到
    dest='my_env',
    # 参数的描述信息
    help='设置企业微信接口自动化测试默认的环境\n test:(默认值)测试环境 \n online:线上环境'
     )

# Allow plugins and conftest files to perform initial configuration.
def pytest_configure(config):
    # config:pytest.Config config: The pytest config object.
    # getoption:Return command line option value
    # 获取命令行传递的值
    default_ev = config.getoption("--wechat_env")
    tmp = {"wechat_env": default_ev}
    # 将命令行传递的值通过字典存储,方便后续使用
    global_env.update(tmp)
(2) apis:使用APIObject模式封装api包;
- baseapi.py:所有接口的公共方法及全局初始化类容封装;
- 备注:企业微信的corpid和corpsecret值需要自己获取,下面代码中的不能使用;
"""
baseapi封装:
1、构造函数接收全局的变量,以及实现全局的初始化内容;
2、提供所有请求需要的公共方法;
"""
import requests
import yaml
from 接口自动化.L4.conftest import global_env
from 接口自动化.L4.testwechat_04.utils.log_utils import logger

class BaseApi:
    # 初始化的时候通过命令行参数获取对应测试环境
    def __init__(self):
        # 获取通过自定义命令行参数传递的值,如果没有通过命令行参数传递值,默认test环境
        default = global_env.get("wechat_env")

        # 如果conftest中的hook函数在实现的时候没有给定命令行默认参数会返回None,此时脚本会报错,所以判断,如果没有给默认值就在这里手动给一个默认值
        if default is None:
            default = "online"

        # 代码中获取通过命令行传递的参数值作为yaml文件名进行读取里面的数据,实现环境切换
        self.base_url = yaml.safe_load(open(f'../data/{default}.yaml', 'r', encoding='utf8'))["base_url"]
        logger.debug(f"base_url={self.base_url}")
        # access_token
        self.access_token = self.__get_token()

    def __get_token(self):
        """
        获取token的私有方法
        :return: 成功认证之后的token
        """
        path = "/cgi-bin/gettoken"
        method = "get"
        params = {
            "corpid": "wwc2fcc3esdsdse3d56340c",
            "corpsecret": "JB637mosWGjtVsxcsdN0sorjRxNiuL1CoKfjursgvWE3yKHg"
        }
        response = self.send(method=method, url=self.base_url+path, params=params)
        logger.info(f"access_token={response.json()['access_token']}")
        return response.json()["access_token"]

    def send(self,method, url, **kwargs):
        """
        发送请求并将响应结果输出到日志文件
        :param method: 请求方法:get、post、put、delete
        :param url: 请求url
        :param kwargs: 字典参数信息,比如json= 、 headers=
        :return: 返回响应信息
        """
        # 发起请求
        response = requests.request(method, url, **kwargs)
        # 输出日志信息
        logger.info(f"response={response.json()}")
        # 返回响应信息
        return response

if __name__ == '__main__':
    base = BaseApi()
    print(base.base_url)
    print(f"access_token={base.access_token}")
- department_api.py:具体的接口封装;
"""
apiobject:
1、将每个接口单独封装成一个方法供调用;
2、方法的参数:
    a、把接口所有的参数都列出来,传递到方法内部之后再进行封装成request的请求参数--虽然看起来很直观,但是要写的类容很多,会降低编码速度;
    b、传入一个已经封装好的接口参数,将封装过程体现在测试用例中;
3、方法内部只提供请求方法method、请求路径path;
"""
from 接口自动化.L4.testwechat_04.apis.baseapi import BaseApi
from 接口自动化.L4.testwechat_04.domain.department_domain import DepartmentDomain

class DepartmentApi(BaseApi,DepartmentDomain):

    # 创建部门
    def create(self,department_create_data):
        method ="post"
        path = "/cgi-bin/department/create"
        final_url = f"{self.base_url+path}?access_token={self.access_token}"
        return self.send(method=method,url=final_url,json = department_create_data)

    # 更新部门
    def update(self,department_update_data):
        method = "post"
        path = "/cgi-bin/department/update"
        final_url = f"{self.base_url + path}?access_token={self.access_token}"
        return self.send(method=method, url=final_url, json=department_update_data)

    # 获取部门列表
    def simplelist(self,department_simplelist_data):
        method = "get"
        path = "/cgi-bin/department/simplelist"
        final_url = f"{self.base_url + path}?access_token={self.access_token}"
        return self.send(method=method, url=final_url, params=department_simplelist_data)

    # 删除部门
    def delete(self, department_delete_data):
        method = "get"
        path = "/cgi-bin/department/delete"
        final_url = f"{self.base_url + path}?access_token={self.access_token}"
        return self.send(method=method, url=final_url, params=department_delete_data)
(3)data:数据文件目录;
- online.yaml
base_url: https://qyapi.weixin.qq.com
- test.yaml
base_url: https://www.baidu.com
(4) domain:模块功能抽象定义包;
- department_domain.py:提供模块功能接口,不做具体实现,谁要测试这个模块谁去实现;
"""
接口业务抽象定义:
1、只对外暴露该模块中所有的接口信息,相当于该模块中所有接口的概览;
2、将接口信息封装成方法,但是不做具体实现,谁需要使用这个接口谁就去实现里面的方法;
ps:
1、这在用例编写前期对于了解整个模块的功能架构具有非常好的指导意义,在测试工作管理中对于工作的分工和推荐也很有意义;
2、这很好的使用了面向对象的编程思想,也有mvc设计模式的味道,domain→model、controller→apiobject、view→testcase;
"""
class DepartmentDomain:

    def create_department(self,department_create_data):
        """
        创建部门接口(功能)--未具体实现
        :param department_create_data:创建部门请求参数字典数据
        :return: 需要的地方实现这个方法
        """
        return self.create(department_create_data)

    def update_department(self,department_update_data):
        """
        更新修改部门接口(功能)--未具体实现
        :param department_update_data: 更新部门请求参数字典数据
        :return: 需要的地方实现这个方法
        """
        return self.update(department_update_data)

    def get_simplelist(self,department_simplelist_data):
        """
        获取部门列表接口(功能)--未具体实现
        :param department_simplelist_data: 获取部门列表参数字典数据
        :return: 需要的地方实现这个方法
        """
        return self.simplelist(department_simplelist_data)

    def delete_department(self, department_delete_data):
        """
        删除部门接口(功能)--未具体实现
        :param department_delete_data: 删除部门参数字典数据
        :return: 需要的地方实现这个方法
        """
        return self.delete(department_delete_data)
(5) testcase:测试用例包;
- test_department.py
- 注意:需要在命令行传递
--wechat_env:pytest .\test_department.py --wechat_env=online --alluredir ..\report\ --clean-alluredir
"""
测试用例:
1、api中已经将接口封装成一个“黑箱子”,不出现具体的请求过程实现,只体现测试步骤;
    a、前置条件;
    b、输入数据--可参数化;
    c、实现功能(发送请求);
    d、预期结果断言---断言可以单独封装,看具体的断言数据进行自定义封装;
    e、清理数据,保持被测试环境数据干净;
"""
import allure
import pytest
from jsonpath import jsonpath
from 接口自动化.L4.testwechat_04.apis.department_api import DepartmentApi
from 接口自动化.L4.testwechat_04.utils.jsonschema_utils import JsonSchemaUtils

@allure.feature("部门管理")
class TestDepartment:

    def setup_class(self):
        #jsonschema文件名
        self.create_schema_filename = "../data/create_schema.json"
        self.simplelist_schema_filename = "../data/simplelist_schema.json"
        self.update_schema_filename = "../data/update_schema.json"
        self.delete_schema_filename = "../data/delete_schema.json"

       # 初始化部门管理对象
        self.department = DepartmentApi()

    @pytest.mark.run(order = 1)
    @allure.story("创建部门")
    def test_create(self):
        json_data = {
            "name": "贵州研发中心",
            "name_en": "GZYF",
            "parentid": 1,
            "order": 1,
            "id": 2
        }
        # 调用domain中的方法
        response = self.department.create_department(json_data)

        # 将响应结果转换成schema保持到文件
        JsonSchemaUtils.generate_schema(response.json(),self.create_schema_filename)

        # 断言响应状态码
        assert response.status_code == 200
        # 断言业务数据errmsg断言--TODO
        assert jsonpath(response.json(),"$.errmsg")[0] == "created"
        # 响应结果格式断言
        assert JsonSchemaUtils.schema_validate(response.json(),self.create_schema_filename)

    @pytest.mark.run(order=2)
    @allure.story("更新部门")
    def test_update(self):
        json_data = {
            "id": 2,
            "name": "贵州研发中心_new",
            "name_en": "GZYF",
            "parentid": 1,
            "order": 11
        }
        response = self.department.update_department(json_data)

        # 将响应结果转换成schema保持到文件
        JsonSchemaUtils.generate_schema(response.json(), self.update_schema_filename)

        # 断言响应状态码
        assert response.status_code == 200
        # 断言业务数据errmsg断言
        assert jsonpath(response.json(), "$.errmsg")[0] == "updated"
        # 响应结果格式断言
        assert JsonSchemaUtils.schema_validate(response.json(), self.update_schema_filename)

    @pytest.mark.run(order=3)
    @allure.story("获取子部门ID列表")
    def test_simplelist(self):
        simplelist_params = { "id": 2}
        response = self.department.get_simplelist(simplelist_params)

        # 将响应结果转换成schema保持到文件
        JsonSchemaUtils.generate_schema(response.json(), self.simplelist_schema_filename)

        # 断言响应状态码
        assert response.status_code == 200
        # 断言业务数据errmsg断言
        assert jsonpath(response.json(), "$.errmsg")[0] == "ok"
        # 响应结果格式断言
        assert JsonSchemaUtils.schema_validate(response.json(),self.simplelist_schema_filename)

    @pytest.mark.run(order=4)
    @allure.story("删除部门")
    def test_delete(self):
        params = { "id": 2}
        response = self.department.delete_department(params)

        # 将响应结果转换成schema保持到文件
        JsonSchemaUtils.generate_schema(response.json(), self.delete_schema_filename)

        # 断言响应状态码
        assert response.status_code == 200
        # 断言业务数据errmsg断言
        assert jsonpath(response.json(), "$.errmsg")[0] == "deleted"
        # 响应结果格式断言
        assert JsonSchemaUtils.schema_validate(response.json(), self.delete_schema_filename)
(6) utils:工具类包;
- data_utils.py
import yaml

def get_data_from_yaml(filename):
    """
    从yaml文件中读取数据
    :param filename: 文件绝对路径
    :return: 返回读取的数据,格式为:([[],[],[]]],[a,b,c])
    """
    data_list = []
    data_ids = []
    with open(filename,'r',encoding='utf8') as f :
        data =  yaml.safe_load(f)
    for d in data:
        # temp = []
        # temp.append(d.pop(0))
        data_ids.append(d.pop(0))
        data_list.append(d)
    return data_list,data_ids

if __name__ == '__main__':
    filename = "E:/hogwartscode/homework/接口自动化/L2/testwechat_02/data/detartment.yaml"
    print(get_data_from_yaml(filename)[0])
    print(get_data_from_yaml(filename)[1])
- jsonchema_utils.py
import json
import jsonschema
from genson import SchemaBuilder

class JsonSchemaUtils:

    @classmethod
    def generate_schema(cls,obj,filename):
        """
        将一个json对象转换成jsonshema并保持到json文件中
        :param obj: json对象
        :param filename: 保持schema的文件名
        :return: None
        """
        # 1、获取生成器
        builder = SchemaBuilder()
        # 2、传入被转换的json对象
        builder.add_object(obj)
        # 3、转换成schema
        schema = builder.to_schema()
        # 4、把schema写入到json文件
        try:
            with open(filename, 'w', encoding='utf8') as f:
                json.dump(schema, f)
        except Exception as e:
            print(f"generate_schema写入文件错误:{e}")

    @classmethod
    def schema_validate(cls,obj,schemafile):
        """
        将json对象和schema进行格式比对
        :param obj: json对象
        :param schemafile: schema文件名
        :return: 格式匹配返回True,格式不匹配返回False
        """
        try:
            # 打开存放schema的json文件
            with open(schemafile,'r',encoding='utf8') as  f:
                schema = json.load(f)
            # 将json对象和schema进行格式比对
            jsonschema.validate(instance=obj,schema=schema)
            # 格式匹配返回True
            return True
        except Exception as  e:
            print(f"schema_validate错误:{e}")
            # 格式不匹配返回False
            return False

if __name__ == '__main__':
    obj = {
        "sites": [
            { "name":"菜鸟教程" , "url":"www.runoob.com" },
            { "name":"google" , "url":"www.google.com" },
            { "name":"微博" , "url":"www.weibo.com" }
        ]
    }
    filename = "/接口自动化/L3/testwechat_03/data/demo_schema.json"
    # 生成schema并保持到文件
    JsonSchemaUtils.generate_schema(obj,filename)
    # 格式比对
    result = JsonSchemaUtils.schema_validate(obj,filename)
    print(result)
- log_utils.py
import logging
import os
from logging.handlers import RotatingFileHandler

# 绑定绑定句柄到logger对象
logger = logging.getLogger(__name__)
# 获取当前工具文件所在的路径
root_path = os.path.dirname(os.path.abspath(__file__))
# 拼接当前要输出日志的路径
log_dir_path = os.sep.join([root_path, '..', f'/logs'])
if not os.path.isdir(log_dir_path):
    os.mkdir(log_dir_path)
# 创建日志记录器,指明日志保存路径,每个日志的大小,保存日志的上限
file_log_handler = RotatingFileHandler(os.sep.join([log_dir_path, 'log.log']), maxBytes=1024 * 1024, backupCount=10)
# 设置日志的格式
date_string = '%Y-%m-%d %H:%M:%S'
formatter = logging.Formatter(
    '[%(asctime)s] [%(levelname)s] [%(filename)s]/[line: %(lineno)d]/[%(funcName)s] %(message)s ', date_string)
# 日志输出到控制台的句柄
stream_handler = logging.StreamHandler()
# 将日志记录器指定日志的格式
file_log_handler.setFormatter(formatter)
stream_handler.setFormatter(formatter)
# 为全局的日志工具对象添加日志记录器
# 绑定绑定句柄到logger对象
logger.addHandler(stream_handler)
logger.addHandler(file_log_handler)
# 设置日志输出级别
logger.setLevel(level=logging.INFO)
