一、 测试装置
| 类型 | 规则 | 说明 |
|---|---|---|
| setup_module/teardown_module | 全局模块级,在模块加载前和结束后各运行一次 | 定义在测试类外 |
| setup_class/teardown_class | 类级,在类中只在类前后运行一次 | 定义在测试类中 |
| setup_function/teardown_function(默认) | 函数级,在类外的函数前后各执行一次 | 定义在测试类外 |
| setup_method/teardown_method | 方法级。类中的每个方法执行前后各执行一次 | 定义在测试类中 |
| setup/teardown | 用例级,类中用例前后各执行一次 | 定义在测试类中 |
注意:
-
setup_method/teardown_method和setup/teardown都是作用于测试用例,如果同时出现在测试类中时,会执行setup_method/teardown_method;
2.module/function定义在类外,class/method/setup定义在类中;
# 定义在类外,模块加载时执行一次
def setup_module():
    print("setup_module")

# 定义在类外,模块执行完后执行一次
def teardown_module():
    print("teardown_module")

# 定义在类外,类外用例执行前执行一次
def setup_function():
    print("setup_function")

# 定义在类外,类外用例执行完后执行一次
def teardown_function():
    print("teardown_function")

# 类外用例一
def test_out_1():
    print("test_out_1")

# 类外用例二
def test_out2():
    print("test_out2")

class TestMoudle1():
    # 定义在类中,类加载时执行一次
    def setup_class(self):
        print("TestMoudle1_setup_class")

    # 定义在类中,类执行完后执行一次
    def teardown_class(self):
        print("TestMoudle1_teardown_class")

    # 定义在类中,每个用例执行前执行一次
    def setup_method(self):
        print("setup_method")

    # 定义在类中,每个用例执行完后执行一次
    def teardown_method(self):
        print("teardown_method")

    # 定义在类中,每个用例执行前执行一次
    def setup(self):
        print("setup")

    # 定义在类中,每个用例执行完后执行一次
    def teardown(self):
        print("teardown")

    # 类中测试用例一
    def test_in_1(self):
        print("test_in_1")

    # 类中测试用例二
    def test_in_2(self):
        print("test_in_2")

class TestMoudle2():
    # 定义在类中,类加载时执行一次
    def setup_class(self):
        print("TestMoudle2_setup_class")

    # 定义在类中,类执行完后执行一次
    def teardown_class(self):
        print("TestMoudle2_teardown_class")

    # 定义在类中,每个用例执行前执行一次
    def setup(self):
        print("setup")

    # 定义在类中,每个用例执行完后执行一次
    def teardown(self):
        print("teardown")

    # 类中测试用例3
    def test_in_3(self):
        print("test_in_3")
-------------------------------------------------------------------------------------
collected 5 items

test_测试装置.py::test_out_1 setup_module
setup_function
test_out_1
PASSEDteardown_function

test_测试装置.py::test_out2 setup_function
test_out2
PASSEDteardown_function

test_测试装置.py::TestMoudle1::test_in_1 TestMoudle1_setup_class
setup_method
test_in_1
PASSEDteardown_method

test_测试装置.py::TestMoudle1::test_in_2 setup_method
test_in_2
PASSEDteardown_method
TestMoudle1_teardown_class

test_测试装置.py::TestMoudle2::test_in_3 TestMoudle2_setup_class
setup
test_in_3
PASSEDteardown
TestMoudle2_teardown_class
teardown_module
二、执行用例
- pycharm中通过界面化执行;
- 通过命令行执行;
- 在代码中使用main方法,在方法中给定命令行的命令,然后通过python命令执行;
1、命令行执行用例
-
执行包下所有的用例:
pytest [包名];- 包名:可以是python包,也可以是一个非python文件夹;
-
执行单独一个 pytest 模块:
pytest 文件名.py;- 文件名.py:需要指定py文件的路径,不然找不到;
-
运行某个模块里面某个类:
pytest 文件名.py::类名;- 注意:两个冒号是英文输入,并且和前面类容是挨着的,没有任何空格;
pytest .\基本使用\test_测试装置.py::TestMoudle2
- 运行某个模块里面某个类里面的方法:
pytest 文件名.py::类名::方法名;
pytest .\基本使用\test_测试装置.py::TestMoudle2::test_in_3
2、常用命令行参数
-
–help 获取参数列表;
-
--lf(--last-failed)只重新运行故障; -
--ff(--failed-first)先运行故障然后再运行其余的测试; -
-x用例一旦失败(fail/error),就立刻停止执行,多用于冒烟测试场景; -
--maxfail=num失败个数达到num就停止执行; -
-m只执行某类标签的用例; -
-k执行包含某个关键字的测试用例;–关键字支持逻辑运算;
# 包含关键字in
pytest .\基本使用\test_测试装置.py -vs --maxfail=2 -k "in"
# 不包含关键字in
pytest .\基本使用\test_测试装置.py -vs --maxfail=2 -k "not in"
-
-v打印详细日志; -
-s打印输出日志(一般-vs一块儿使用); -
--collect-only(测试平台,pytest 自动导入功能 )收集测试用例,只收集展示到控制台,不执行;
3、Python代码执行用例
- 使用 main 函数;–用python解释器执行;
- 执行:使用python命令
python 文件名.py;
- 执行:使用python命令
if __name__ == '__main__':
    # 1、运行当前目录下所有符合规则的用例,包括子目录(test_*.py 和 *_test.py)
    # pytest.main()
    # 2、运行test_测试装置.py::TestMoudle1类中的用例
    # pytest.main(['test_测试装置.py::TestMoudle1','-vs'])
    # 3、运行test_测试装置.py::TestMoudle1::test_in_1--类中某一条用例
    pytest.main(['test_测试装置.py::TestMoudle1::test_in_1','-vs'])
    # 4、运行某个mark标签的用例
    # pytest.main(['test_测试装置.py','-vs','-m','dkej'])
---------------------------------------------------------------------------------------------------------
命令行命令:
python .\test_测试装置.py
- 使用 python -m pytest 调用 pytest(jenkins 持续集成用到);–用pytest解释器执行;
python -m pytest .\test_测试装置.py
4、pytest异常处理
-
try...except; -
pytest.raise();
    def testcase_06(self):
        with pytest.raises(eval("TypeError")) as e:
            result = self.calc.add({10}, {10})
        assert e.type == TypeError
##5、运行结果
| 状态 | 说明 |
|---|---|
| passed | assert通过 |
| failed | assert失败 |
| error | 用例本身代码报错 |
| xfail | 预期失败,加了 @pytest.mark.xfail(),并且assert失败 |
| xpass | 预期失败,加了 @pytest.mark.xfail(),但是assert通过 |
| skipped | 跳过用例,加了@pytest.mark.skip()
|
| deselected | 用例未被选中,比如使用了标记、只运行故障、失败个数达到上限等导致有的用例未被选中执行 |
三、mark用例标记
1、标记测试用例
- 场景:只执行符合要求的某一部分用例 可以把一个web项目划分多个模块,然后指定模块名称执行。
- 解决: 在测试用例方法上加
@pytest.mark.自定义标签名; - 执行: -m 执行自定义标记的相关用例;
- 等号赋值:
pytest .\mark标记.py -m=one - 空格给值:
pytest .\mark标记.py -m two - 支持逻辑运算的字符串:
pytest .\mark标记.py -m="not one"pytest .\mark标记.py -m "not one"
- 等号赋值:
import pytest

@pytest.mark.one
def test_out_1():
    print("test_out_1")

@pytest.mark.one
def test_out2():
    print("test_out2")

@pytest.mark.two
def test_out_3():
    print("test_out_3")

@pytest.mark.three
def test_out4():
    print("test_out4")
2、设置跳过(用例或用例类)、预期失败用例-内置标签
- skip - 始终跳过该测试用例;
- skipif - 遇到特定情况跳过该测试用例;
- xfail - 遇到特定情况,产生一个“期望失败”输出;
(1)skip
-
装饰器使用:
@pytest.mark.skip(*, reason=None)- 执行前跳过–始终跳过;
- 以下方式都可以:
@pytest.mark.skip@pytest.mark.skip("reason")@pytest.mark.skip(reason = "reason")
-
代码中使用:
pytest.skip(reason ="",allow_module_level=False)- 执行期间跳过,后续逻辑不执行。
# 不调用方法,而是获取属性--还是跳过
@pytest.mark.skip
@pytest.mark.one
def test_out_0():
    print("test_out_0")

# 不用reason=
@pytest.mark.skip("没有reason=")
@pytest.mark.one
def test_out_1():
    print("test_out_1")

# 用reason=
@pytest.mark.skip(reason="因为2")
@pytest.mark.one
def test_out2():
    print("test_out2")

# 登录方法,返回是否登录成功
def login():
    return False

# 代码中添加skip
@pytest.mark.three
def test_login():
    print("test_login_start")
    if not login():
        pytest.skip(reason="没有登录,不执行后续逻辑")
    print("登录了才执行的逻辑")

# 跳过测试类
@pytest.mark.skip("skip跳过测试类")
class TestSkip_1():
    def test_in1(self):
        print("test_in1")
(2) skipif
- 装饰器使用:
@pytest.mark.skipif(condition, *, reason=None)- condition为True的时候跳过;
- reason=为关键字参数,而且 必填;
# skipif加判断逻辑控制,如果True就跳过
@pytest.mark.skipif(1 > 0,reason="1大于0为True,所以跳过")
@pytest.mark.two
def test_out_3():
    print("test_out_3")

# 跳过测试类
@pytest.mark.skipif(1>0,reason="skipif跳过测试类")
class TestSkip_2():
    def test_in2(self):
        print("test_in2")
(3) skipif markers
- Pytest还提供“跳过标记”的功能,我们定义跳过标记,然后可以作用于多模块间。
minversion = pytest.mark.skipif(
    sys.version_info > (3, 8), reason=" 版本大于python3.8 则跳过"
)

@minversion
def test_function():
    assert True

# test_skip_002.py
from test_skip_001 import minversion

@minversion
def test_anotherfunction():
    assert True
(4)xfail
- 装饰器使用: @pytest.mark.xfail(reason=“”), 期望测试用例是失败的,但是不会影响测试用例的的执行。如果测试用例执行失败的则结果是xfail(不会额外显示出错误信息);如果测试用例执行成功的则结果是xpass 。
@pytest.mark.xfail
def test_two():
    print("test_two方法执行" )
    assert 1==1
- 代码中使用:pytest.xfail(reason=‘该功能尚未完成’), 将该用例标记成xfail失败,并且该用例中的后续代码不会执行 。
def test_one():
    print("----start------")
    pytest.xfail(reason='该功能尚未完成')
    print("test_one方法执行")
    assert 1 == 1
四、参数化
1 @pytest.mark.parametrize参数化
(1)参数说明
@pytest.mark.parametrize(self,argnames, argvalues, indirect=False, ids=None, scope=None)):
-
argnames:必传,参数名,必须和被装饰函数参数名一致, 以逗号分隔的字符串,表示一个或多个参数名称(key),或参数字符串的列表/元组; -
argvalues:必传,参数值,若argnames只有一个则单值列表传入,若argnames有多个,则套用列表(元素为元组)或者元组(元素为元组)展示,内部元组内的元素个数和位置与参数名一一对应,列表中有多少个元组就会执行多少条用例; -
indirect:为true时,那argnames一定是一个fixture函数名称,argvalues值将传入对应的fixture内,相当于@pytest.fixture(params=)的用法,默认False; -
ids: 标记子用例执行名称,与argvalues数量一致,也就是一个用例一个名称,未指定自动生成,默认None; -
scope:如果指定,则表示参数的范围。范围用于按参数实例对测试进行分组。它还将覆盖任何fixture函数定义的范围,允许使用测试上下文或配置设置动态范围;
(2)argnames、argvalues参数
A、单参数单值
import pytest

@pytest.mark.parametrize('arg',[1])
#测试函数要将argnames做为形参传入
def test_one_params(arg):
    print("传入的值为:{}".format(arg))
    assert arg == 1
B、单参数多值
1.单参数多值,argvalues可以传入多样的python数据类型:列表,嵌套了元组的列表,字典,字符串;
2.传入多个值时,测试用例会被执行多次,每次取一个值去运行;
import pytest

# 值的类型为列表或者元组都可以
# @pytest.mark.parametrize('arg',['abc',1,{'a':1,'b':3},(4,5),[6,7]])
@pytest.mark.parametrize('arg',('abc',1,{'a':1,'b':3},(4,5),[6,7]))
def test_one_params(arg):
    print("传入的值为:{}".format(arg))
"""
PASSED                      [ 20%]传入的值为:abc
PASSED                        [ 40%]传入的值为:1
PASSED                     [ 60%]传入的值为:{'a': 1, 'b': 3}
PASSED                     [ 80%]传入的值为:(4, 5)
PASSED                     [100%]传入的值为:[6, 7]
"""
C、多参数多值
import pytest
# 值的类型为列表或者元组都可以
# @pytest.mark.parametrize("test_input,expected",[("3+5",8),("5-2",1),("5*2",10)])
@pytest.mark.parametrize("test_input,expected",(("3+5",8),("5-2",1),("5*2",10)))
def test_params(test_input,expected):
    print("原值:{} 期望值{}".format(test_input,expected))
"""
PASSED                        [ 33%]原值:3+5 期望值8
PASSED                        [ 66%]原值:5-2 期望值1
PASSED                       [100%]原值:5*2 期望值10
"""
D、笛卡尔积
- 笛卡尔积在测试中叫全量测试;
- 比如:a = [1,2,3],b = [‘a’,‘b’,‘c’],ab各取一个值一共有多少多少个组合;
- (1,a),(1,b),(1,c)
- (2,a),(2,b),(2,c)
- (3,a),(3,b),(3,c)
import pytest

# a = [1,2,3],b = ['a','b','c'],ab各取一个值一共有多少多少个组合;
@pytest.mark.parametrize("first",[1,2,3])
@pytest.mark.parametrize("second",['a','b','c'])
def test_dkej(first,second):
    print(f"组合有:{first,second}")
"""
PASSED                                       [ 11%]组合有:(1, 'a')
PASSED                                       [ 22%]组合有:(2, 'a')
PASSED                                       [ 33%]组合有:(3, 'a')
PASSED                                       [ 44%]组合有:(1, 'b')
PASSED                                       [ 55%]组合有:(2, 'b')
PASSED                                       [ 66%]组合有:(3, 'b')
PASSED                                       [ 77%]组合有:(1, 'c')
PASSED                                       [ 88%]组合有:(2, 'c')
PASSED                                       [100%]组合有:(3, 'c')
(3)indirect 参数
-
indirect一般与Pytest的request、fixture组合使用;
-
当indrect 为True时,argnames则要传入fixture函数名称,不再是一个普通参数,而是要被调用的fixture函数,argvalues则是要给这个函数传的值;
-
作法其实与@pytest.fixture(params)一样,但使用了@pytest.mark.parametrize相当于参数化了fixture,而不是只有固定的一套数据传入使用;
大致原理如下:
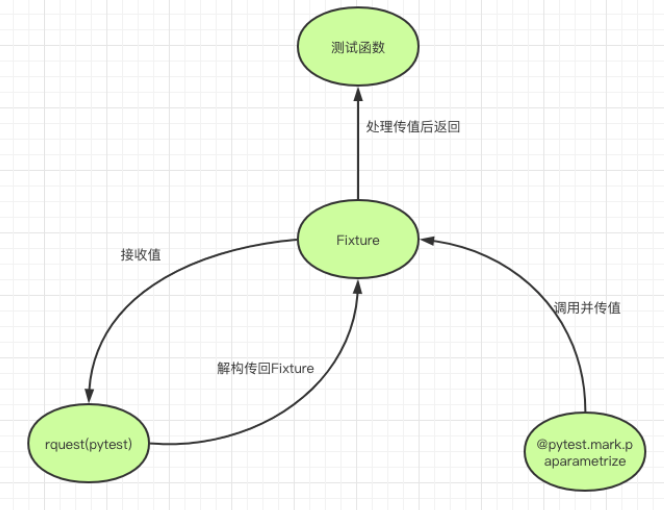
一句话: indirect=True的用法与False用法基本是类似的,唯一的区别是,当它为True的时候会将参数传入fixture再进行一次前置处理,将处理后的返回值再给测试函数使用。False是直接使用。
A、单fixture单值(通过列表)
import pytest
@pytest.fixture()
def login(request):
    user = request.param
    print("传入的用户名为:{}".format(user))
    return user

user = ['张三','李四']

@pytest.mark.parametrize('login',user,indirect=True)
def test_one_param(login):
    print("测试用例读到的用户是:{}".format(login))
"""
传入的用户名为:张三
PASSED                     [ 50%]测试用例读到的用户是:张三
传入的用户名为:李四
PASSED                     [100%]测试用例读到的用户是:李四
"""
B、单fixture多值(通过字典)
import pytest

userinfo  = [
    {'user':'张三','pwd':123},
    {'user':'李四','pwd':456}
]

@pytest.fixture()
def login(request):
    user = request.param
    print(f"传入的用户名密码为:{user}")
    return user

@pytest.mark.parametrize('login',userinfo,indirect=True)
def test_one_param(login):
    print("测试类的读到的用户是:{} 密码是:{}".format(login['user'],login['pwd']))
"""
传入的用户名密码为:{'user': '张三', 'pwd': 123}
PASSED                  [ 50%]测试类的读到的用户是:张三 密码是:123
传入的用户名密码为:{'user': '李四', 'pwd': 456}
PASSED                  [100%]测试类的读到的用户是:李四 密码是:456
"""
C、传多fixture多值(通过嵌套元组的列表)
import pytest
#一个@pytest.mark.parametrize使用多个fixture,传入的数据要是嵌套了元组的列表
userinfo  = [
    ('张三',123),
    ('李四','pwd')
]

@pytest.fixture()
def login_user(request):
    user = request.param
    print("传入的用户名为:{}".format(user))
    return user

@pytest.fixture()
def login_pwd(request):
    pwd = request.param
    print("密码为:{}".format(pwd))
    return pwd

@pytest.mark.parametrize('login_user,login_pwd',userinfo,indirect=True)
def test_one_param(login_user,login_pwd):
    print("测试类的读到的用户是:{} 密码是:{}".format(login_user,login_pwd))
"""
传入的用户名为:张三
密码为:123
PASSED        [ 50%]测试类的读到的用户是:张三 密码是:123
传入的用户名为:李四
密码为:pwd
PASSED        [100%]测试类的读到的用户是:李四 密码是:pwd

Process finished with exit code 0
"""
D、叠加fixture(单值列表,执行次数笛卡尔集 N*M)
import pytest

user = ['张三','李四']
pwd  = [124,345]

@pytest.fixture()
def login_user(request):
    user = request.param
    print("传入的用户名为:{}".format(user))
    return user

@pytest.fixture()
def login_pwd(request):
    pwd = request.param
    print("密码为:{}".format(pwd))
    return pwd

@pytest.mark.parametrize('login_pwd',pwd,indirect=True)
@pytest.mark.parametrize('login_user',user,indirect=True)
def test_one_param(login_user,login_pwd):
    print("测试类的读到的用户是:{} 密码是:{}".format(login_user,login_pwd))
"""
传入的用户名为:张三
密码为:124
PASSED  [ 25%]测试类的读到的用户是:张三 密码是:124
传入的用户名为:张三
密码为:345
PASSED  [ 50%]测试类的读到的用户是:张三 密码是:345
传入的用户名为:李四
密码为:124
PASSED  [ 75%]测试类的读到的用户是:李四 密码是:124
传入的用户名为:李四
密码为:345
PASSED  [100%]测试类的读到的用户是:李四 密码是:345
"""
(4)ids参数
- 作用:标记子用例执行名称,增加可读性;
- 需要在
conftest.py文件中增加全局配置,并将以下代码复制到配置文件:
def pytest_collection_modifyitems(items):
    """
    测试用例收集完成时,将收集到的用例名name和用例标识nodeid的中文信息显示在控制台上
    """
    for i in items:
        i.name=i.name.encode("utf-8").decode("unicode_escape")
        i._nodeid=i.nodeid.encode("utf-8").decode("unicode_escape")
(5)scope参数
-
scope的作用范围取值与fixture scope一致,当indirect=True才会被使用;
-
scope的作用范围会覆盖fixture的scope范围,如果同一个被调用的fixture有多个parametrize定义了scope,取第一条的范围
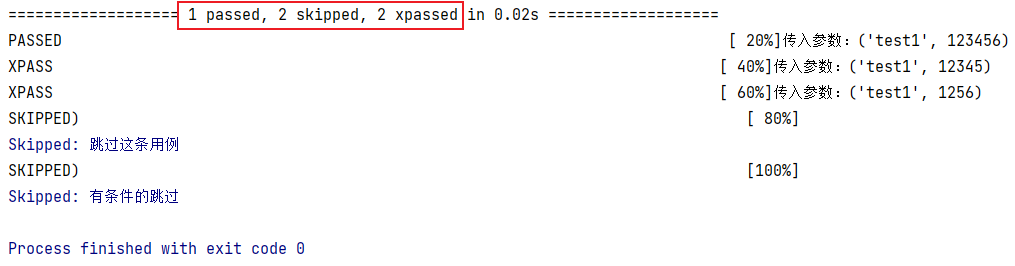
(6)与其他mark一起使用,标记子用例
import pytest
a = '跳过'
@pytest.mark.parametrize("x,y",
                         [('test1',123456),
                          pytest.param("test1",12345,marks=pytest.mark.xfail),
                          pytest.param("test1",1256,marks=pytest.mark.xfail),
                          pytest.param("test2",123,marks=pytest.mark.skip("跳过这条用例")),
                          pytest.param("test3",456,marks=pytest.mark.skipif(a =='跳过',reason="有条件的跳过"))
                         ]
                         )
def test_one(x,y):
    print(f"传入参数:{x,y}")
结果:
2 @pytest .fixture参数化-详见fixture-params参数用法
五、pytest测试用例生命周期管理-feature用法
基本介绍
Fixture 特点及优势
- 1、命令灵活:对于 setup,teardown,可以不起这两个名字;
- 2、数据共享:在 conftest.py 配置⾥写⽅法可以实现数据共享,不需要 import 导⼊。可以跨⽂件共享;
- 3、scope 的层次及神奇的 yield 组合相当于各种 setup 和 teardown;
- 4、实现参数化;
Fixture 在自动化中的应用- 基本用法
-
场景:
- 测试⽤例执⾏时,有的⽤例需要登陆才能执⾏,有些⽤例不需要登陆。setup 和 teardown ⽆法满⾜。fixture 可以。默认 scope(范围)function;
-
步骤:
- 1.导⼊ pytest;
- 2.在登陆的函数上⾯加@pytest.fixture();
- 3.在要使⽤的测试⽅法中传⼊(登陆函数名称),就先登陆;
- 4.不传⼊的就不登陆直接执⾏测试⽅法。;
1、 Fixture参数详解及使用
@pytest.fixture(scope = "function",params=None,autouse=False,ids=None,name=None)
**提示:**一个用例可以使用多个fixture装饰的函数名作为参数,执行顺序是fixture传入的顺序;
import pytest

@pytest.fixture()
def login():
    # 类似setup操作
    print("登录操作返回token")
    token = "4s6df1s6dfs1df31sdf1s3df1"
    username = "无双王者"
    yield token,username
    # 类似teardown操作
    print("退出登录并清理数据操作")
    # yield # 报错--fixture function has more than one 'yield'
    print("关闭手机操作")

@pytest.fixture()
def db_operate():
    print("连接数据库")
    yield
    print("关闭数据库连接")

class TestLogin:
    def test_search(self):
        print("")

    @pytest.mark.usefixtures("login")
    def test_cart(self):
        print("加入购物车")

    # 传入多个fixture
    def test_commit(self,login,db_operate):
        token,username = login
        print(f"下单-用户名:{username},token:{token}")
----------------------------------------------------------------------------------------
============================== 3 passed in 0.02s ==============================
PASSED                        [ 33%]
登录操作返回token
PASSED                          [ 66%]加入购物车
退出登录并清理数据操作
关闭手机操作
登录操作返回token
连接数据库
PASSED                        [100%]下单-用户名:无双王者,token:4s6df1s6dfs1df31sdf1s3df1
关闭数据库连接
退出登录并清理数据操作
关闭手机操作
(1) SCOPE作用范围
- 用于控制Fixture的作用范围,作用类似于Pytest的setup/teardown;
- 默认取值为function(函数级别),控制范围的排序为:session > module > class > function
| 取值 | 范围 | 说明 |
|---|---|---|
| function | 方法级 | 每一个函数或方法都会调用一次 |
| class | 函数级 模块级 | 从.py文件开始引用fixture的位置生效,类外引用会执行一次,类中引用也会执行一次,如果类外和类中同时应用那就各执行一次 |
| module | 模块级 | 从.py文件开始引用fixture的位置生效,类外引用会执行一次,类中引用也会执行一次,如果类外和类中同时应用那只在类外执行一次 |
| package | 包级别 | 每一个包才会执行一次 |
| session | 会话级 | 每次会话只需要运行一次,会话内所有方法及类,模块都共享这个方法 |
格式:
@pytest.fixture() # --默认function级别
#或者
@pytest.fixture(scope='function')
A、scope = “function”
a、场景一:做为参数传入
- 从运行结果可以看出,fixture做为参数传入时,会在执行函数之前执行该fixture函数。再将值传入测试函数做为参数使用,这个场景多用于登录;
import pytest

# fixture函数(类中) 作为多个参数传入
@pytest.fixture()
def login():
    print("打开浏览器")
    a = "account"
    return a

@pytest.fixture()
def logout():
    print("关闭浏览器")

class TestLogin:
    # 传入lonin fixture
    def test_001(self, login):
        print(f"001传入了loging fixture = {login}")
        assert login == "account"

    # 传入logout fixture
    def test_002(self, logout):
        print(f"002传入了logout fixture = {logout}")

    def test_003(self, login, logout):
        print(f"003传入了两个fixture,分别是:{login}和{logout}")

    def test_004(self):
        print("004未传入仍何fixture哦")
---------------------------------------------------------------------------------------
collecting ... collected 4 items

function作为参数传入.py::TestLogin::test_001 打开浏览器
PASSED                      [ 25%]001传入了loging fixture = account

function作为参数传入.py::TestLogin::test_002 关闭浏览器
PASSED                      [ 50%]002传入了logout fixture = None

function作为参数传入.py::TestLogin::test_003 打开浏览器
关闭浏览器
PASSED                      [ 75%]003传入了两个fixture,分别是:account和None

function作为参数传入.py::TestLogin::test_004 PASSED                      [100%]004未传入仍何fixture哦


============================== 4 passed in 0.03s ==============================
b、 场景二、Fixture的相互调用
- 有多层fixture调用时,最先执行的是最后一层fixture,而不是先执行传入测试函数的fixture;
import pytest

# fixtrue作为参数,互相调用传入
@pytest.fixture()
def account():
    a = "account返回"
    print("第一层fixture")
    return a

@pytest.fixture()
def login(account):
    print(f"第二层fixture")
    return f"拿到account = {account},并成功登录"

def test_out(login):
    print(f"使用第二层fixture,返回值为:{login}")

class TestLogin:
    def test_1(self, login):
        print(f"使用第二层fixture,返回值为:{login}")

    def test_2(self, account):
        print(f"只调用account第一层fixture,返回值为:{account}")

if __name__ == '__main__':
    pytest.main()

-----------------------------------------------------------------------------------------------------
第一层fixture
第二层fixture
PASSED                           [ 33%]使用第二层fixture,返回值为:拿到account = account返回,并成功登录

第一层fixture
第二层fixture
PASSED                  [ 66%]使用第二层fixture,返回值为:拿到account = account返回,并成功登录

第一层fixture
PASSED                  [100%]只调用account第一层fixture,返回值为:account返回
B、 scope = “class”
@pytest.fixture(scope='class')
a、场景一:类外执行
- 类外引用会执行一次,类中引用也会执行一次,如果类外和类中同时应用那就各执行一次
类外和类中都在引用:
# 类外引用fixture
import pytest

# fixture作用域 scope = 'class'
@pytest.fixture(scope='class')
def login():
    print("fixture:scope为class")
    return "成功登录"

def test_out(login):
    print(f"类外方法调用fixture = {login}")

class TestLogin:
    def test_1(self):
        print(f"用例1")

    def test_2(self,):
        print(f"用例2")

    def test_3(self):
        print(f"用例3")

if __name__ == '__main__':
    pytest.main()

---------------------------------------------
fixture:scope为class
PASSED                                [ 25%]类外方法调用fixture = 成功登录


PASSED                       [ 50%]用例1
PASSED                       [ 75%]用例2
PASSED                       [100%]用例3
b、场景二:类中引用
- 类外引用会执行一次,类中引用也会执行一次,如果类外和类中同时应用那就各执行一次
类中引用:
# 类中调用了fixture
import pytest

@pytest.fixture(scope='class')
def login():
    a = '123'
    print("fixture输入账号密码登陆")

class TestLogin:
    def test_1(self):
        print("用例1没有调用fixture")

    def test_2(self, login):
        print("用例2调用了fixture")

    def test_3(self, login):
        print("用例3调用了fixture")

    def test_4(self):
        print("用例4")

if __name__ == '__main__':
    pytest.main()
-----------------------------------------------------------------------
PASSED                       [ 25%]用例1没有调用fixture
fixture输入账号密码登陆
PASSED                       [ 50%]用例2调用了fixture
PASSED                       [ 75%]用例3调用了fixture
PASSED                       [100%]用例4
c、场景三:类外和类中都引用
- 类外引用会执行一次,类中引用也会执行一次,如果类外和类中同时应用那就各执行一次
# 类外和类中都引用fixture
import pytest

# fixture作用域 scope = 'class'
@pytest.fixture(scope='class')
def login():
    print("fixture:scope为class")
    return "成功登录"

def test_out(login):
    print(f"类外方法调用fixture = {login}")

class TestLogin:
    def test_1(self, login):
        print(f"用例1-login = {login}")

    def test_2(self, login):
        print(f"用例2-login = {login}")

    def test_3(self):
        print(f"用例3")

if __name__ == '__main__':
    pytest.main()
----------------------------------------------------------
fixture:scope为class
PASSED                        [ 25%]类外方法调用fixture = 成功登录

fixture:scope为class
PASSED               [ 50%]用例1-login = 成功登录
PASSED               [ 75%]用例2-login = 成功登录
PASSED               [100%]用例3
C、 scope = “module”
a、场景一:类外执行
- 类外引用会执行一次,类中引用也会执行一次,如果类外和类中同时应用那只在类外执行一次
# 类外调用fixture
import pytest

# fixture scope = 'module'
@pytest.fixture(scope='module')
def login():
    print("fixture范围为module")

def test_01():
    print("类外用例01")

def test_02(login):
    print("类外用例02")

class TestLogin():
    def test_1(self):
        print("类中用例1")

    def test_2(self):
        print("类中用例2")

if __name__ == '__main__':
    pytest.main()
-----------------------------------------------------
PASSED                                       [ 25%]类外用例01

fixture范围为module
PASSED                                       [ 50%]类外用例02

PASSED                             [ 75%]类中用例1
PASSED                             [100%]类中用例2
b、场景二:类中引用
- 类外引用会执行一次,类中引用也会执行一次,如果类外和类中同时应用那只在类外执行一次
# 类中调用fixture
import pytest

# fixture scope = 'module'
@pytest.fixture(scope='module')
def login():
    print("fixture范围为module")

def test_01():
    print("类外用例01")

def test_02():
    print("类外用例02")

class TestLogin():
    def test_1(self,login):
        print("类中用例1")

    def test_2(self):
        print("类中用例2")

if __name__ == '__main__':
    pytest.main()
---------------------------------------------------------
PASSED                                       [ 25%]类外用例01
PASSED                                       [ 50%]类外用例02

fixture范围为module
PASSED                             [ 75%]类中用例1
PASSED                             [100%]类中用例2
c、场景三:类外和类中都引用
- 类外引用会执行一次,类中引用也会执行一次,如果类外和类中同时应用那只在类外执行一次
# 类外和类中都调用fixture
import pytest

# fixture scope = 'module'
@pytest.fixture(scope='module')
def login():
    print("fixture范围为module")

def test_01():
    print("类外用例01")

def test_02(login):
    print("类外用例02")

class TestLogin():
    def test_1(self,login):
        print("类中用例1")

    def test_2(self):
        print("类中用例2")

if __name__ == '__main__':
    pytest.main()
------------------------------------------------
PASSED                               [ 25%]类外用例01
fixture范围为module
PASSED                               [ 50%]类外用例02

PASSED                     [ 75%]类中用例1
PASSED                     [100%]类中用例2
D、 scope = “session”
- session的作用范围是针对.py级别的,module是对当前.py生效,seesion是对多个.py文件生效;
- session只作用于一个.py文件时,作用相当于module;
- 所以session多数与contest.py文件一起使用,做为全局Fixture;
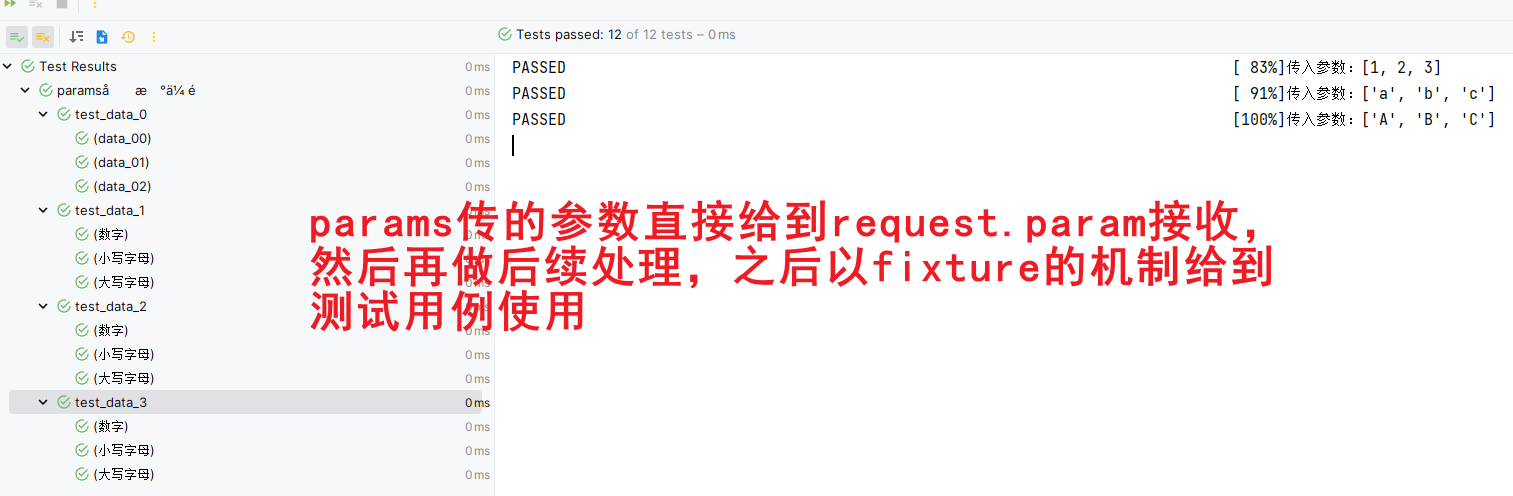
(2)params参数传递和ids用例名称
- Fixture的可选形参列表,支持列表传入;
- 默认None,每个param的值fixture都会去调用执行一次,类似for循环;
- 可与参数ids一起使用,作为每个参数的标识,详见ids;
- 被Fixture装饰的函数要调用是采用:request.param(固定写法 )
import pytest

# 元组元组数据
@pytest.fixture(params=[(1,2,3),('a','b','c'),('A','B','C')])
def data_0(request):
    return request.param

def test_data_0(data_0):
    print(f"传入参数:{data_0}")

# 元组列表数据
@pytest.fixture(params=[(1,2,3),('a','b','c'),('A','B','C')],ids=["数字","小写字母","大写字母"])
def data_1(request):
    return request.param

def test_data_1(data_1):
    print(f"传入参数:{data_1}")

# 列表列表数据
@pytest.fixture(params=[[1,2,3],['a','b','c'],['A','B','C']],ids=["数字","小写字母","大写字母"])
def data_2(request):
    return request.param

def test_data_2(data_2):
    print(f"传入参数:{data_2}")

# 列表元组数据
@pytest.fixture(params=([1,2,3],['a','b','c'],['A','B','C']),ids=["数字","小写字母","大写字母"])
def data_3(request):
    return request.param

def test_data_3(data_3):
    print(f"传入参数:{data_3}")
(3)autouse参数
- 默认False,若为True,刚每个测试函数都会自动调用该fixture,无需传入fixture函数名;
- 由此得出fixture的三种用法:
1.函数或类里面方法直接传fixture的函数参数名称;
2.使用装饰器@pytest.mark.usefixtures()修饰;
3.autouse=True自动调用,无需传仍何参数,作用范围跟着scope走(谨慎使用);
import pytest

# autouse为true时无需传入函数名,作用范围和scope一致
@pytest.fixture(autouse=True)
def login():
    print("当fixture的autouse为true时无需传入函数名")

def test_out():
    print("test_out")

class TestAutouse:
    def test_in_1(self):
        print("test_in_1")

    def test_in_2(self):
        print("test_in_2")
------------------------------------------
当fixture的autouse为true时无需传入函数名
PASSED                                        [ 33%]test_out

当fixture的autouse为true时无需传入函数名
PASSED                          [ 66%]test_in_1
当fixture的autouse为true时无需传入函数名
PASSED                          [100%]test_in_2
(4)name参数-fixture重命名
- 通常来说使用 fixture 的测试函数会将 fixture 的函数名作为参数传递,但是 pytest 也允许将fixture重命名,如果使用了name,那只能将name传如,函数名不再生效并且会报错;
- 调用方法:
@pytest.mark.usefixtures(‘fixturename1’,‘fixturename2’,..);
import pytest

# 使用name对fixture重命名
@pytest.fixture(name="new_fixture")
def test_name():
    pass

# 使用name参数后,传入重命名函数,执行成功
def test_1(new_fixture):
    print("使用:name参数后,传入重命名函数,执行成功")

@pytest.mark.usefixtures("new_fixture")
def test_2():
    print("使用:@pytest.mark.usefixtures(),执行成功")

# 使用name参数后,仍传入函数名称,会失败
def test_3(test_name):
    print("使用name参数后,仍传入函数名称,会会报错")
----------------------------------------------------------------------------------
PASSED                                    [ 33%]使用:name参数后,传入重命名函数,执行成功
PASSED                                    [ 66%]使用:@pytest.mark.usefixtures('new_fixture'),执行成功
E       fixture 'test_name' not found
(5)@pytest.mark.usefixtures(‘fixturename1’,‘fixturename2’,…)
- 作用:不以函数名的方式使用fixture,而是在需要使用fixture的方法上使用这个装饰器;
- 场景:
- 1、没有对fixture重命名,那么fixturename就是函数名;
- 2、如果对fixture进行了重命名,fixtname就是重命名之后的名字;
- 3、经常用于对类进行装饰的时候,因为类无法将函数名作为参数传递进去,只能使用这种方式;
2、结合yield关键字使用
-
场景:
- 已经可以将测试⽅法【前要执⾏的或依赖的】解决了,
- 测试⽅法后销毁清除数据的要如何进⾏呢?
-
解决:
- 通过在 fixture 函数中加⼊ yield 关键字,yield 是调⽤第⼀次返回结果,
- 被装饰的case运行结束后执⾏它下⾯的语句返回。
-
步骤:
- 在@pytest.fixture(scope=module);
- 在登陆的⽅法中加 yield,之后加退出登录等销毁清除的步骤;
-
注意:
- 1、yield可以返回多个数据;
- 2、一个方法中在同一层级只能使用一个yield,如果同一层级使用多个会报错;
import pytest

@pytest.fixture()
def login():
    # 类似setup操作
    print("登录操作返回token")
    token = "4s6df1s6dfs1df31sdf1s3df1"
    username = "无双王者"
    yield token,username
    # 类似teardown操作
    print("退出登录并清理数据操作")
    # yield # 报错--fixture function has more than one 'yield'
    print("关闭手机操作")

class TestLogin:
    def test_search(self):
        print("")

    @pytest.mark.usefixtures("login")
    def test_cart(self):
        print("加入购物车")

    def test_commit(self,login):
        token,username = login
        print(f"下单-用户名:{username},token:{token}")
----------------------------------------------------------------------------------
PASSED                       [ 33%]
登录操作返回token
PASSED                         [ 66%]加入购物车
退出登录并清理数据操作
关闭手机操作
登录操作返回token
PASSED                       [100%]下单-用户名:无双王者,token:4s6df1s6dfs1df31sdf1s3df1
退出登录并清理数据操作
关闭手机操作
3、conftest.py的使用
-
场景:
- 与其他测试⼯程师合作⼀起开发时,公共的模块要在不同⽂件中,要在⼤家都访问到的地⽅。
-
解决:
- 使⽤ conftest.py 这个⽂件进⾏数据共享,并且他可以放在不同位置起着不同的范围共享作⽤。
-
前提:
- conftest ⽂件名是不能换;
- 放在项⽬下是全局的数据共享的地⽅;
-
执⾏:
- 系统执⾏到fixture装饰器函数参数 login 时先从本模块中查找是否有这个名字的变量,
- 之后在 conftest.py 中找是否有。
-
步骤:
- 将登陆模块带@pytest.fixture 写在 conftest.py;
conftest.py
@pytest.fixture(scope="class")
def login_in_conftest():
    # 类似setup操作
    print("登录操作返回token")
    token = "4s6df1s6dfs1df31sdf1s3df1"
    username = "无双王者"
    yield token,username
    # 类似teardown操作
    print("退出登录并清理数据操作")
    # yield # 报错--fixture function has more than one 'yield'
    print("关闭手机操作")
testcase.py
import pytest

class TestLogin:
    def test_search(self):
        print("")

    @pytest.mark.usefixtures("login_in_conftest")
    def test_cart(self):
        print("加入购物车")

    def test_commit(self,login_in_conftest):
        token,username = login_in_conftest
        print(f"下单-用户名:{username},token:{token}")
4、 addfinalizer方法
- addfinalizer也可以实现环境的清理,实现与yield方法相同的效果,跟yield不同的是需要注册作为终结器使用的函数。
- 和yield的区别:
- 1、yield是一个关键字,除了在之后语句进行环境清理之外,还可以直接返回,不需要其他多余动作即可实现;
- 2、addfinalizer是一个方法,需要进行注册,也就是需要使用request调用,它将一个函数名传入,然后解释器会执行函数名对应的函数去完成环境清理等动作;
import pytest

@pytest.fixture()
def login(request):
    print("登录")
    def demo_finalizer():
        print("退出登录")
    # 注册demo_finalizer为终结函数
    request.addfinalizer(demo_finalizer)

class Test_Demo():
    def test_case1(self):
        print("开始执行测试用例1")
        assert 1 + 1 == 2

    def test_case2(self, login):
        print("开始执行测试用例2")
        assert 2 + 8 == 10

    def test_case3(self):
        print("开始执行测试用例3")
        assert 99 + 1 == 100

if __name__ == '__main__':
    pytest.main()
------------------------------------------------------
PASSED                    [ 33%]开始执行测试用例1
登录
PASSED                    [ 66%]开始执行测试用例2
退出登录
PASSED                    [100%]开始执行测试用例3
六、数据驱动
1、什么是数据驱动
- 数据驱动就是数据的改变从而驱动自动化测试的执行,最终引起测试结果的改变。简单来说,就是参数化的应用。数据量小的测试用例可以使用代码的参数化来实现数据驱动,数据量大的情况下建议大家使用一种结构化的文件(例如 yaml,json 等)来对数据进行存储,然后在测试用例中读取这些数据。
- 应用:
- App、Web、接口自动化测试
- 测试步骤的数据驱动
- 测试数据的数据驱动
- 配置的数据驱动
2、yaml文件数据驱动
- 读取 yaml 文件
- 安装:
pip install pyyaml - 方法:
yaml.safe_load(f) - 方法:
yaml.safe_dump(f)
- 安装:
# 读取yaml文件
def get_yaml():
    """
    获取json数据
    :return: 返回数据的结构:[[1, 1, 2], [3, 6, 9], [100, 200, 300]]
    """
    with open('../datas/data.yaml', 'r') as f:
        data = yaml.safe_load(f)
        return data
3、Excel数据驱动
(1)操作Excel的第三方库
- 第三方库
xlrdxlwingspandas- openpyxl
# 读取Excel文件
import openpyxl
import pytest

def get_excel():
    # 获取工作簿
    book = openpyxl.load_workbook('../data/params.xlsx')

    # 获取活动行(非空白的)
    sheet = book.active

    # 提取数据,格式:[[1, 2, 3], [3, 6, 9], [100, 200, 300]]
    values = []
    for row in sheet:
        line = []
        for cell in row:
            line.append(cell.value)
        values.append(line)
    return values
4、csv数据驱动
(1)什么是scv文件
- csv:逗号分隔值
- 是 Comma-Separated Values 的缩写
- 以纯文本形式存储数字和文本
- 文件由任意数目的记录组成
- 每行记录由多个字段组成
Linux从入门到高级,linux,¥5000
web自动化测试进阶,python,¥3000
app自动化测试进阶,python,¥6000
Docker容器化技术,linux,¥5000
测试平台开发与实战,python,¥8000
(2)读取csv文件
- 读取数据
- 内置函数:
open() - 内置模块:
csv
- 内置函数:
- 方法:
csv.reader(iterable)- 参数:iterable ,文件或列表对象
- 返回:迭代器,每次迭代会返回一行数据存入一个列表。
# 读取csv文件内容

import csv

def get_csv(filename):
    with open(filename, 'r',encoding='utf8') as file:
        raw = csv.reader(file)

        for line in raw:
            print(line)
if __name__ == '__main__':
    filename = 'csvdata.csv'
    get_csv(filename)
-------------------------------------------------------------
['Linux从入门到高级', 'linux', '¥5000']
['web自动化测试进阶', 'python', '¥3000']
['app自动化测试进阶', 'python', '¥6000']
['Docker容器化技术', 'linux', '¥5000']
['测试平台开发与实战', 'python', '¥8000']
5、json数据驱动
(1)什么是json文件
- json 是 JS 对象
- 全称是 JavaScript Object Notation
- 是一种轻量级的数据交换格式
- json 结构
- 对象
{"key": value} - 数组
[value1, value2 ...]
- 对象
{
  "name:": "hogwarts ",
  "detail": {
    "course": "python",
    "city": "北京"
  },
  "remark": [1000, 666, 888]
}
(2)读取json文件
- 内置函数 open()
- 内置库 json
- 方法:
json.loads() - 方法:
json.dumps()
import json

def get_json(filename):
    with open(filename, 'r',encoding='utf8') as f:
        data = json.loads(f.read())
        print(data)

if __name__ == '__main__':
    filename = 'jsondata.json'
    get_json(filename)
----------------------------------------------------------------------
{'name:': 'hogwarts ', 'detail': {'course': 'python', 'city': '北京'}, 'remark': [1000, 666, 888]}
七、pytest.ini配置文件
1、什么是pytest.ini文件
-
pytest.ini 是 pytest 的配置文件;
-
可以修改 pytest 的默认行为;
-
不能使用任何中文符号,包括汉字、空格、引号、冒号等等;–ini文件中注释使用英文分号
;,用pycharm注释快捷键即可; -
通常放在项目的根目录下,因为这个是对整个项目全局生效;
-
pytest.ini文件中关键字,通过
pytest --help查看;
2、常见使用
-
修改用例的命名规则;
-
配置日志格式,比代码配置更方便;
-
添加标签,防止运行过程报警告错误;
-
指定执行目录;
-
排除搜索目录;
注意: windows系统 需要把中文 注释去掉。
(1) pytest 配置- 改变运行规则
;执行check_开头和 test_开头的所有的文件,后面一定要加*
python_files = check_* test_*
;执行所有的以Test和Check开头的类
python_classes = Test*  Check*
;执行所有以test_和check_开头的方法
python_functions= test_* check_*
(2) pytest 配置- 添加默认参数
- 添加默认参数之后,命令行就不需要再写入这些参数,当然,也不用输入addops关键字,直接输入pytest及没有添加默认的其他参数;
addopts = -v -s --alluredir=./results
(3) pytest 配置- 指定/忽略执行目录
;设置执行的路径
;testpaths = bilibili baidu
;忽略某些文件夹/目录
norecursedirs = result logs datas test_demo*
(4) pytest 配置- 日志
[pytest]
;----------------------------输出到控制台的设置----------------------------------------------
;日志开关 true false
log_cli = true
;日志级别
log_cli_level = info
;打印详细日志,相当于命令行加 -vs
addopts = --capture=no
;日志格式
log_cli_format = %(asctime)s [%(levelname)s] %(message)s (%(filename)s:%(lineno)s)
;日志时间格式
log_cli_date_format = %Y-%m-%d %H:%M:%S
;----------------------------输出到日志文件的设置----------------------------------------------
;日志文件位置
log_file = ./log/test.log
;日志文件等级
log_file_level = info
;日志文件格式
log_file_format = %(asctime)s [%(levelname)s] %(message)s (%(filename)s:%(lineno)s)
;日志文件日期格式
log_file_date_format = %Y-%m-%d %H:%M:%S
(5)pytest 配置- 添加标签,防止运行过程报警告错误
pytest.ini
[pytest]

;check and test start files
python_files = check_* test_*
;check and test start class
python_classes = Test*  Check*
;check and test start function
python_functions= test_* check_*

;add mark
markers = serach
          login
          loginout
          fixed

;----------------------------terminal----------------------------------------------
;logging switch
log_cli = true
;logging level
log_cli_level = info
;default command params  -vs
addopts = --capture=no
;logging format
log_cli_format = %(asctime)s [%(levelname)s] %(message)s (%(filename)s:%(lineno)s)
;logging date format
log_cli_date_format = %Y-%m-%d %H:%M:%S
;----------------------------file----------------------------------------------
;logging file location
log_file = ./log/test.log
;logging file level
log_file_level = info
;logging file format
log_file_format = %(asctime)s [%(levelname)s] %(message)s (%(filename)s:%(lineno)s)
;logging file date format
log_file_date_format = %Y-%m-%d %H:%M:%S


;test files
testpaths = pytestiniuse
;ignore files
;norecursedirs = result logs datas test_demo*
check_ini.py
import logging
import pytest

def check_function_out1():
    print("check_function1")

@pytest.mark.serach
def test_function_out1():
    logging.info("类外用例日志信息111111111")
    print("test_function_out1")

class CheckClass:
    def check_class_in1(self):
        print("check_class_in1")

    @pytest.mark.login
    def test_class_in1(self):
        logging.info("类中用例日志信息22222222")
        print("test_class_in1")

class TestClass:
    def check_class_in2(self):
        print("check_class_in2")

    @pytest.mark.loginout
    def test_class_in2(self):
        print("test_class_in2")
八、pytest插件
1、pytest插件分类
-
外部插件:pip install 安装的插件;
-
本地插件:pytest 自动模块发现机制(conftest.py 存放的);
-
内置插件:代码内部的_pytest 目录加载;
2、pytest常用外部插件
pip install pytest-ordering  控制用例的执行顺序(重点)
pip install pytest-xdist    分布式并发执行测试用例(重点)
pip install pytest-dependency   控制用例的依赖关系 (了解)
pip install pytest-rerunfailures   失败重跑(了解)
pip install pytest-assume          多重较验(了解)
pip install pytest-random-order  用例随机执行(了解)
pip install pytest-html            测试报告(了解)
(1)、插件pytest-ordering-执行顺序控制
-
场景:
- 对于集成测试,经常会有上下文依赖关系的测试用例。比如 10 个步骤,拆成 10 条 case,这时候能知道到底执行到哪步报错。用例默认执行顺序:自上而下执行。
-
解决:
-
可以通过 setup,teardown 和 fixture 来解决。也可以使用对应的插件。
-
安装:
pip install pytest-ordering -
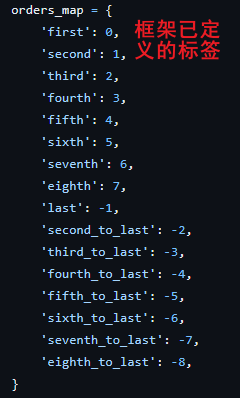
用法:
@pytest.mark.run(order=2)或者使用插件中已经定义好的标记:@pytest.mark.first; -
注意:多个插件装饰器(>2)的时候,有可能会发生冲突;
-
-
官网:
https://github.com/ftobia/pytest-ordering/blob/develop/pytest_ordering/__init__.py
import pytest

@pytest.mark.run(order = 10)
def test_case1():
    print("test_case1")

@pytest.mark.run(order = 3)
def test_case2():
    print("test_case2")

@pytest.mark.run(order = 4)
def test_case3():
    print("test_case3")

class TestOrdering:

    @pytest.mark.first
    def test_case4(self):
        print("test_case4")

    @pytest.mark.run(order=5)
    def test_case5(self):
        print("test_case5")

    @pytest.mark.second
    def test_case6(self):
        print("test_case6")
-------------------------------------------------
test_case4
PASSEDtest_case6
PASSEDtest_case2
PASSEDtest_case3
PASSEDtest_case5
PASSEDtest_case1
PASSED
(2)插件pytest-xdist- Pytest 并行与分布式执行
场景 1:
- 测试用例 1000 条,一个用例执行 1 分钟,一个测试人员执行需要 1000 分钟。通常我们会用人力成本换取时间成本,加几个人一起执行,时间就会 缩短。如果 10 人一起执行只需要 100 分钟,这就是一种分布式场景。
场景 2:
- 假设有个报名系统,对报名总数统计,数据同时进行修改操作的时候有可能出现问题,需要模拟这个场景,需要多用户并发请求数据。
解决:
-
使用分布式并发执行测试用例。分布式插件:
pytest-xdist -
安装:
pip install pytest-xdist -
官网:
https://github.com/pytest-dev/pytest-xdist
- 使用:命令行执行用例的时候添加参数:
pytest -n auto;–自动匹配当前电脑的CPU数量去分布式运行;
注意: 用例多的时候效果明显,多进程并发执行,同时支持 allure;
分布式执行测试用例原则
-
用例之间是独立的,不要有依赖关系;
-
用例执行没有顺序,随机顺序都能正常执行;
-
每个用例都能重复运行,运行结果不会影响其他用例;
3、 pytest 内置插件 hook 体系
(1) pytest hook 介绍

-
是个函数,在系统消息触发时被系统调用,pytest源码只对方法进行了定义,但是没有具体实现,只有当具体实现的时候才会被调用;
-
所有的勾子都放在pytest源码
/Lib/site-packages/_pytest/hookspec.py中; -
自动触发机制;
-
Hook 函数的名称是确定的;
-
pytest 有非常多的勾子函数;
-
使用时直接编写函数体;
提示: 实现的勾子函数必须都放到conftest.py文件中,这样pytest会自动去寻找实现的勾子函数;
confte.py
def pytest_runtest_setup(item: "Item") -> None:
    # 执行测试用例前执行的setup方法
    print("hook setup:",item)
def pytest_runtest_call(item: "Item") -> None:
    # 调用执行测试的用例
    print("hook 测试执行:",item)
def pytest_runtest_teardown(item: "Item", nextitem: Optional["Item"]) -> None:
    # 执行测试用例后执行的teardown
    print("hook teardown:",item)
test_hook.py
def test_hook1():
  print("test_hook1执行了")

def test_hook2():
  print("test_hook2执行了")
--------------------------------------------
hook setup: <Function test_hook1>
hook 测试执行: <Function test_hook1>
test_hook1执行了
PASSED

hook setup: <Function test_hook2>
hook 测试执行: <Function test_hook2>
test_hook2执行了
PASSED
(2)pytest执行顺序勾子函数
site-package/_pytest/hookspec.py
pytest_addoption :  添加命令行参数,运时会先读取命令行参数
pytest_collection_modifyitems : 收集测试用例,收集之后(改编码,改执行顺序)
pytest_collection_finish:收集之后的操作
pytest_runtest_setup:在调用 pytest_runtest_call 之前调用
pytest_runtest_call:调用执行测试的用例
pytest_runtest_makereport:运行测试用例,返回setup,call,teardown的执行结果
(3) 定制pytest插件必备之pytest hook的执行顺序
4、pytest插件开发
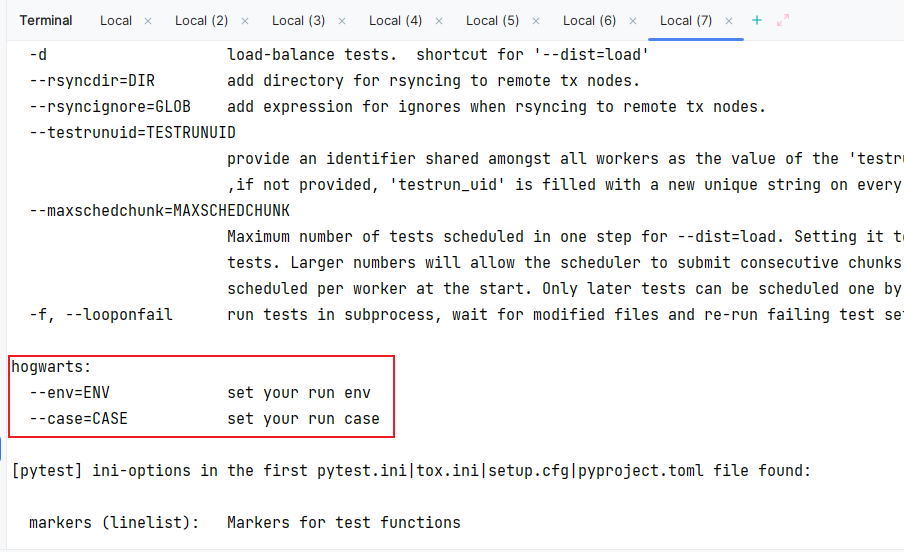
(1)添加命令行参数def pytest_addoption
- 在
conftest.py文件中实现这个hook函数后使用pytest --help即可查看到新增的命令行参数;
conftest.py
def pytest_addoption(parser) -> None:
    """
    添加命令行参数
    :param parser: 一组命令行参数的组名
    :return:
    """
    # 打开或者是新建一个参数组
    mygroup = parser.getgroup("hogwarts")

    # 添加一个参数到上面的参数组中
    mygroup.addoption("--env",  # 注册一个命令行选项
                      default='test',  # 参数的默认值
                      dest='env',  # 存储的变量,为属性命令,可以使用Option对象访问到这个值,暂用不到
                      help='set your run env'  # 帮助提示 参数的描述信息
                      )

    # 添加一个参数到上面的参数组中
    mygroup.addoption("--case",  # 注册一个命令行选项
                      default='test',  # 参数的默认值
                      dest='CASE',  # 存储的变量,为属性命令,可以使用Option对象访问到这个值,暂用不到
                      help='set your run case'  # 帮助提示 参数的描述信息
                      )
- 要想使这个命令行参数具有实际的操作意义,那就需要实现它的操作逻辑;
- 使用fixture实现命令行的功能,在需要使用命令行的地方使用这个fixture即可;
conftest.py
# 针对传入的不同命令行参数完成不同的逻辑处理--哪里需要使用命令就在哪里使用这个fixture
@pytest.fixture(scope="session")
def my_cmdoption_env(request):
    # 接收命令行传过来的--env所给的参数
    myenv = request.config.getoption('--env',default='test')
    # 针对不同的参数值做相应的逻辑处理
    if myenv == 'test':
        datapath = "data/test.yaml"
    elif myenv == 'dev':
        datapath = "data/dev.yaml"

    with open(datapath,'r') as file:
        datas = yaml.safe_load(file)
    return myenv,datas

@pytest.fixture(scope="session")
def my_cmdoption_case(request):
    # 接收命令行传过来的--case所给的参数
    mycase = request.config.getoption('--case',default='test')

    # 针对不同的参数值做相应的逻辑处理
    if mycase == "test":
        return "收集test开头的测试用例"
    elif mycase == "check":
        return "收集check开头的测试用例"
test_option.py–需要使用命令行操作的代码;
def test_my_cmdoption_env(my_cmdoption_env):
    print(my_cmdoption_env)

def test_my_cmdoption_case(my_cmdoption_case):
    print(my_cmdoption_case)
命令行使用新增的参数:
pytest --case check --env dev -vs

A、添加命令行参数实现多环境切换
- 步骤:
- 1、在conftest.py文件中使用hook函数添加命令行参数;
- 2、在代码中实现从命令行获取参数;
- 3、在终端中使用自定义的命令行参数传递值实现环境切换;
案例:
online.py
base_url: https://httpbin.org/
test.py
base_url: https://httpbin.ceshiren.com/
conftest.py
# 定义全局变量用于存储命令行传递的参数及值
global_env = {}

# 添加命令行参数hook函数
def pytest_addoption(parser):
    # group 将下面所有的 option都展示在这个group下。
    mygroup = parser.getgroup("hogwarts")
    # 注册一个命令行选项
    mygroup.addoption("--httpbin_env",
     # 参数的默认值
    default='test',
    # dest相当于是给注册的命令行组起了个别名;存储的变量,为属性命令,可以使用Option对象访问到这个值,暂用不到
    dest='my_env',
    # 参数的描述信息
    help='设置httpbin接口自动化测试默认的环境\n test:测试环境 \n online:线上环境'
     )

# Allow plugins and conftest files to perform initial configuration.
def pytest_configure(config):
    # config:pytest.Config config: The pytest config object.
    # getoption:Return command line option value
    # 获取命令行传递的值
    default_ev = config.getoption("--httpbin_env")
    tmp = {"httpbin_env": default_ev}
    # 将命令行传递的值通过字典存储,方便后续使用
    global_env.update(tmp)

test_commend_line.py
import requests
import yaml
from 多环境管理.testcase.conftest import global_env

class TestEnvironmentVariable:

    def setup_class(self):
        # 获取通过自定义命令行参数传递的值,如果没有通过命令行参数传递值,默认test环境
        default = global_env.get("httpbin_env", "online")
        print(default)
        print(type(default))
        print("*"*20)
        print(f'../data/{default}.yaml')

        # 代码中获取通过命令行传递的参数值作为yaml文件名进行读取里面的数据,实现环境切换
        self.base_url = yaml.safe_load(open(f'../data/{default}.yaml','r',encoding='utf8'))["base_url"]
        print(f"url={self.base_url}")

    # 如果是开发环境这个用例通过
    def test_test(self):
        path = "/get"
        response = requests.request(method="get",url=self.base_url+path,verify=False)
        print(response.json())
        # 断言
        assert response.json()['headers']['Host'] == 'httpbin.ceshiren.com'

    # 如果是测试环境这个用例通过
    def test_online(self):
        path = "/get"
        response = requests.request(method="get", url=self.base_url + path, verify=False)
        print(response.json())
        # 断言
        assert response.json()['headers']['Host'] == 'httpbin.org'
命令行执行命令:
# 运行用例并传入自定义命令行参数--注意:代码中当前路径是输入命令的路径
pytest -vs .\test_commend_line.py --httpbin_env=online
B、添加命令行实现多浏览器切换(处理)
conftest.py
from _pytest.config import Config
from _pytest.config.argparsing import Parser

# 定义一个全局变量,用于存储命令行参数传递过来的值,方便其他地方使用这个命令行参数值做不同逻辑处理
WEBUI_BROWSER = {}

# 重写pytest的pytest_addoption勾子(hook)函数创建一个命令行参数
def pytest_addoption(parser: Parser) -> None:
    # 注册一个参数组
    """
    :param name: Name of the option group.
    :param description: Long description for --help output.
    """
    browser_group = parser.getgroup(name="webui_browser",description="web自动化浏览器选择")
    # 注册一个命令行参数
    browser_group.addoption(
        # 命令行参数名称
        "--browser",
        # 命令行参数的默认值,也就是不通过--browser传值的时候,默认的--browser的值就是这个值
        default = "Chrome",
        # 给这个命令行参数起个别名--被存在之后会变成大写
        dest = "webuibrowser",
        # 命令行参数的帮助文档
        help = "用于指定web自动化的浏览器\n Chrome:谷歌浏览器\n Edge:edge浏览器"
    )

# 重写pytest的pytest_configure勾子函数,用于获取从命令行传过来的参数值
def pytest_configure(config: Config) -> None:
    # 获取命令行参数--browser传过来的值,默认值为Chrome
    browser = config.getoption(name="--browser",default="Chrome")
    print(f"命令行参数--browser传过来的值为:{browser}")
    # 将获取的命令行参数值添加到全局变量中,方便后续针对不同命令行参数进行不同逻辑处理
    WEBUI_BROWSER["browser"] = browser
testcase.py
"""
多浏览器处理:兼容性测试的时候需要测试应用在不同浏览器上的显示及功能是否符合预期
目标:使用同一套测试脚本在不同浏览器上运行
方案:
1、conftest.py文件中,通过pytest的hook函数pytest_addoption注册一个命令行参数用于在命令行给定参数
2、通conftest.py文件中,过pytest的hook函数pytest_configure获取通过命令行传递过来的参数---获取到的参数在脚本中要用,所以需要把这个参数进行保存
3、在脚本中,创建driver的时候通过判断命令行参数传递过来的值来创建对应的driver---因为值要传递,所以要把从命令行获取到的参数值先保存
"""
import time

from selenium import webdriver
from apiusage.conftest import WEBUI_BROWSER

class TestBaidu:
    def setup_class(self):
        # 通过全局的命令行参数值判断所使用的浏览器
        browser = WEBUI_BROWSER["browser"]
        if browser == "Chrome":
            self.driver = webdriver.Chrome()
        elif browser == "Edge":
            self.driver = webdriver.Edge()
        else:
            raise Exception(f"未安装{browser}浏览器及其对应驱动")
        self.driver.maximize_window()
        self.driver.get("https://www.baidu.com")

    def teardown_class(self):
        self.driver.quit()

    def test_baidu(self):
        url = self.driver.current_url
        print(url)
        time.sleep(5)
(2)用例执行后-搜集执行失败用例信息并写入文件def pytest_runtest_makereport
实现思路:
- 搜集执行失败用例信息:
- 判断用例执行失败。
- 提取失败用例信息。
- 失败用例信息保存到 yaml 文件中。
# conftest.py
@pytest.hookimpl(hookwrapper=True, tryfirst=True)
def pytest_runtest_makereport(item, call):
    # 获取钩子方法的调用结果
    out = yield
    # 从钩子方法的调用结果中获取测试报告
    report = out.get_result()
    fail_case_info = []
    # 如果用例执行不通过
    if report.outcome != "passed":
        case_info = {
            "nodeid": report.nodeid,
            "result": report.outcome
        }
        fail_case_info.append(case_info)
        # 用例信息写入 yaml 文件
        with open('./fail_cases_info.yaml', 'a', encoding='utf-8') as f:
            yaml.dump(fail_case_info, f)
(3)收集用例后-修改用例ids中文编码def pytest_collection_modifyitems
def pytest_collection_modifyitems(items):
    """
    测试用例收集完成时,将收集到的用例名name和用例标识nodeid的中文信息显示在控制台上
    """
    for i in items:
        i.name=i.name.encode("utf-8").decode("unicode_escape")
        i._nodeid=i.nodeid.encode("utf-8").decode("unicode_escape")
5、pytest插件打包发布
- 1、源代码发给对方使用;
- 2、将插件打包发布到
www.pypi.org,使用者通过在线安装方式进行使用;
(1)打包项目构成
- 源码包;
- setup.py;
- 测试包;
- 其他说明(README.md)或者授权等文件;
- 官方文档: Packaging Python Projects — Python Packaging User Guide
(2)setup.py构建文件
setup.py
from setuptools import setup,find_packages
setup(
    # 插件包的名字
    name='pytest_encode',
    # 源码地址
    url='https://github.com/xxx/pytest-encode',
    version='1.0',
    author="echo",
    author_email='echooche@163.com',
    description='set your encoding and logger',
    long_description='Show Chinese for your mark.parametrize(). Define logger variable for getting your log',
    classifiers=[# 分类索引 ,pip 对所属包的分类
        'Framework :: Pytest',
        'Programming Language :: Python',
        'Topic :: Software Development :: Testing',
        'Programming Language :: Python :: 3.11.4',
    ],
    # 授权证书
    license='proprietary',
    # 可以通过import导入包,find_packages能自动发现可以导入的包(带__init__.py文件)
    packages = find_packages(), #['pytest_encode'],
    # pipy能够通过这些关键字进行分类
    keywords=[
        'pytest', 'py.test', 'pytest_encode',
    ],

    # 需要安装的依赖--安装自己打的包的时候会自动去安装这里的依赖包
    install_requires=[
        'pytest'
    ],
    # 入口模块 或者入口函数--很重要:pytest11是查找插件的关键字,后面给定各自的入口点
    entry_points={
        'pytest11': [
            'pytest_encode = pytest_encode.main',
        ]
    },
    # 针对Windows需要设置为false,不然可能会出错
    zip_safe=False
)
(3)打包命令
- 依赖包安装:
pip install setuptools   →python 的包管理工具,负责 安装和发布,尤其是安装拥有信赖关系的包。
pip install wheel        →生成 *.whl 格式的安装包,本质上也是一个压缩包
- 打包命令:需要在setup.py文件所在的路径下执行命令;
python setup.py sdist bdist_wheel

