一、capability 进阶用法
1、 deviceName
- 只是设备的名字,别名
- 随便起
- 不能锁定唯一一个设备
2、 uid
- 多设备选择的时候,要指定 uid
- 默认读取设备列表的第一个设备
- 设备列表获取
adb devices
3、 newCommandTimeout
- appium 程序应等待来自客户端的新命令多长时间
- 超时后==会话删除==
- 默认
60秒 - 设置为 0 禁用
4、 autoGrantPermissions
- 授予启动的应用程序某些权限
5、 PRINT_PAGE_SOURCE_ON_FIND_FAILURE
- 默认为
false - 发生任何错误,强制服务器将实际的 XML 页面源转储到日志中.
6、 测试策略
- noReset
- fullReset
- dontStopAppOnReset
7、 noReset
- 默认为
false - 安卓
true- 不停止应用程序
- 不清除应用程序数据
- 不卸载 apk
8、 fullReset
- 默认为
false。true:新会话之前完全卸载被测应用程序 - 安卓
- 在会话开始之前(appium 启动 app)和测试之后停止应用程序
- 清除应用程序数据并卸载 apk
9、 dontStopAppOnReset
- 默认为
false。 - 不希望应用程序在运行时重新启动,设置为
true
#打开的app退出后重新启动
adb shell am start -S 包名/activity名

#打开的app不需要退出,直接使用当前页面
adb shell am start 包名/activity名
二、元素定位工具
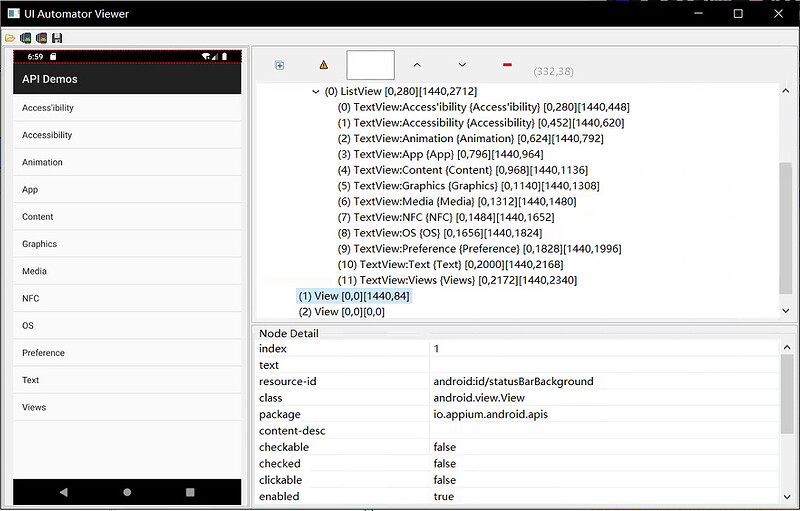
1、uiautomatorviewer 工具安装
- 工具的安装:Android SDK 自带的界面分析工具
- 打开
tools/bin目录下的uiautomatorviewer程序
2、 uiautomatorviewer 工具功能介绍
- 第一个是通过分析给定的文件定位
- 第二个是将当前界面截图并分析xml结构
- 第三个与第二个功能类似,但它会对页面内容进行压缩,导致一些控件定位不准确
- 第四个是保存当前界面的截图以及xml结构
UiAutomatorViewer界面
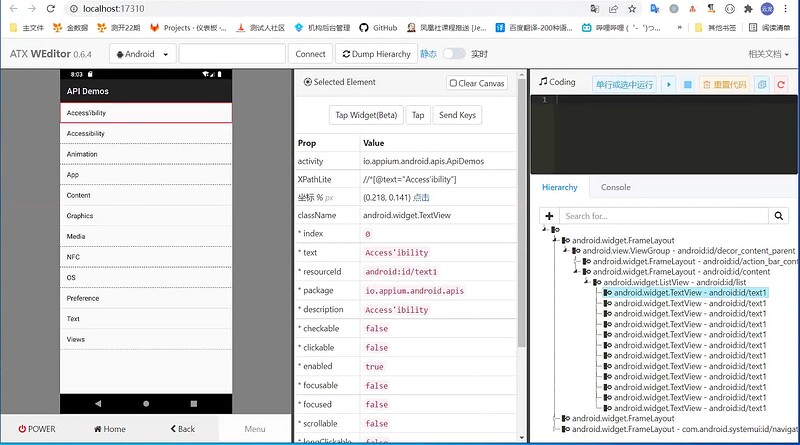
3、 weditor 安装与运行
- 要求:python 3.6+ 以上
- 安装:weditor 是 python 的第三方库
-
pip install weditor进行安装
-
- 运行:安装完成之后,在命令行运行
python -m weditor即可
4、 weditor 功能介绍
- 支持 Android 和 iOS 的界面分析
- 通过设备的 uuid 连接设备
- 展示页面结构
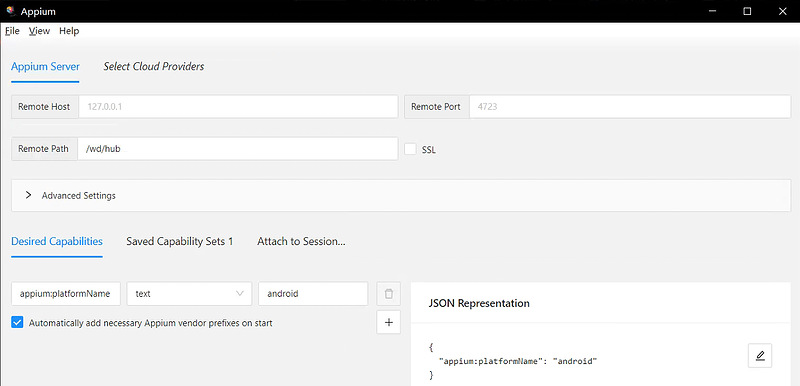
5、 appium inspector 安装与运行
- 下载:下载链接
- 运行 appium inspector
- 运行 appium server
- 本地的 adb 已连接设备
- Desired Capabilities 参数填写
- 点击 Start Session
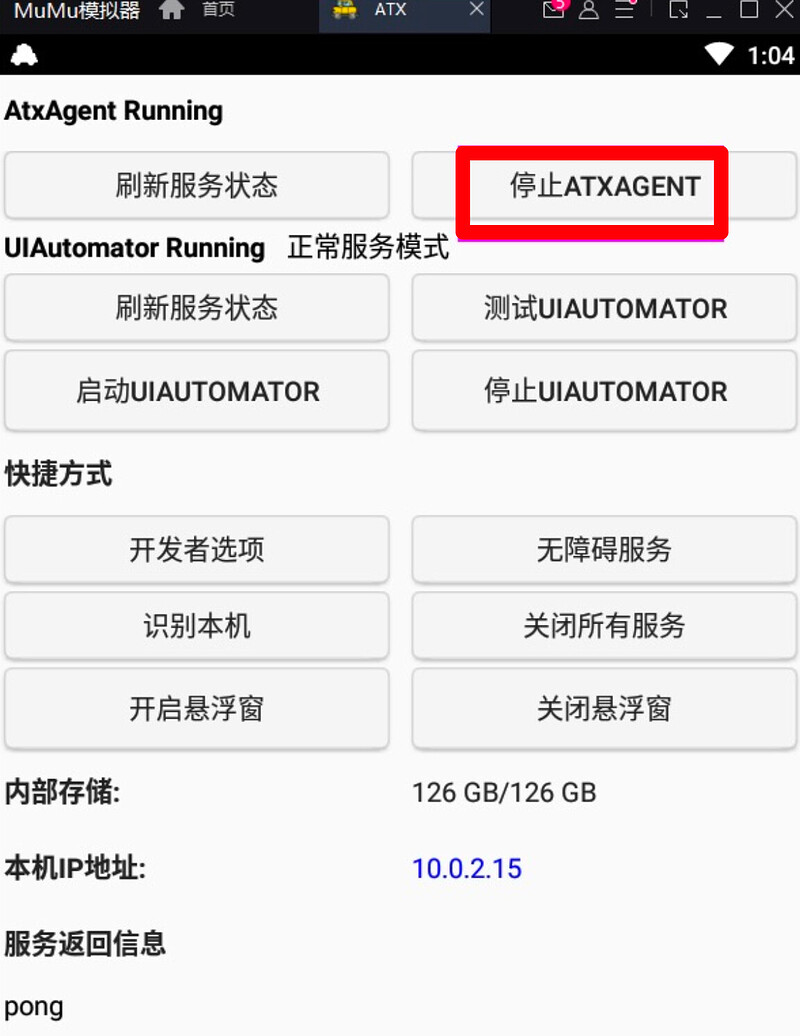
- 注意:在运行appium inspect 的时候需要检查一下weditor在手机上安装的ATX服务是否停止,因为ATX服务会占用uiautomator2的
6、 appium inspector 功能简介
- 定位的模式相关
- 原生app模式
- 混合模式
- 界面操作相关
- 选择元素
- 坐标滑动界面
- 坐标点击元素
- 其他功能
- 返回
- 刷新页面
- 录制
- 搜索元素
- 复制 xml 结构

7、 对选中元素操作
- 点击
- 输入
- 清空
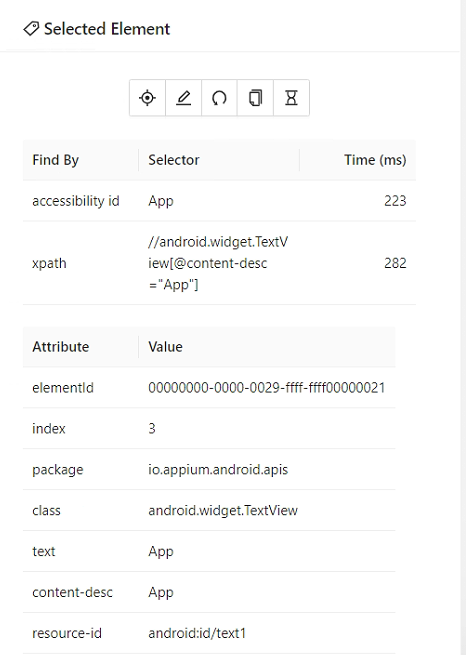
- 复制元素的属性
- 获取元素的响应时间
- 元素的属性
三、高级定位技巧-xpath 定位
1、 * xpath 函数:包含-contains()
-
Xpath表达式中的一个函数 -
contains()函数匹配==属性值==中包含的==字符串==
//*[contains(@属性,"属性值")]
2、 总结
-
contains()函数定位的元素很容易为list -
contains()函数内的属性名需要用@开始
3、 XPath 轴
- 父子
- 爷孙
- 祖先
- 兄弟姐妹
父子-当前节点的父节点
//*[@text="HK"]/..
//*[@text="HK"]/parent::*
父子-当前节点的子节点
- 当前节点的儿子
//*[@resource-id="com.xueqiu.android:id/stock_layout"]/child::*
爷孙-当前节点的爷爷
- 当前节点的父级的父级
//*[@text="HK"]/../..
//*[@text="HK"]/parent::*/parent::*
爷孙-当前节点的孙子
- 当前节点的儿子的儿子
//*[@resource-id="com.xueqiu.android:id/stock_layout"]/child::*/child::*
祖先-ancestor
- 返回当前节点的所有祖先
//*[@text="HK"]/ancestor::android.widget.RelativeLayout
- 显式指定要返回的祖先
//*[@text="HK"]/ancestor::android.widget.RelativeLayout[1]
兄弟姐妹-sibling
- 节点后的兄弟姐妹节点
- 节点前的兄弟姐妹节点
following-sibling
- 选择当前节点之后的所有兄弟节点
- 节点后有一个兄弟节点
//*[@text="HK"]/following-sibling::*
- 节点后有多个兄弟节点
//*[@resource-id="com.xueqiu.android:id/stock_layout"]/following-sibling::*[@resource-id="com.xueqiu.android:id/price_layout"]
preceding-sibling
- 选择当前节点之前的所有兄弟节点
- 节点前有一个兄弟节点
//*[@text="09988"]/preceding-sibling::*
- 节点前有多个兄弟节点
//*[@resource-id="com.xueqiu.android:id/add_attention"]/preceding-sibling::*[@resource-id="com.xueqiu.android:id/price_layout"]
4、 XPath 运算符
(1)AND
- 可以在
XPath表达式中放置 2 个条件 - 在
AND两个条件都应该为真的情况下,才能找到元素
//*[@resource-id="com.xueqiu.android:id/current_price" and @text="107.8"]
(2) OR
- 可以在
XPath表达式中放置 2 个条件 - 在
OR的情况下,两个条件中的任何一个为真,就可找到元素。 -
OR定位获取的是并集
//*[@resource-id="com.xueqiu.android:id/tv_stock_add_follow" or @text="加自选"]
5、 总结
-
and定位是 2 个条件的交集 -
or定位是 2 个条件的是并集
四、 CSS 定位与原生定位
1、 原生定位
- 官网地址
- 元素属性定位
- 组合定位
# ID 定位
driver.find_element_by_android_uiautomator('\
    new UiSelector().resourceId("<element-ID>")')

# 组合定位
driver.find_element_by_android_uiautomator('\
    new UiSelector().resourceId("com.xueqiu.android:id/tab_name").\
    text("我的")')
2、 css selector 定位介绍
- 官网说明
- Android: Appium Server 版本 >= 1.19.0
- iOS:Appium Server>= 1.21.0
driver.find_element(AppiumBy.CSS_SELECTOR,\
    "#com\.xueqiu\.android\:id\/tv_search")

解析前:
{"using":"css selector",\
    "value":"#com\\.xueqiu\\.android\\:id\\/tv_search"}

解析后:
{"strategy":"-android uiautomator",\
    "selector":"new UiSelector().resourceId
    (\"com.xueqiu.android:id/tv_search\")",...}
3、 css selector 用法
# 通过 id
elementById("someResourceID")`
    -> `elementsByCss("#someResourceID")
# 通过 class
elementsByClassName("android.widget.TextView")`
    -> `elementsByCss("android.widget.TextView")
# 通过 accessibility id
elementsByAccessibilityId("Some Content Description")`
    -> `elementsByCss('*[description="Some Content Description"]')
# 通过 xpath
elementsByXpath("//android.widget.TextView[@description='Accessibility']")`
    -> `elementsByCss("android.widget.TextView[description='Accessibility']")
4、 示例
- 打开【雪球】应用首页
- 点击搜索框
- 向搜索框输入:alibaba
- 判断【阿里巴巴】可见
def test_search1(self):
    # 点击搜索框
    element = self.driver.find_element(\
        AppiumBy.CSS_SELECTOR,"#com\.xueqiu\.android\:id\/tv_search")
    element.click()
    # 向搜索框输入:alibaba
    self.driver.find_element(AppiumBy.CSS_SELECTOR,
        "#com\.xueqiu\.android\:id\/search_input_text"). \
        send_keys("alibaba")
    alibaba_element = self.driver.find_element(\
        AppiumBy.CSS_SELECTOR, "*[text='阿里巴巴']")
    displayed = alibaba_element.get_attribute("displayed")
    print(displayed)
    # 判断【阿里巴巴】可见
    assert displayed == "true"
    print(f"结束时间:{self.get_time()}")
5、 iOS css selector 定位
- Appium Server 版本>=1.21.0
- 官网:Release v1.21.0 · appium/appium · GitHub
6、 总结
- Appium Server 版本>=1.21.0
- css selector 会转化为 Android/iOS 原生定位的定位策略
- Android 转为 Android Uiautomator 定位方式
- iOS 转为 class chain 定位方式
五、特殊控件 toast 识别
1、 Toast 是什么
- 一种消息框类型
- 永远不会获得焦点
- 无法被点击
- Toast显示的时间有限,Toast会根据用户设置的显示时间后自动消失
- 是系统级别的控件,属于系统settings
- Toast类的思想:
- 就是尽可能不引人注意,同时还向用户显示信息,希望他们看到
2、 Toast 定位
-
appium 用的是uiautomator底层来抓取toast,
-
再把toast放到控件树内,但是它本身不属于空间
-
使用的是uiautomator2
xpath可以找到 ``` //*[@class=“android.widget.Toast”]//*[contains(@text,“xxx”)] ``` xxx:toast的文本内容
driver.manage().timeouts().implicitlyWait(Duration.ofSeconds(50));
driver.findElement(AppiumBy.xpath("//*[@class=\"android.widget.Toast\"]"));
from appium import webdriver
from appium.webdriver.common.mobileby import MobileBy

class TestToast():
    def setup(self):
        desire = {
            'platformName': 'android',
            'platformVersion': '6.0',
            'deviceName': 'emulator-5554',
            'appPackage': 'io.appium.android.apis',
            'appActivity': 'io.appium.android.apis.view.PopupMenu1',
            #可以加也可以不加,现在默认就是uiautomator2
            'automationName' : 'uiautomator2'
        }
        self.driver = webdriver.Remote("http://127.0.0.1:4723/wd/hub", desire)
        self.driver.implicitly_wait(5)

    def teardown(self):
        self.driver.quit()

    def test_toast(self):
        self.driver.find_element(MobileBy.ACCESSIBILITY_ID,"Make a Popup!").click()
        self.driver.find_element(MobileBy.XPATH,"//*[@text='Search']").click()
        # print(self.driver.page_source)
        # print(self.driver.find_element(MobileBy.XPATH, "//*[@class='android.widget.Toast']").text)
        #获取toast弹框信息
        print(self.driver.find_element(MobileBy.XPATH, "//*[contains(@text, 'Clicked popup')]").text)
六、显式等待高级使用
1、 Wait 等待
- 强制等待:sleep 不推荐
- 全局隐式等待
- 在服务端等待
driver.implicitly_wait(TIMEOUT)
- 显式等待
- 在客户端等待
WebDriverWait(self.driver,10).until(expected_conditions.visibility_of_element_located(LOCATOR))
2、 显式等待
- 显式等待
- 显示等待与隐式等待相对,显示等待必须在每个需要等待的元素前面进行声明。
- 是针对于某个特定的元素设置的等待时间,在设置时间内,默认每隔一段时间检测一次当前页面某个元素是否存在,
- 如果在规定的时间内找到了元素,则直接执行,即找到元素就执行相关操作,
- 如果超过设置时间检测不到则抛出异常。默认检测频率为 0.5s,默认抛出异常为:
NoSuchElementException
- 显示等待用到的两个类:
-
WebDriverWait和expected_conditions两个类
-
3、 显式等待
- 显式等待可以等待动态加载的 ajax 元素,显式等待需要使 ExpectedCondtions 来检查条件
- 一般页面上元素的呈现
- title 出现 首先出现 title
- dom 树出现 presence ,还不完整
- css 出现 (可见 visibility)
- js 出现,js 特效执行 ( 可点击 clickable)
- html 文档是自上而下加载的,
- js 文件加载会阻塞 Html 内容的加载,有些 JS 异步加载的方式来完成 js 的加载
- 样式表下载完成之后会跟之前的样式表一起进行解析,会对之前的元素重新渲染
4、 WebDriverWait 用法
- WebDriverWait 用法
- WebDriverWait(driver,timeout,poll_frequency=0.5,ignored_exceptions=None)
- driver:浏览器驱动
- timeout:最长超时时间,默认以秒为单位
- poll_frequency:检测的间隔步长,默认为 0.5s
- ignored_exceptions:超时后的抛出的异常信息,默认抛出 NoSuchElementExeception 异常。
- WebDriverWait 的 until()和 until_not()方法:
- method: 在等待期间,每隔一段时间(init中的 poll_frequency)调用这个传入的方法,直到返回值不是 False , message: 如果超时,抛出 TimeoutException,将 message 传入异常
- until_not: 与 until 相反,until 是当某元素出现或什么条件成立则继续执行,until_not 是当某元素消失或什么条件不成立则继续执行,参数也相同。
5、 expected_conditions 类
-
presence_of_element_located判断元素是否被加到了 DOM 树里,并不代表该元素一定可见- 用法:
WebDriverWait().until(expected_conditions.presence_of_element_located(元素对象))
- 用法:
-
visibility_of_element_located判断某个元素是否可见,可见代表元素非隐藏,并且元素的宽和高都不等于 0- 用法:
WebDriverWait().until(expected_conditions.visibility_of_element_located(元素定位符))
6、 使用 lambda 表达式
WebDriverWait(driver,time).until(lambda x:x.find_element_by_id("someId")- 返回一个元素
7、 显式等待案例
8、 总结三种等待方式
- 隐式等待,尽量默认都加上,时间限定在 3-6s,不要太长, 为了所有的 find_element 方法都有一个很好的缓冲
- 显式等待,用来处理隐式等待无法解决的一些问题,比如:文件上传(可以设置长一点),文件上传需要设置 20s 以上, 但是如果设置隐式等待, 它会在每个 find 方法都等这么长时间 , 一旦发现没有找到元素, 就会等 20s 以后才抛出异常, 影响 case 的执行效率,这时候就需要用显式等待,显式等待可以设置的长一点
- 强制等待:一般不推荐,前两种基本能解决绝大部分问题,如果某个控件没有任何特征,只能强制等待,这种情况比较少
七、高级控件交互方法
1、 Actions
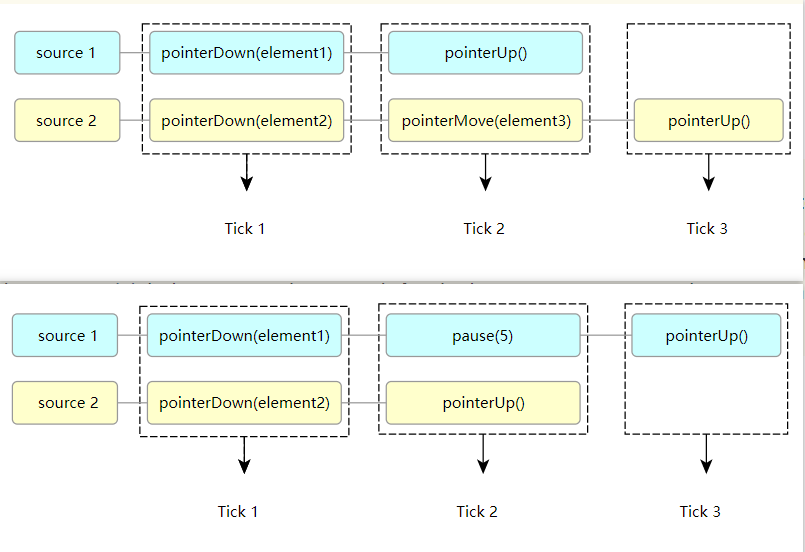
2、 W3C 事件流
3、 用法
- 定义 ActionChains 实例
- 定义输入源
- 定义动作
# 定义ActionChains 实例
actions = ActionChains(driver)
# 第一步:定义输入源
# ActionChains里有个属性是ActionBuilder类型的, 使用的就是w3c协议
# 可以定义鼠标指针源,键盘源,滚轮源事件
actions.w3c_actions = ActionBuilder(driver, mouse=PointerInput(interaction.POINTER_TOUCH, "touch"))
# 第二步:定义动作
# 移动到起点-> 按下-> 滑动-> 抬起
actions.w3c_actions.pointer_action.move_to_location(115, 183)
actions.w3c_actions.pointer_action.pointer_down()
actions.w3c_actions.pointer_action.move_to_location(362, 179)
actions.w3c_actions.pointer_action.release()
actions.perform()
八、设备交互api
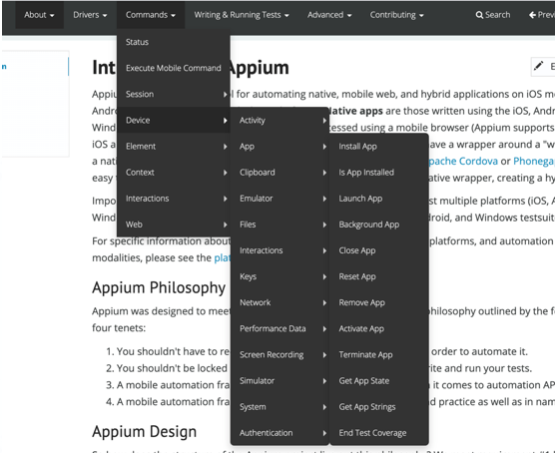
1、 常用的设备交互命令
- 模拟电话、短信
- 网络模式
- 横竖屏切换
- App处理
- 录屏
- 官方地址:http://appium.io/docs/en/about-appium/intro/
2、 官方参考
3、 模拟电话、短信
- appium可以模拟来电话,来短信功能,在app运行过程中收到短信/电话,app如何做处理的,专属的一些场景
- 只支持原生模拟器,不支持mumu,genimotion等
driver.makeGsmCall(PHONE_NUMBER, GsmCallActions.CALL);
driver.makeGsmCall(PHONE_NUMBER, GsmCallActions.ACCEPT);
driver.makeGsmCall(PHONE_NUMBER, GsmCallActions.CANCEL);
driver.sendSMS("555-123-4567", “Appium Test”);
4、 网络设置
self.driver.set_network_connection(1)
self.driver.set_network_connection(4)
def set_network_connection(self, connection_type: int) -> int:
        """Sets the network connection type. Android only.

        Possible values:

            +--------------------+------+------+---------------+
            | Value (Alias)      | Data | Wifi | Airplane Mode |
            +====================+======+======+===============+
            | 0 (None)           | 0    | 0    | 0             |
            +--------------------+------+------+---------------+
            | 1 (Airplane Mode)  | 0    | 0    | 1             |
            +--------------------+------+------+---------------+
            | 2 (Wifi only)      | 0    | 1    | 0             |
            +--------------------+------+------+---------------+
            | 4 (Data only)      | 1    | 0    | 0             |
            +--------------------+------+------+---------------+
            | 6 (All network on) | 1    | 1    | 0             |
            +--------------------+------+------+---------------+
5、 横竖屏切换
- 横竖屏切换,官方暂不支持python,以下是java代码。
- 切换成横屏
driver.rotate(Screenorientation.LANDSCAPE)
- 切换成竖屏
driver.rotate(Screenorientation.PORTRAIT)
6、 获取日志
self.driver.log_types
self.driver.get_log("logcat")
7、 其它常用操作
- 锁屏
driver.lock()
- 截图
driver.get_screenshot_as_file('./photos/img.png')
- 录屏:模拟器需要 androidAPI>27,华为不支持,只支持 8.0以上的版本
- 开始录制:
self.driver.start_recording_screen() - 结束录制:
self.driver.stop_recording_screen()
- 开始录制:
九、模拟器控制
1、 主要内容
- 模拟器自动启动与自动执行测试用例
2、 android 模拟器创建
- Android Studio
- 在命令行启动模拟器
- emulator -list-avds 模拟器列表
- emulator ‘@foo’ or ‘-avd foo’
3、配置
- desirecap里面需要配置
- avd: ‘模拟器名’
- 注意自动启动模拟器,只能是sdk的模拟器,第三方模拟器不支持,7.0不支持
