一、自动化用例录制
1、Appium Inspctor 功能介绍
- UI 分析
- 录制用例
- 元素查找测试
- Attcah 已有的 session
- 云测试
2、用例录制
1)获取 app 的信息
2)配置待测应用
3、获取 app 的信息
1)app 入口,两种方式获取:
* 通过 logcat 日志获取
    Mac/Linux: adb logcat ActivityManager:I | grep “cmp"
    Windows: adb logcat ActivityManager:I | findstr "cmp"
* 通过 aapt 获取
    Mac/Linux: aapt dump badging wework.apk | grep launchable-activity
    Windows: aapt dump badging wework.apk | findstr launchable-activity
2)启动应用命令 adb shell am start -W -n <package-name>/<activity-name> -S
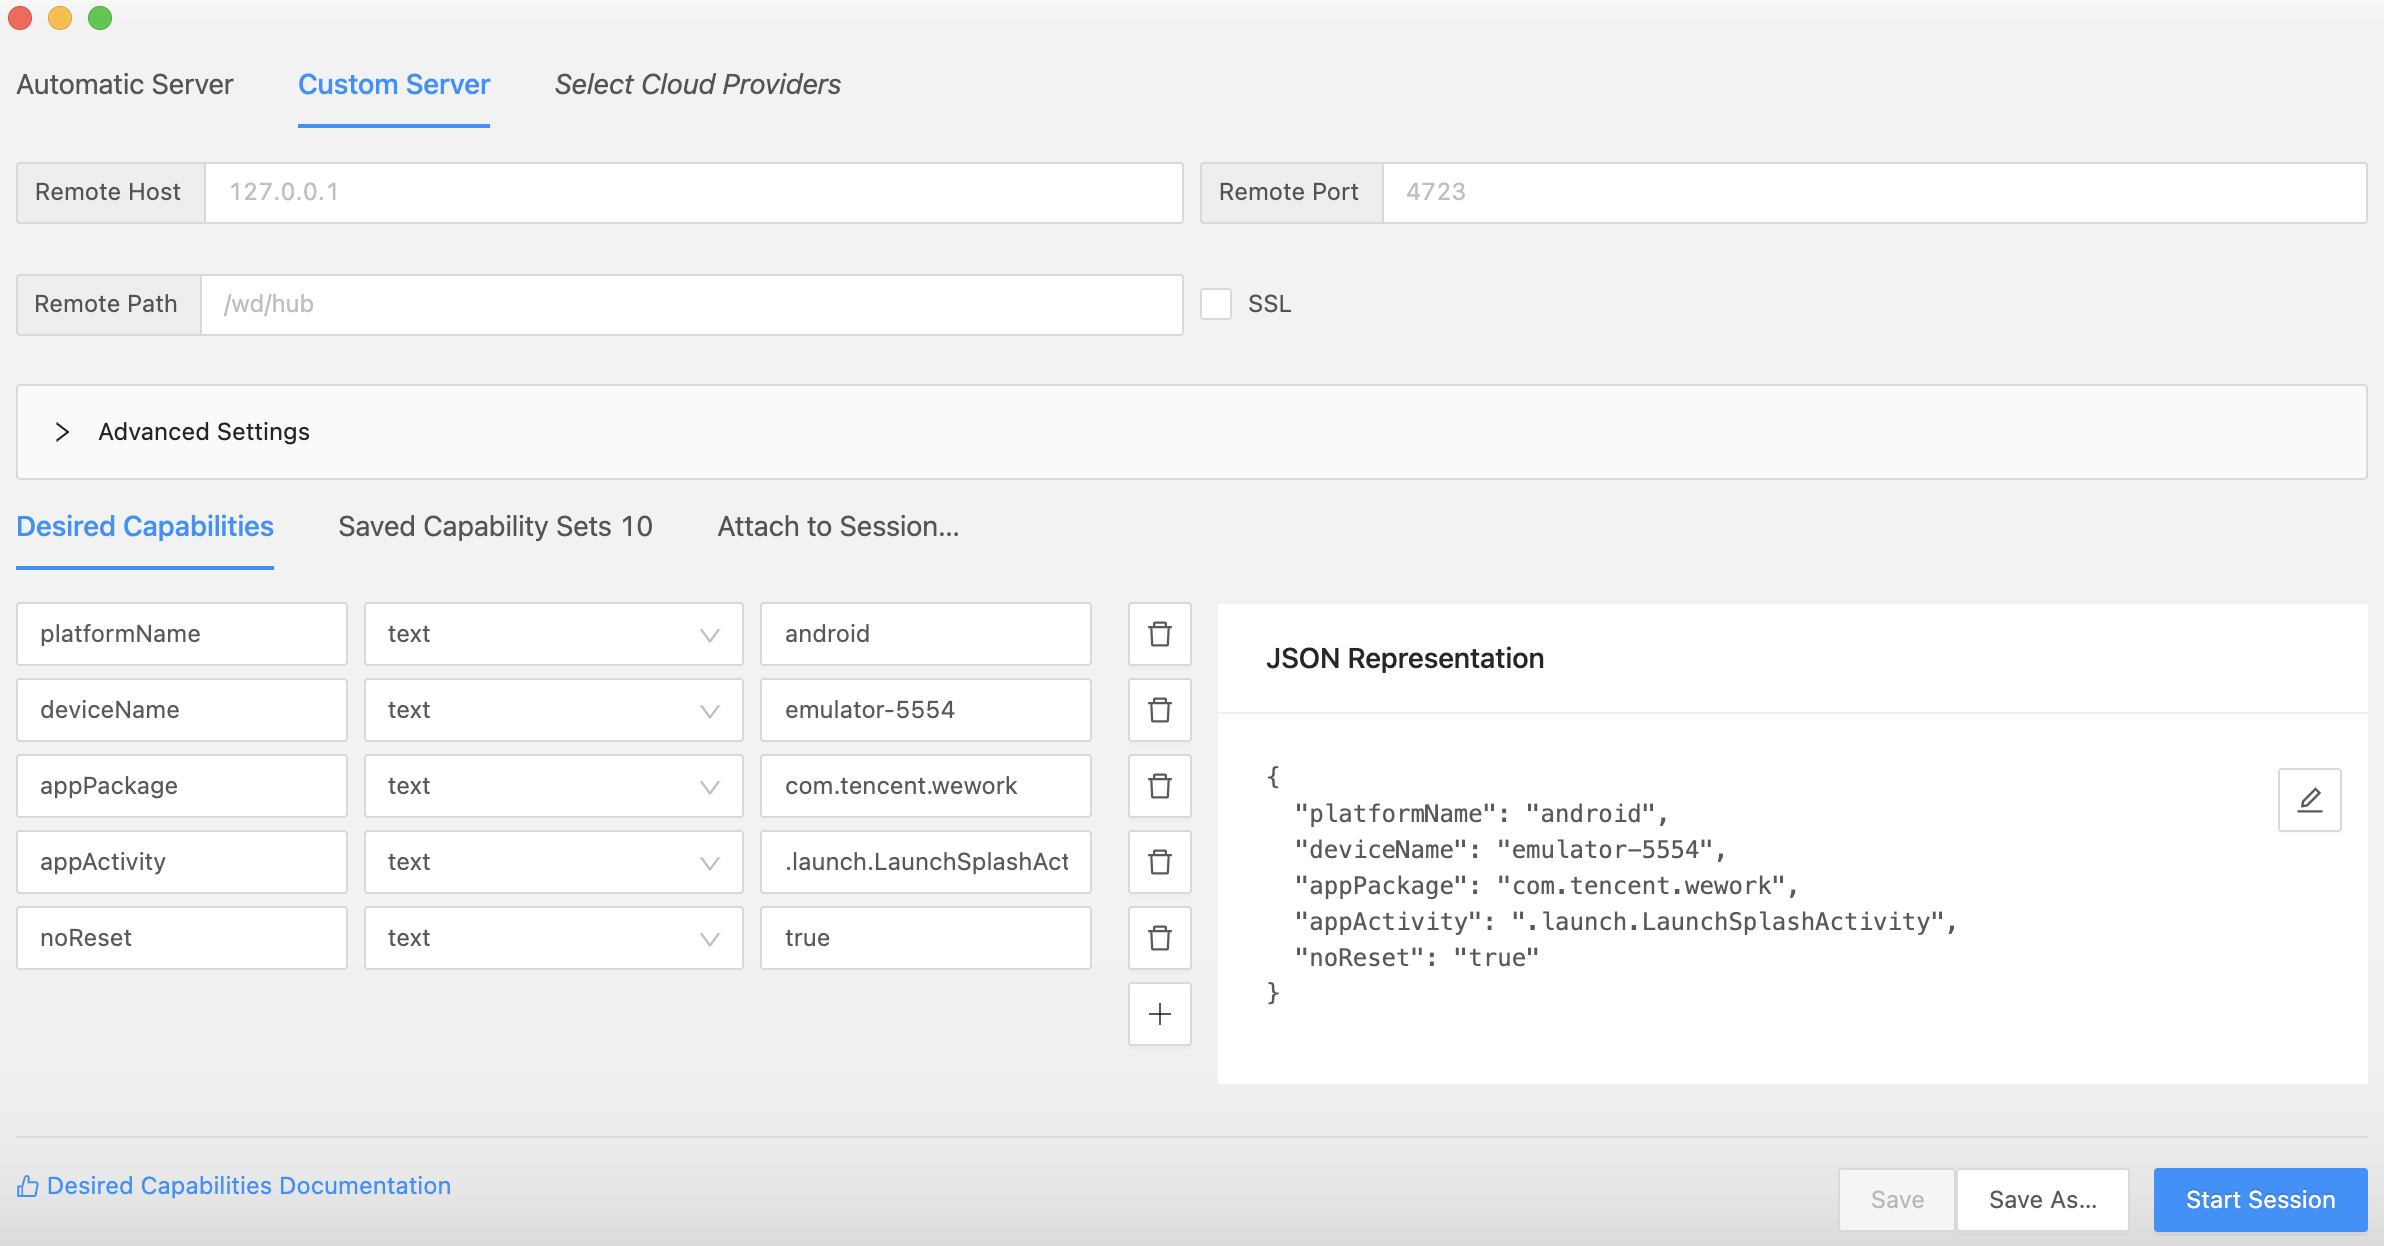
4、配置待测应用
1)platformName:平台,Android/iOS
2)deviceName:设备名
3)appPackage:应用的包名
4)appActivity:应用的页面名 Activity
5)noReset: 防止清空缓存信息
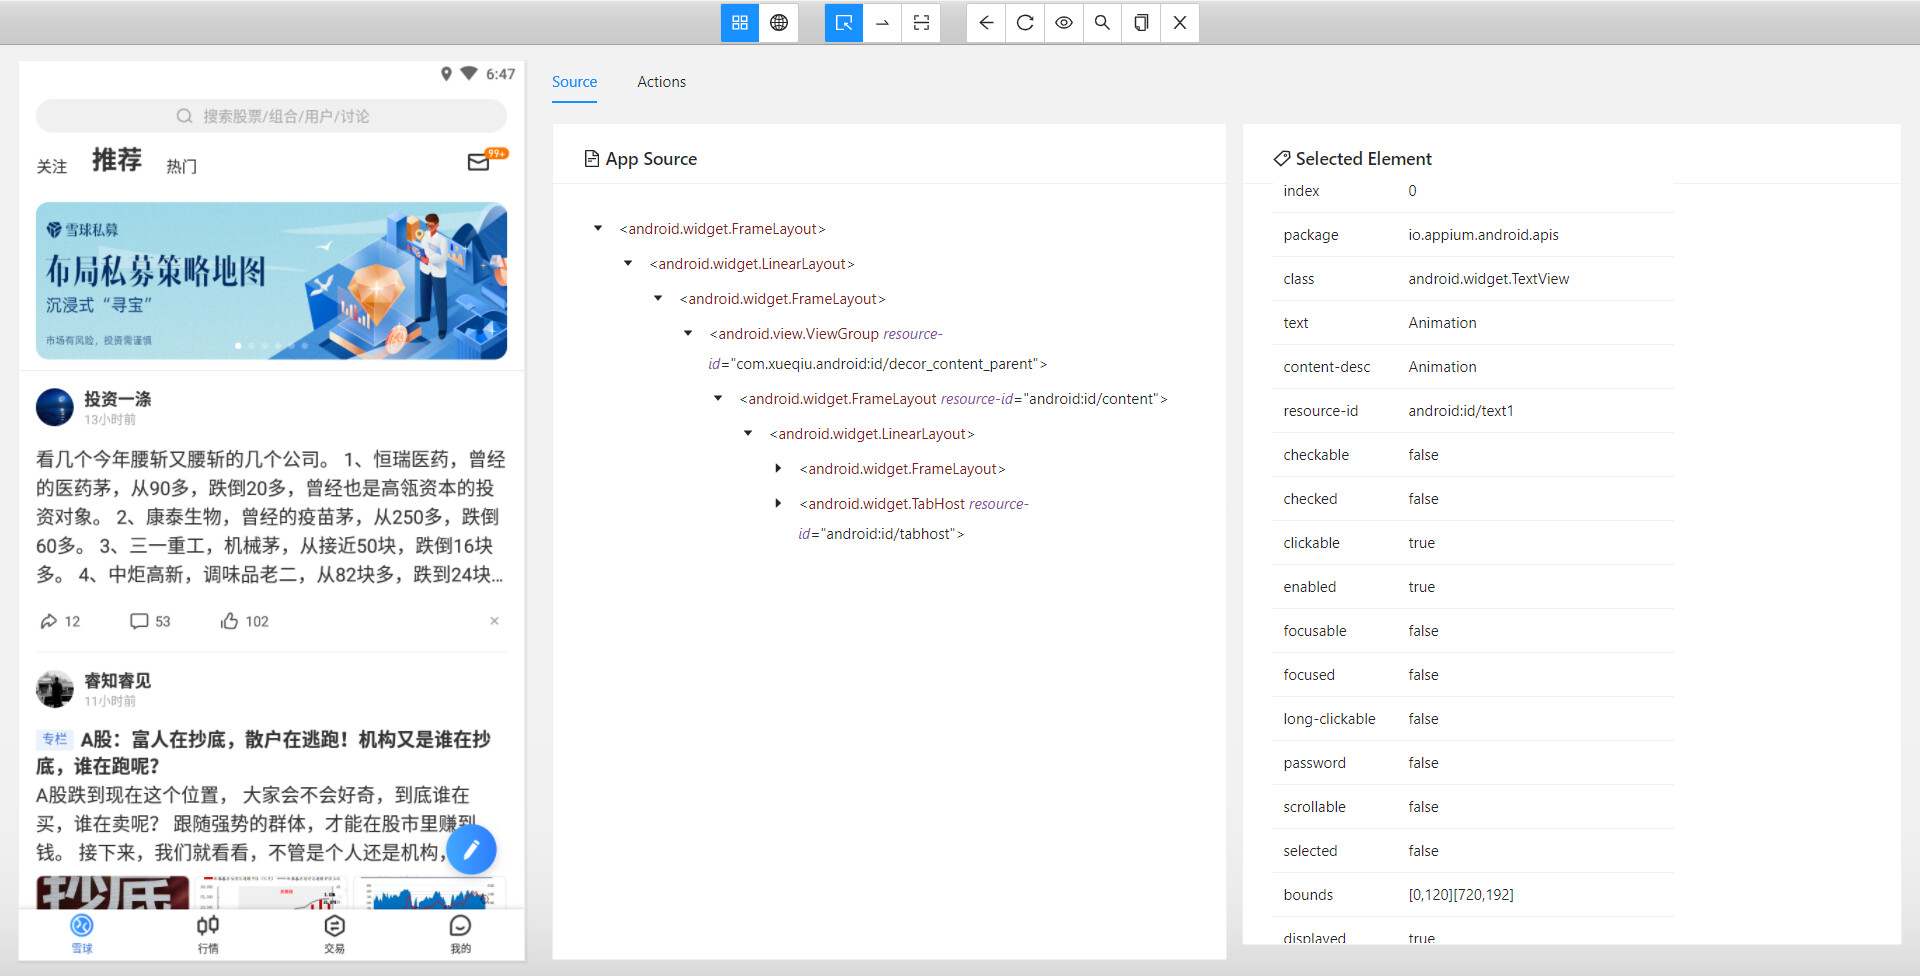
5、Appium inspector 页面结构

6、功能键
1)SelectElements:选中元素,查看层级和属性
2)Swipe By Coordinates:通过坐标点滑动
3)Tap By Coordinates:通过坐标点点击
4)Back:返回
5)Refresh Source & Screenshot:刷新页面
6)StartRecording:开始录制脚本
7)Search for element:搜索元素
8)Copy XML Source to Clipboard:复制 xml 结构
9)Quit Session & Close Inspector:退出当前 Session
7、实战示例
- 下载官方 Demo apk(https://github.com/appium/appium/tree/master/sample-code/apps)
- 安装 API Demo.apk
8、录制用例
1)打开 API Demo 应用
2)点击 OS,进入下个界面
3)点击【Morse Code】
4)输入内容【ceshiren.com】
5)返回上一个页面
6)返回上一个页面
7)关闭应用
from appium import webdriver

# 创建一个字典,desirecapbility
caps = {}
# Android 包名和页面名,获取命令:
# mac/linux: adb logcat ActivityManager:I | grep "cmp"
# windows: adb logcat ActivityManager:I | findstr "cmp"
caps["platformName"] = "Android"
caps["appPackage"] = "io.appium.android.apis"
caps["appActivity"] = ".ApiDemos"
caps["deviceName"] = "127.0.0.1:6155"
caps["ensureWebviewsHavePages"] = True

# 创建driver ,与appium server建立连接,返回一个 session
driver = webdriver.Remote("http://localhost:4723/wd/hub", caps)

el1 = driver.find_element_by_accessibility_id("OS")
el1.click()
el2 = driver.find_element_by_accessibility_id("Morse Code")
el2.click()
el3 = driver.find_element_by_id("io.appium.android.apis:id/text")
el3.clear()
el4 = driver.find_element_by_id("io.appium.android.apis:id/text")
el4.send_keys("ceshiren.com")
# 返回
driver.back()
driver.back()
driver.back()
# 回收session
driver.quit()
二、自动化测试用例结构分析
1、 用例脚本优化
- 添加 capability 信息
- 初始化
webdriver,添加setup和teardown - 添加隐式等待和
noReset属性增强用例稳定性 - 添加断言
- 注意
- selenium 版本建议 3.141.0
- appium-python-client 版本建议 1.2.0
完整代码
from appium import webdriver
from appium.webdriver.common.appiumby import AppiumBy


class TestAppDemo:
    def setup(self):
        # 创建一个字典,desirecapbility
        caps = {}
        caps["platformName"] = "Android"
        # Android 包名和页面名,获取命令:
        # mac/linux: adb logcat ActivityManager:I | grep "cmp"
        # windows: adb logcat ActivityManager:I | findstr "cmp"
        caps["appPackage"] = "io.appium.android.apis"
        caps["appActivity"] = ".ApiDemos"
        caps["deviceName"] = "127.0.0.1:6555"
        caps["noReset"] = "true"

        # 创建driver ,与appium server建立连接,返回一个 session
        # driver 变成self.driver 由局部变量变成实例变量,就可以在其它的方法中引用这个实例变量了
        self.driver = webdriver.Remote("http://localhost:4723/wd/hub", caps)
        self.driver.implicitly_wait(5)

    def teardown(self):
        # 回收session
        self.driver.quit()

    def test_input(self):
        """
        1、打开 API demo apk
        2、点击 OS 控件
        3、点击 Morse Code 控件
        4、在搜索框中输入 ceshiren.com
        5、返回到第一页
        6、断言
        :return:
        """
        # 点击OS控件
        # el1 = self.driver.find_element_by_accessibility_id("OS")
        el1 = self.driver.find_element(AppiumBy.ACCESSIBILITY_ID, "OS")
        el1.click()
        # 点击 Morse Code 控件
        # el2 = self.driver.find_element_by_accessibility_id("Morse Code")
        el2 = self.driver.find_element(AppiumBy.ACCESSIBILITY_ID, "Morse Code")
        el2.click()
        # 输入`ceshiren.com`
        # el3 = self.driver.find_element_by_id("io.appium.android.apis:id/text")
        el3 = self.driver.find_element(AppiumBy.ID, "io.appium.android.apis:id/text")
        # 清除原有的内容
        el3.clear()
        # 输入内容
        el3.send_keys("ceshiren.com")
        el3.clear()
        # 返回
        self.driver.back()
        # 返回
        self.driver.back()
        # 返回第一页
        self.driver.back()
        # 选择元素进行断言
        result = self.driver.find_element(AppiumBy.ACCESSIBILITY_ID, "Accessibility").text
        # 断言
        assert result == "Accessibility"
三、 capability 配置参数解析
1、 Capability 简介
- 功能:配置 Appium 会话,告诉 Appium 服务器需要自动化的平台的应用程序
- 形式:键值对的集合,键对应设置的名称,值对应设置的值
- 主要分为三部分
- 公共部分
- ios 部分
- android 部分
2、 Session
- Appium 的客户端和服务端之间进行通信的前提
- 通过
Desired Capabilities建立会话
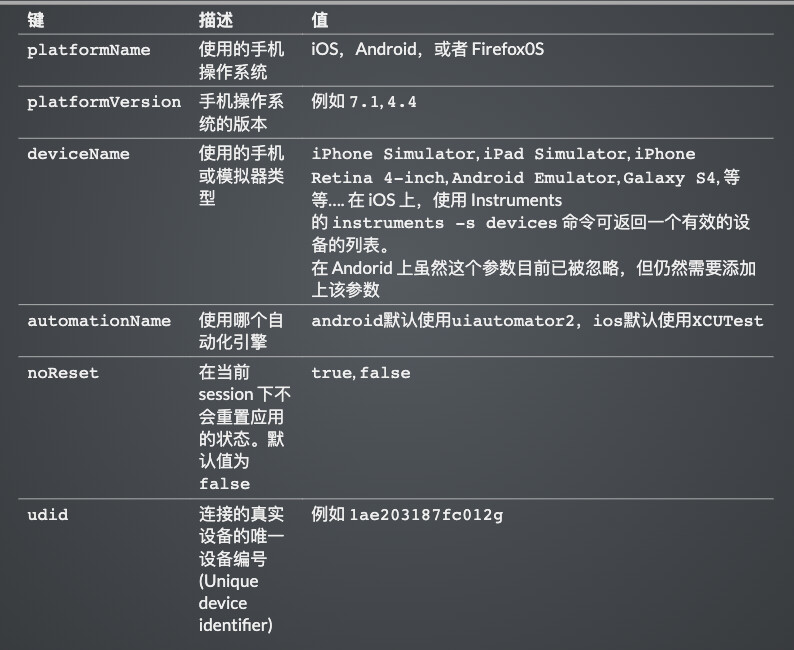
3、 公共部分参数配置
| 键 | 描述 | 值 |
|---|---|---|
platformName |
使用的手机操作系统 | iOS,Android,或者 Firefox0S |
platformVersion |
手机操作系统的版本 | 例如 7.1, 4.4
|
deviceName |
使用的手机或模拟器类型 |
iPhone Simulator, iPad Simulator, iPhone Retina 4-inch, Android Emulator, Galaxy S4, 等等…. 在 iOS 上,使用 Instruments的 instruments -s devices 命令可返回一个有效的设备的列表。在 Andorid 上虽然这个参数目前已被忽略,但仍然需要添加上该参数 |
automationName |
使用哪个自动化引擎 |
android默认使用uiautomator2,ios默认使用XCUTest
|
noReset |
在当前 session 下不会重置应用的状态。默认值为 false
|
true, false
|
udid |
连接的真实设备的唯一设备编号 (Unique device identifier) | 例如 1ae203187fc012g
|
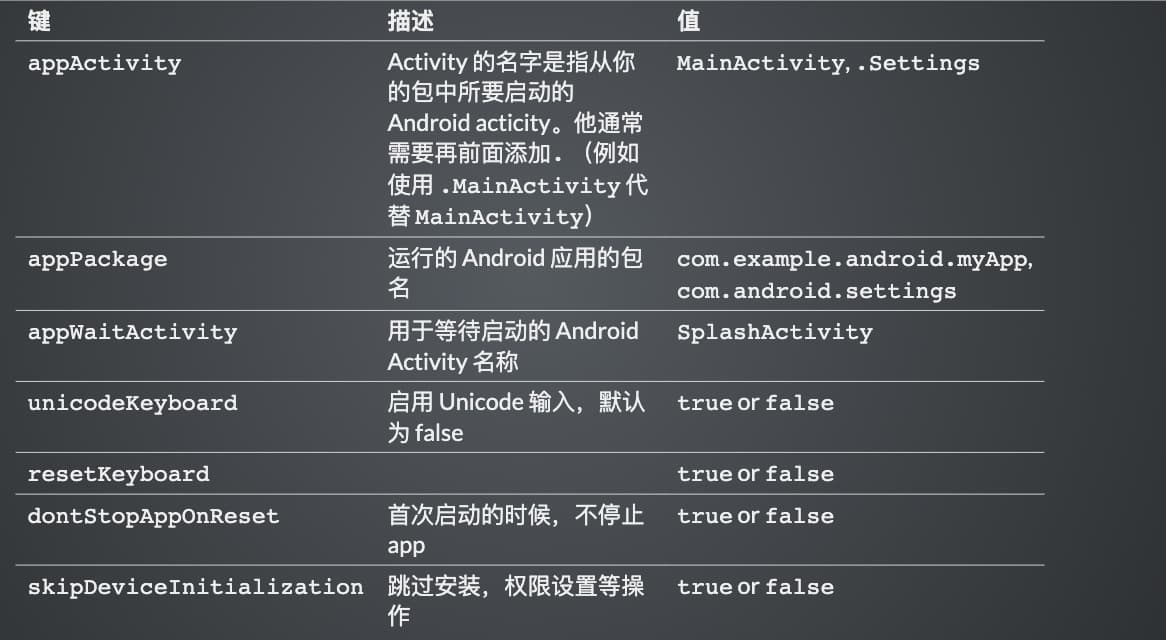
4、 Android 部分特有参数配置
| 键 | 描述 | 值 |
|---|---|---|
| appActivity | Activity 的名字是指从你的包中所要启动的 Android acticity。他通常需要再前面添加. (例如 使用 .MainActivity 代替 MainActivity) | MainActivity, .Settings |
| appPackage | 运行的 Android 应用的包名 | com.example.android.myApp, com.android.settings |
| appWaitActivity | 用于等待启动的 Android Activity 名称 | SplashActivity |
| unicodeKeyboard | 启用 Unicode 输入,默认为 false | true or false |
| resetKeyboard | true or false | |
| dontStopAppOnReset | 首次启动的时候,不停止 app | true or false |
| skipDeviceInitialization | 跳过安装,权限设置等操作 | true or false |
5、 Android 部分特有参数配置
| 键 | 描述 | 值 |
|---|---|---|
| appActivity | Activity 的名字是指从你的包中所要启动的 Android acticity。他通常需要再前面添加. (例如 使用 .MainActivity 代替 MainActivity) | MainActivity, .Settings |
| appPackage | 运行的 Android 应用的包名 | com.example.android.myApp, com.android.settings |
| appWaitActivity | 用于等待启动的 Android Activity 名称 | SplashActivity |
| unicodeKeyboard | 启用 Unicode 输入,默认为 false | true or false |
| resetKeyboard | true or false | |
| dontStopAppOnReset | 首次启动的时候,不停止 app | true or false |
| skipDeviceInitialization | 跳过安装,权限设置等操作 | true or false |

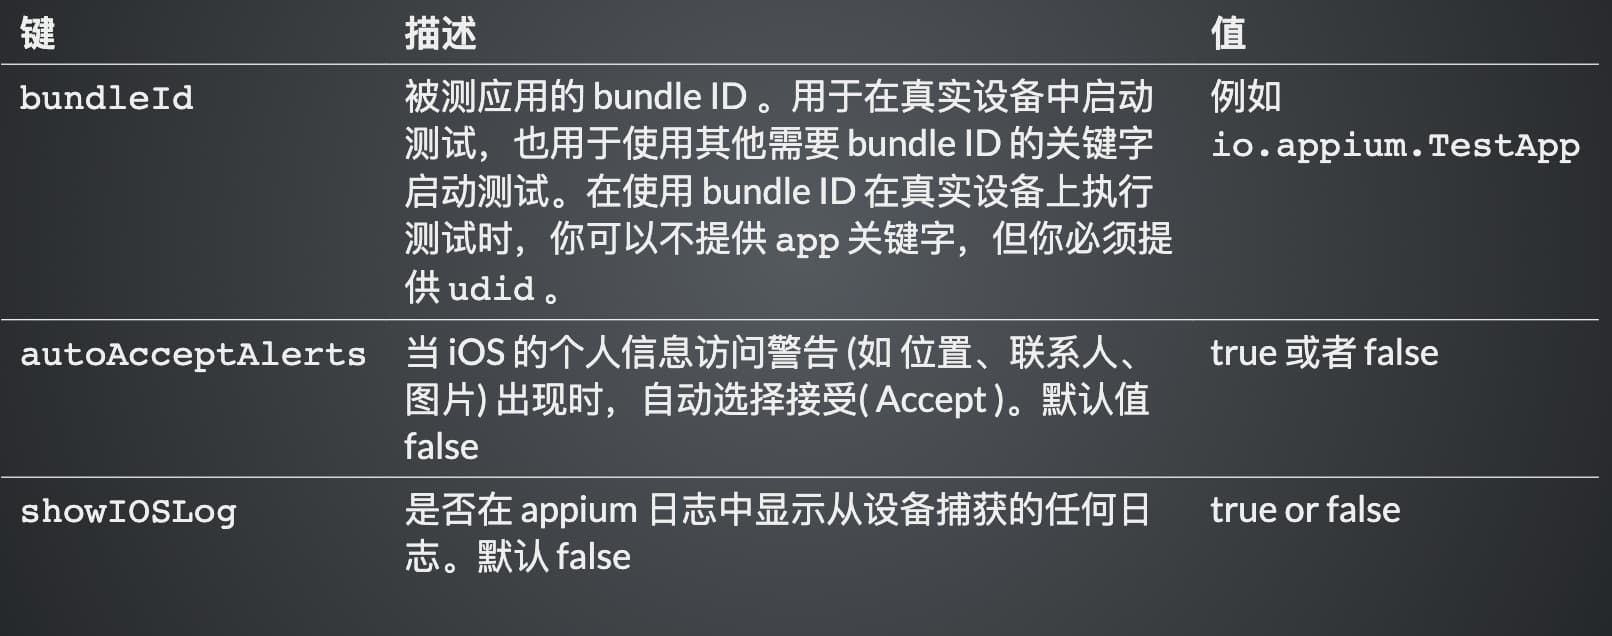
6、 iOS 独有
| 键 | 描述 | 值 |
|---|---|---|
| bundleId | 被测应用的 bundle ID 。用于在真实设备中启动测试,也用于使用其他需要 bundle ID 的关键字启动测试。在使用 bundle ID 在真实设备上执行测试时,你可以不提供 app 关键字,但你必须提供 udid 。 | 例如 io.appium.TestApp |
| autoAcceptAlerts | 当 iOS 的个人信息访问警告 (如 位置、联系人、图片) 出现时,自动选择接受( Accept )。默认值 false | true 或者 false |
| showIOSLog | 是否在 appium 日志中显示从设备捕获的任何日志。默认 false | true or false |
7、 Desire capability 参数
- API Demo 启动页配置
{
  "platformName": "android",
  "deviceName": "emulator-5554",
  "appPackage": "io.appium.android.apis",
  "appActivity": ".ApiDemos"
}
8、 配置优化
- 添加参数,提高用例的稳定性
{
  "noReset": "true", // 不清空缓存信息
  "dontStopAppOnReset": "true", // 首次启动的时候,不停止app
  "skipDeviceInitialization": "true", // 跳过安装,权限设置等操作
  "unicodeKeyBoard": "true" // 输入中文
}
四、app自动化控制
1、 启动
- 启动应用
- 方式一:
webdriver.remote("url",desirecapability) - 方式二:
launch_app()将应用启动起来
# 方式一:
self.driver = webdriver.Remote\
("http://127.0.0.1:4723/wd/hub", desire_cap)

# 方式二:热启动,会进入到app的首页
self.driver.launch_app()
2、 数据清理
- 清空输入框内容
clear()
self.driver.find_element_by_accessibility_id('SomeAccessibilityID').clear()
3、 关闭
- 退出app
quit()
self.driver.quit()
五、常见控件定位方法
1、 android 基础知识
- Android 是通过容器的布局属性来管理子控件的位置关系,布局关系就是把界面上的所有的空间,根据他们的间距的大小,摆放在正确的位置
- Android 七大布局
- LinerLayout(线性布局)
- RelativeLayout(相对布局)
- FrameLayout(帧布局)
- AboluteLayout(绝对布局)
- TableLayout(表格布局)
- GridLayout(网格布局)
- ConstraintLayout(约束布局
2、Android 四大组件
- activity 与用户交互的可视化界面
- service 实现程序后台运行的解决方案
- content provider 内容提供者,提供程序所需要的数据
- broadcast receiver 广播接收器,监听外部事件的到来(比如来电)
3、常用的控件
- TextView(文本控件),EditText(可编辑文本控件)
- Button(按钮),ImageButton(图片按钮),ToggleButton(开关按钮)
- ImageView(图片控件)
- CheckBox(复选框控件),RadioButton(单选框控件)
4、布局
- 布局
- 是可用于放置很多控件的容器按照一定的规律调整内部控件的位置由此构成界面。
- 嵌套布局
- 布局内部放置布局,多层布局嵌套,可以完成复杂的界面结构

5、 ios 基础知识
- 布局
- iOS 不使用布局的概念,用变量之间的相对关系完成位置的计算
- 注意
- 使用 Appium 测试 iOS 应用需要使用 MacOS 操作系统
6、 元素定位
- 概念:元素定位的含义就是定位控件
- 注意:同一脚本同时支持 android/iOS 两个系统的前提是元素属性(id,aid,xpath 等)一致
7、 控件基础知识
-
dom:Document Object Model 文档对象模型
-
dom 应用:用于表示界面的控件层级,界面的结构化描述
- 常见的格式:html、xml
- 核心元素:节点、属性
-
xpath:xml 路径语言,用于 xml 中的节点定位
-
Anrdroid 应用的层级结构与 html 不一样,是一个定制的 xml
-
app source 类似于 dom ,表示 app 的层级,代表了界面里面所有的控件树的结构
-
每个控件都有它的属性(resourceid,xpath,aid),但是没有 css 属性
8、 app dom 结构解析
- node
- attribute
- clickable
- content-desc
- resource-id
- text
- bounds
9、 iOS 与 Android dom 结构的区别
- dom 属性和节点结构类似
- 名字和属性命名不同
- android 的 resourceid 和 ios 的 name
- android 的 content-desc 和 ios 的 accessibility-id
10、 定位方法
- 测试步骤三要素
- 定位、交互、断言
- 定位方式:
- id 定位
- accessibilty_id 定位
- xpath 定位
- classname 定位(不推荐)
11、 App 定位方式
| 定位策略 | 描述 |
|---|---|
| Accessibility ID | 识别一个唯一的 UI 元素,对于 XCUITest 引擎,它对应的的属性名是 accessibility-id,对于 Android 系统的页面元素,对应的属性名是 content-desc |
| Class name | 对于 iOS 系统,它的 class 属性对应的属性值会以XCUIElementType开头,对于 Android 系统,它对应的是 UIAutomator2 的 class 属性(e.g.: android.widget.TextView) |
| ID | 原生元素的标识符,Android 系统对应的属性名为resource-id,iOS 为name |
| Name | 元素的名称 |
| XPath | 使用 xpath 表达式查找页面所对应的 xml 的路径(不推荐,存在性能问题) |

12、 App 定位方式进阶
| 定位策略 | 描述 |
|---|---|
| Image | 通过匹配 base 64 编码的图像文件定位元素 |
| Android UiAutomator (UiAutomator2 only) | 使用 UI Automator 提供的 API, 尤其是 UiSelector 类来定位元素,在 Appium 中,会发送 Java 代码作为字符串发送到服务器,服务器在应用程序的环境中执行这段代码,并返回一个或多个元素 |
| Android View Tag (Espresso only) | 使用 view tag 定位元素 |
| Android Data Matcher (Espresso only) | 使用 Espresso 数据匹配器定位元素 |
| IOS UIAutomation | 在 iOS 应用程序自动化时,可以使用苹果的 instruments 框架查找元素 |

13、 选择定位器通用原则
- 与研发约定的属性优先
- android 推荐 content-description
- ios 推荐 label
- 身份属性 id
- 组合定位 xpath,css
- 其它定位
14、 元素定位的写法
- 返回单个元素 WebElement
- 返回元素列表 [WebElement, WebElement, WebElement…]
# 返回单个元素 WebElement
driver.find_element(AppiumBy.xxx, "xxx属性值")
# 返回元素列表 [WebElement, WebElement, WebElement...]
driver.find_elements(AppiumBy.xxx, "xxx属性值")

driver.find_element(AppiumBy.ID, "ID属性值")
driver.find_element(AppiumBy.XPATH, "xpath表达式")
driver.find_element(AppiumBy.CLASS_NAME, "CLASS属性值")
driver.find_element(AppiumBy.ACCESSIBILITY_ID, "ACCESSIBILITY_ID表达式")
driver.find_element(AppiumBy.ANDROID_UIAUTOMATOR, "android uiautomator 表达式")
driver.find_element(AppiumBy.IOS_UIAUTOMATION, "ios uiautomation 表达式")
driver.find_element(AppiumBy.ANDROID_VIEWTAG, "ESPRESSO viewtag 表达式")
driver.find_element(AppiumBy.ANDROID_DATA_MATCHER, "ESPRESSO data matcher 表达式")
driver.find_element(AppiumBy.IMAGE, "IMAGE图片")
15、 ID 定位
- 通过身份标识 id 查找元素
- 写法:
find_element(AppiumBy.ID, "ID属性值")
16、ACCESSIBILITY_ID 定位
- 通过 accessibility id 查找元素
- 写法:
find_element(AppiumBy.ACCESSIBILITY_ID, "ACCESSIBILITY_ID属性值")
17、 XPath 定位
| 表达式 | 描述 |
|---|---|
| / | 从根节点选取(取子节点)。 |
| // | 从匹配选择的当前节点选择文档中的节点,而不考虑它们的位置(取子孙节点)。 |
| . | 选取当前节点。 |
| … | 选取当前节点的父节点。 |
| @ | 选取属性。 |

18、 XPath 单属性定位
- 基本表达式:
//*[@属性名='属性值']
19、 XPath 多属性定位
- 表达式:
//*[@属性名='属性值' and @属性名='属性值' ]
实战练习
- 安装 ApiDemo.apk - 链接: 百度网盘 请输入提取码 密码: gdcw
- 打开应用
- 定位文字为【App】元素
class TestLocation:
    def setup(self):
        caps = {}
        caps["platformName"] = "Android"
        caps["appium:appPackage"] = "io.appium.android.apis"
        caps["appium:appActivity"] = ".ApiDemos"
        caps["appium:deviceName"] = "127.0.0.1:7555"
        caps["dontStopAppOnReset"] = "true"
        caps["noReset"] = "true"
        self.driver = webdriver.Remote("http://127.0.0.1:4723/wd/hub", caps)
        self.driver.implicitly_wait(5)

    def teardown(self):
        self.driver.quit()

    def test_id(self):
        """通过 ID 进行元素定位"""
        print(self.driver.find_element(AppiumBy.ID, "android:id/text1"))

    def test_aid(self):
        """通过 ACCESSIBILITY_ID 进行元素定位"""
        print(self.driver.find_element(AppiumBy.ACCESSIBILITY_ID, "App"))

    def test_xpath(self):
        """通过 XPATH 进行元素定位"""
        print(self.driver.find_element(AppiumBy.XPATH, "//*[@text='App']"))

    def test_xpath1(self):
        """通过 XPATH 进行元素定位"""
        print(self.driver.find_element(AppiumBy.XPATH, "//*[@text='App' and @resource-id='android:id/text1']"))
原生定位
20、 Android 原生定位
- 元素属性定位
- ID 定位
- 文本定位
- 文本匹配定位
- 父子关系定位
- 兄弟关系定位
21、 Android 原生定位 - 单属性定位
- 格式
'new UiSelector().属性名("<属性值>")'- 比如:
'new UiSelector().resourceId("android:id/text1")'
- 比如:
- 注意外面是单引号,里面是双引号,顺序不能变
- 可以简写为
属性名("<属性值>")'- 比如:·
resourceId("android:id/text1")
- 比如:·
# ID 定位
def test_android_uiautomator_by_id(self):
        print(self.driver.find_element(AppiumBy.ANDROID_UIAUTOMATOR,\
                'new UiSelector().resourceId("android:id/text1")'))
# TEXT 定位
def test_android_uiautomator_by_text(self):
        print(self.driver.find_element(AppiumBy.ANDROID_UIAUTOMATOR,\
                'new UiSelector().text("App")'))

# classname 定位
def test_android_uiautomator_by_className(self):
        print(self.driver.find_element(AppiumBy.ANDROID_UIAUTOMATOR, \
                'new UiSelector().className("android.widget.TextView")'))
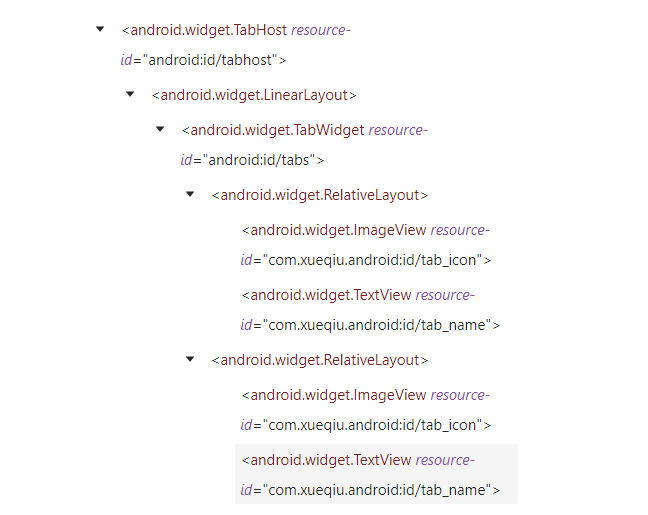
22、 Android 原生定位-组合定位
- 多个属性同时确定元素的(多个属性任意组合 ,不限长度)
driver.find_element_by_android_uiautomator('\
    new UiSelector().resourceId("com.xueqiu.android:id/tab_name").\
    text("我的")')
23、Android 原生定位-模糊匹配
- 文字包含
- 文字以 x 开头
- 文字正则匹配
# 模糊匹配
# 文字包含
def test_android_uiautomator_by_text_contains(self):
    print(self.driver.find_element(AppiumBy.ANDROID_UIAUTOMATOR, 'new UiSelector().textContains("ssi")').text)

# 文字以 x 开头
def test_android_uiautomator_by_text_start_with(self):
    print(self.driver.find_element(AppiumBy.ANDROID_UIAUTOMATOR, 'new UiSelector().textStartsWith("Ani")').text)

# 文字正则匹配
def test_android_uiautomator_by_text_match(self):
    print(self.driver.find_element(AppiumBy.ANDROID_UIAUTOMATOR, 'new UiSelector().textMatches("^Pre.*")').text)
24、 Android 原生定位-层级定位
- 兄弟元素定位
fromParent - 父子结点定位
childSelector, 可以传入 resourceId() , description() 等方法
# 查找目标元素Text,先找App ,fromParent() 方法可以查找兄弟结点
new UiSelector().text("App").fromParent(text("Text"))

# 根据父结点查找子结点/ 子孙结点
new UiSelector().className("android.widget.ListView").childSelector(text("Text"))
25、 滑动查找元素
new UiScrollable(new UiSelector().scrollable(true).instance(0)).scrollIntoView(new UiSelector().text("查找的元素文本").instance(0))
总结
- Appium 提供多种元素定位方式,id,xpath, class, 也可以通过 Android Uiautomator 定位,或 iOS Predicate
- xpath 是比较灵活的定位方式
六、强制等待与隐式等待
1、 添加等待的作用
- 避免页面未渲染完成后操作,导致的报错
2、 直接等待
- 解决方案:在报错的元素操作之前添加等待
- 原理:强制等待,线程休眠一定时间
time.sleep(3)
from appium import webdriver
import time
desired_caps={}
desired_caps['platformName']='Android'
desired_caps['platformVersion']='6.0'
desired_caps['deviceName']='emulator-5554'
desired_caps['appPackage']='com.xueqiu.android'
desired_caps['appActivity']='com.xueqiu.android.common.MainActivity'
desired_caps['noReset'] = "true"
driver = webdriver.Remote("http://127.0.0.1:4723/wd/hub",desired_caps)
time.sleep(3)
driver.find_element(AppiumBy.ID, \
    "com.xueqiu.android:id/tv_search").click()
time.sleep(3)
driver.find_element(AppiumBy.ID, \
    "com.xueqiu.android:id/search_input_text").send_keys("alibaba")

driver.find_element(AppiumBy.ID,\
    "com.xueqiu.android:id/code").click()

driver.quit()
3、 隐式等待
- 问题:难以确定元素加载的具体等待时间。
- 解决方案:针对于寻找元素的这个动作,使用隐式等待添加配置。
- 原理:隐式等待是一种全局的等待方式,设置一个等待时间,轮询查找(默认 0.5 秒)元素是否出现,如果没出现就抛出异常
# 设置一个等待时间,轮询查找(默认0.5秒)元素是否出现,如果没出现就抛出异常
# 隐式等待设置,一般实例化完driver之后设置,是一个全局的等待方式
# 每一次调用 find_element 方法的时候,都会触发隐式等待
# 每隔0.5秒查找一次,如果20秒内查找到了元素,则后面的时候就不等了
driver.implicitly_wait(20)
4、 隐式等待无法解决的问题
- 元素可以找到,使用点击等操作,出现报错
- 原因:
- 页面元素加载是异步加载过程,通常 xml 会先加载完成,相应的元素属性后加载
- 元素存在与否是由 xml 决定,元素的交互是由属性决定
- 隐式等待只关注元素能不能找到,不关注元素能否点击或者进行其他的交互
- 解决方案:使用显式等待
5、 显式等待基本使用(初级)
- 示例:
WebDriverWait(driver实例, 最长等待时间, 轮询时间).until(结束条件) - 原理:在最长等待时间内,轮询,是否满足结束条件
WebDriverWait(driver, 10).until(
        expected_conditions.element_to_be_clickable(
        (AppiumBy.ID, 'com.xueqiu.android:id/code')))

driver.find_element(AppiumBy.ID,"com.xueqiu.android:id/code").click()
总结
| 类型 | 使用方式 | 原理 | 适用场景 |
|---|---|---|---|
| 直接等待 | time.sleep(等待时间)) | 强制线程等待 | 调试代码,临时性添加 |
| 隐式等待 | driver.implicitly_wait(等待时间) | 在时间范围内,轮询查找元素 | 解决找不到元素问题,无法解决交互问题 |
| 显式等待 | WebDriverWait(driver实例, 最长等待时间, 轮询时间).until(结束条件) | 设定特定的等待条件,轮询操作 | 解决特定条件下的等待问题,比如点击等交互性行为 |
七、常见控件交互方法
1、元素的常用方法
-
点击方法
element.click() -
输入操作
element.send_keys('appium') -
设置元素的值
element.set_value('appium') -
清除操作
element.clear() -
是否可见
element.is_displayed()返回 True/False -
是否可用
element.is_enabled()返回 True/False -
是否被选中
element.is_selected()返回 True/False -
获取属性值
get_attribute(name)-
get_attribute()方法能获取的属性,元素的属性几乎都能获取到,属性名称和 uiautomatorviewer 里面的一致 - 源码地址: appium-uiautomator2-server/GetElementAttribute.java at master · appium/appium-uiautomator2-server · GitHub
- get_attribute() 可以获取的属性
- resource-id/resourceld 返回 resource-id(API=>18 支持)
- text 返回 text
- class 返回 class(API=>18 支持)
- content-desc/contentDescription 返回 content-desc 属性
- checkable,checked,clickable,enabled,focusable,focused,{long-clickable,longClickable), package, password,scrollable,selection-start,selection-end,selected,bounds,displayed,contentSize 返回 true or false
-
2、 元素常用属性
- 获取元素文本
- 格式:element.text
- 获取元素坐标
- 格式:element.location
- 结果:
{'y': 19,'x: 498}
- 获取元素尺寸(高和宽)
- 格式:element.size
- 结果:
{'width':500,'height':22)
示例练习
- 打开 demo.apk
- 点击 Animation 进入下个页面
- 点击 Seeking 进入下个页面
- 查看【RUN】按钮是否显示/是否可点击
- 查看【滑动条】是否显示/是否可用/是否可点击
- 获取【滑动条】长度
- 点击【滑动条】中心位置
def test_seeking(self):
        """
        打开 demo.apk
        1. 点击 Animation 进入下个页面
        2. 点击 Seeking 进入下个页面
        3. 查看【RUN】按钮是否显示/是否可点击
        4. 查看【滑动条】是否显示/是否可用/是否可点击
        5. 获取【滑动条】长度
        6. 点击【滑动条】中心位置
        :return:
        """
        self.driver.find_element(AppiumBy.ACCESSIBILITY_ID, "Animation").click()
        self.driver.find_element(AppiumBy.ACCESSIBILITY_ID, "Seeking").click()
        # 查看【RUN】按钮是否显示、是否可点击
        run_element = self.driver.find_element(AppiumBy.ACCESSIBILITY_ID, "Run")
        run_is_displayed = run_element.is_displayed()
        run_is_clickable = run_element.get_attribute("clickable")
        print(f"【run】按钮是否可见:{run_is_displayed},是否可点击:{run_is_clickable}")
        # 查看【滑动条】是否显示/是否可用/是否可点击
        seekbar_element = self.driver.find_element(AppiumBy.ID, "io.appium.android.apis:id/seekBar")
        seekbar_displayed = seekbar_element.is_displayed()
        seekbar_enabled = seekbar_element.is_enabled()
        seekbar_clickable = seekbar_element.get_attribute("clickable")
        print(f"seekbar 滑动条 是否可见:{seekbar_displayed},"
              f"是否可用:{seekbar_enabled},"
              f"是否可点击:{seekbar_clickable}")
        # 获取【滑动条】长度
        seekbar_size = seekbar_element.size
        width = seekbar_size.get("width")
        height = seekbar_size.get("height")
        print(f"seekbar 的长度:{width}")

        seekbar_location = seekbar_element.location
        x = seekbar_location.get("x")
        y = seekbar_location.get("y")
        # 点击【滑动条】中心位置
        seekbar_centerx = x + width / 2
        seekbar_centery = y
        self.driver.tap([(seekbar_centerx, seekbar_centery)])
        sleep(5)
八、自动化测试定位策略
1、App 定位方式
| 定位策略 | 描述 |
|---|---|
| Accessibility ID | 识别一个唯一的 UI 元素,对于 XCUITest 引擎,它对应的的属性名是 accessibility-id,对于 Android 系统的页面元素,对应的属性名是 content-desc |
| Class name | 对于 iOS 系统,它的 class 属性对应的属性值会以XCUIElementType开头,对于 Android 系统,它对应的是 UIAutomator2 的 class 属性(e.g.: android.widget.TextView) |
| ID | 原生元素的标识符,Android 系统对应的属性名为resource-id,iOS 为name |
| Name | 元素的名称 |
| XPath | 使用 xpath 表达式查找页面所对应的 xml 的路径(不推荐,存在性能问题) |
2、App 定位方式进阶
| 定位策略 | 描述 |
|---|---|
| Image | 通过匹配 base 64 编码的图像文件定位元素 |
| Android UiAutomator (UiAutomator2 only) | 使用 UI Automator 提供的 API, 尤其是 UiSelector 类来定位元素,在 Appium 中,会发送 Java 代码作为字符串发送到服务器,服务器在应用程序的环境中执行这段代码,并返回一个或多个元素 |
| Android View Tag (Espresso only) | 使用 view tag 定位元素 |
| Android Data Matcher (Espresso only) | 使用 Espresso 数据匹配器定位元素 |
| IOS UIAutomation | 在 iOS 应用程序自动化时,可以使用苹果的 instruments 框架查找元素 |
3、 Web 定位方式
| 定位策略 | 描述 |
|---|---|
| class name | 通过 class 属性定位元素 |
| css selector | 通过匹配css selector 定位元素 |
| id | 通过 id 属性匹配元素 |
| name | 通过 name 属性定位元素 |
| link text | 通过 text 标签中间的text文本定位元素 |
| partial link text | 通过 text 标签中间的text文本的部分内容定位元素 |
| tag name | 通过 tag 名称定位元素 |
| xpath | 通过 xpath 表达式匹配元素 |
4、 选择定位器通用原则
- 与研发约定的属性优先
- web 推荐 class
- android 推荐 content-description
- ios 推荐 label
- 身份属性 id,name(web 定位)
- 组合定位 xpath,css
- 其它定位
5、 元素定位不到的原因
| 原因 | 解决方案 |
|---|---|
| 定位不正确 | 在定位工具中先测试定位表达式是否正确 |
| 存在动态 ID | 定位方式使用 css 或者 xpath 的相对定位 |
| 页面还没有加载完成 | 添加死等验证,使用显示等待或隐式等待进行优化 |
| 页面有 iframe | 切换到 iframe 后定位 |
| 页面切换 window | 切换到对应窗口后定位 |
| 要定位元素为隐藏元素 | 使用 js 操作该元素 |
6、混合定位的应用场景
- 场景:
- 属性动态变化(id,text)
- 重复元素属性(id,text,class)
- 解决:
- 根据相对位置关系进行定位(css、xpath)(父级,子级,兄弟,索引)
- 使用 find_elements 遍历查找
- 参考高级定位技巧章节(xpath,css)
7、使用等待机制的场景
- 场景
- 控件动态出现
- 控件出现特定特征
- 解决
- 元素定位结合隐式等待与显式等待
8、Web 弹框定位
- 场景
- web 页面 alert 弹框
- 解决:
- web 需要使用
driver.switchTo().alert()处理
- web 需要使用
9、 App toast 提示框定位
- 场景
- app toast 提示框
- 解决:
- 使用 driver.page_source 拿到页面布局结构文件,分析 toast/弹框组件的标签内容,
- 然后通过 id/text/class 等属性,使用 xpath 完成元素定位
- 结合 隐式等待
10、 下拉框/日期控件定位
- 场景:
-
<input>标签组合的下拉框无法定位 -
<input>标签组合的日期控件无法定位
-
- 解决:
- 面对这些元素,我们可以引入 JS 注入技术来解决问题。
11、 文件上传定位
- 场景:
- input 标签文件上传
- 解决:
- input 标签直接使用 send_keys()方法
