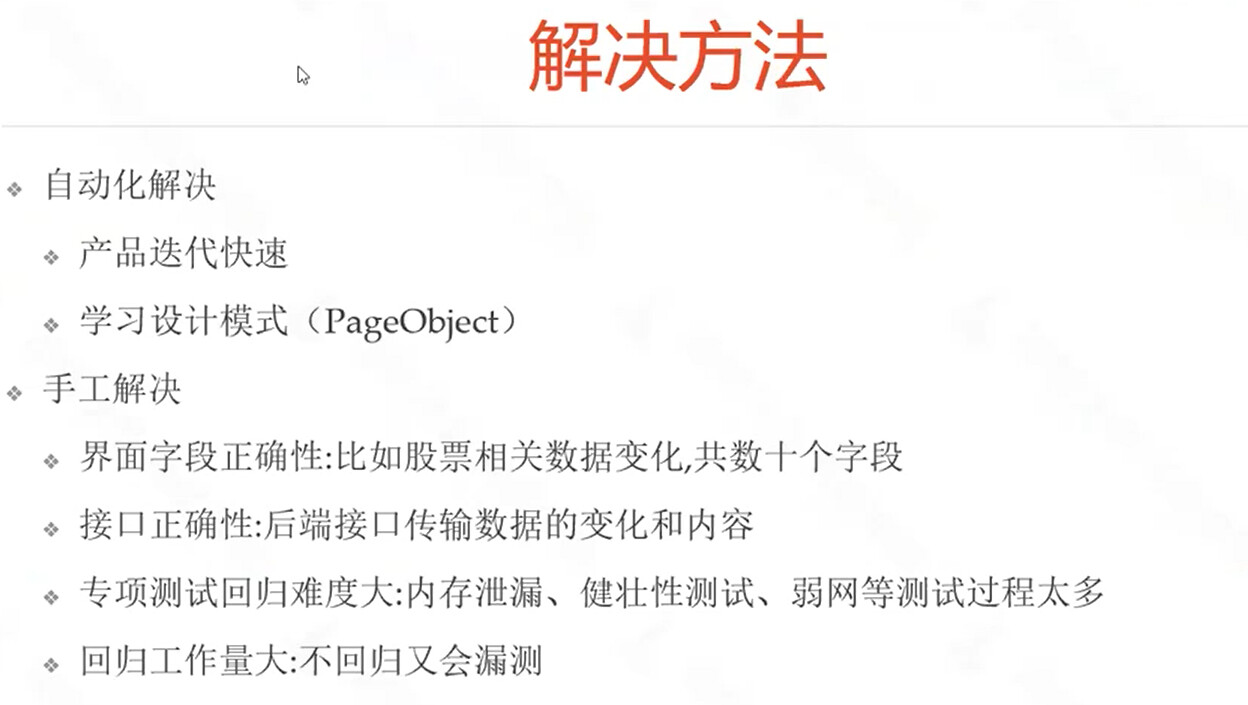
App 自动化测试的价值与体系
UI 自动化价值
- 提高效率
- 融入企业迭代流水线,与 CI/CD/DevOps 结合
- 回归测试、功能测试加速
- 提高质量:
- 兼容性测试
- 专项/非功能测试
- 自动化探索测试
app 测试的时代背景
- 按月发布->按周发布->按小时发布
- 多端发布:Android、iOS、微信小程序、h5
- 多环境发布:联调环境、测试环境、预发布环境、线上环境
- 多机型发布:众多设备型号、众多系统版本
- 多版本共存:用户群体中存在多个不同的版本
- 历史回归测试任务:成百上千条业务用例如何回归
技术选型
- Appium
- Airtest
- 其他框架:calabash macaca atx
- iOS:KIF WDA XCUITest
- Android:Robotium Uiautomator2
自动化测试框架选择
- 推荐 Appium
- 跨语言:Java、Python、nodejs 等
- 跨平台
- Andoid、iOS
- Windows、Mac
- 底层多引擎可切换
- 生态丰富,社区强大
- iOS:KIF WDA XCTest
- Android:Robotium Uiautomator
- 其他框架:calabash macaca atx
UI 自动化测试用例如何编写
- 业务流程不频繁改动
- UI 元素不频繁改动
- 需要频繁回归的场景
- 核心场景等
技术选型 1
- Appium
- Airtest
- 其他框架:calabash macaca atx
- iOS:KIF WDA XCUITest
- Android:Robotium Uiautomator2
技术选型 2
- 推荐 Appium
- 跨语言:Java、Python、nodejs 等
- 跨平台
- Andoid、iOS
- Windows、Mac
- 底层多引擎可切换
- 生态丰富,社区强大
Appium 环境安装
目前 mobile 自动化解决方案
- iOS:
- calabash-ios
- Frank
- UIAutomation
- ios-driver
- KeepItFunctional
- Android:
- calabash-android
- MonkeyTalk
- Robotium
- UiAutomator
- selendroid
自动化工具选择

自动化工具选择的取决因素
- 单平台测试 or 多平台测试?
- 是否有多设备同时测试的场景?
- 不局限于测试环境,任何版本任何环境都可以测试?
- 最擅长哪种开发语言?
- 当前市面是否有满足项目需求的测试工具?是否需要二次开发?
Appium 介绍
Appium是一个移动端的自动化测试框架 ,可用于测试原生应用,移动网页应用和混合应用,且是跨平台的。可用于iOS和Android操作系统。原生应用是指用android或iOS编写的应用,移动网页应用是指网页应用,类似于iOS中safari应用或者Chrome应用或者类似浏览器的应用。混合应用是指一种包裹webview的应用,原生应用网页内容交互性的应用。重要的是Appium是跨平台的。何为跨平台,意思是可以针对不同平台用一套api来编写脚本。
Appium 框架介绍
- 推荐Appium原因:
- 跨语言:Java、Python、nodejs等
- 跨平台:
- Android、iOS
- Windows、Mac
- 底层多引擎切换
- 生态丰富,社区强大
Appium 引擎列表
- iOS
- The XCUITest Driver(推荐)
- (DEPRECATED)The UIAutomation Driver
- Android
- (BETA)The Espresso Driver
- The UiAutomator2 Driver(推荐)
- (DEPRECATED) The UiAutomator Driver
- (DEPRECATED) The Selendroid Driver
- Windows:The Windows Driver(for Windows Desktop apps)
- Mac:The Mac Driver(for Mac Desktop apps)
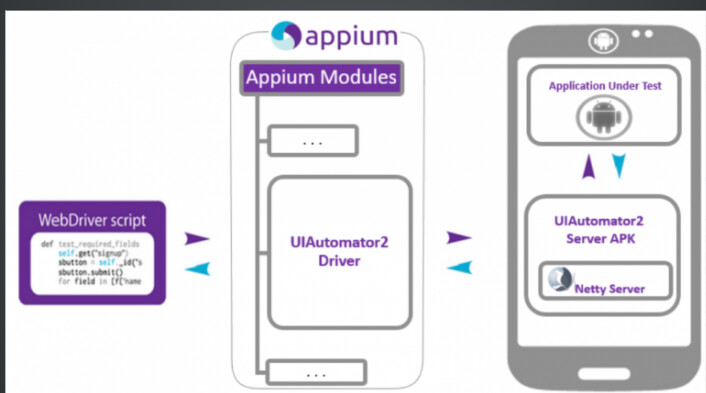
Appium 原理
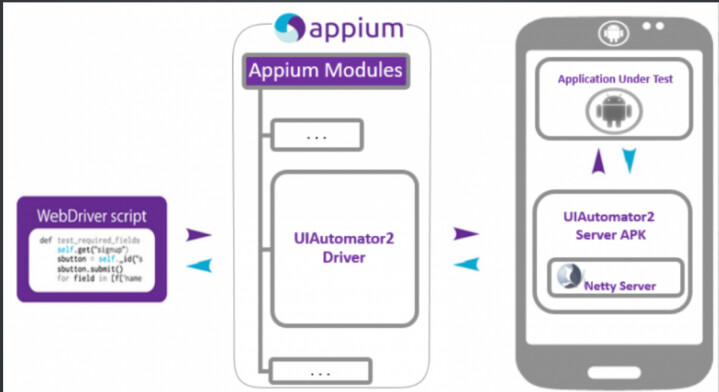
Appium 的设计理念
- webdriver是基于http协议的,第一连接会建立一个session会话,并通过post发送一个json告知服务端相关测试信息
- Client/Server设计模式
- 客户端通过WebDriver json wire协议与服务端通讯
- 多语言支持
- Server可以放在任何地方
- 服务端NODEJS开发的HTTP服务
- appium使用appium-xcuitest-driver来测试iPhone设备,其中需要安装facebook出的WDA(webdriveragent)来驱动iOS测试
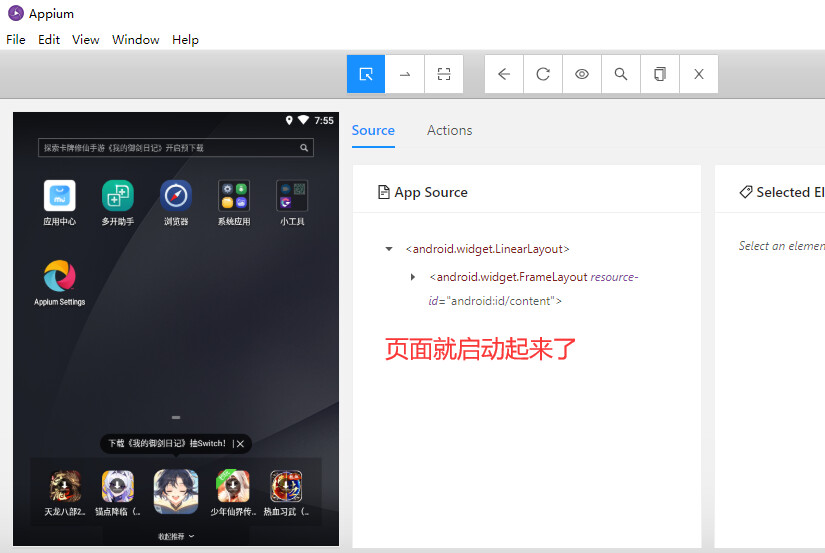
自动化用例录制
Appium Inspctor 功能介绍
- UI 分析
- 录制用例
- 元素查找测试
- Attcah 已有的 session
- 云测试

用例录制
-
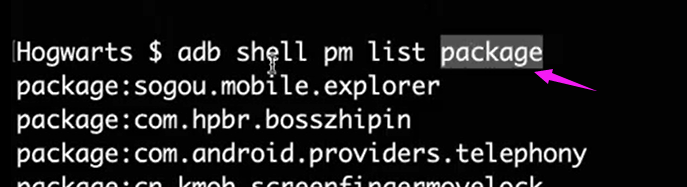
获取 app 的信息
-
配置待测应用
platformName : Android


录制步骤:
1、启动模拟器,cmd连接上设备
2、打开Appium Inspctor
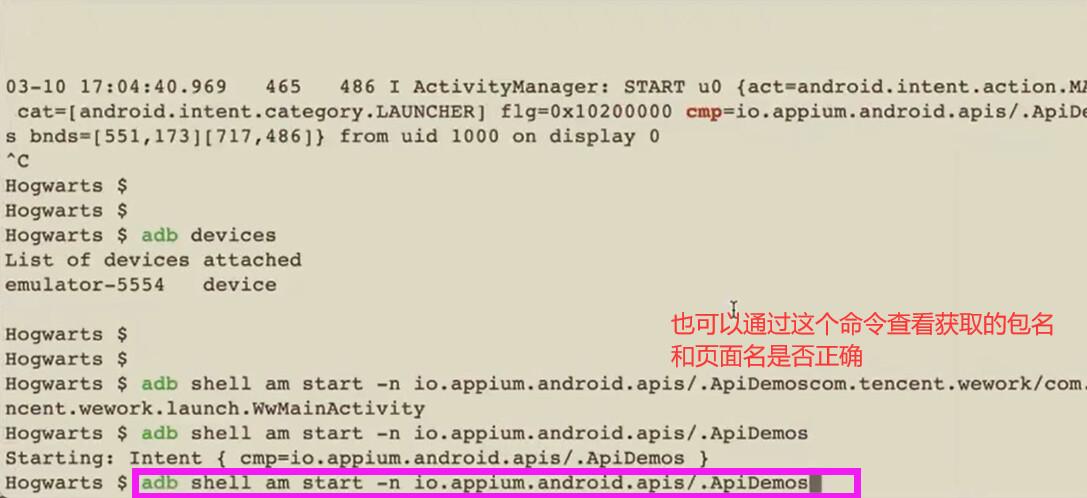
获取 app 的信息
- app 入口,两种方式获取:
- 1、通过 logcat 日志获取
- Mac/Linux:
adb logcat ActivityManager:I | grep “cmp" - Windows:
adb logcat ActivityManager:I | findstr "cmp"
- Mac/Linux:
- 2、通过 aapt 获取
- Mac/Linux:
aapt dump badging wework.apk | grep launchable-activity - Windows:
aapt dump badging wework.apk | findstr launchable-activity
- Mac/Linux:
- 1、通过 logcat 日志获取
- 启动应用命令
adb shell am start -W -n <package-name>/<activity-name> -S
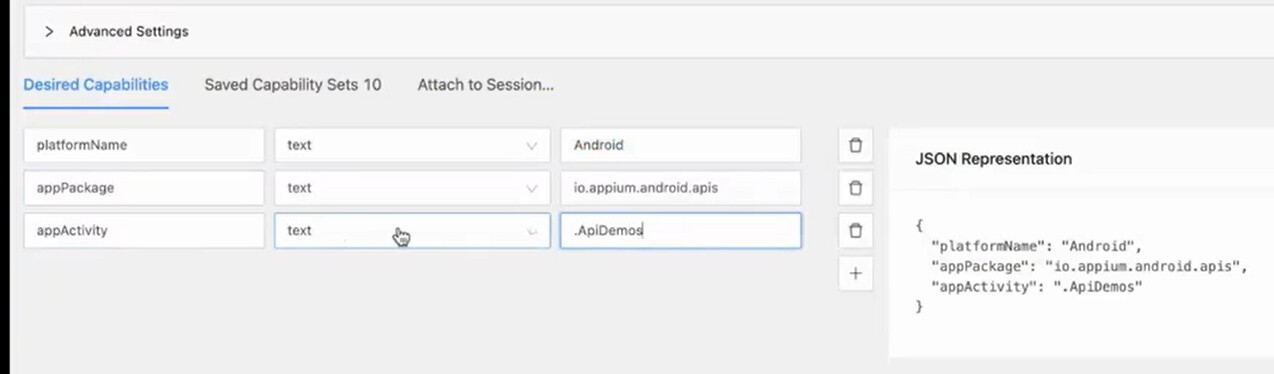

appPackage : io.appium.android.apis
appActivity :.ApiDemos
deviceName : 127.0.0.1:7555
配置待测应用
-
platformName:平台,Android/iOS -
deviceName:设备名 -
appPackage:应用的包名 -
appActivity:应用的页面名 Activity -
noReset: 防止清空缓存信息
功能键
-
SelectElements:选中元素,查看层级和属性 -
Swipe By Coordinates:通过坐标点滑动 -
Tap By Coordinates:通过坐标点点击 -
Back:返回 -
Refresh Source & Screenshot:刷新页面 -
StartRecording:开始录制脚本 -
Search for element:搜索元素 -
Copy XML Source to Clipboard:复制 xml 结构 -
Quit Session & Close Inspector:退出当前 Session
示例
- 下载官方 Demo apk(https://github.com/appium/appium/tree/master/sample-code/apps)
- 安装 API Demo.apk
示例-录制用例
- 打开 API Demo 应用
- 点击 OS,进入下个界面
- 点击【Morse Code】
- 输入内容【ceshiren.com】
- 返回上一个页面
- 返回上一个页面
- 关闭应用

from appium import webdriver

# 创建一个字典,desirecapbility
caps = {}
# Android 包名和页面名,获取命令:
# mac/linux: adb logcat ActivityManager:I | grep "cmp"
# windows: adb logcat ActivityManager:I | findstr "cmp"
caps["platformName"] = "Android"
caps["appPackage"] = "io.appium.android.apis"
caps["appActivity"] = ".ApiDemos"
caps["deviceName"] = "127.0.0.1:7555"
caps["ensureWebviewsHavePages"] = True

# 创建driver ,与appium server建立连接,返回一个 session
driver = webdriver.Remote("http://localhost:4723/wd/hub", caps)

el1 = driver.find_element_by_accessibility_id("OS")
el1.click()
el2 = driver.find_element_by_accessibility_id("Morse Code")
el2.click()
el3 = driver.find_element_by_id("io.appium.android.apis:id/text")
el3.clear()
el4 = driver.find_element_by_id("io.appium.android.apis:id/text")
el4.send_keys("ceshiren.com")
# 返回
driver.back()
driver.back()
driver.back()
# 回收session
driver.quit()
自动化测试用例结构分析
用例脚本优化
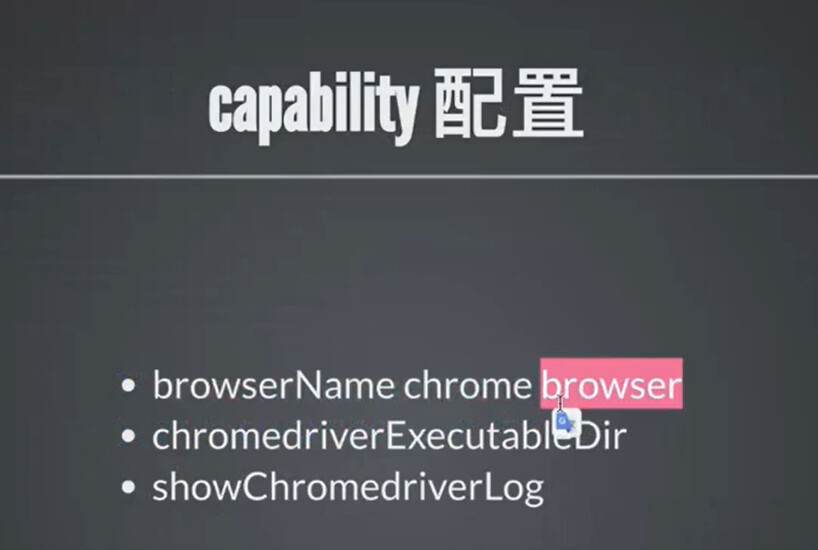
- 添加 capability 信息
- 初始化
webdriver,添加setup和teardown - 添加隐式等待和
noReset属性增强用例稳定性 - 添加断言
- 注意
- selenium 版本建议 3.141.0
- appium-python-client 版本建议 1.2.0
完整代码
class TestAppDemo:
    def setup(self):
        # 创建一个字典,desirecapbility
        caps = {}
        caps["platformName"] = "Android"
        # Android 包名和页面名,获取命令:
        # mac/linux: adb logcat ActivityManager:I | grep "cmp"
        # windows: adb logcat ActivityManager:I | findstr "cmp"
        caps["appPackage"] = "io.appium.android.apis"
        caps["appActivity"] = ".ApiDemos"
        caps["deviceName"] = "127.0.0.1:7555"
        caps["noReset"] = "true"

        # 创建driver ,与appium server建立连接,返回一个 session
        # driver 变成self.driver 由局部变量变成实例变量,就可以在其它的方法中引用这个实例变量了
        self.driver = webdriver.Remote("http://localhost:4723/wd/hub", caps)
        self.driver.implicitly_wait(5)

    def teardown(self):
        # 回收session
        self.driver.quit()

    def test_input(self):
        # el1 = self.driver.find_element_by_accessibility_id("OS")
        el1 = self.driver.find_element(AppiumBy.ACCESSIBILITY_ID, "OS")
        el1.click()
        # el2 = self.driver.find_element_by_accessibility_id("Morse Code")
        el2 = self.driver.find_element(AppiumBy.ACCESSIBILITY_ID, "Morse Code")
        el2.click()
        # el3 = self.driver.find_element_by_id("io.appium.android.apis:id/text")
        el3 = self.driver.find_element(AppiumBy.ID, "io.appium.android.apis:id/text")
        # 清除原有的内容
        el3.clear()
        el3.send_keys("ceshiren.com")
        el3.clear()
        self.driver.back()
        #返回
        self.driver.back()
        self.driver.back()
        result = self.driver.find_element(AppiumBy.ACCESSIBILITY_ID, "Accessibility").text
        # 断言
        assert result == "Accessibility"
capability 配置参数解析
Capability 简介
- 功能:配置 Appium 会话,告诉 Appium 服务器需要自动化的平台的应用程序
- 形式:键值对的集合,键对应设置的名称,值对应设置的值
- 主要分为三部分
- 公共部分
- ios 部分
- android 部分
Session
- Appium 的客户端和服务端之间进行通信的前提
- 通过
Desired Capabilities建立会话
公共部分参数配置
| 键 | 描述 | 值 |
|---|---|---|
platformName |
使用的手机操作系统 | iOS,Android,或者 Firefox0S |
platformVersion |
手机操作系统的版本 | 例如 7.1, 4.4
|
deviceName |
使用的手机或模拟器类型 |
iPhone Simulator, iPad Simulator, iPhone Retina 4-inch, Android Emulator, Galaxy S4, 等等…. 在 iOS 上,使用 Instruments |
的 instruments -s devices 命令可返回一个有效的设备的列表。 |
||
| 在 Andorid 上虽然这个参数目前已被忽略,但仍然需要添加上该参数 | ||
automationName |
使用哪个自动化引擎 |
android默认使用uiautomator2,ios默认使用XCUTest
|
noReset |
在当前 session 下不会重置应用的状态。默认值为 false
|
true, false
|
udid |
连接的真实设备的唯一设备编号 (Unique device identifier) | 例如 1ae20
|
Android 部分特有参数配置
| 键 | 描述 | 值 |
|---|---|---|
| appActivity | Activity 的名字是指从你的包中所要启动的 Android acticity。他通常需要再前面添加. (例如 使用 .MainActivity 代替 MainActivity) | MainActivity, .Settings |
| appPackage | 运行的 Android 应用的包名 | com.example.android.myApp, com.android.settings |
| appWaitActivity | 用于等待启动的 Android Activity 名称 | SplashActivity |
| unicodeKeyboard | 启用 Unicode 输入,默认为 false | true or false |
| resetKeyboard | true or false | |
| dontStopAppOnReset | 首次启动的时候,不停止 app | true or false |
| skipDeviceInitialization | 跳过安装,权限设置等操作 | true or false |
iOS 独有
| 键 | 描述 | 值 |
|---|---|---|
| bundleId | 被测应用的 bundle ID 。用于在真实设备中启动测试,也用于使用其他需要 bundle ID 的关键字启动测试。在使用 bundle ID 在真实设备上执行测试时,你可以不提供 app 关键字,但你必须提供 udid 。 | 例如 io.appium.TestApp |
| autoAcceptAlerts | 当 iOS 的个人信息访问警告 (如 位置、联系人、图片) 出现时,自动选择接受( Accept )。默认值 false | true 或者 false |
| showIOSLog | 是否在 appium 日志中显示从设备捕获的任何日志。默认 false | true or false |
Desire capability 参数示例
- API Demo 启动页配置
{
  "platformName": "android",
  "deviceName": "emulator-5554",
  "appPackage": "io.appium.android.apis",
  "appActivity": ".ApiDemos"
}
配置优化
- 添加参数,提高用例的稳定性
{
  "noReset": "true", // 不清空缓存信息
  "dontStopAppOnReset": "true", // 首次启动的时候,不停止app
  "skipDeviceInitialization": "true", // 跳过安装,权限设置等操作
  "unicodeKeyBoard": "true" // 输入中文
}
app 自动化控制
启动
- 启动应用
- 方式一:
webdriver.remote("url",desirecapability) - 方式二:
launch_app()将应用启动起来
# 方式一:
self.driver = webdriver.Remote\
("http://127.0.0.1:4723/wd/hub", desire_cap)

# 方式二:# 启动应用, 热启动,会进入到app 的首页
self.driver.launch_app()
数据清理
- 清空输入框内容
clear()
self.driver.find_element_by_accessibility_id('SomeAccessibilityID').clear()
关闭
- 退出app
quit()
self.driver.quit()
常见控件定位方法
android 基础知识
- Android 是通过容器的布局属性来管理子控件的位置关系,布局关系就是把界面上的所有的空间,根据他们的间距的大小,摆放在正确的位置
- Android 七大布局
- LinerLayout(线性布局)
- RelativeLayout(相对布局)
- FrameLayout(帧布局)
- AboluteLayout(绝对布局)
- TableLayout(表格布局)
- GridLayout(网格布局)
- ConstraintLayout(约束布局
android 基础知识
- Android 四大组件
- activity 与用户交互的可视化界面
- service 实现程序后台运行的解决方案
- content provider 内容提供者,提供程序所需要的数据
- broadcast receiver 广播接收器,监听外部事件的到来(比如来电)
android 基础知识
- 常用的控件
- TextView(文本控件),EditText(可编辑文本控件)
- Button(按钮),ImageButton(图片按钮),ToggleButton(开关按钮)
- ImageView(图片控件)
- CheckBox(复选框控件),RadioButton(单选框控件)
android 基础知识
- 布局
- 是可用于放置很多控件的容器按照一定的规律调整内部控件的位置由此构成界面。
- 嵌套布局
- 布局内部放置布局,多层布局嵌套,可以完成复杂的界面结构
ios 基础知识
- 布局
- iOS 不使用布局的概念,用变量之间的相对关系完成位置的计算
- 注意
- 使用 Appium 测试 iOS 应用需要使用 MacOS 操作系统
元素定位
- 概念:元素定位的含义就是定位控件
- 注意:同一脚本同时支持 android/iOS 两个系统的前提是元素属性(id,aid,xpath 等)一致
控件基础知识
- dom:Document Object Model 文档对象模型
- dom 应用:用于表示界面的控件层级,界面的结构化描述
- 常见的格式:html、xml
- 核心元素:节点、属性
- xpath:xml 路径语言,用于 xml 中的节点定位
控件基础知识
- Anrdroid 应用的层级结构与 html 不一样,是一个定制的 xml
- app source 类似于 dom ,表示 app 的层级,代表了界面里面所有的控件树的结构
- 每个控件都有它的属性(resourceid,xpath,aid),但是没有 css 属性
app dom 示例
- node
- attribute
- clickable
- content-desc
- resource-id
- text
- bounds
iOS 与 Android dom 结构的区别
- dom 属性和节点结构类似
- 名字和属性命名不同
- android 的 resourceid 和 ios 的 name
- android 的 content-desc 和 ios 的 accessibility-id
定位方法
- 测试步骤三要素
- 定位、交互、断言
- 定位方式:
- id 定位
- accessibilty_id 定位
- xpath 定位
- classname 定位(不推荐)
常见的控件定位方法
App 定位方式
| 定位策略 | 描述 |
|---|---|
| Accessibility ID | 识别一个唯一的 UI 元素,对于 XCUITest 引擎,它对应的的属性名是 accessibility-id,对于 Android 系统的页面元素,对应的属性名是 content-desc |
| Class name | 对于 iOS 系统,它的 class 属性对应的属性值会以XCUIElementType开头,对于 Android 系统,它对应的是 UIAutomator2 的 class 属性(e.g.: android.widget.TextView) |
| ID | 原生元素的标识符,Android 系统对应的属性名为resource-id,iOS 为name |
| Name | 元素的名称 |
| XPath | 使用 xpath 表达式查找页面所对应的 xml 的路径(不推荐,存在性能问题) |
App 定位方式进阶
| 定位策略 | 描述 |
|---|---|
| Image | 通过匹配 base 64 编码的图像文件定位元素 |
| Android UiAutomator (UiAutomator2 only) | 使用 UI Automator 提供的 API, 尤其是 UiSelector 类来定位元素,在 Appium 中,会发送 Java 代码作为字符串发送到服务器,服务器在应用程序的环境中执行这段代码,并返回一个或多个元素 |
| Android View Tag (Espresso only) | 使用 view tag 定位元素 |
| Android Data Matcher (Espresso only) | 使用 Espresso 数据匹配器定位元素 |
| IOS UIAutomation | 在 iOS 应用程序自动化时,可以使用苹果的 instruments 框架查找元素 |
选择定位器通用原则
- 与研发约定的属性优先
- android 推荐 content-description
- ios 推荐 label
- 身份属性 id
- 组合定位 xpath,css
- 其它定位
元素定位的写法
- 返回单个元素 WebElement
- 返回元素列表 [WebElement, WebElement, WebElement…]
# 返回单个元素 WebElement
driver.find_element(AppiumBy.xxx, "xxx属性值")
# 返回元素列表 [WebElement, WebElement, WebElement...]
driver.find_elements(AppiumBy.xxx, "xxx属性值")
元素定位的写法
driver.find_element(AppiumBy.ID, "ID属性值")
driver.find_element(AppiumBy.XPATH, "xpath表达式")
driver.find_element(AppiumBy.CLASS_NAME, "CLASS属性值")
driver.find_element(AppiumBy.ACCESSIBILITY_ID, "ACCESSIBILITY_ID表达式")
driver.find_element(AppiumBy.ANDROID_UIAUTOMATOR, "android uiautomator 表达式")
driver.find_element(AppiumBy.IOS_UIAUTOMATION, "ios uiautomation 表达式")
driver.find_element(AppiumBy.ANDROID_VIEWTAG, "ESPRESSO viewtag 表达式")
driver.find_element(AppiumBy.ANDROID_DATA_MATCHER, "ESPRESSO data matcher 表达式")
driver.find_element(AppiumBy.IMAGE, "IMAGE图片")
driver.find_elements(AppiumBy.ID, "ID属性值")
driver.find_elements(AppiumBy.XPATH, "xpath表达式")
driver.find_elements(AppiumBy.CLASS_NAME, "CLASS属性值")
driver.find_elements(AppiumBy.ACCESSIBILITY_ID, "ACCESSIBILITY_ID表达式")
driver.find_elements(AppiumBy.ANDROID_UIAUTOMATOR, "android uiautomator 表达式")
driver.find_elements(AppiumBy.IOS_UIAUTOMATION, "ios uiautomation 表达式")
driver.find_elements(AppiumBy.ANDROID_VIEWTAG, "ESPRESSO viewtag 表达式")
driver.find_elements(AppiumBy.ANDROID_DATA_MATCHER, "ESPRESSO data matcher 表达式")
driver.find_elements(AppiumBy.IMAGE, "IMAGE图片")
ID 定位
- 通过身份标识 id 查找元素
- 写法:
find_element(AppiumBy.ID, "ID属性值")
ACCESSIBILITY_ID 定位
- 通过 accessibility id 查找元素
- 写法:
find_element(AppiumBy.ACCESSIBILITY_ID, "ACCESSIBILITY_ID属性值")
XPath 定位
| 表达式 | 描述 |
|---|---|
| / | 从根节点选取(取子节点)。 |
| // | 从匹配选择的当前节点选择文档中的节点,而不考虑它们的位置(取子孙节点)。 |
| . | 选取当前节点。 |
| … | 选取当前节点的父节点。 |
| @ | 选取属性。 |
XPath 单属性定位
- 基本表达式:
//*[@属性名='属性值']
XPath 多属性定位
- 表达式:
//*[@属性名='属性值' and @属性名='属性值' ]
实战练习
- 安装 ApiDemo.apk - 链接: 百度网盘 请输入提取码 密码: gdcw
- 打开应用
- 定位文字为【App】元素
class TestLocation:
    def setup(self):
        caps = {}
        caps["platformName"] = "Android"
        caps["appium:appPackage"] = "io.appium.android.apis"
        caps["appium:appActivity"] = ".ApiDemos"
        caps["appium:deviceName"] = "127.0.0.1:7555"
        caps["dontStopAppOnReset"] = "true"
        caps["noReset"] = "true"
        self.driver = webdriver.Remote("http://127.0.0.1:4723/wd/hub", caps)
        self.driver.implicitly_wait(5)

    def teardown(self):
        self.driver.quit()

    def test_id(self):
        """通过 ID 进行元素定位"""
        print(self.driver.find_element(AppiumBy.ID, "android:id/text1"))

    def test_aid(self):
        """通过 ACCESSIBILITY_ID 进行元素定位"""
        print(self.driver.find_element(AppiumBy.ACCESSIBILITY_ID, "App"))

    def test_xpath(self):
        """通过 XPATH 进行元素定位"""
        print(self.driver.find_element(AppiumBy.XPATH, "//*[@text='App']"))

    def test_xpath1(self):
        """通过 XPATH 进行元素定位"""
        print(self.driver.find_element(AppiumBy.XPATH, "//*[@text='App' and @resource-id='android:id/text1']"))
原生定位
Android 原生定位
- 元素属性定位
- ID 定位
- 文本定位
- 文本匹配定位
- 父子关系定位
- 兄弟关系定位
Android 原生定位 - 单属性定位
- 格式
'new UiSelector().属性名("<属性值>")'- 比如:
'new UiSelector().resourceId("android:id/text1")'
- 比如:
- 注意外面是单引号,里面是双引号,顺序不能变
- 可以简写为
属性名("<属性值>")'- 比如:·
resourceId("android:id/text1")
- 比如:·
# ID 定位
def test_android_uiautomator_by_id(self):
        print(self.driver.find_element(AppiumBy.ANDROID_UIAUTOMATOR,\
                'new UiSelector().resourceId("android:id/text1")'))
# TEXT 定位
def test_android_uiautomator_by_text(self):
        print(self.driver.find_element(AppiumBy.ANDROID_UIAUTOMATOR,\
                'new UiSelector().text("App")'))

# classname 定位
def test_android_uiautomator_by_className(self):
        print(self.driver.find_element(AppiumBy.ANDROID_UIAUTOMATOR, \
                'new UiSelector().className("android.widget.TextView")'))
Android 原生定位-组合定位
- 多个属性同时确定元素的(多个属性任意组合 ,不限长度)
driver.find_element_by_android_uiautomator('\
    new UiSelector().resourceId("com.xueqiu.android:id/tab_name").\
    text("我的")')
Android 原生定位-模糊匹配
- 文字包含
- 文字以 x 开头
- 文字正则匹配
# 模糊匹配
def test_android_uiautomator_by_text_contains(self):
    print(self.driver.find_element(AppiumBy.ANDROID_UIAUTOMATOR, 'new UiSelector().textContains("ssi")').text)

def test_android_uiautomator_by_text_start_with(self):
    print(self.driver.find_element(AppiumBy.ANDROID_UIAUTOMATOR, 'new UiSelector().textStartsWith("Ani")').text)

def test_android_uiautomator_by_text_match(self):
    print(self.driver.find_element(AppiumBy.ANDROID_UIAUTOMATOR, 'new UiSelector().textMatches("^Pre.*")').text)
Android 原生定位-层级定位
- 兄弟元素定位
fromParent - 父子结点定位
childSelector, 可以传入 resourceId() , description() 等方法
# 查找目标元素Text,先找App ,fromParent() 方法可以查找兄弟结点
new UiSelector().text("App").fromParent(text("Text"))

# 根据父结点查找子结点/ 子孙结点
new UiSelector().className("android.widget.ListView").childSelector(text("Text"))
滑动查找元素
new UiScrollable(new UiSelector().scrollable(true).instance(0)).scrollIntoView(new UiSelector().text("查找的元素文本").instance(0))
总结
- Appium 提供多种元素定位方式,id,xpath, class, 也可以通过 Android Uiautomator 定位,或 iOS Predicate
- xpath 是比较灵活的定位方式(后面有章节详细介绍高级用法)
- 原生定位了解即可
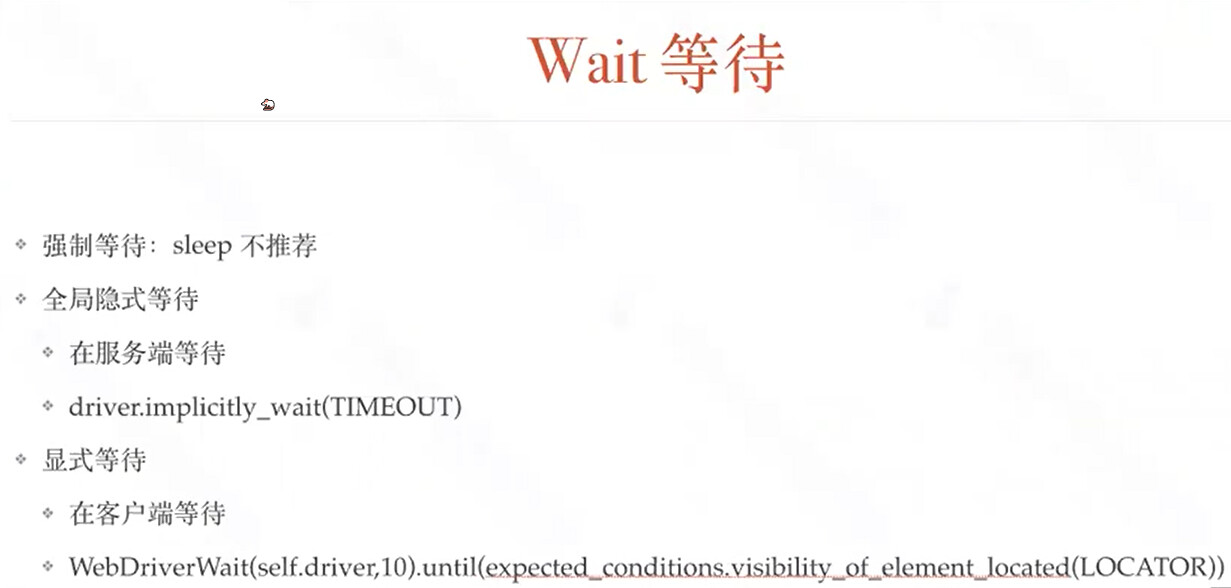
强制等待与隐式等待
为什么要添加等待
- 避免页面未渲染完成后操作,导致的报错
直接等待
- 解决方案:在报错的元素操作之前添加等待
- 原理:强制等待,线程休眠一定时间
- 演练环境:雪球 app
time.sleep(3)
from appium import webdriver
import time
desired_caps={}
desired_caps['platformName']='Android'
desired_caps['platformVersion']='6.0'
desired_caps['deviceName']='emulator-5554'
desired_caps['appPackage']='com.xueqiu.android'
desired_caps['appActivity']='com.xueqiu.android.common.MainActivity'
desired_caps['noReset'] = "true"
driver = webdriver.Remote("http://127.0.0.1:4723/wd/hub",desired_caps)
time.sleep(3)
driver.find_element(AppiumBy.ID, \
    "com.xueqiu.android:id/tv_search").click()
time.sleep(3)
driver.find_element(AppiumBy.ID, \
    "com.xueqiu.android:id/search_input_text").send_keys("alibaba")

driver.find_element(AppiumBy.ID,\
    "com.xueqiu.android:id/code").click()

driver.quit()
隐式等待
- 问题:难以确定元素加载的具体等待时间。
- 解决方案:针对于寻找元素的这个动作,使用隐式等待添加配置。
- 演练环境:雪球 app
- 原理:隐式等待是一种全局的等待方式,设置一个等待时间,轮询查找(默认 0.5 秒)元素是否出现,如果没出现就抛出异常
#设置一个等待时间,轮询查找(默认0.5秒)元素是否出现,如果没出现就抛出异常
driver.implicitly_wait(3)
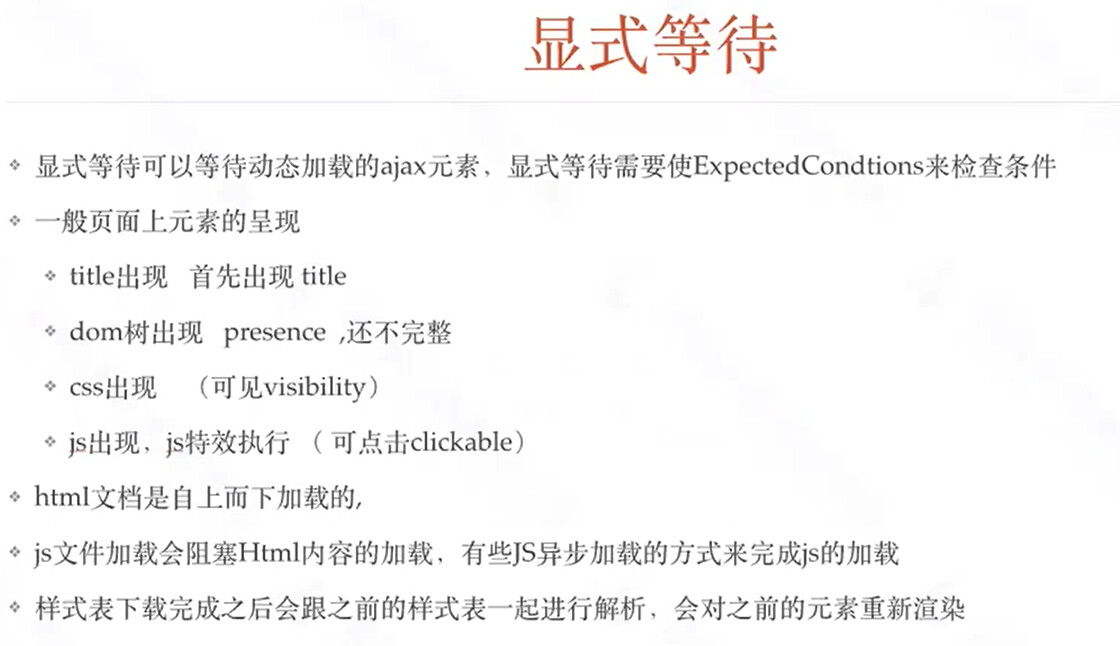
隐式等待无法解决的问题
- 元素可以找到,使用点击等操作,出现报错
- 原因:
- 页面元素加载是异步加载过程,通常 xml 会先加载完成,相应的元素属性后加载
- 元素存在与否是由 xml 决定,元素的交互是由属性决定
- 隐式等待只关注元素能不能找到,不关注元素能否点击或者进行其他的交互
- 解决方案:使用显式等待
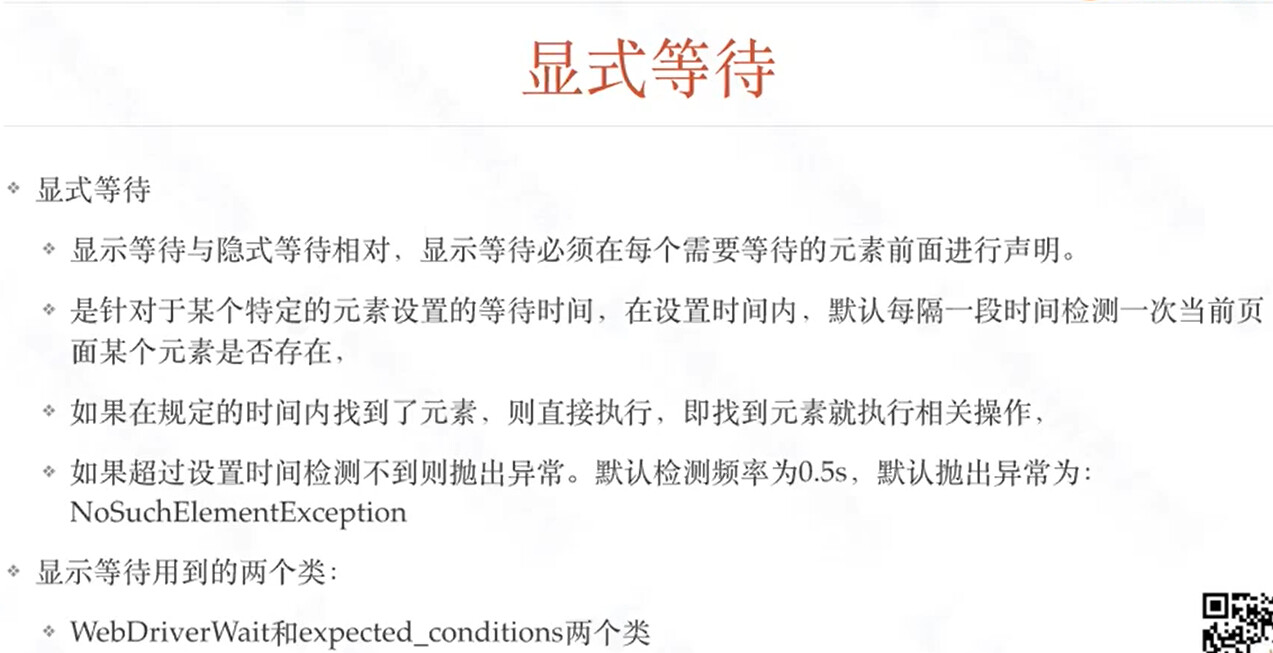
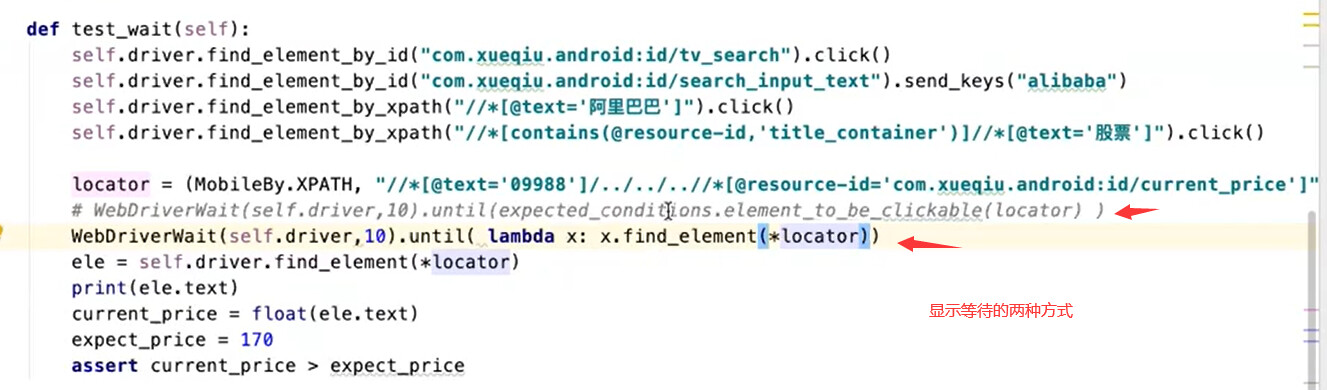
显式等待基本使用(初级)
- 示例:
WebDriverWait(driver实例, 最长等待时间, 轮询时间).until(结束条件) - 原理:在最长等待时间内,轮询,是否满足结束条件
- 演练环境: 雪球app
- 注意:在初级时期,先关注使用
WebDriverWait(driver, 10).until(
        expected_conditions.element_to_be_clickable(
        (AppiumBy.ID, 'com.xueqiu.android:id/code')))

driver.find_element(AppiumBy.ID,"com.xueqiu.android:id/code").click()
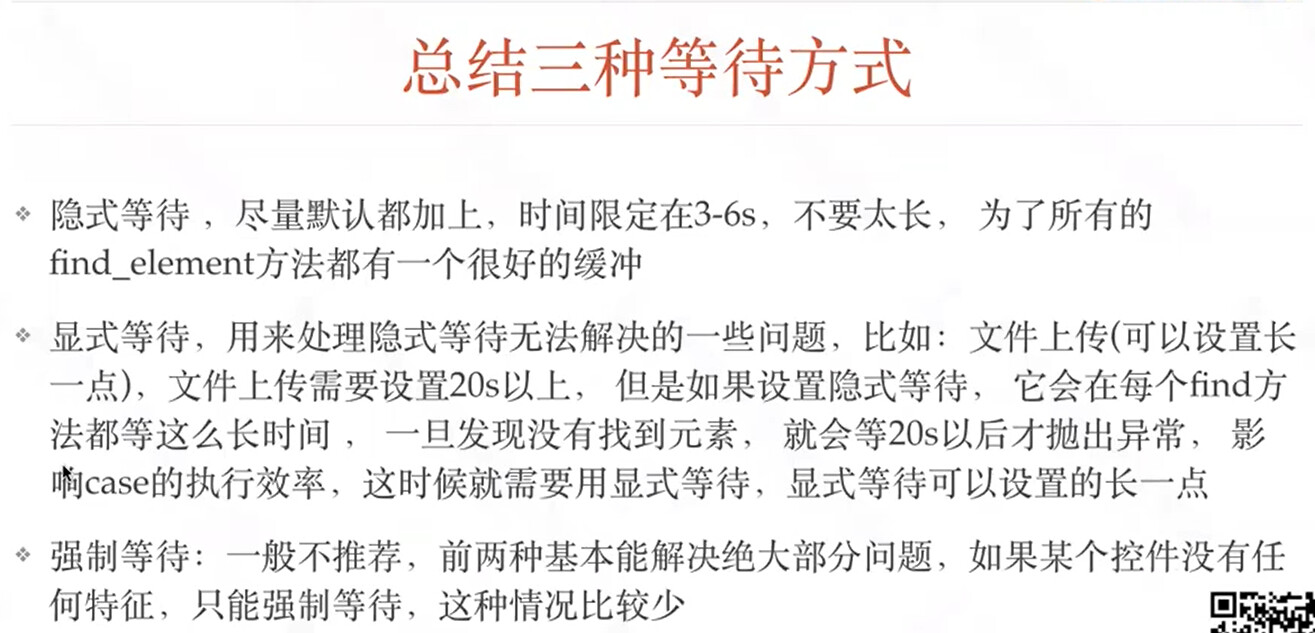
总结
| 类型 | 使用方式 | 原理 | 适用场景 |
|---|---|---|---|
| 直接等待 | time.sleep(等待时间)) | 强制线程等待 | 调试代码,临时性添加 |
| 隐式等待 | driver.implicitly_wait(等待时间) | 在时间范围内,轮询查找元素 | 解决找不到元素问题,无法解决交互问题 |
| 显式等待 | WebDriverWait(driver实例, 最长等待时间, 轮询时间).until(结束条件) | 设定特定的等待条件,轮询操作 | 解决特定条件下的等待问题,比如点击等交互性行为 |
常见的交互方法
元素的常用方法
- 点击方法
element.click() - 输入操作
element.send_keys('appium') - 设置元素的值
element.set_value('appium') - 清除操作
element.clear() - 是否可见
element.is_displayed()返回 True/False - 是否可用
element.is_enabled()返回 True/False - 是否被选中
element.is_selected()返回 True/False - 获取属性值
get_attribute(name)
元素的常用方法
-
get_attribute()方法能获取的属性,元素的属性几乎都能获取到,属性名称和 uiautomatorviewer 里面的一致 - 源码地址: https://github.com/appium/appium-uiautomator2-server/blob/master/app/src/main/java/io/appium/uiautomator2/handler/GetElementAttribute.java
- get_attribute() 可以获取的属性
- resource-id/resourceld 返回 resource-id(API=>18 支持)
- text 返回 text
- class 返回 class(API=>18 支持)
- content-desc/contentDescription 返回 content-desc 属性
- checkable,checked,clickable,enabled,focusable,focused,{long-clickable,longClickable), package, password,scrollable,selection-start,selection-end,selected,bounds,displayed,contentSize 返回 true or false
元素常用属性
- 获取元素文本
- 格式:element.text
- 获取元素坐标
- 格式:element.location
- 结果:
{'y': 19,'x: 498}
- 获取元素尺寸(高和宽)
- 格式:element.size
- 结果:
{'width':500,'height':22)
Demo 示例 1
- 打开 demo.apk
- 点击 Animation 进入下个页面
- 点击 Seeking 进入下个页面
- 查看【RUN】按钮是否显示/是否可点击
- 查看【滑动条】是否显示/是否可用/是否可点击
- 获取【滑动条】长度
- 点击【滑动条】中心位置
    def test_seeking(self):
        """
        打开 demo.apk
        1. 点击 Animation 进入下个页面
        2. 点击 Seeking 进入下个页面
        3. 查看【RUN】按钮是否显示/是否可点击
        4. 查看【滑动条】是否显示/是否可用/是否可点击
        5. 获取【滑动条】长度
        6. 点击【滑动条】中心位置
        :return:
        """
        self.driver.find_element(AppiumBy.ACCESSIBILITY_ID, "Animation").click()
        self.driver.find_element(AppiumBy.ACCESSIBILITY_ID, "Seeking").click()
        # 3. 查看【RUN】按钮是否显示/是否可点击
        run_element = self.driver.find_element(AppiumBy.ACCESSIBILITY_ID, "Run")
        run_is_displayed = run_element.is_displayed()
        run_is_clickable = run_element.get_attribute("clickable")
        print(f"【run】按钮是否可见:{run_is_displayed},是否可点击:{run_is_clickable}")
        # 4. 查看【滑动条】是否显示/是否可用/是否可点击
        seekbar_element = self.driver.find_element(AppiumBy.ID, "io.appium.android.apis:id/seekBar")
        seekbar_displayed = seekbar_element.is_displayed()
        seekbar_enabled = seekbar_element.is_enabled()
        seekbar_clickable = seekbar_element.get_attribute("clickable")
        print(f"seekbar 滑动条 是否可见:{seekbar_displayed},"
              f"是否可用:{seekbar_enabled},"
              f"是否可点击:{seekbar_clickable}")
        # 5.获取【滑动条】长度
        seekbar_size = seekbar_element.size
        width = seekbar_size.get("width")
        height = seekbar_size.get("height")
        print(f"seekbar 的长度:{width}")

        seekbar_location = seekbar_element.location
        x = seekbar_location.get("x")
        y = seekbar_location.get("y")
        # 6.点击【滑动条】中心位置
        seekbar_centerx = x + width / 2
        seekbar_centery = y
        self.driver.tap([(seekbar_centerx, seekbar_centery)])
        sleep(5)
定位策略
App 定位方式
| 定位策略 | 描述 |
|---|---|
| Accessibility ID | 识别一个唯一的 UI 元素,对于 XCUITest 引擎,它对应的的属性名是 accessibility-id,对于 Android 系统的页面元素,对应的属性名是 content-desc |
| Class name | 对于 iOS 系统,它的 class 属性对应的属性值会以XCUIElementType开头,对于 Android 系统,它对应的是 UIAutomator2 的 class 属性(e.g.: android.widget.TextView) |
| ID | 原生元素的标识符,Android 系统对应的属性名为resource-id,iOS 为name |
| Name | 元素的名称 |
| XPath | 使用 xpath 表达式查找页面所对应的 xml 的路径(不推荐,存在性能问题) |
App 定位方式进阶
| 定位策略 | 描述 |
|---|---|
| Image | 通过匹配 base 64 编码的图像文件定位元素 |
| Android UiAutomator (UiAutomator2 only) | 使用 UI Automator 提供的 API, 尤其是 UiSelector 类来定位元素,在 Appium 中,会发送 Java 代码作为字符串发送到服务器,服务器在应用程序的环境中执行这段代码,并返回一个或多个元素 |
| Android View Tag (Espresso only) | 使用 view tag 定位元素 |
| Android Data Matcher (Espresso only) | 使用 Espresso 数据匹配器定位元素 |
| IOS UIAutomation | 在 iOS 应用程序自动化时,可以使用苹果的 instruments 框架查找元素 |
Web 定位方式
| 定位策略 | 描述 |
|---|---|
| class name | 通过 class 属性定位元素 |
| css selector | 通过匹配css selector 定位元素 |
| id | 通过 id 属性匹配元素 |
| name | 通过 name 属性定位元素 |
| link text | 通过 text 标签中间的text文本定位元素 |
| partial link text | 通过 text 标签中间的text文本的部分内容定位元素 |
| tag name | 通过 tag 名称定位元素 |
| xpath | 通过 xpath 表达式匹配元素 |
选择定位器通用原则
- 与研发约定的属性优先
- web 推荐 class
- android 推荐 content-description
- ios 推荐 label
- 身份属性 id,name(web 定位)
- 组合定位 xpath,css
- 其它定位
元素定位不到
| 原因 | 解决方案 |
|---|---|
| 定位不正确 | 在定位工具中先测试定位表达式是否正确 |
| 存在动态 ID | 定位方式使用 css 或者 xpath 的相对定位 |
| 页面还没有加载完成 | 添加死等验证,使用显示等待或隐式等待进行优化 |
| 页面有 iframe | 切换到 iframe 后定位 |
| 页面切换 window | 切换到对应窗口后定位 |
| 要定位元素为隐藏元素 | 使用 js 操作该元素 |
混合定位的应用场景
- 场景:
- 属性动态变化(id,text)
- 重复元素属性(id,text,class)
- 解决:
- 根据相对位置关系进行定位(css、xpath)(父级,子级,兄弟,索引)
- 使用 find_elements 遍历查找
- 参考高级定位技巧章节(xpath,css)
使用等待机制的场景
- 场景
- 控件动态出现
- 控件出现特定特征
- 解决
- 元素定位结合隐式等待与显式等待
Web 弹框定位
- 场景
- web 页面 alert 弹框
- 解决:
- web 需要使用
driver.switchTo().alert()处理
- web 需要使用
App toast 提示框定位
- 场景
- app toast 提示框
- 解决:
- 使用 driver.page_source 拿到页面布局结构文件,分析 toast/弹框组件的标签内容,
- 然后通过 id/text/class 等属性,使用 xpath 完成元素定位
- 结合 隐式等待
下拉框/日期控件定位
- 场景:
-
<input>标签组合的下拉框无法定位 -
<input>标签组合的日期控件无法定位
-
- 解决:
- 面对这些元素,我们可以引入 JS 注入技术来解决问题。
文件上传定位
- 场景:
- input 标签文件上传
- 解决:
- input 标签直接使用 send_keys()方法
雪球 app 自动化测试实战练习
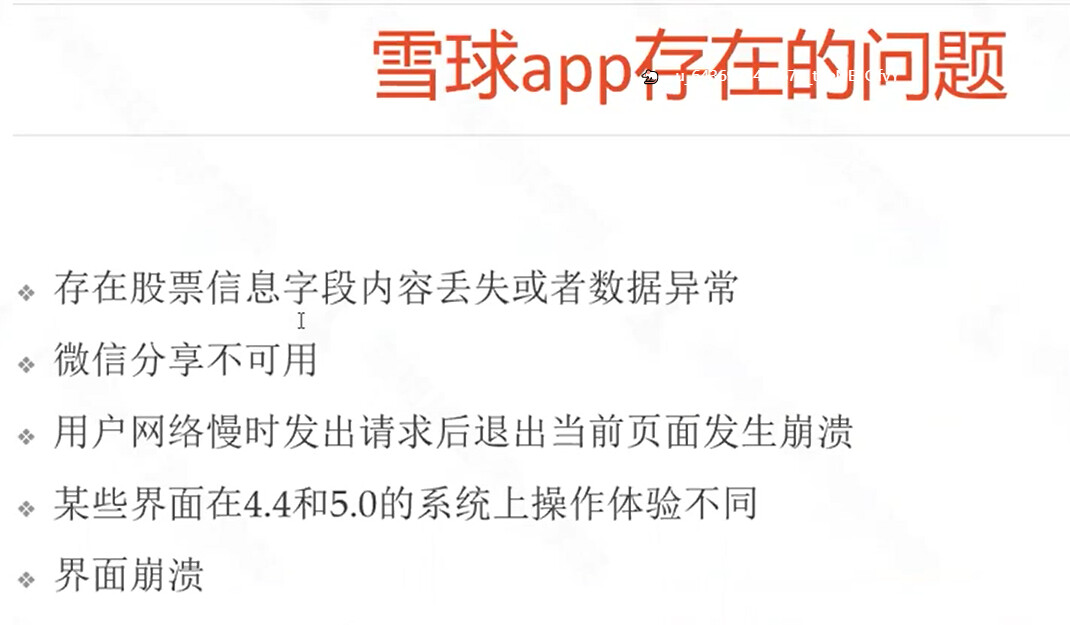
产品分析
- 被测应用:雪球 App
- 雪球 App 介绍
- 雪球 app 是一款免费版,非常实用的股票平台,提供热点资讯内容和实时行情,提供了证券交流交易,公募、理财服务
- 雪球 app 功能包括搜索股票,查看行情,交易,浏览热门文章,发帖,登录,注册,等功能
雪球 app 搜索功能点自动化测试实战
用例设计
- 打开【雪球】应用首页
- 点击搜索框(点击之前,判断搜索框的是否可用,并查看搜索框 name 属性值,并获取搜索框坐标,以及它的宽高)
- 向搜索框输入:alibaba
- 判断【阿里巴巴】是否可见
- 如果可见,打印“搜索成功”
- 如果不可见,打印“搜索失败
用例编写思路
- pytest 测试框架编写
- 添加隐式等待
- 添加 setup teardown
- 添加断言
代码示例
from appium import webdriver
from appium.webdriver.common.appiumby import AppiumBy


class TestSearch:
    def setup(self):
        # 创建一个字典,desirecapbility
        caps = {}
        caps["platformName"] = "Android"
        # Android 包名和页面名,获取命令:
        # mac/linux: adb logcat ActivityManager:I | grep "cmp"
        # windows: adb logcat ActivityManager:I | findstr "cmp"
        # com.xueqiu.android/.view.WelcomeActivityAlias
        caps["appPackage"] = "com.xueqiu.android"
        caps["appActivity"] = ".view.WelcomeActivityAlias"
        caps["deviceName"] = "emulator-5554"
        caps["noReset"] = "true"
        self.driver = webdriver.Remote("http://localhost:4723/wd/hub", caps)
        # 隐式等待
        self.driver.implicitly_wait(20)

    def teardown(self):
        # 关闭应用
        self.driver.quit()

    def test_search(self):
        """
        1. 判断搜索框的是否可用,并查看搜索框 name 属性值,并获取搜索框坐标,以及它的宽高
        2. 点击搜索框
        3. 向搜索框输入:alibaba
        4. 判断【阿里巴巴】是否可见
            如果可见,打印“搜索成功”
            如果不可见,打印“搜索失败
        :return:
        """
        # 1. 判断搜索框的是否可用,并查看搜索框 name 属性值,并获取搜索框坐标,以及它的宽高
        search_key = "alibaba"
        searchbox_ele = self.driver.find_element(AppiumBy.ID, "com.xueqiu.android:id/home_search")
        # 先判断一下搜索框是否可用
        if searchbox_ele.is_enabled():
            searchbox_text = searchbox_ele.text
            searchbox_location = searchbox_ele.location
            searchbox_size = searchbox_ele.size
            print(f"首页搜索框的 text:{searchbox_text}")
            print(f"首页搜索框的 location坐标为:{searchbox_location}")
            print(f"首页搜索框的 size 宽高:{searchbox_size}")
            # 2. 点击搜索框
            searchbox_ele.click()
            # 3. 向搜索框输入:alibaba
            self.driver.find_element(AppiumBy.ID,
                                     "com.xueqiu.android:id/search_input_text").send_keys(search_key)
            # 4. 判断【阿里巴巴】是否可见
            #             如果可见,打印“搜索成功”
            #             如果不可见,打印“搜索失败
            #
            alibaba_element = self.driver.find_element(AppiumBy.XPATH, "//*[@text='阿里巴巴']")
            result = alibaba_element.is_displayed()
            # print(result)
            if result == True:
                print("搜索成功")
            else:
                print("搜索失败")
            assert result == True
        else:
            print("搜索框不可用")
            assert False
Appium Server 安装(Windows)
安装 Node.js
- 下载
- 默认配置环境变量
- 查看源
- 更换源
// 查看源
npm config get registry

//更换源
npm config set registry https://registry.npm.taobao.org
版本查看
node -v
npm -v
问题
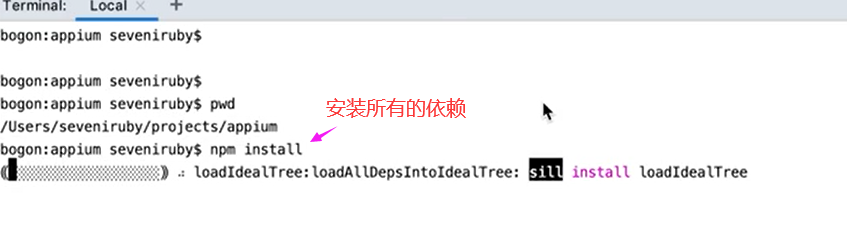
安装 Appium Server
- Appium Server 安装
// 安装最新版本的appium server
npm install -g appium
- 注意 -g 参数一定要有,不能省,代表全局
- 安装某个特定的版本
npm install -g appium@1.19.1
验证环境
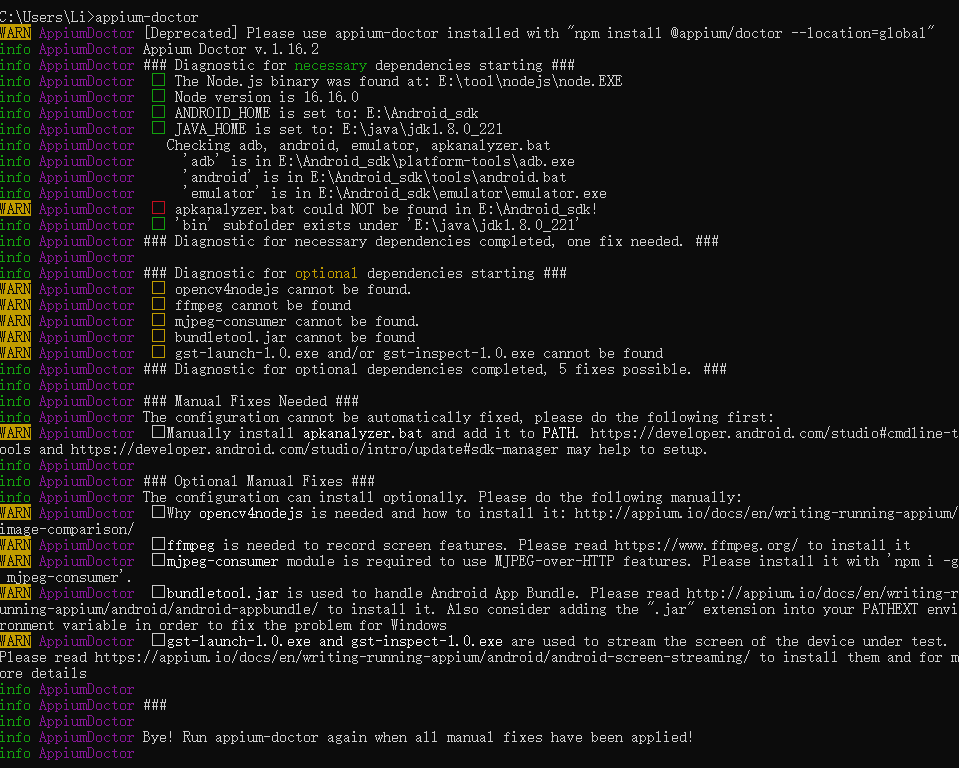
安装环境检测工具
- 运行环境检测工具 appium-doctor
安装检测工具 appium-doctor
npm install -g appium-doctor
检测环境
- 执行检测命令
appium-doctor
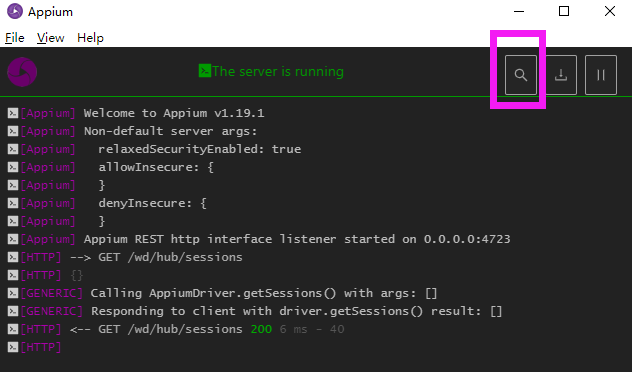
运行 Appium 服务
// 帮助文档
appium --help
// 运行 appium 服务
appium
appium --session-override

Capabilities 进阶
deviceName
- 只是设备的名字,别名
- 随便起
- 不能锁定唯一一个设备
uid
- 多设备选择的时候,要指定 uid
- 默认读取设备列表的第一个设备
- 设备列表获取
adb devices
newCommandTimeout
- appium 程序应等待来自客户端的新命令多长时间
- 超时后==会话删除==
- 默认
60秒 - 设置为 0 禁用
autoGrantPermissions
- 授予启动的应用程序某些权限
PRINT_PAGE_SOURCE_ON_FIND_FAILURE
- 默认为
false - 发生任何错误,强制服务器将实际的 XML 页面源转储到日志中.
测试策略
- noReset
- fullReset
- dontStopAppOnReset
noReset
- 默认为
false - 安卓
true- 不停止应用程序
- 不清除应用程序数据
- 不卸载 apk
fullReset
- 默认为
false。true:新会话之前完全卸载被测应用程序 - 安卓
- 在会话开始之前(appium 启动 app)和测试之后停止应用程序
- 清除应用程序数据并卸载 apk
dontStopAppOnReset
- 默认为
false。 - 不希望应用程序在运行时重新启动,设置为
true
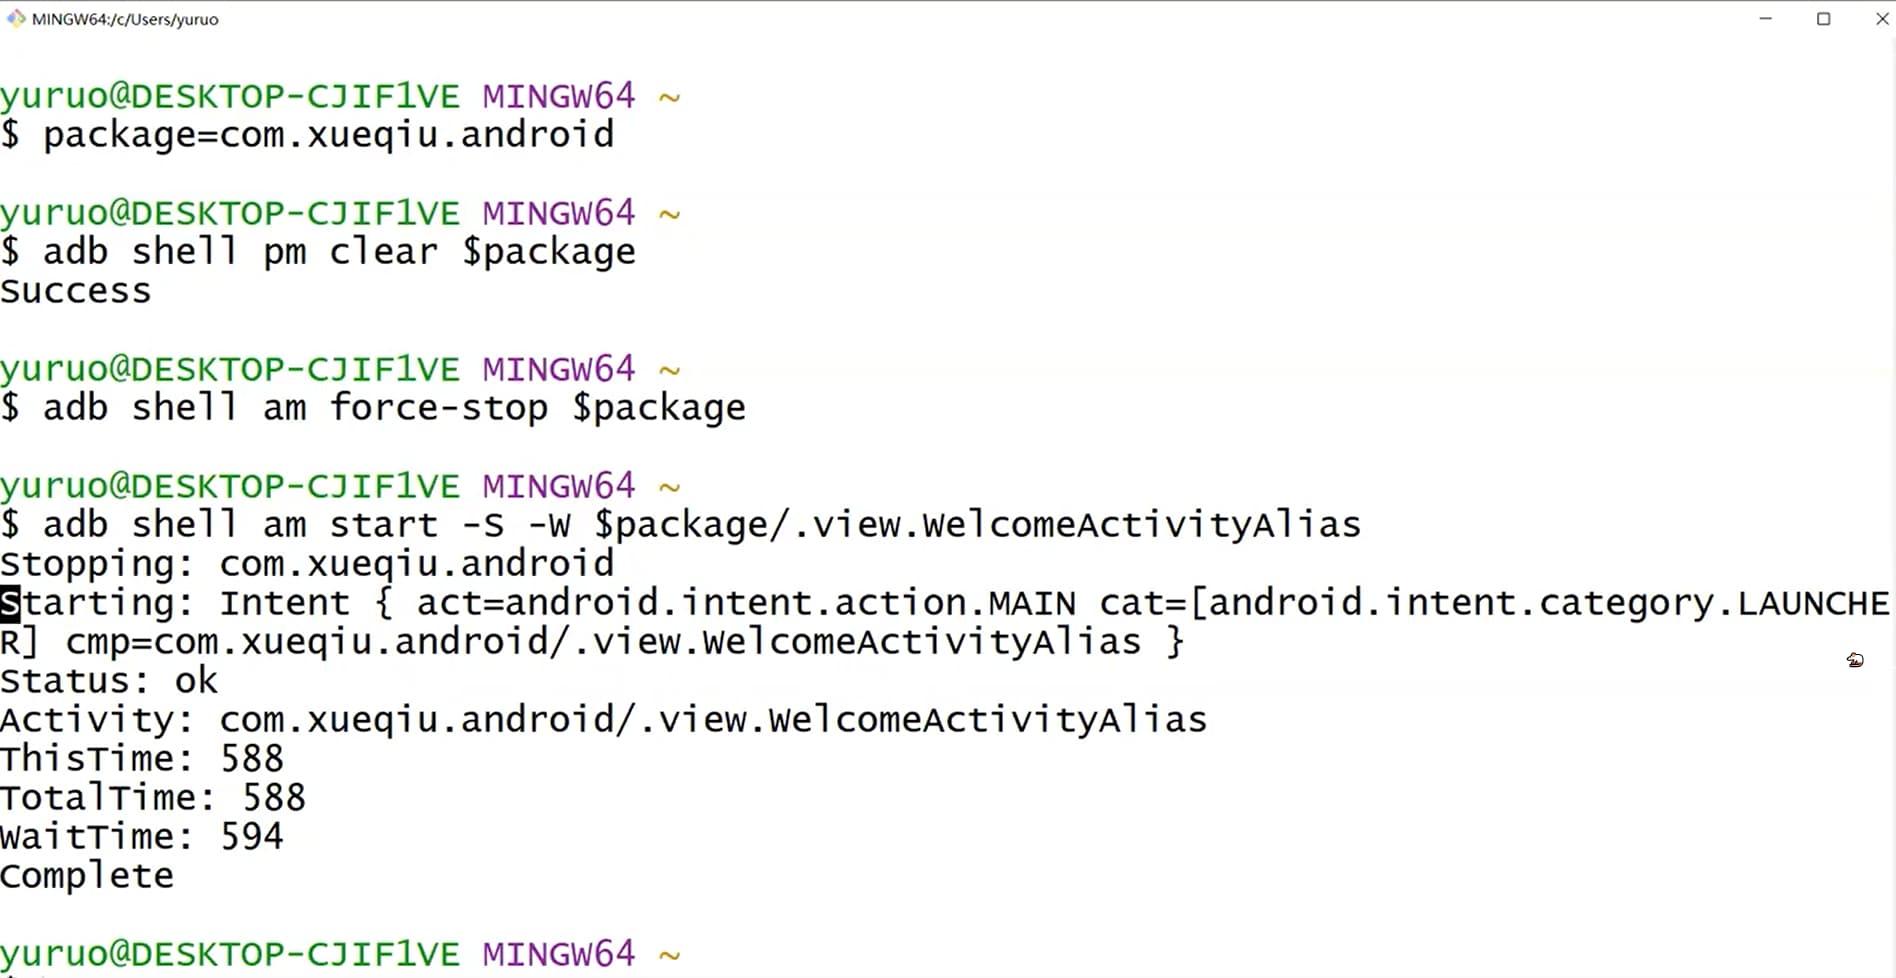
#打开的app退出后重新启动
adb shell am start -S 包名/activity名

#打开的app不需要退出,直接使用当前页面
adb shell am start 包名/activity名
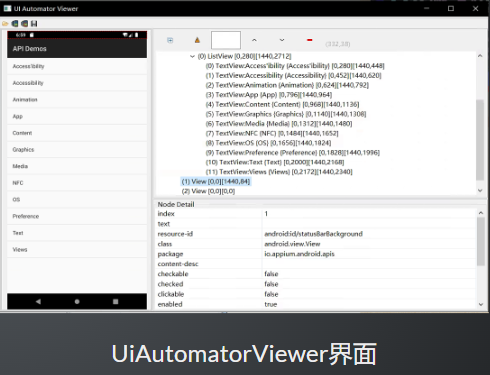
元素定位工具
目录
- uiautomatorviewer
- weditor 支持安卓和IOS
- appium inspector 支持安卓和IOS
uiautomatorviewer 工具安装
- 工具的安装:Android SDK 自带的界面分析工具
- 打开
tools/bin目录下的uiautomatorviewer程序
uiautomatorviewer 工具功能介绍
- 第一个是通过分析给定的文件定位
- 第二个是将当前界面截图并分析xml结构
- 第三个与第二个功能类似,但它会对页面内容进行压缩,导致一些控件定位不准确
- 第四个是保存当前界面的截图以及xml结构
weditor 安装与运行
- 要求:python 3.6+ 以上
- 安装:weditor 是 python 的第三方库
-
pip install weditor==0.6.3进行安装
-
- 运行:安装完成之后,在命令行运行
python -m weditor即可
weditor 功能介绍
- 支持 Android 和 iOS 的界面分析
- 通过设备的 uuid 连接设备
- 展示页面结构

appium inspector 安装与运行
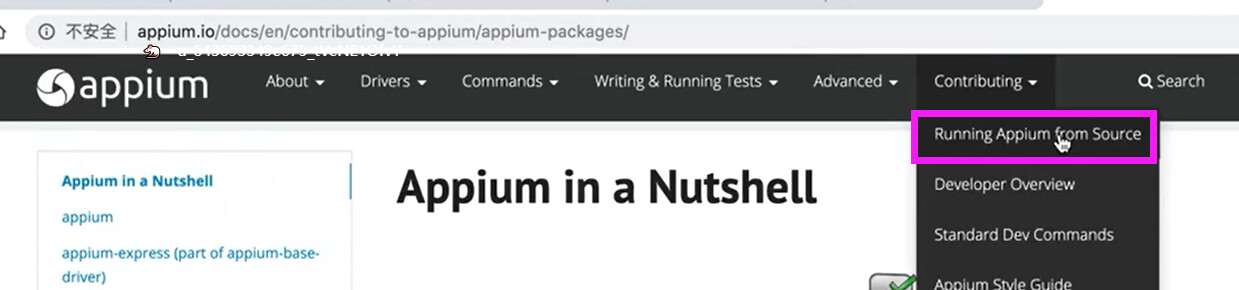
- 下载:下载链接
- 运行 appium inspector
- 运行 appium server
- 本地的 adb 已连接设备
- Desired Capabilities 参数填写
- 点击 Start Session
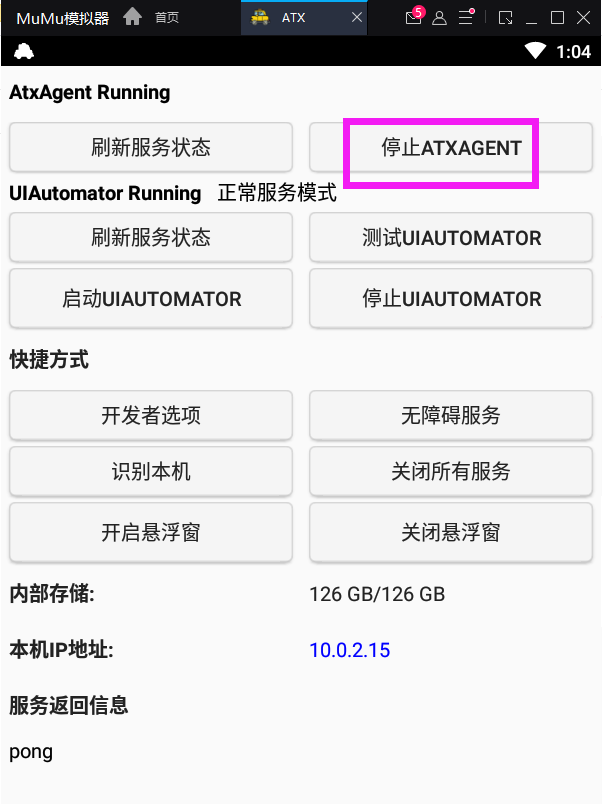
- 注意:在运行appium inspect 的时候需要检查一下weditor在手机上安装的ATX服务是否停止,因为ATX服务会占用uiautomator2的

appium inspector 功能简介
- 定位的模式相关
- 原生app模式
- 混合模式
- 界面操作相关
- 选择元素
- 坐标滑动界面
- 坐标点击元素
- 其他功能
- 返回
- 刷新页面
- 录制
- 搜索元素
- 复制 xml 结构
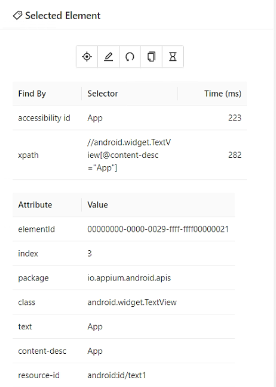
对选中元素操作
- 点击
- 输入
- 清空
- 复制元素的属性
- 获取元素的响应时间
- 元素的属性
高阶定位-Xpath
目录
- xpath 函数
- xpath 轴
- XPath 运算符
包含-contains()
-
Xpath表达式中的一个函数 -
contains()函数匹配==属性值==中包含的==字符串==
//*[contains(@属性,"属性值")]
//*[contains(@text,"加自选")]
总结
-
contains()函数定位的元素很容易为list -
contains()函数内的属性名需要用@开始
XPath 轴
- 父子
- 爷孙
- 祖先
- 兄弟姐妹
父子-当前节点的父节点
//*[@text="HK"]/..

//*[@text="HK"]/parent::*
父子-当前节点的子节点
当前节点的儿子
//*[@resource-id="com.xueqiu.android:id/stock_layout"]/child::*
爷孙-当前节点的爷爷
当前节点的父级的父级
//*[@text="HK"]/../..

//*[@text="HK"]/parent::*/parent::*
爷孙-当前节点的孙子
当前节点的儿子的儿子
//*[@resource-id="com.xueqiu.android:id/stock_layout"]/child::*/child::*
祖先-ancestor
返回当前节点的所有祖先
//*[@text="HK"]/ancestor::android.widget.RelativeLayout
显式指定要返回的祖先
//*[@text="HK"]/ancestor::android.widget.RelativeLayout[1]
兄弟姐妹-sibling
- 节点后的兄弟姐妹节点
- 节点前的兄弟姐妹节点
following-sibling
- 选择当前节点之后的所有兄弟节点
- 节点后有一个兄弟节点
//*[@text="HK"]/following-sibling::*
节点后有多个兄弟节点
//*[@resource-id="com.xueqiu.android:id/stock_layout"]/following-sibling::*[@resource-id="com.xueqiu.android:id/price_layout"]
preceding-sibling
- 选择当前节点之前的所有兄弟节点
- 节点前有一个兄弟节点
//[@text=“09988”]/preceding-sibling::
节点前有多个兄弟节点
//*[@resource-id="com.xueqiu.android:id/add_attention"]/preceding-sibling::*[@resource-id="com.xueqiu.android:id/price_layout"]
XPath 运算符
AND
- 可以在
XPath表达式中放置 2 个条件 - 在
AND两个条件都应该为真的情况下,才能找到元素
//*[@resource-id="com.xueqiu.android:id/current_price" and @text="107.8"]
OR
- 可以在
XPath表达式中放置 2 个条件 - 在
OR的情况下,两个条件中的任何一个为真,就可找到元素。 -
OR定位获取的是并集
//*[@resource-id="com.xueqiu.android:id/tv_stock_add_follow" or @text="加自选"]
总结
-
and定位是 2 个条件的交集 -
or定位是 2 个条件的是并集
CSS 定位与原生定位
原生定位
- 官网地址
- 元素属性定位
- 组合定位
# ID 定位
driver.find_element_by_android_uiautomator('\
    new UiSelector().resourceId("<element-ID>")')

# 组合定位
driver.find_element_by_android_uiautomator('\
    new UiSelector().resourceId("com.xueqiu.android:id/tab_name").\
    text("我的")')
CSS Selector 定位
css selector 定位介绍
- 官网说明
- Android: Appium Server 版本 >= 1.19.0
- iOS:Appium Server>= 1.21.0
代码:
driver.find_element(AppiumBy.CSS_SELECTOR,\
    "#com\.xueqiu\.android\:id\/tv_search")

解析前:
{"using":"css selector",\
    "value":"#com\\.xueqiu\\.android\\:id\\/tv_search"}

解析后:
{"strategy":"-android uiautomator",\
    "selector":"new UiSelector().resourceId
    (\"com.xueqiu.android:id/tv_search\")",...}
css selector 用法
# 通过 id
elementById("someResourceID")`
    -> `elementsByCss("#someResourceID")
# 通过 class
elementsByClassName("android.widget.TextView")`
    -> `elementsByCss("android.widget.TextView")
# 通过 accessibility id
elementsByAccessibilityId("Some Content Description")`
    -> `elementsByCss('*[description="Some Content Description"]')
# 通过 xpath
elementsByXpath("//android.widget.TextView[@description='Accessibility']")`
    -> `elementsByCss("android.widget.TextView[description='Accessibility']")
示例
- 打开【雪球】应用首页
- 点击搜索框
- 向搜索框输入:alibaba
- 判断【阿里巴巴】可见
ef test_search1(self):
    # 点击搜索框
    element = self.driver.find_element(\
        AppiumBy.CSS_SELECTOR,"#com\.xueqiu\.android\:id\/tv_search")
    element.click()
    # 向搜索框输入:alibaba
    self.driver.find_element(AppiumBy.CSS_SELECTOR,
        "#com\.xueqiu\.android\:id\/search_input_text"). \
        send_keys("alibaba")
    alibaba_element = self.driver.find_element(\
        AppiumBy.CSS_SELECTOR, "*[text='阿里巴巴']")
    displayed = alibaba_element.get_attribute("displayed")
    print(displayed)
    # 判断【阿里巴巴】可见
    assert displayed == "true"
    print(f"结束时间:{self.get_time()}")
iOS css selector 定位
- Appium Server 版本>=1.21.0
- 官网:https://github.com/appium/appium/releases/tag/v1.21.0
总结
- Appium Server 版本>=1.21.0
- css selector 会转化为 Android/iOS 原生定位的定位策略
- Android 转为 Android Uiautomator 定位方式
- iOS 转为 class chain 定位方式
特殊控件 Toast
Toast 是什么
- 一种消息框类型
- 永远不会获得焦点
- 无法被点击
- Toast显示的时间有限,Toast会根据用户设置的显示时间后自动消失
- 是系统级别的控件,属于系统settings
- Toast类的思想:
- 就是尽可能不引人注意,同时还向用户显示信息,希望他们看到
Toast 定位
- appium 用的是uiautomator底层来抓取toast,
- 再把toast放到控件树内,但是它本身不属于空间
- 使用的是uiautomator2
Toast 定位
xpath 可以找到 ``` //*[@class=“android.widget.Toast”]
//*[contains(@text,“xxx”)] ``` xxx:toast的文本内容
driver.manage().timeouts().implicitlyWait(Duration.ofSeconds(50));
driver.findElement(AppiumBy.xpath("//*[@class=\"android.widget.Toast\"]"));
上课代码:
from appium import webdriver
from appium.webdriver.common.mobileby import MobileBy

class TestToast():
    def setup(self):
        desire = {
            'platformName': 'android',
            'platformVersion': '6.0',
            'deviceName': 'emulator-5554',
            'appPackage': 'io.appium.android.apis',
            'appActivity': 'io.appium.android.apis.view.PopupMenu1',
            #可以加也可以不加,现在默认就是uiautomator2
            'automationName' : 'uiautomator2'
        }
        self.driver = webdriver.Remote("http://127.0.0.1:4723/wd/hub", desire)
        self.driver.implicitly_wait(5)

    def teardown(self):
        self.driver.quit()

    def test_toast(self):
        self.driver.find_element(MobileBy.ACCESSIBILITY_ID,"Make a Popup!").click()
        self.driver.find_element(MobileBy.XPATH,"//*[@text='Search']").click()
        # print(self.driver.page_source)
        # print(self.driver.find_element(MobileBy.XPATH, "//*[@class='android.widget.Toast']").text)
        #获取toast弹框信息
        print(self.driver.find_element(MobileBy.XPATH, "//*[contains(@text, 'Clicked popup')]").text)


高级控件交互方法
Actions
W3C 事件流
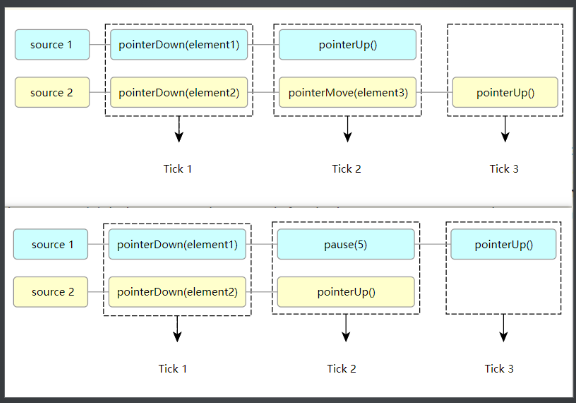
用法
- 定义 ActionChains 实例
- 定义输入源
- 定义动作
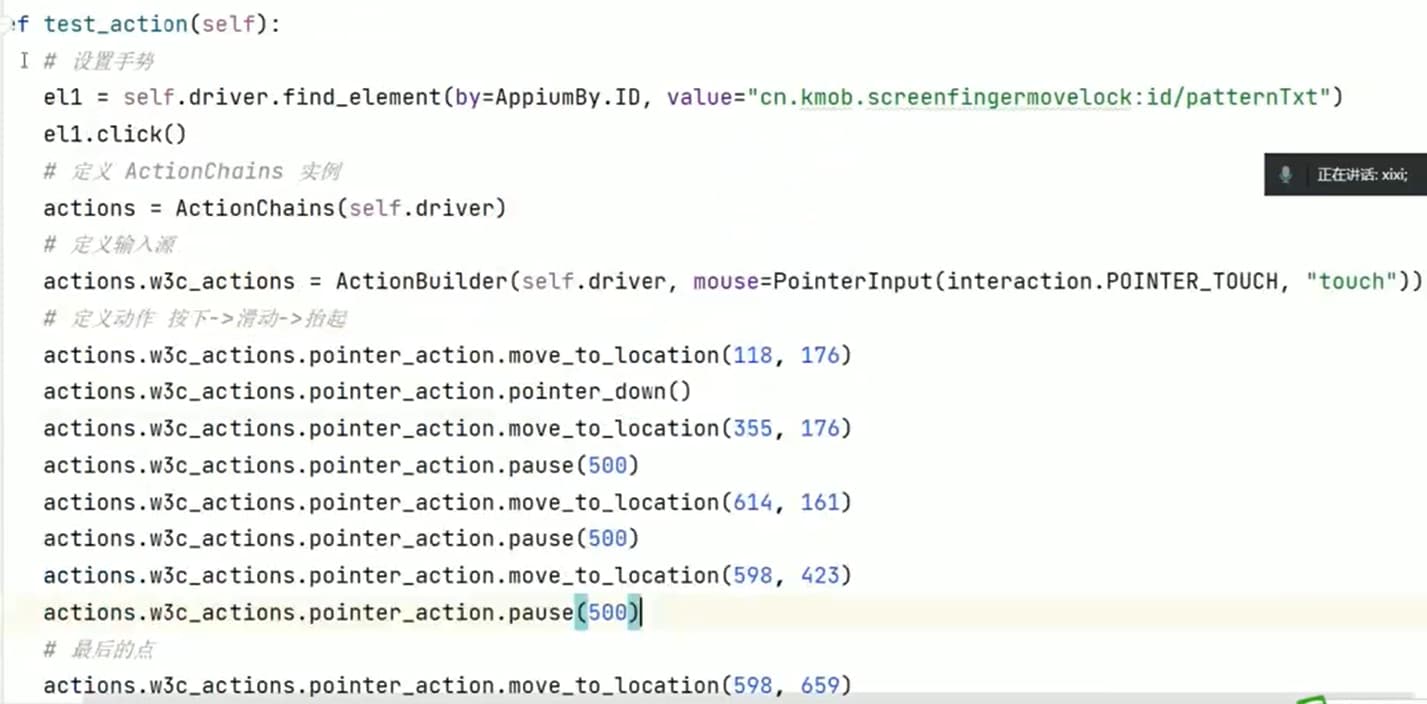
代码
...
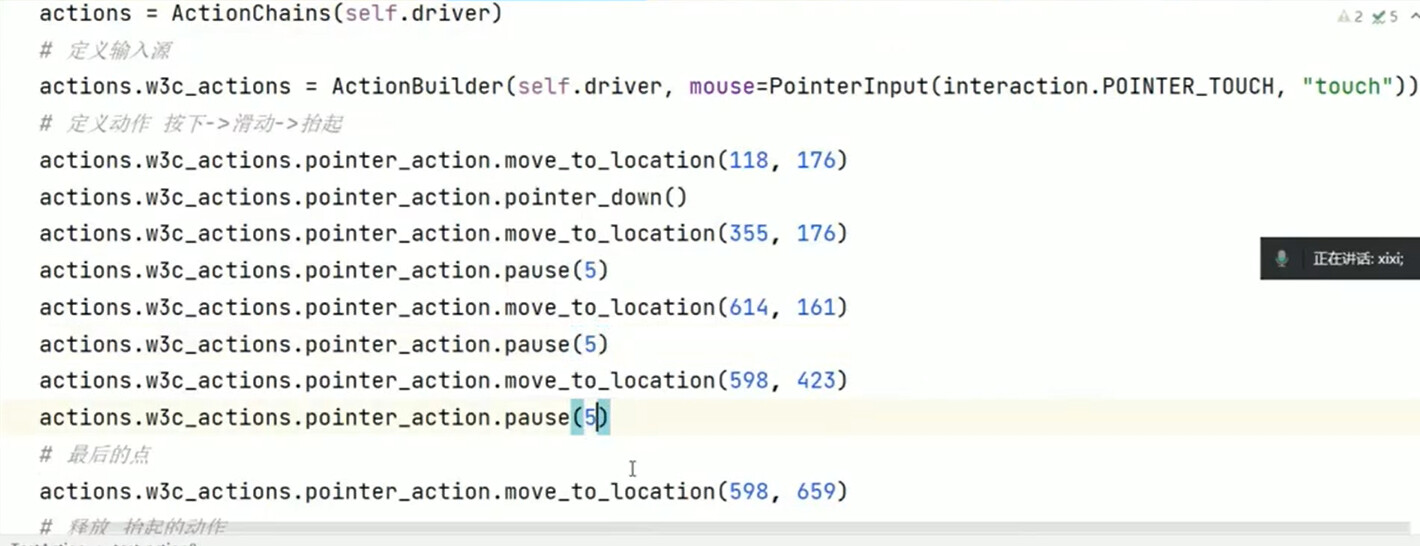
# 定义ActionChains 实例
actions = ActionChains(driver)
# 第一步:定义输入源
# ActionChains里有个属性是ActionBuilder类型的, 使用的就是w3c协议
# 可以定义鼠标指针源,键盘源,滚轮源事件
actions.w3c_actions = ActionBuilder(driver, mouse=PointerInput(interaction.POINTER_TOUCH, "touch"))
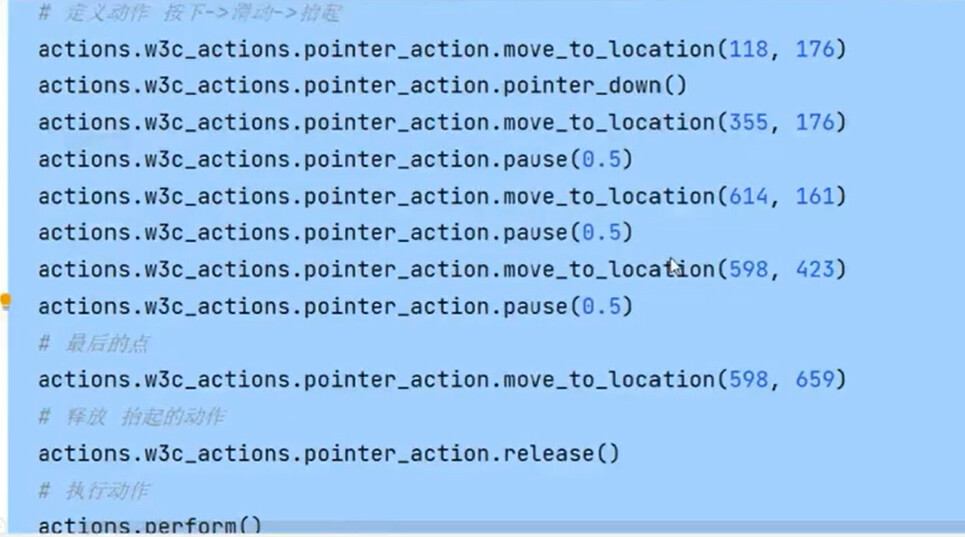
# 第二步:定义动作
# 移动到起点-> 按下-> 滑动-> 抬起
actions.w3c_actions.pointer_action.move_to_location(115, 183)
actions.w3c_actions.pointer_action.pointer_down()
actions.w3c_actions.pointer_action.move_to_location(362, 179)
actions.w3c_actions.pointer_action.release()
actions.perform()
...
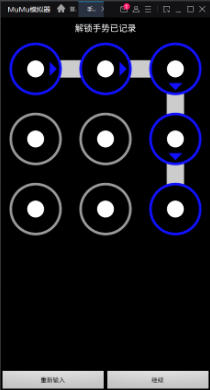
练习
- 安装手势密码锁 app(TouchAction.apk)
- 打开应用
- 点击【设置手势】
- 完成手势操作(如图)
设备交互 Api
目录
- 测试过程中模拟来电、来短信
- 模拟网络切换
- 运行过程中获取系统日志
- 截图
常用的设备交互命令
- 模拟电话、短信
- 网络模式
- 横竖屏切换
- App处理
- 录屏
- 官方地址:http://appium.io/docs/en/about-appium/intro/
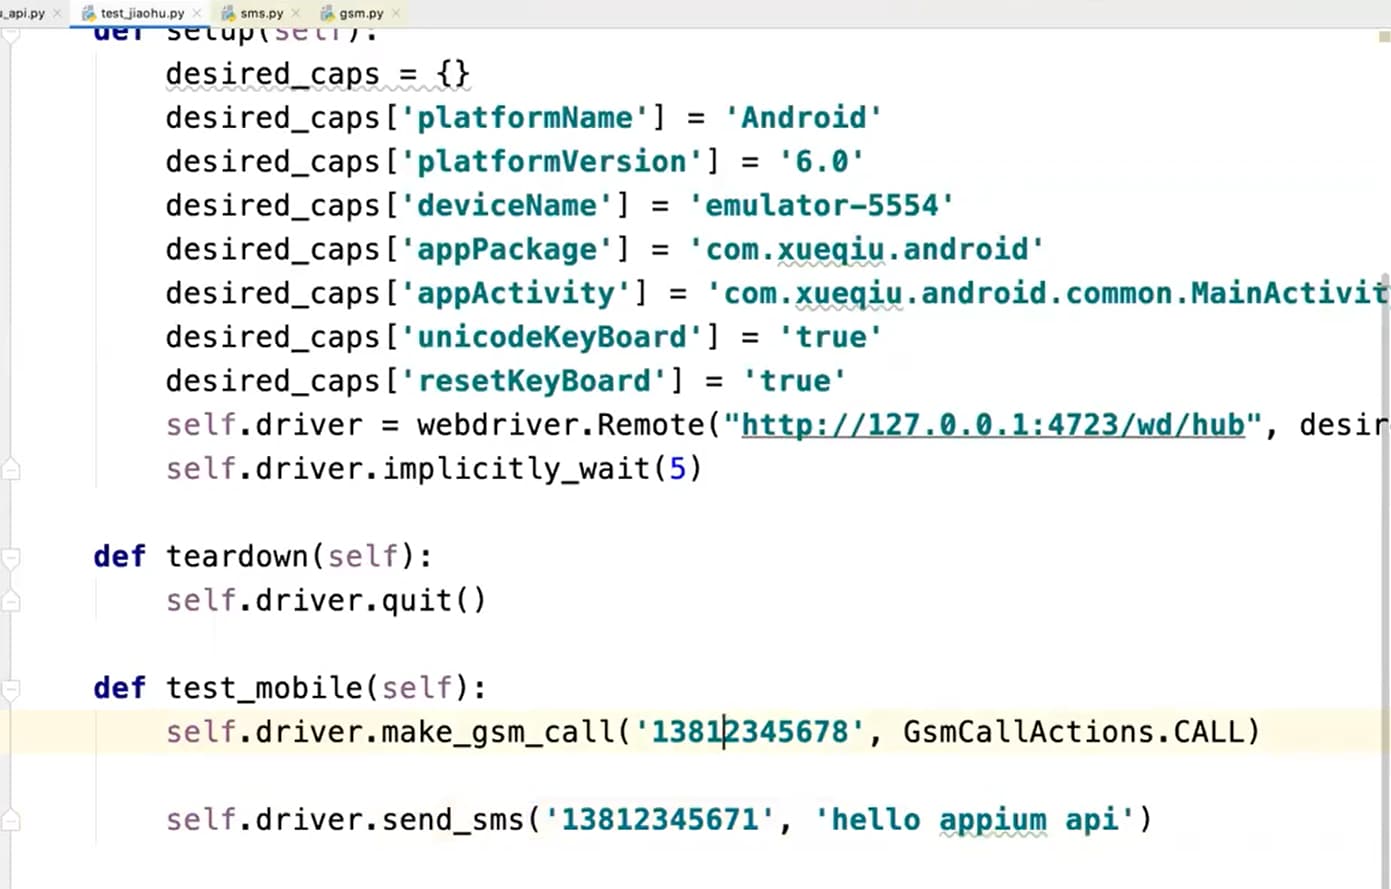
模拟电话、短信
- appium可以模拟来电话,来短信功能,在app运行过程中收到短信/电话,app如何做处理的,专属的一些场景
- 只支持原生模拟器,不支持mumu,genimotion等
driver.makeGsmCall(PHONE_NUMBER, GsmCallActions.CALL);
driver.makeGsmCall(PHONE_NUMBER, GsmCallActions.ACCEPT);
driver.makeGsmCall(PHONE_NUMBER, GsmCallActions.CANCEL);
driver.sendSMS("555-123-4567", “Appium Test”);
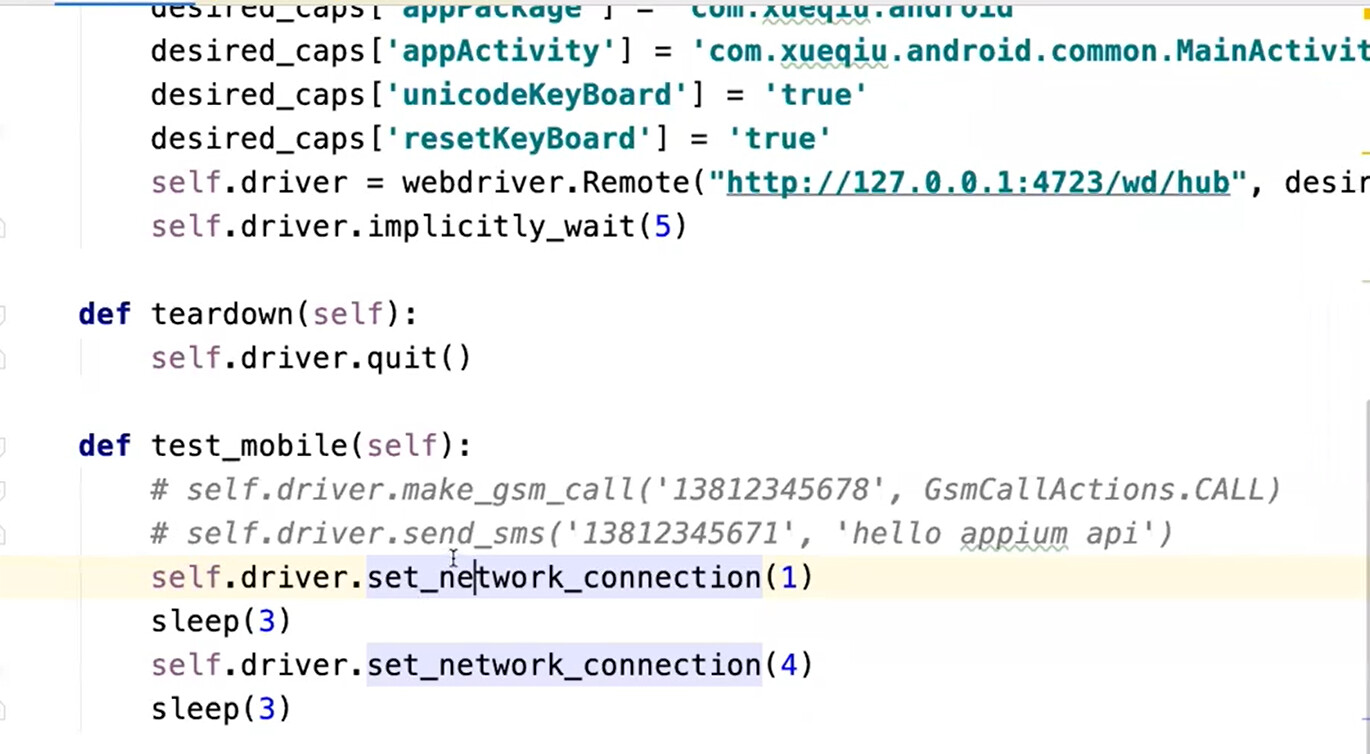
网络设置
self.driver.set_network_connection(1)
self.driver.set_network_connection(4)
def set_network_connection(self, connection_type: int) -> int:
        """Sets the network connection type. Android only.

        Possible values:

            +--------------------+------+------+---------------+
            | Value (Alias)      | Data | Wifi | Airplane Mode |
            +====================+======+======+===============+
            | 0 (None)           | 0    | 0    | 0             |
            +--------------------+------+------+---------------+
            | 1 (Airplane Mode)  | 0    | 0    | 1             |
            +--------------------+------+------+---------------+
            | 2 (Wifi only)      | 0    | 1    | 0             |
            +--------------------+------+------+---------------+
            | 4 (Data only)      | 1    | 0    | 0             |
            +--------------------+------+------+---------------+
            | 6 (All network on) | 1    | 1    | 0             |
            +--------------------+------+------+---------------+
横竖屏切换
横竖屏切换,官方暂不支持python,以下是java代码。
切换成横屏
driver.rotate(Screenorientation.LANDSCAPE)
切换成竖屏
driver.rotate(Screenorientation.PORTRAIT)
获取日志
self.driver.log_types
self.driver.get_log("logcat")
其它常用操作
锁屏
driver.lock()
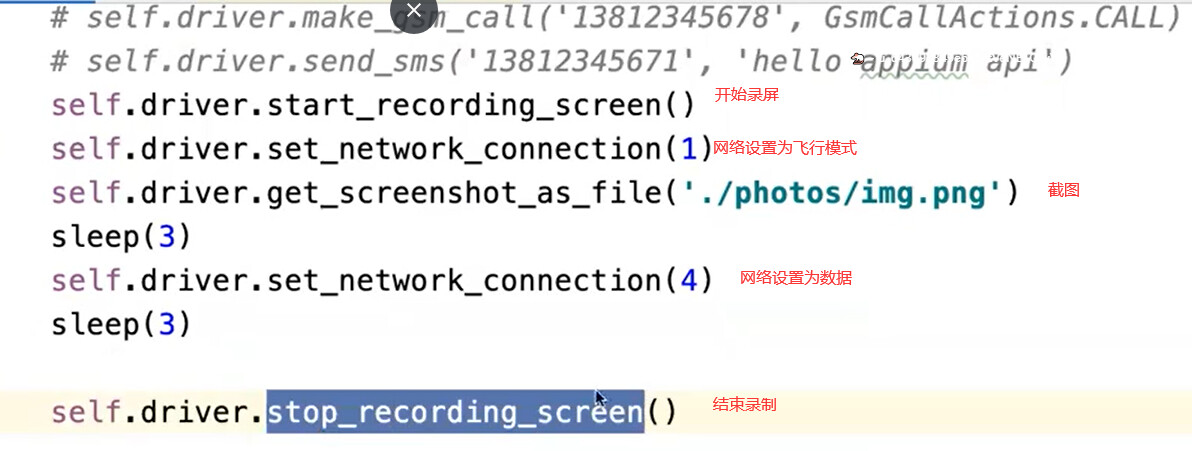
截图
driver.get_screenshot_as_file('./photos/img.png')
录屏:模拟器需要 androidAPI>27,华为不支持,只支持 8.0以上的版本
开始录制:self.driver.start_recording_screen()
结束录制:self.driver.stop_recording_screen()
模拟器控制
主要内容
模拟器自动启动与自动执行测试用例
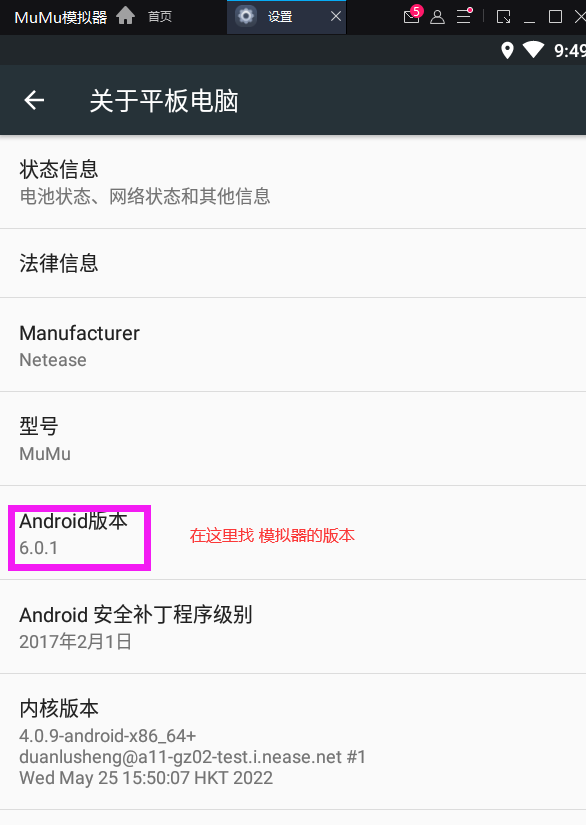
android 模拟器创建
- Android Studio
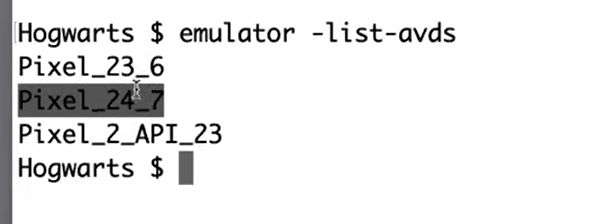
- 在命令行启动模拟器
- emulator -list-avds 模拟器列表
- emulator ‘@foo’ or ‘-avd foo’
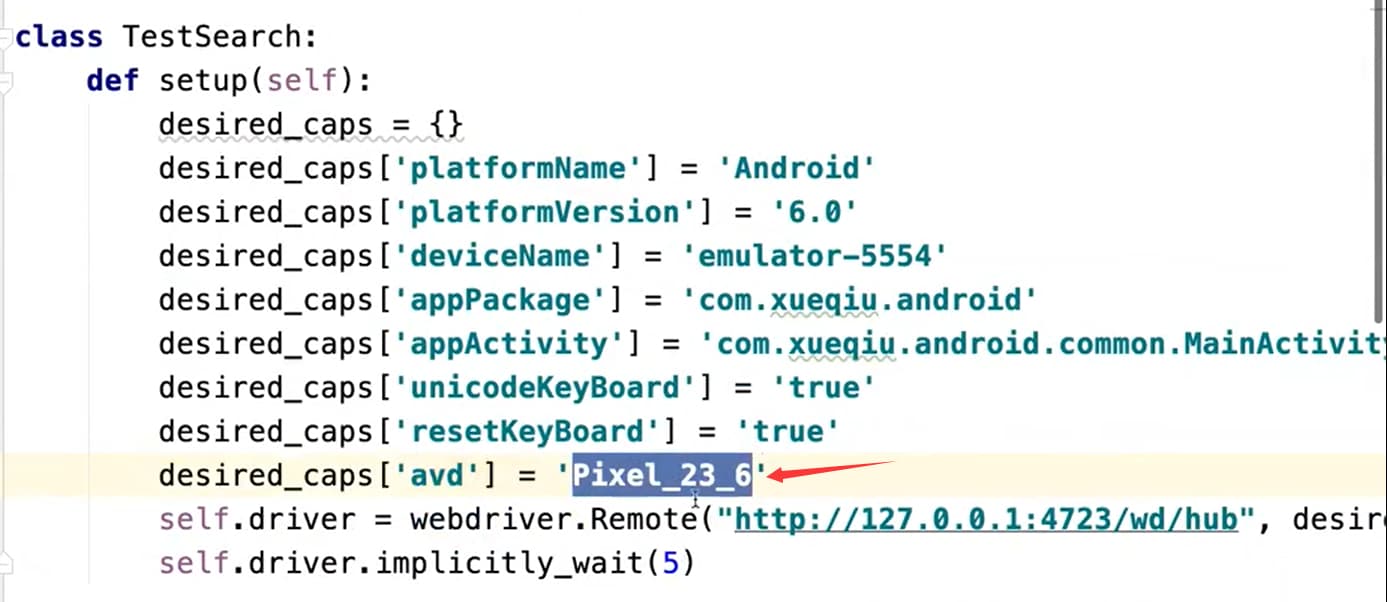
配置
- esirecap里面需要配置
- avd: ‘模拟器名’
- 注意自动启动模拟器,只能是sdk的模拟器,第三方模拟器不支持,7.0不支持
启动安卓自带的模拟器
雪球 app 自动化测试 PO 实战
产品分析
- 被测应用:雪球 App
- 雪球 App 介绍
- 雪球 app 是一款免费版,非常实用的股票平台,提供热点资讯内容和实时行情,提供了证券交流交易,公募、理财服务
- 雪球 app 功能包括搜索股票,查看行情,交易,浏览热门文章,发帖,登录,注册,等功能
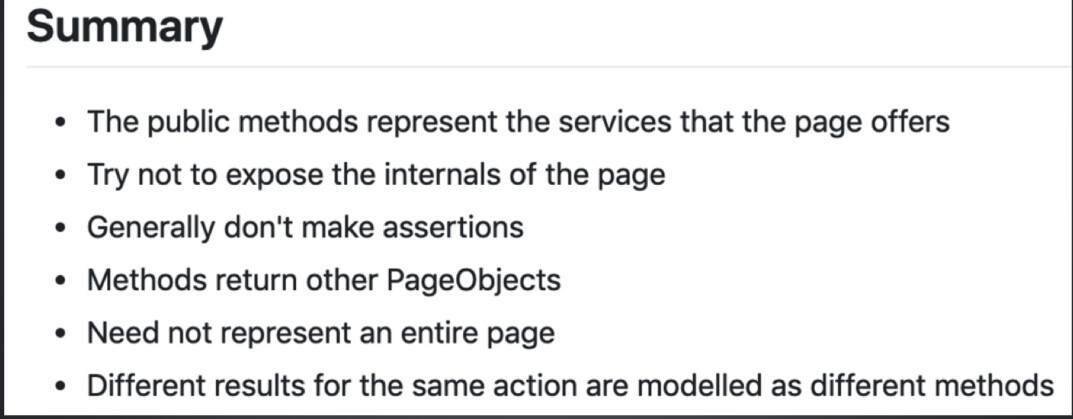
Page Object 模式六大原则
用例设计
- 搜索场景
- 打开【雪球】应用首页
- 点击搜索框,进入搜索页面
- 向搜索输入框中输入【alibaba】
- 点击搜索结果中的【阿里巴巴】
- 切换到 tab 的【股票】
- 找到 股票【阿里巴巴】的股票价格 price
- 判断 price 在 110 上下 10%浮动
实战练习思路
@startmindmap
- HowToDo
** 梳理测试用例
*** 梳理用例的前置后置动作
** 构造PO模型
*** 构造页面相关类和方法
*** 实现暂时实际为空
** 编写测试用例
*** 根据业务逻辑编写
*** 链式调用
** 填充具体实现
*** Driver初始化
*** BasePage封装
** 优化用例
*** 封装样板代码
*** 提取页面元素
*** 添加起始页的url
@endmindmap
填充实现-构造 PO 模型类图
- 分为三层
- 具体业务层
- 公共业务层
- 和业务无关的公共方法层
@startuml

class BasePage{

  __init__()

  do_click()
  do_send()
  do_swipe()

}

class XueQiuPage{
  start()
  restart()
  stop()
}

class MainPage{
    str _INPUT_SearchBox
    ~ click_search()
}

class SearchPage{
    str _BTN_Search
    str _BTN_SearchInputBox
    ~ search()
}

class SearchResultPage{
    str _NAMES
    ~ get_price()
}


BasePage<|--XueQiuPage:继承
XueQiuPage<|-- MainPage: 继承
XueQiuPage<|-- SearchPage: 继承
XueQiuPage<|-- SearchResultPage: 继承

BasePage<|--WechatPage:继承
WechatPage<|-- MainPage: 继承
WechatPage<|-- SearchPage: 继承
WechatPage<|-- SearchResultPage: 继承


@enduml
代码编写
目录结构
base/
    base_page.oy
    xueqiu_app.py
page/
    main_page.py
    search_page.py
    search_result_page.py
cases/
    test_xueqiu.py
logs/
reports/
优化用例-封装样板代码(基类)
- 问题:
- 直接调用 Appium API,导致存在大量的样板代码,find、finds 等。
- 解决方案:
- 常用的 UI 操作封装在 base_page 中。
优化用例-页面元素提取
- 问题:
- 页面定位写在每个 Page 的方法中,如果此页面定位存在多处复用,那么需要多处修改
- 解决方案:
- 将页面定位抽离为私有类变量,符合六大原则中不要暴露页面内部的元素给外部
优化用例-复用driver
- 问题
- 当执行多条测试用例时,每次执行用例都创建一个driver,浪费资源,效率低
- 当执行多条测试用例时,所有的用例都使用同一个driver ,一旦服务出现问题(比如socket hang up)服务宕了,会导致后面所有的用例执行失败
- 解决方案
- 当创建driver 时,做个判断,如果driver 为None,则创建,否则,复用之前的driver
L3
自动化关键数据记录
目录
- 行为日志
- 截图
- 页面源码
行为日志
- 使用 python 自带的 logging 模块
- 使用 pytest.ini 配置日志开关与格式
- 参考链接
[pytest]
;日志开关 true false
log_cli = true
;日志级别
log_cli_level = info
;打印详细日志,相当于命令行加 -vs
addopts = --capture=no
;日志格式
log_cli_format = %(asctime)s [%(levelname)s] %(message)s (%(filename)s:%(lineno)s)
;日志时间格式
log_cli_date_format = %Y-%m-%d %H:%M:%S
;日志文件位置(可以在这里注释掉,使用conftest文件里面的路径)
;log_file = ./log/test.log
;日志文件等级
log_file_level = info
;日志文件格式
log_file_format = %(asctime)s [%(levelname)s] %(message)s (%(filename)s:%(lineno)s)
;日志文件日期格式
log_file_date_format = %Y-%m-%d %H:%M:%S
conftest文件对应的代码:
@pytest.fixture(scope="session", autouse=True)
def manage_logs(request):
    """Set log file name same as test name"""
    now = time.strftime("%Y-%m-%d_%H-%M-%S")
    log_name = 'log/' + now + '.logs'
    request.config.pluginmanager.get_plugin("logging-plugin") \
        .set_log_path(log_name)
截图
| 方法名 | 描述 |
|---|---|
| get_screenshot_as_file(filename) | 保存图片为.png 格式,filename 图片路径 |
| save_screenshot(filename) | 保存图片为.png 格式,filename 图片路径 |
| get_screenshot_as_png() | 保存图片为二进制格式 |
| get_screenshot_as_base64() | 将图片保存为 base64 格式。通常用在 html 里添加截图 |
获取页面源码
- 通过获取页面源码,分析页面的 dom 结构
driver.page_source
示例代码
def test_search(self):
        '''使用 xpath 定位'''
        logging.info("搜索用例")
        element = self.driver.find_element(MobileBy.XPATH,"//*[@resource-id='com.xueqiu.android:id/tv_search']")
        search_enabled = element.is_enabled()

        logging.info(f"搜索框的文本:{element.text},搜索框的坐标:{element.location},搜索框的size:{element.size}")

        if search_enabled == True:
            logging.info("点击搜索框")
            element.click()
            logging.info(f"输入搜索内容:alibaba")
            self.driver.find_element(MobileBy.XPATH,
                                     "//*[@resource-id='com.xueqiu.android:id/search_input_text']").\
                send_keys("alibaba")

            alibaba_element = self.driver.find_element(MobileBy.XPATH, "//*[@text='阿里巴巴']")

            # alibaba_element.is_displayed()
            displayed = alibaba_element.get_attribute("displayed")
           #添加页面源码的打印
            logging.info("搜索结果页的页面源码为:"self.driver.page_source)
            logging.info(f"是否可见:{displayed}")
            self.driver.save_screenshot("./image/search_result.png")
            assert displayed == "true"
App 弹窗异常处理
黑名单处理
- 运行过程中不定时弹框(广告弹窗,升级提示框,新消息提示框等等)
- 弹框不是 BUG(UI 界面提示,警告的作用)
黑名单处理
black_list = [(AppiumBy.ID, "com.xueqiu.android:id/iv_close")]
def find(self, by, locator):
    try:
        return self.driver.find_element(by, locator)
    except Exception as e:
        for black in black_list:
            eles = self.driver.find_elements(*black)
            if len(eles) > 0:
                eles[0].click()
                return find(by, locator)
        raise e

装饰器优势
- 对原有函数的功能增强
- 不改变原有函数的逻辑
- 使代码更简洁、易维护
异常处理 - 装饰器
# Web 自动化测试 [高级]4.异常自动截图 部分
# 装饰器逻辑
def ui_exception_record(func):
    def run(*args, **kwargs):
        self = args[0]
        try:
            return func(*args, **kwargs)
        except Exception as e:
            # 这里添加所有的异常情况处理
            # 日志
            logger.warning("执行过程中发生异常")
            # 截图
            timestamp = int(time.time())
            image_path = f"./images/image_{timestamp}.PNG"
            page_source_path = \
                    f"./page_source/{timestamp}_page_source.html"
            # page_source
            with open(f"./page_source/{timestamp}_page_source.html",\
                     "w", encoding="u8") as f:
                f.write(self.driver.page_source)
            self.driver.save_screenshot(image_path)
            allure.attach.file(image_path, name="image",\
                     attachment_type=allure.attachment_type.PNG)
            allure.attach.file(page_source_path, \
                    name="page_source", \
                    attachment_type=allure.attachment_type.TEXT)
            raise e
    return run
异常处理代码实现
black_list = [(AppiumBy.ID, "com.xueqiu.android:id/iv_close")]
# 声明一个黑名单
def black_wrapper(fun):
    def run(*args, **kwargs):
        basepage = args[0]
        try:
            return fun(*args, **kwargs)
        except Exception as e:
            for black in black_list:
                eles = basepage.driver.find_elements(*black)
                if len(eles) > 0:
                    eles[0].click()
                    return fun(*args, **kwargs)
            raise e
    return run

@black_wrapper
def find(self, by, locator)
    return self.driver.find_element(by, locator)
自动化测试架构优化
打造测试框架的需求与价值
- 领域模型适配:封装业务实现,实现业务管理
- 提高效率:降低用例维护成本,提高执行效率
- 增强功能:解决已有框架不满足的情况
自动化框架应具备的功能
- 支持管理用例,运行用例
- 支持查找元素/定位元素,对元素/页面 进行各种操作(点击,滑动,输入等等)
- 支持生成测试报告
- 能够实现功能的复用,(比如登录,搜索等)
- 当页面有异常弹框的时候,可以进行有效的处理
- 当用例失败,需要添加失败时的日志,截图,等信息,放在测试报告中
- 多设备并发
- 支持平台化
- …
自动化测试框架实现
| 功能 | 实现 |
|---|---|
| 管理用例,运行用例 | pytest |
| 查找元素/定位元素 | Appium |
| 测试报告 | Allure |
| 功能复用 | PO 实现 |
| 异常弹框 | 编写代码 |
| 失败时的日志,截图 | 编写代码 |
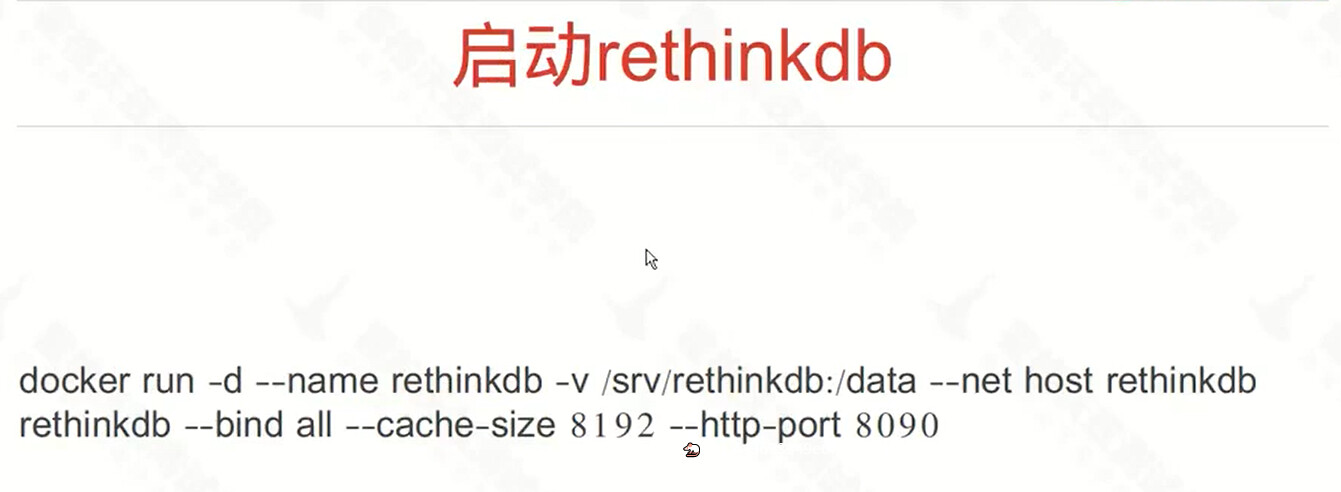
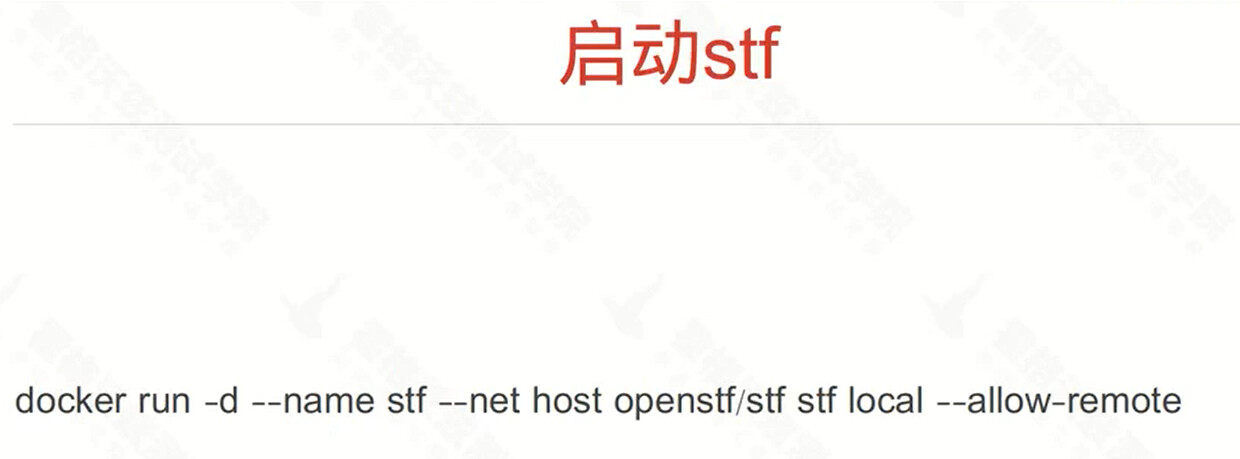
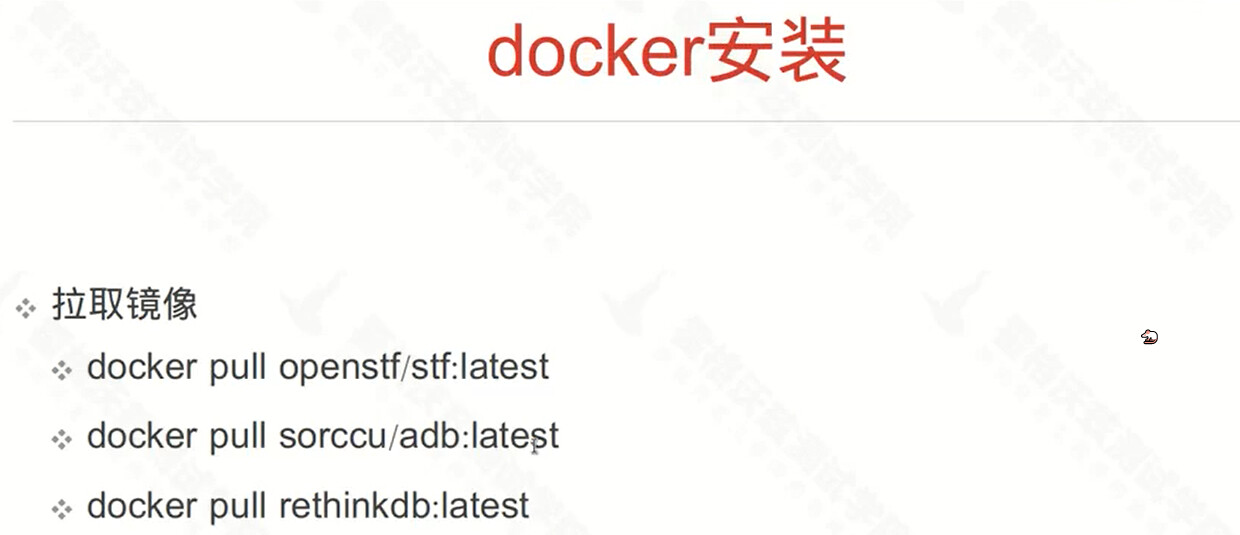
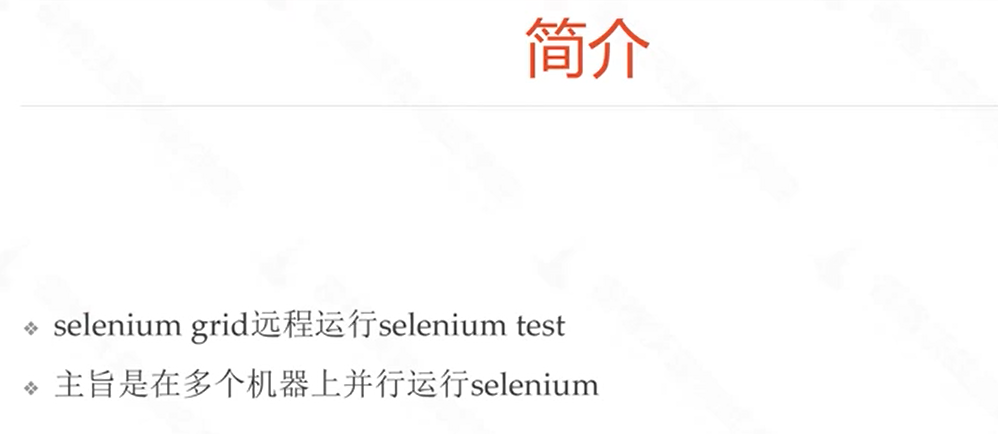
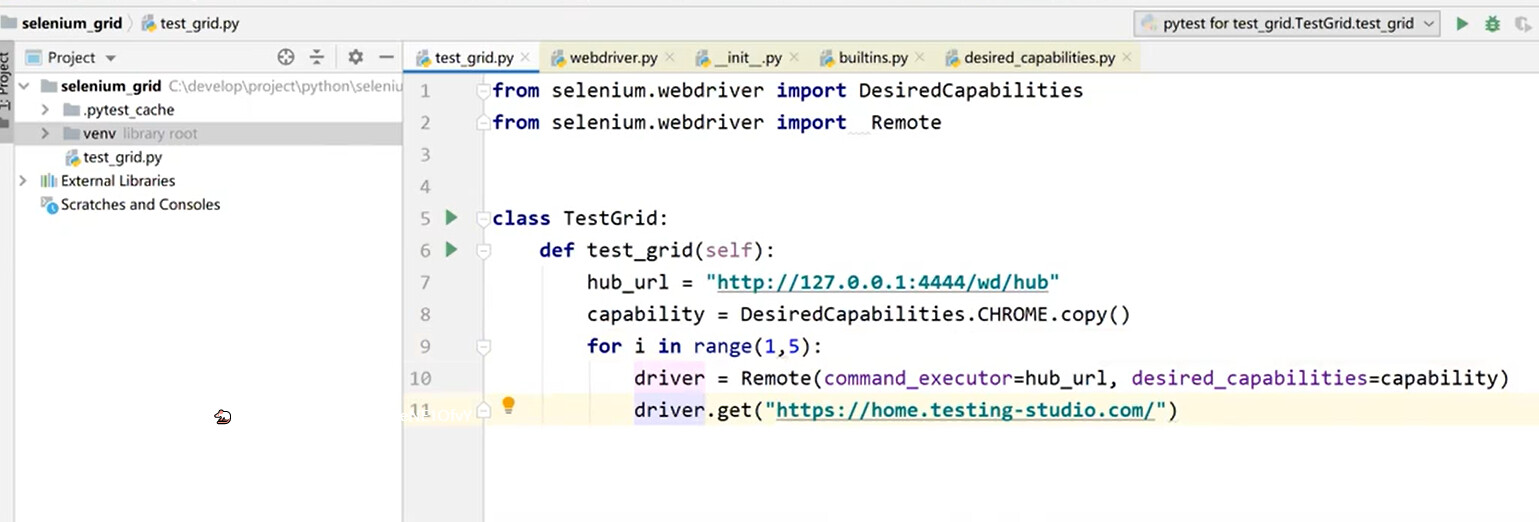
| 多设备并发 | selenium grid |
| 平台化 | VUE+FLASK/Django |
项目结构

为什么要封装框架?
- 复用
- 平台化
增强功能
- 需求与价值
- 项目结构优化
- 框架封装
项目结构优化
- 框架层
- 业务层
- 用例层
框架封装
- 异常处理(弹窗黑名单)
- 日志记录
- 报告生成
- 数据驱动
异常处理(弹窗黑名单)
# 声明一个黑名单
def black_wrapper(fun):
    def run(*args, **kwargs):
        basepage = args[0]
        try:
            return fun(*args, **kwargs)
        except Exception as e:
            for black in black_list:
                eles = basepage.driver.find_elements(*black)
                if len(eles) > 0:
                    eles[0].click()
                    return fun(*args, **kwargs)
            raise e
    return run

@black_wrapper
def find(self, by, locator)
    return self.driver.find_element(by, locator)
日志记录
- 运行日志记录
- 错误日志记录
import logging
logging.basicConfig(level=logging.INFO)


def black_wrapper(fun):
    def run(*args, **kwargs):
        basepage = args[0]
        try:
            logging.info("start find: \nargs: " + str(args) + " kwargs: " + str(kwargs))
            return fun(*args, **kwargs)
        except Exception as e:
            basepage.screenshot("tmp.png")
            with open("./tmp.png", 'rb') as f:
                picture_data = f.read()
            allure.attach(picture_data, attachment_type=allure.attachment_type.PNG)
            for black in basepage.black_list:
                eles = basepage.driver.find_elements(*black)
                if len(eles) > 0:
                    eles[0].click()
                    return fun(*args, **kwargs)
            raise e
    return run
报告生成
- 异常日志
- 异常截图
- 测试用例步骤
- 测试描述
- bug,issue 关联
- 用例分类(feature,story,step 等)
参数化与数据驱动
- 支持支持测试用例 / 步骤层级的参数化驱动配置
- 配置方式包括三个部分
- 参数定义(指定名字)
- 数据源指定(指定 yaml 文件 /或者其它格式文件)
- 数据源准备(无论是从线上环境 捞的数据,还是自己创建的测试数据)
总结
- 自动化测试框架应具备的功能
- 自动化测试框架优化(在 PO 的基础上,添加异常处理,日志,报告 ,截图,参数化与数据驱动等)逐步的将框架完善
pip install allure-pytest
pytest test_xxx.py --alluredir=./result
allure serve ./result
数据驱动
- find: //*[@text='xxxx']
  action: find_and_click
- find: //*[@text='xxxx']
  action: send
  content: 123
def load(self, yaml_path):
    with open(yaml_path, encoding="utf-8") as f:
        data = yaml.load(f)
    for step in data:
        xpath_expr = step.get("find")
        action = step.get("action")
        if action == "find_and_click":
            self.find_and_click(By.XPATH, xpath_expr)
        elif action == "send":
            content = step.get("content")
            self.send(By.XPATH, xpath_expr, content)
基于 PO 模式的测试框架优化实战
目录
- 异常处理(弹窗黑名单)
- 日志记录
- 报告生成
- 测试数据的数据驱动
异常弹框处理
- 定义黑名单列表
- 处理弹框
# 声明一个黑名单
def black_wrapper(fun):
    def run(*args, **kwargs):
        basepage = args[0]
        try:
            return fun(*args, **kwargs)
        except Exception as e:
            for black in black_list:
                eles = basepage.driver.find_elements(*black)
                if len(eles) > 0:
                    eles[0].click()
                    return fun(*args, **kwargs)
            raise e
    return run

@black_wrapper
def find(self, by, locator)
    return self.driver.find_element(by, locator)
异常截图
- 封装
screenshot()截图方法 - 出现异常时调用截图
# 封装截图方法
def screenshot(self, path):
    self.driver.save_screenshot(path)
...
# 声明一个黑名单
def black_wrapper(fun):
    def run(*args, **kwargs):
        basepage = args[0]
        try:
            return fun(*args, **kwargs)
        except Exception as e:
            basepage.screenshot("tmp.png")
            for black in black_list:
                eles = basepage.driver.find_elements(*black)
                if len(eles) > 0:
                    eles[0].click()
                    return fun(*args, **kwargs)
            raise e
    return run
生成报告
- 添加日志
- 使用
logging日志模块 - 配置
pytest.ini
- 使用
- 添加截图
import logging

def black_wrapper(fun):
    def run(*args, **kwargs):
        basepage = args[0]
        try:
            #找的是元素的定位值
            logging.info(f"查找元素:{args[2]}")
            return fun(*args, **kwargs)
        except Exception as e:
            basepage.screenshot("tmp.png")
            with open("./tmp.png", 'rb') as f:
                picture_data = f.read()
            allure.attach(picture_data, attachment_type=\
                allure.attachment_type.PNG)
            for black in black_list:
                eles = basepage.driver.find_elements(*black)
                if len(eles) > 0:
                    eles[0].click()
                    return fun(*args, **kwargs)
            raise e
    return run
数据驱动
- 减少冗余代码
- 集中管理测试数据
- 便于维护
@pytest.mark.parametrize('参数1,参数2', [
        ('参数1-值1', '参数2-值1'),
        ('参数1-值2', '参数2-值2'),
    ])
总结
- 异常处理(弹窗黑名单),异常截图
- 日志记录
- 报告生成
- 测试数据的数据驱动
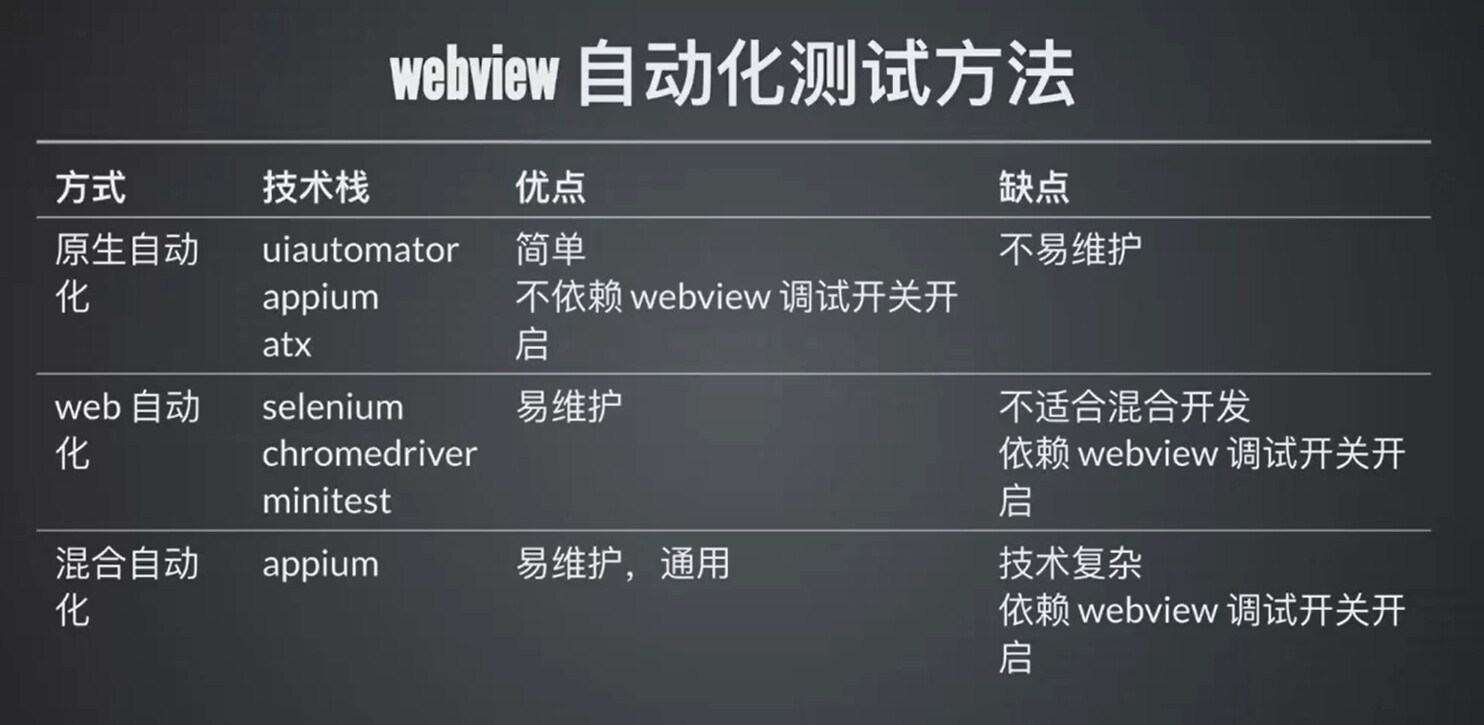
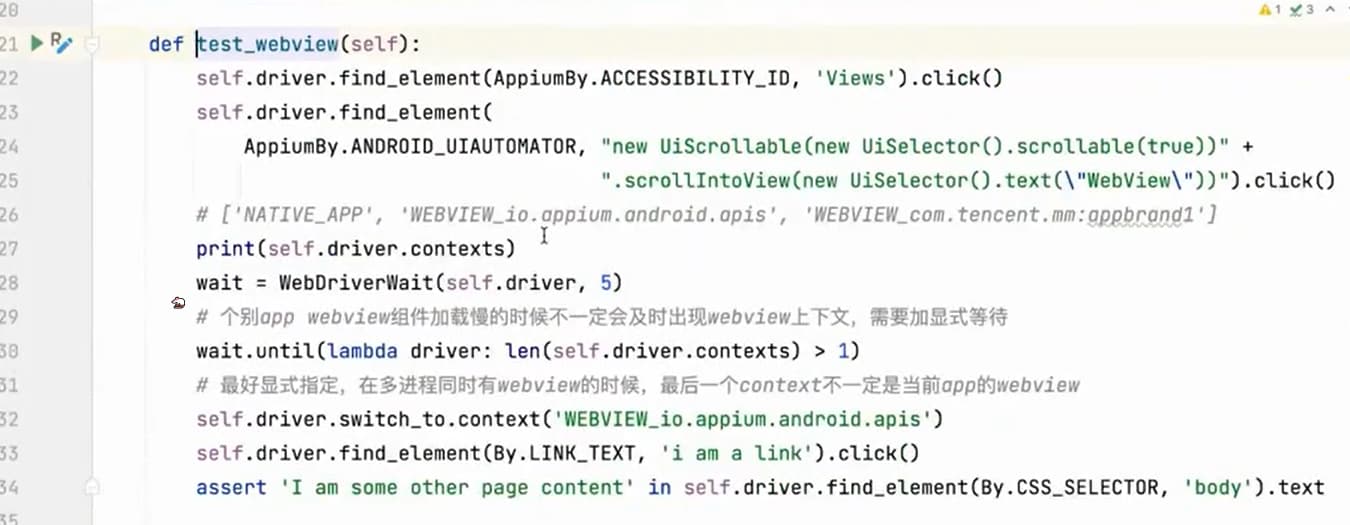
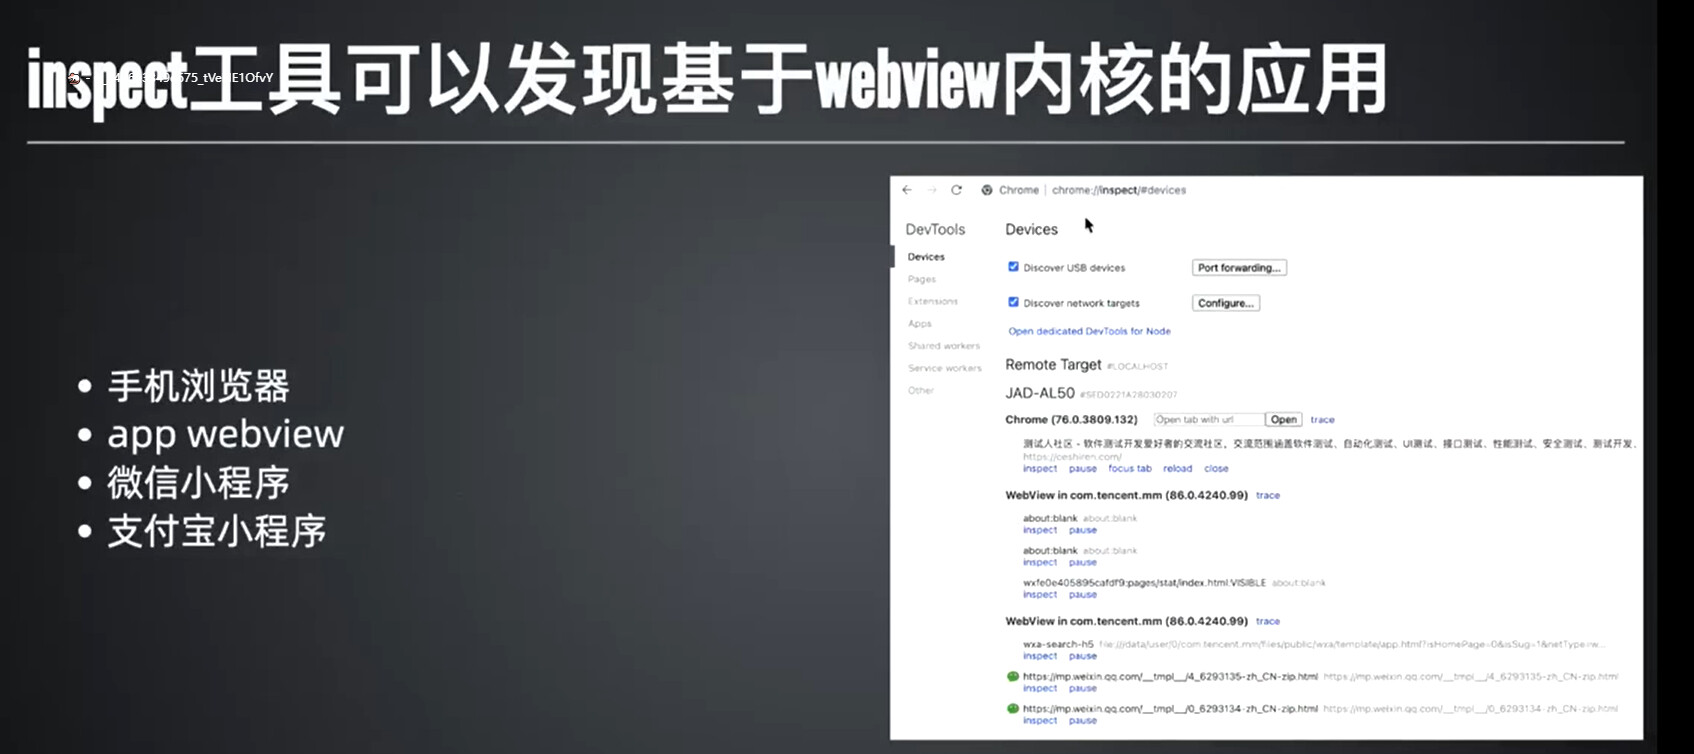
webview 自动化测试
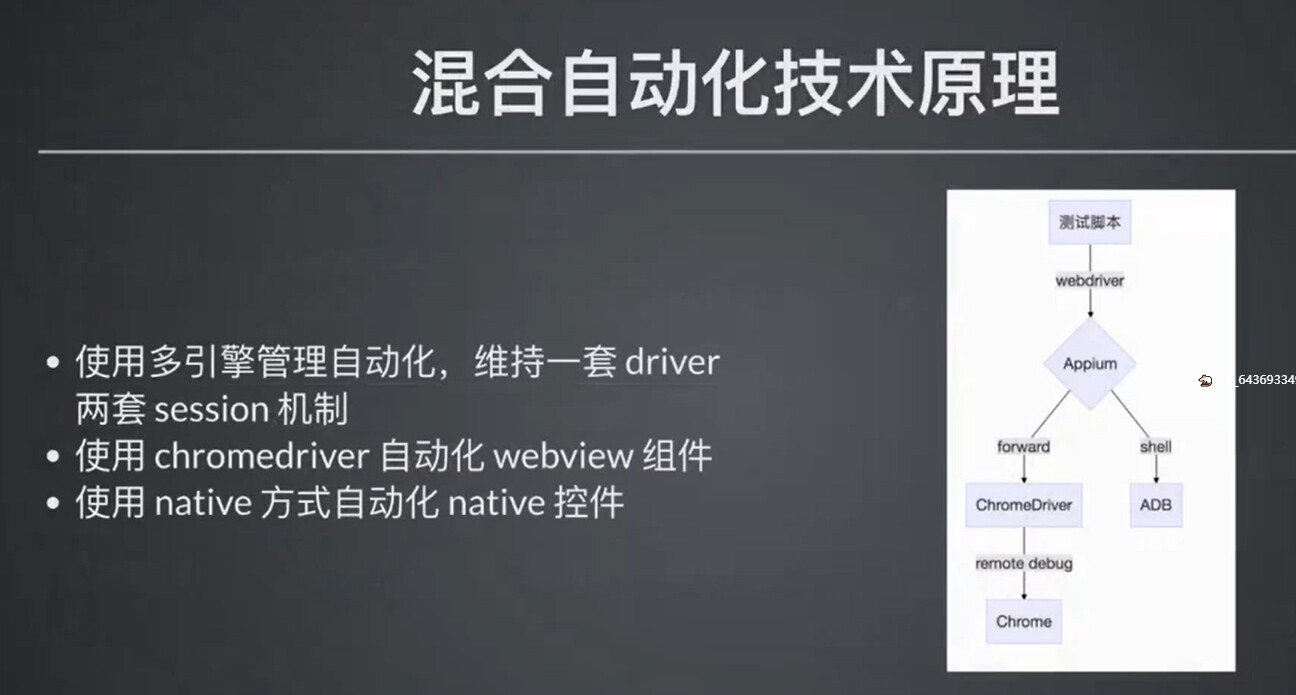


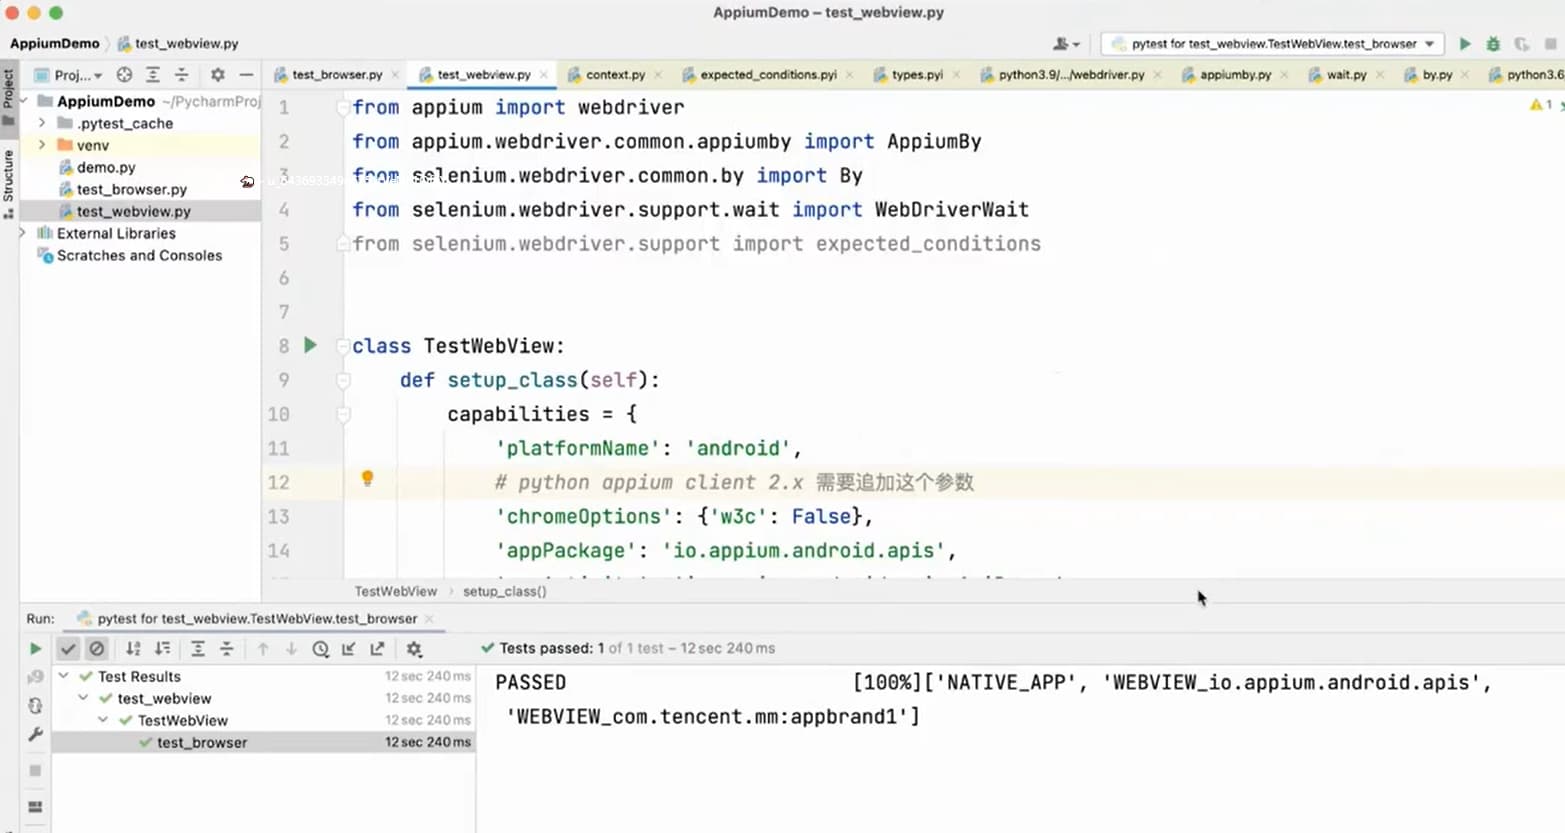

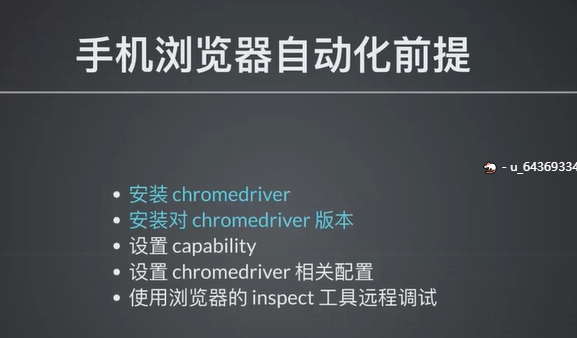
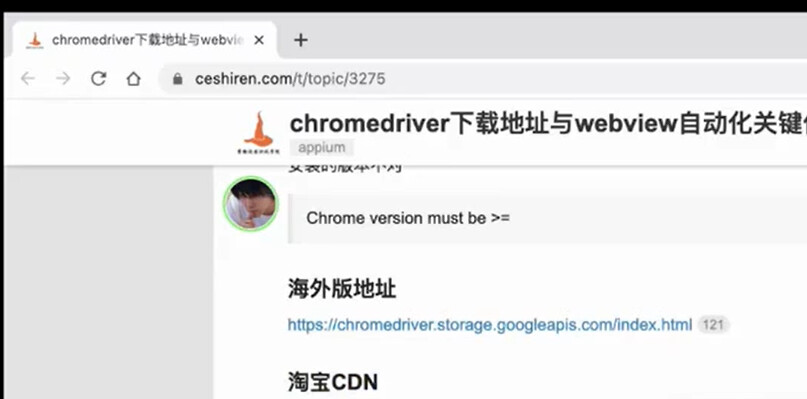
手机浏览器自动化测试


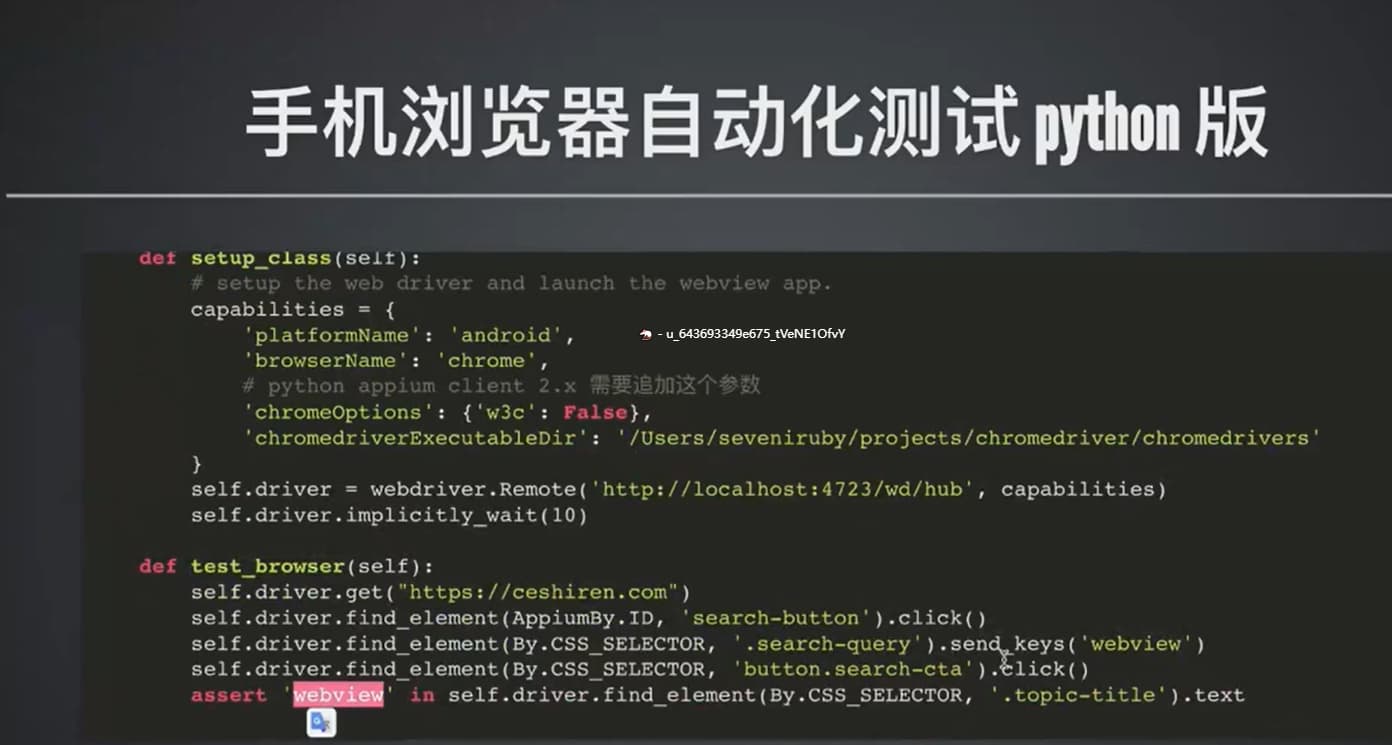
【实战】雪球财经 app 实战 3- webview 自动化测试实战
Web App:在手机浏览器里面能打开的应用

把页面放到手机上
原生应用:应用商城进行下载,上线时间长,开发成本高,性能好
混合:可以随时在后台进行更新
Web App:开发成本低

Appium 问题分析
目录
- 定位问题思路
- 客户端日志分析
- 服务端日志分析
- 手机端日志分析
定位问题思路
- 1、代码报的错误
- 2、appium server 服务器报的错误
- 3、手机端 捕获 appium相关的日志
客户端日志分析
服务端日志分析
服务端日志获取
appium -g appium2.log |tee

手机端日志分析

Appium 原理与 JsonWP 协议分析
目录
- Appium 原理
- JsonWP 协议分析
- JsonWP 手工模拟
Appium 原理
Appium 原理


什么是 W3C
- W3C 是一个组织(中文:万维网联盟)
- 这个组织是专门负责统一 WEB 相关的各种标准,定义了很多 WEB 通讯的标准
- 注意:不是一个标准,是很多标准,比如:html 的结构, css 表现,js 行为等等
- WebDriver 是 W3C 制定的标准协议之一(https://w3c.github.io/webdriver/)
协议分析
Method  URI Template    Command
// 一次/session 的post 请求,代码创建了一个新的session --代表自动化的开始
POST    /session                    New Session
DELETE  /session/{session id}           Delete Session
...
POST    /session/{session id}/element       Find Element
POST    /session/{session id}/elements      Find Elements
协议手工模拟
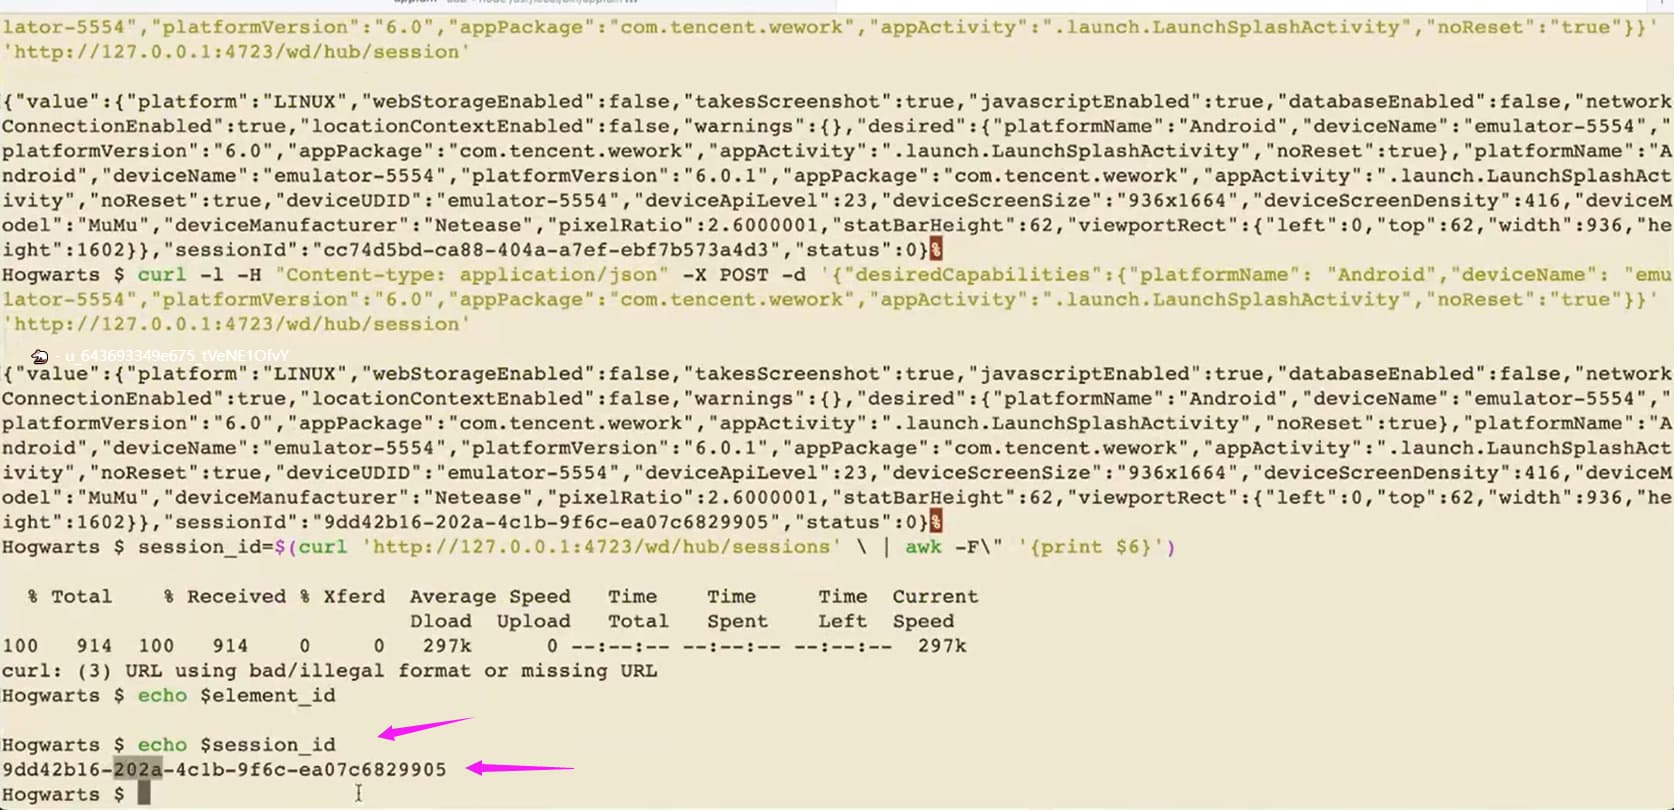
模拟session创建
curl -l -H "Content-type: application/json" -X POST -d '{"desiredCapabilities":{"platformName": "Android","deviceName": "emulator-5554","platformVersion":"6.0","appPackage":"com.tencent.wework","appActivity":".launch.LaunchSplashActivity","noReset":"true"}}' 'http://127.0.0.1:4723/wd/hub/session'
模拟session_id获取
先使用命令:`curl 'http://127.0.0.1:4723/wd/hub/sessions'`  获取session 包含的信息内容,从中找到session_id
session_id=$(curl 'http://127.0.0.1:4723/wd/hub/sessions' \ | awk -F\" '{print $6}')
模拟element_id元素ID获取
// 获取 element 元素
Hogwarts $ element_id=$(curl -X POST http://127.0.0.1:4723/wd/hub/session/$session_id/elements --data-binary '{"using":"xpath", "value":"//*[@text=\"通讯录\"]"}' -H "Content-Type: application/json;charset=UTF-8" \ | awk -F\" '{print $6}')
模拟元素属性获取
// 获取元素 text 文本属性
Hogwarts $ curl http://127.0.0.1:4723/wd/hub/session/$session_id/element/$element_id/attribute/text
模拟元素动作
// 完成元素的点击动作
Hogwarts $ curl -X POST http://127.0.0.1:4723/wd/hub/session/$session_id/element/$element_id/click
总结
- webdriver 是 W3C 定义的协议标准之一
- webdriver 定义一系列与app 通讯的接口,支持多语言
- 可以通过shell 模拟自动化操作的动作
Appium 源码分析
Appium 所有的源代码
- Appium server
- Node.js 系列包
- adb shell
- ChromeDriver
- 底层引擎
- Uiautomator java
- WDA
- selenium
- Appium client : Python 、Java
Appium 体系
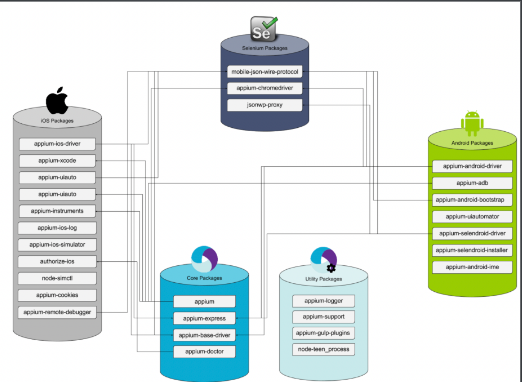
了解 appium/package.json
官方git仓库:https://github.com/appium/appium
梳理调用关系
Appium 源码修改定制
为什么需要改造开源框架
- bug fix
- 增强功能
- 提升性能
改造方式
- 直接改造:直接改造开源框架,创建特性分支
- 二次封装:不修改原有项目,直接进行上层封装
- 插件改造:利用已有项目的插件或者扩展机制进行定制
- 外挂改造:不修改原有代码的情况打补丁,利用 mock、hook 方法
维护开源项目的方式
- fork 原有项目
- 拉出新的分支进行修改
- 通过 github、gitlab 平台发起 merge/pull request
appium 改造实例
- fork 原始项目到远程个人仓库
- clone 原始项目到本地
- checkout 新的 feature 分支进行代码更新维护
- push 到远程个人仓库进行代码版本化管理
- 重新构建打包
- 使用定制版本的 appium 完成自动化测试
- 发起 pull/merge request 给原始仓库(可选)

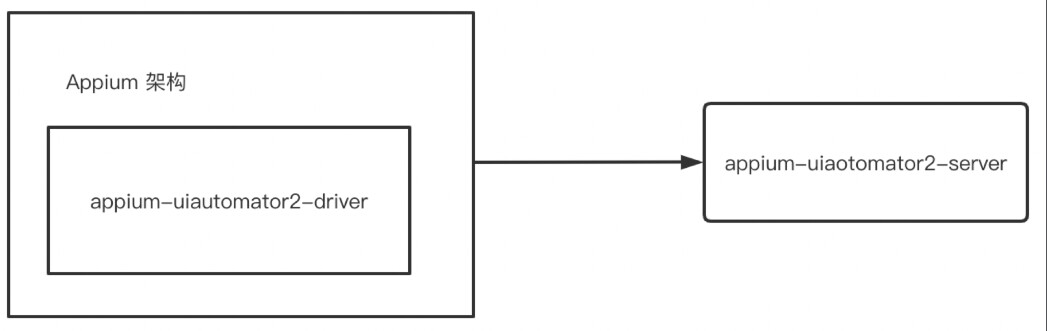
appium 的核心代码
- appium: appium的核心代码,负责与底层引擎通讯,nodejs项目,npm构建
- appium-uiautomator2-server: Android自动化引擎,java项目,gradle构建
- wda: iOS自动化引擎
构建 npm 项目
npm run build
构建 gradle 项目
./gradlew clean assembleServerDebug assembleServerDebugAndroidTest
如何提升代码改造能力
- 静态分析:深入阅读开源框架的源代码
- 动态分析:掌握动态分析代码执行的能力
- 设计经验:了解经典设计模式、数据结构与算法
基于图像匹配的自动化测试
价值与用途
- 解决特殊场景的自动化测试问题
- 不可识别控件,自定义控件、图片控件、滑块
- 安全性较高控件,比如安全键盘
- 特殊渲染引擎,比如游戏 app
- 作为常规自动化测试的补充
- 图像识别速度较慢
- 游戏控件通过自定义可以实现控件识别
基于图像匹配的自动化测试框架
- airtest,适合纯游戏自动化测试场景
- appium,适合常规与特殊控件的结合场景
- sikuliX,老牌工具
appium 图像匹配能力支持
- appium 1.8 版本新增
- 基于 opencv + 匹配算法
- 图像匹配相关的 API
- 自动化相关的 API
图像匹配 API
- 子图像查找 findImageOccurrence
- 匹配算法 matchImagesFeatures
- 相似度计算 getImagesSimilarity
环境准备
- 安装 opencv4nodejs
-
注意 appium 的报错
- Cannot find module /usr/local/lib/node_modules/opencv4nodejs/build/Release/opencv4nodejs
- Encountered internal error running command: Error: ‘opencv4nodejs’ module is required to use OpenCV features. Please install it first (‘npm i -g opencv4nodejs’) and restart Appium. Read https://github.com/justadudewhohacks/opencv4nodejs#how-to-install for more details on this topic.
安装 opencv4nodejs
npm install -g opencv4nodejs

# mac安装
export OPENCV4NODEJS_DISABLE_AUTOBUILD=1
npm install -g opencv4nodejs

cd $(npm root -g)/opencv4nodejs/
export OPENCV4NODEJS_AUTOBUILD_FLAGS=-DBUILD_LIST=core,imgproc,imgcodecs,videoio,highgui,video,calib3d,features2d,objdetect,dnn,ml,flann,photo,stitching,gapi
npm i --save opencv-build
node install/install.js
capability 与 settings 设置
 desiredCapabilities.setCapability("settings[fixImageFindScreenshotDims]", false);
 desiredCapabilities.setCapability("settings[fixImageTemplateSize]", true);
 desiredCapabilities.setCapability("settings[getMatchedImageResult]", true)
 desiredCapabilities.setCapability("settings[imageMatchThreshold]", 0.4)
基于图像识别的自动化测试 python 版
class TestImage:
    def setup_class(self):
        capabilities = {
            'platformName': 'android',
            'appPackage': 'io.appium.android.apis',
            'appActivity': 'io.appium.android.apis.ApiDemos'
        }
        self.driver = webdriver.Remote('http://localhost:4723/wd/hub', capabilities)
        self.driver.implicitly_wait(10)

    def test_image(self):
        self.driver.find_element(AppiumBy.ACCESSIBILITY_ID, 'Graphics').click()
        self.driver.find_element(AppiumBy.ACCESSIBILITY_ID, 'BitmapMesh').click()
        self.driver.find_element_by_image("nose.png").click()
        self.driver.find_element_by_image("flower.png").click()


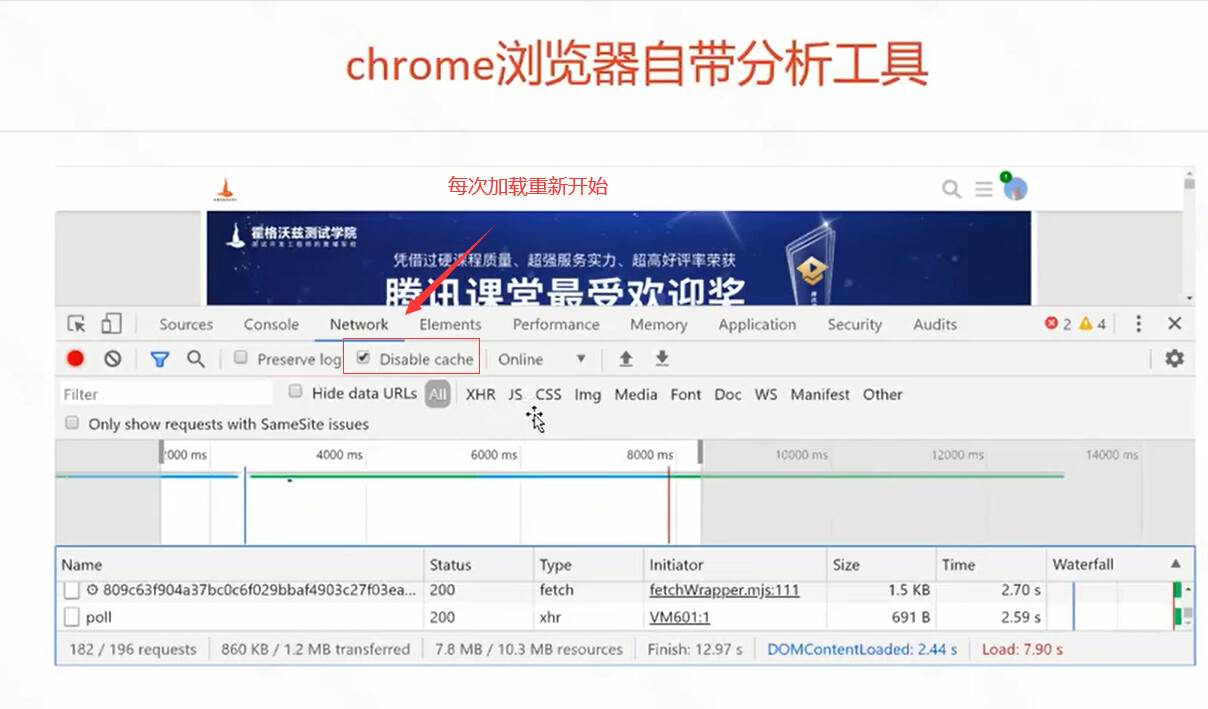
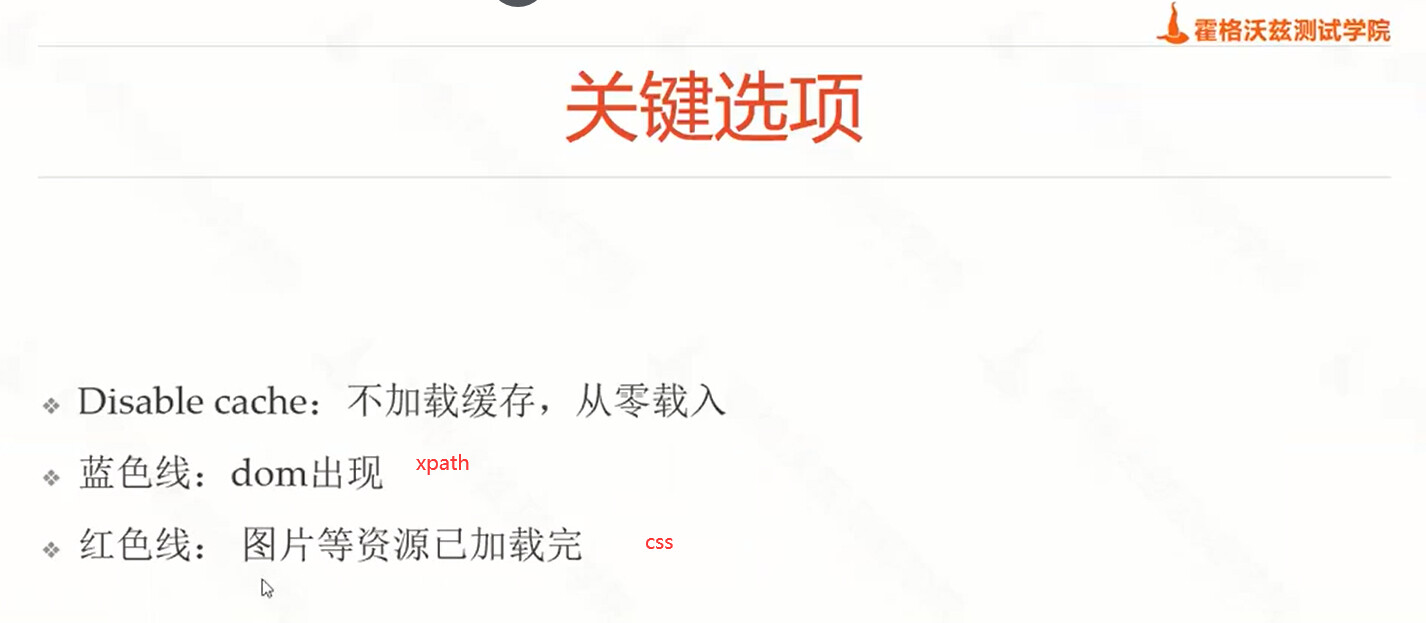
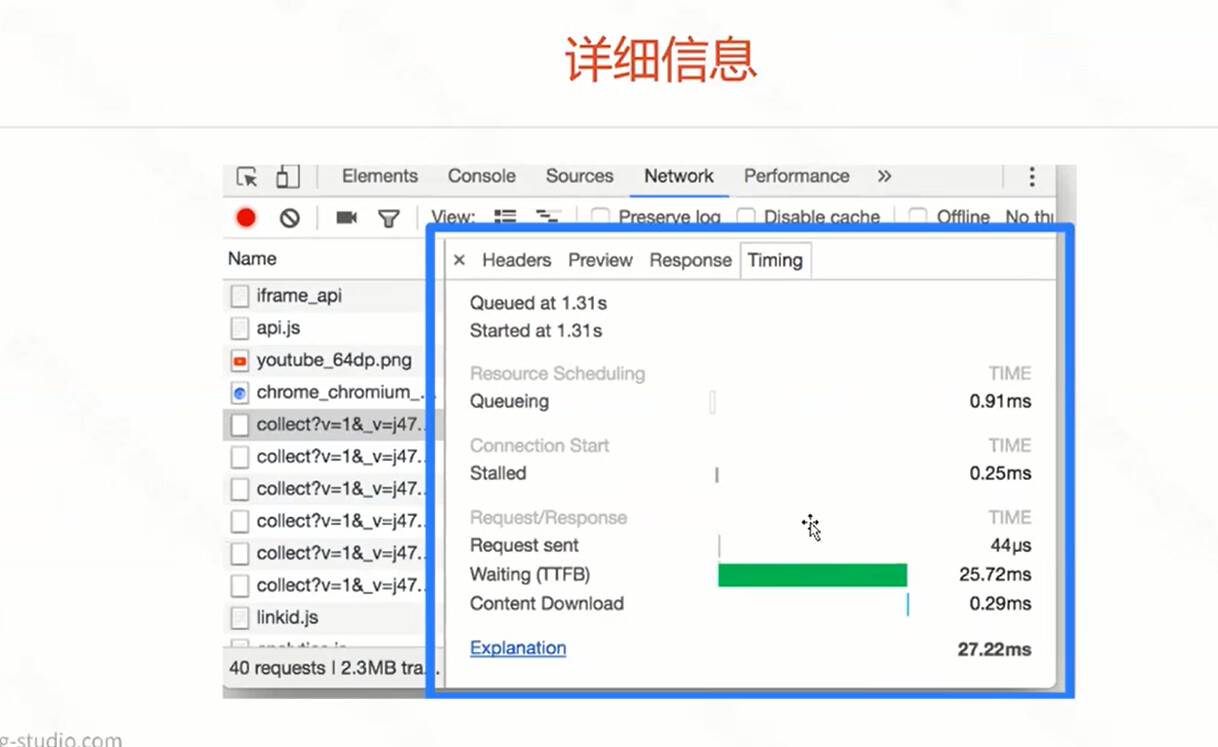
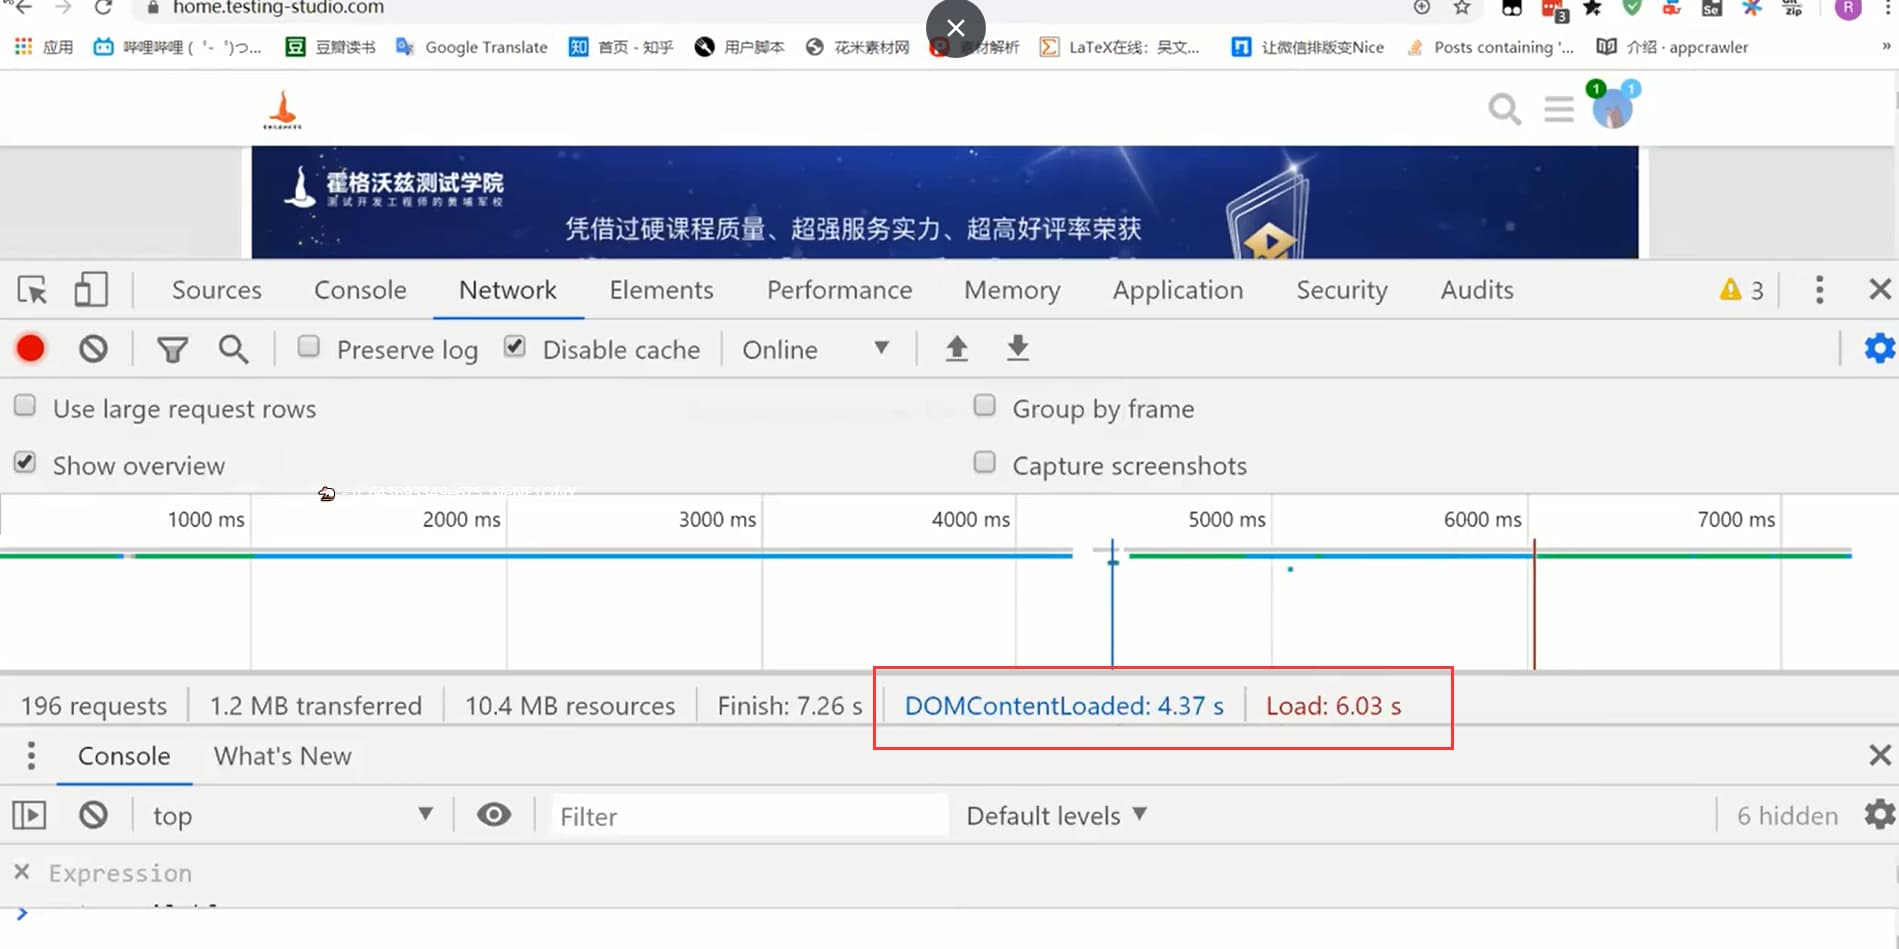
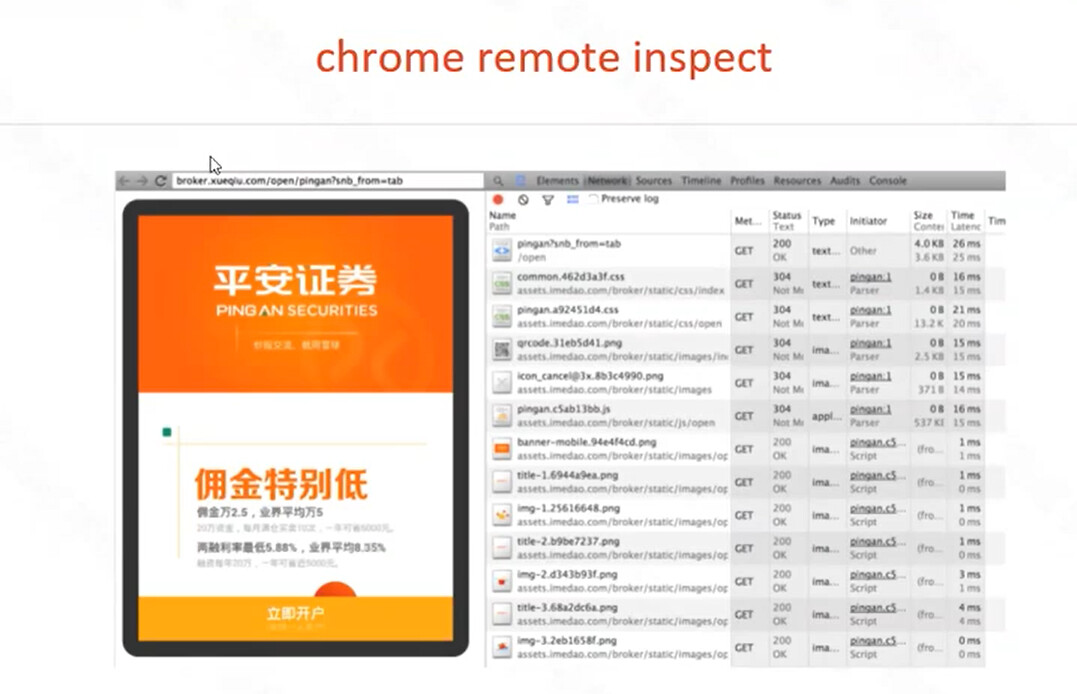
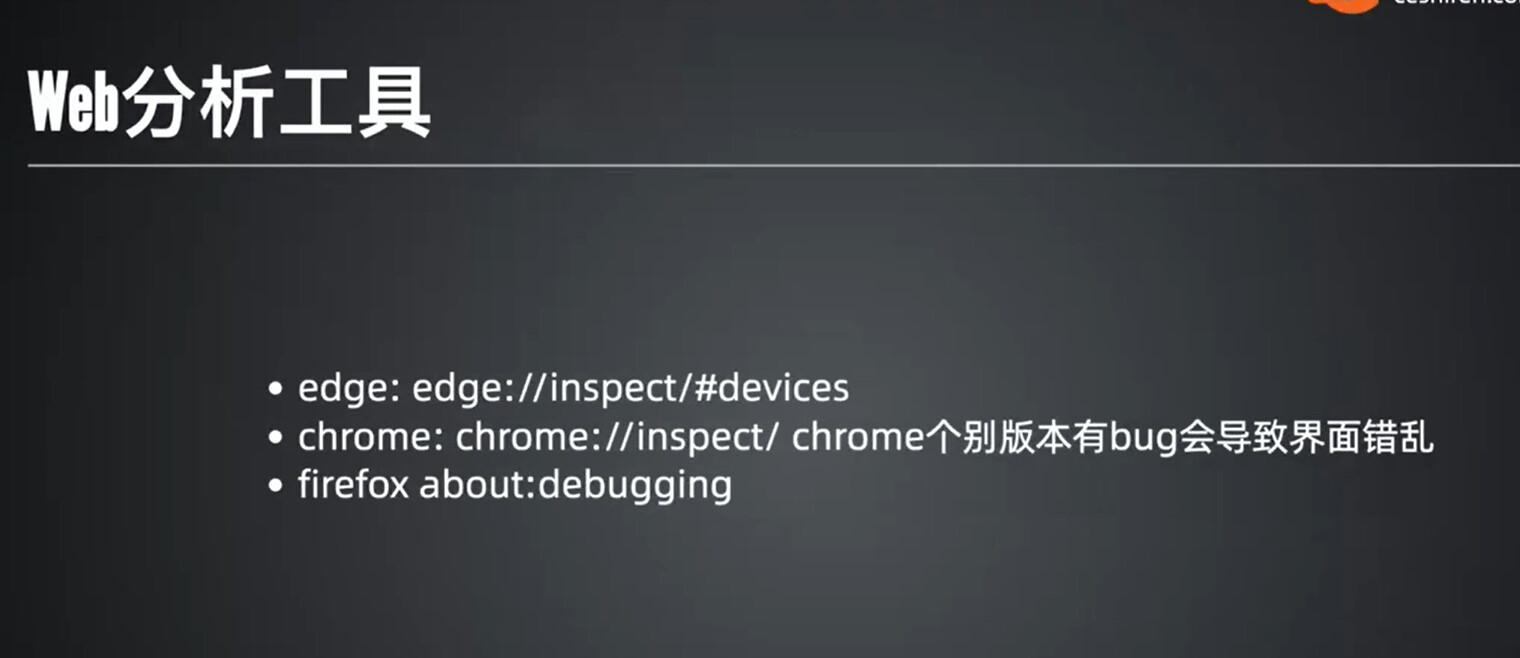
PC 浏览器的性能分析

手机浏览器的性能分析


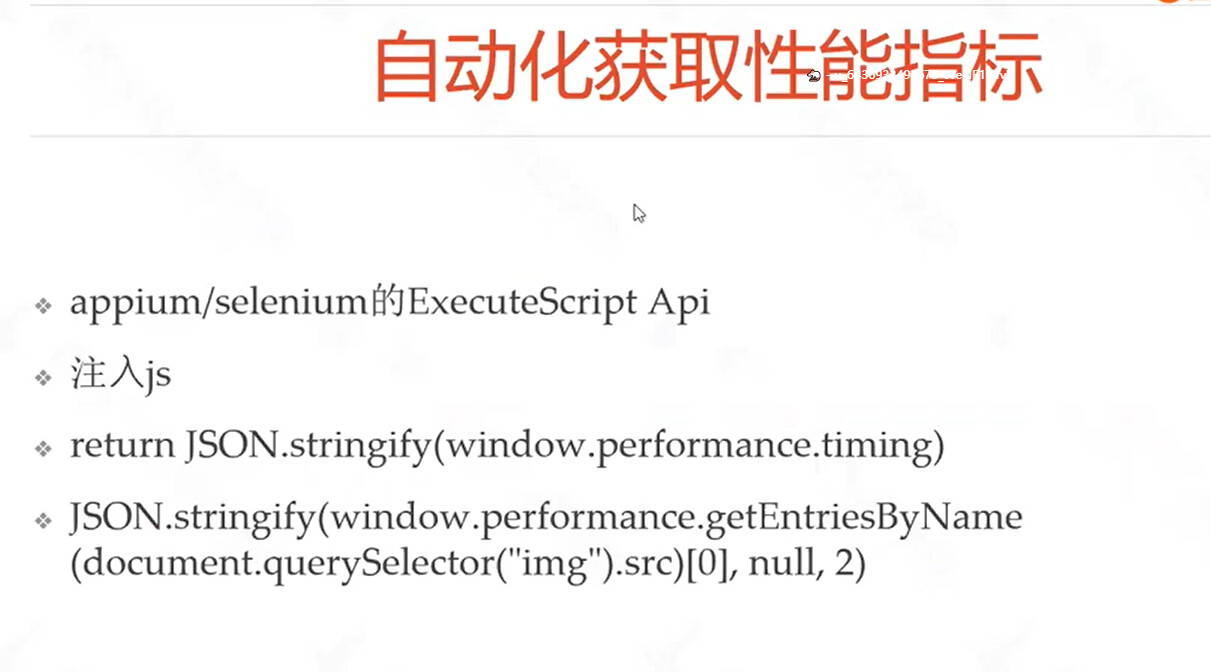

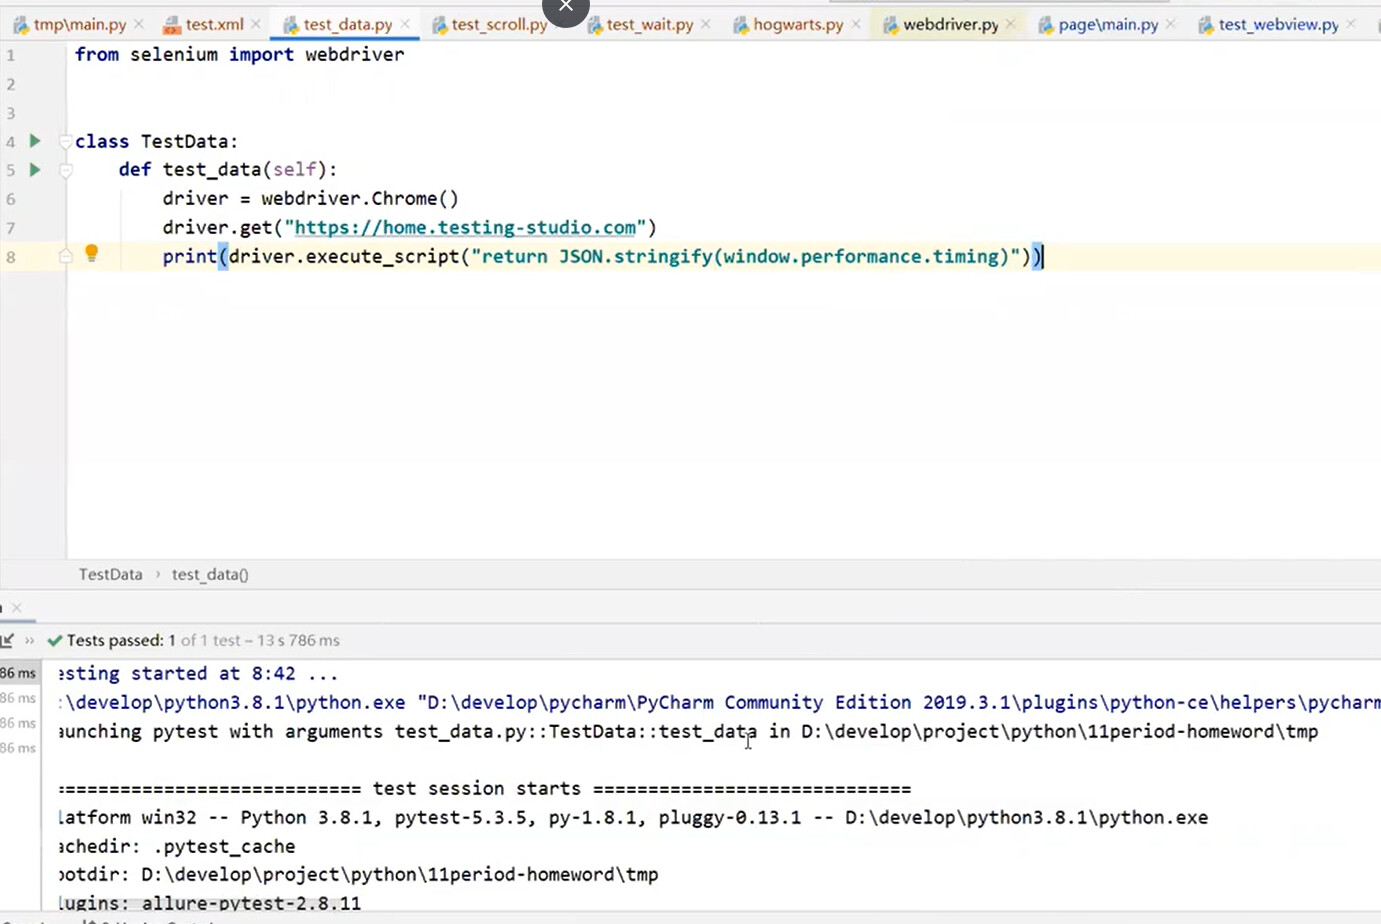
selenium和appuim同理:进行JS注入
app webview 性能分析
webview 和 H5的区别:
webview 是手机上内嵌的一个浏览器,APP上有小型的浏览器,可以加载我们的页面。
H5就是html5,webview 可以加载H5。webview 通常是采用了H5,H5依托了webview 。两者相辅相成。

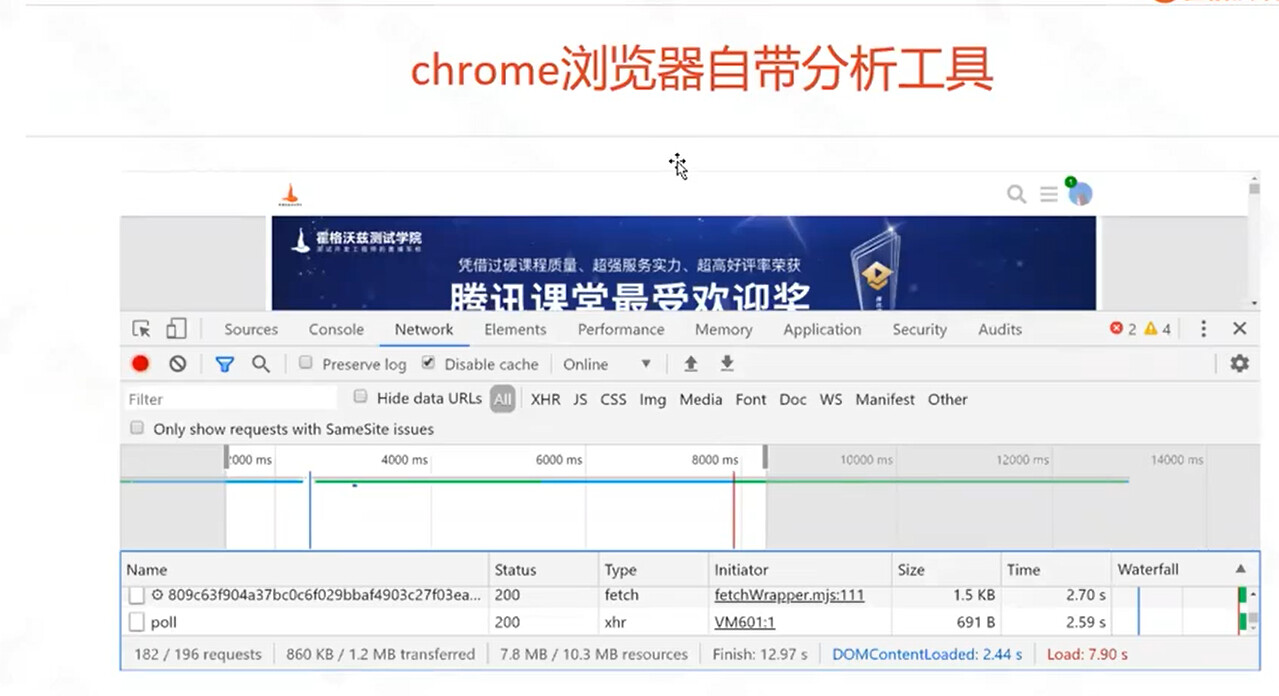

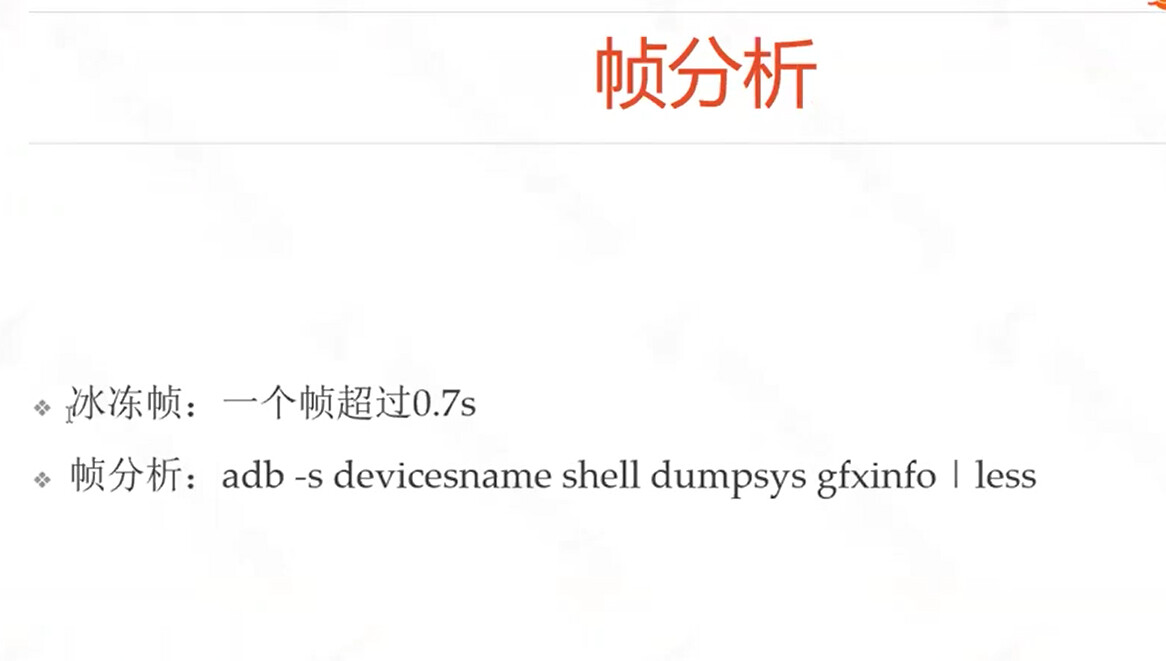
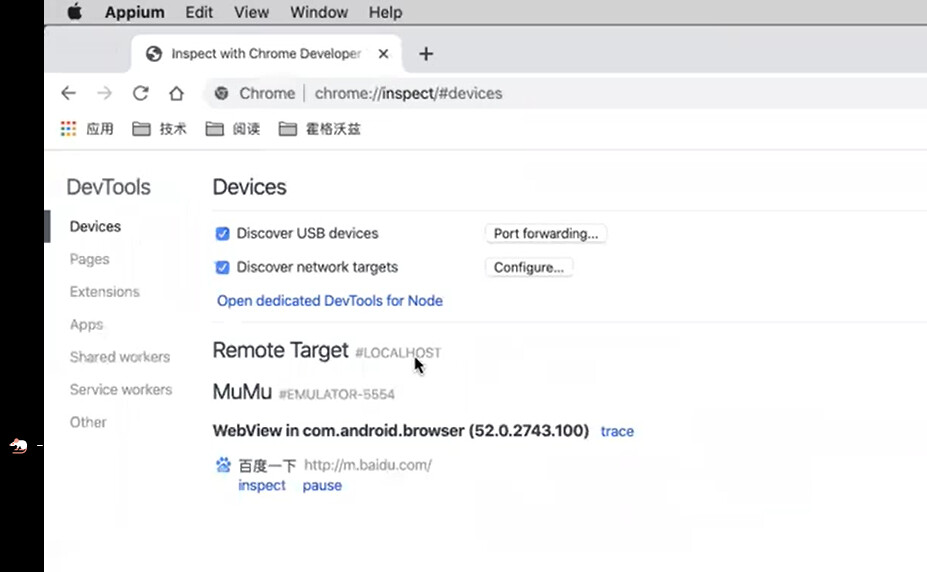
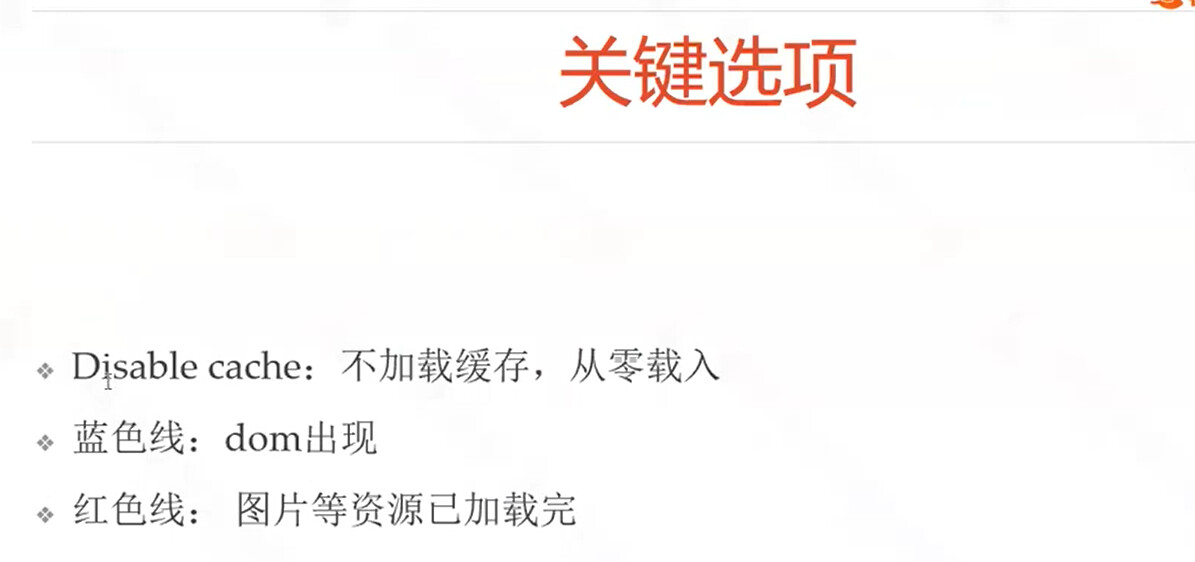
蓝色出现后就可以进行点击和输入操作
1、手机是webview
2、只有app页面是webview,需要开发人员打开一个开关


微信小程序性能分析

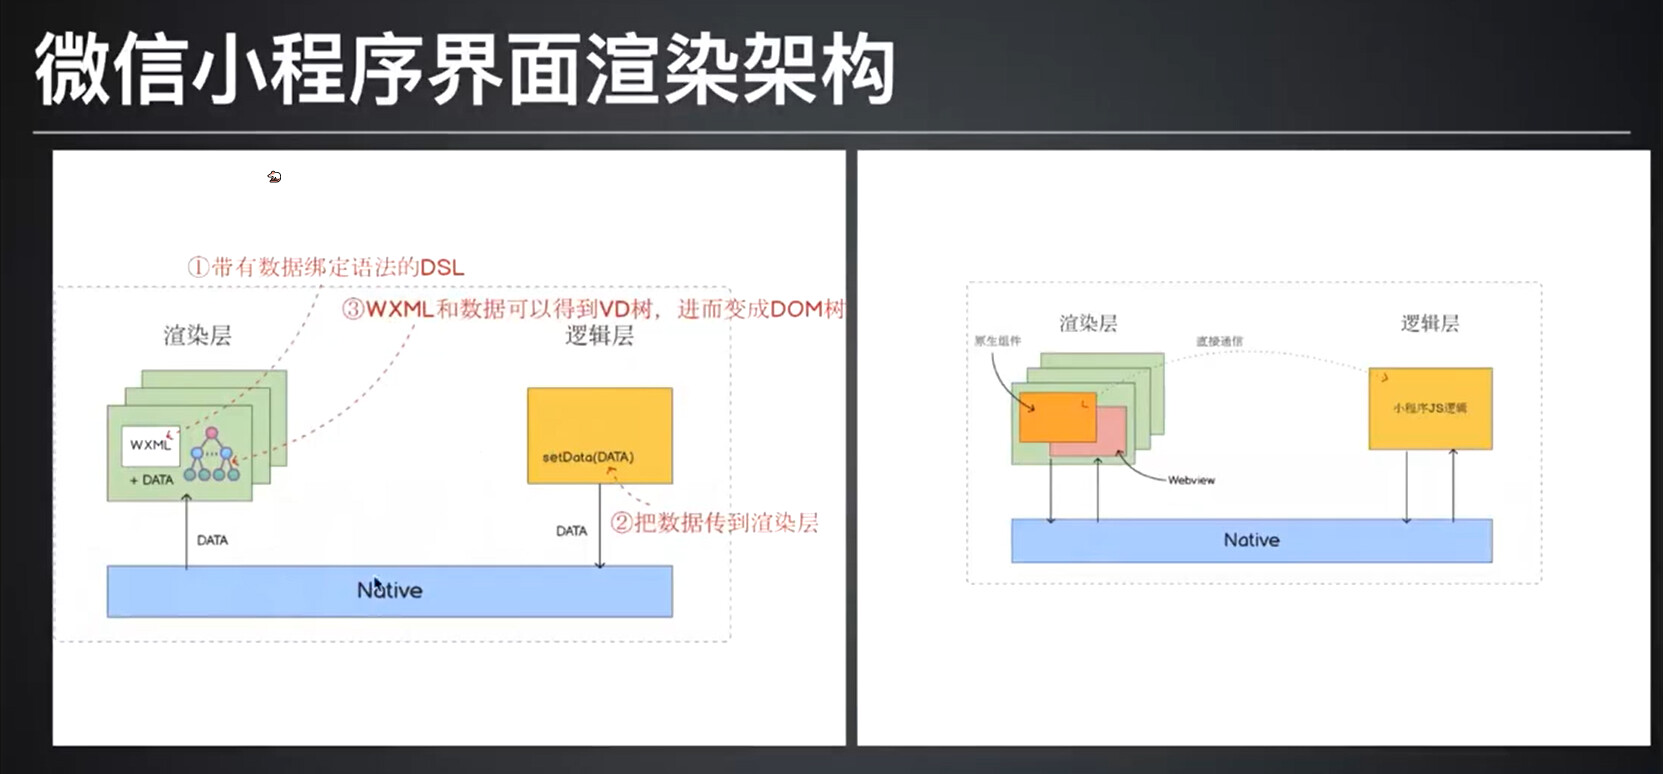


注意:小程序无法获取nework数据
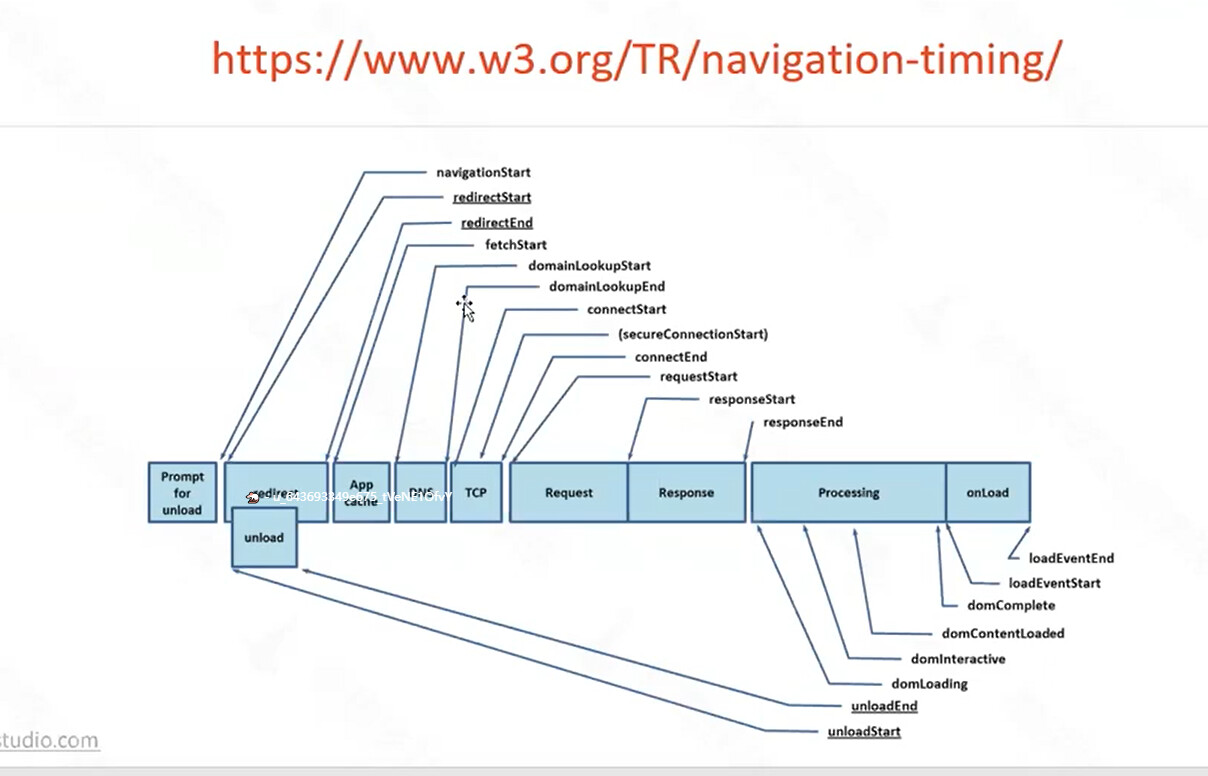
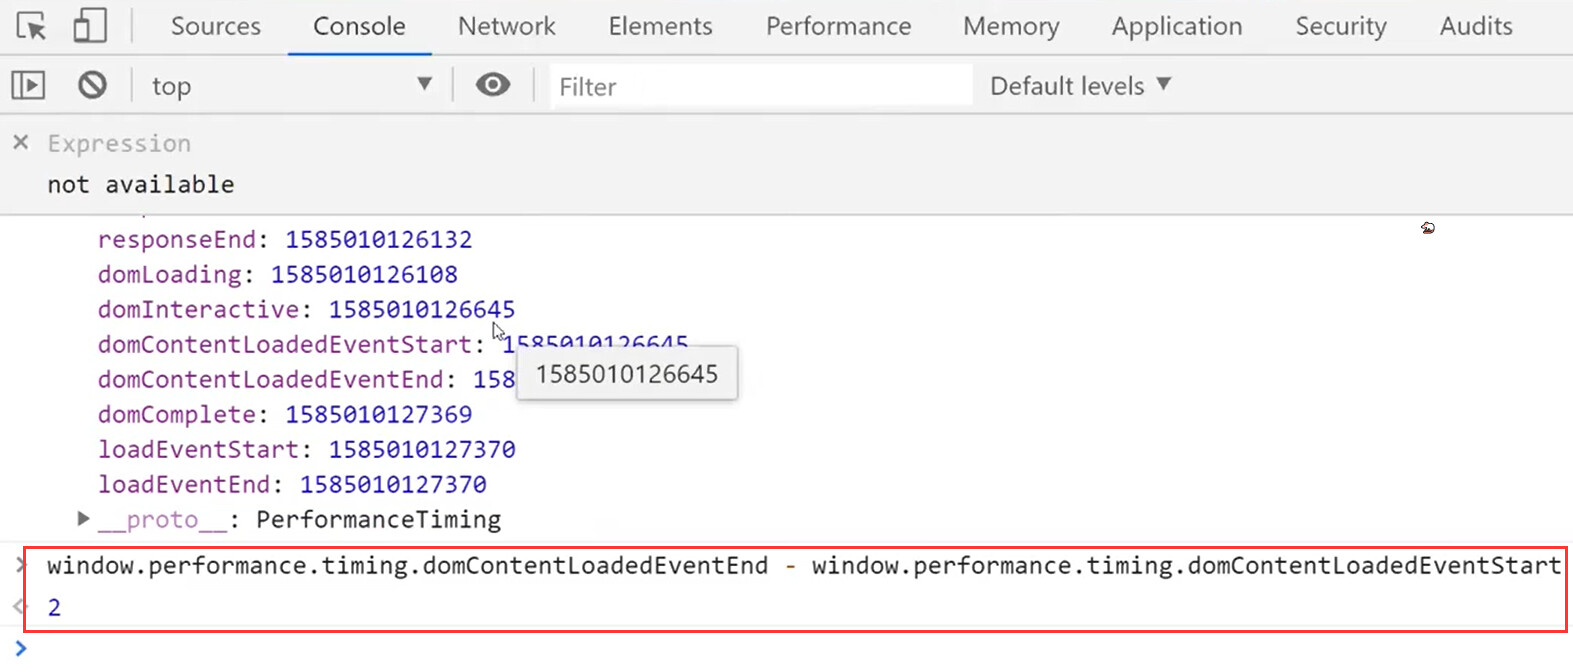
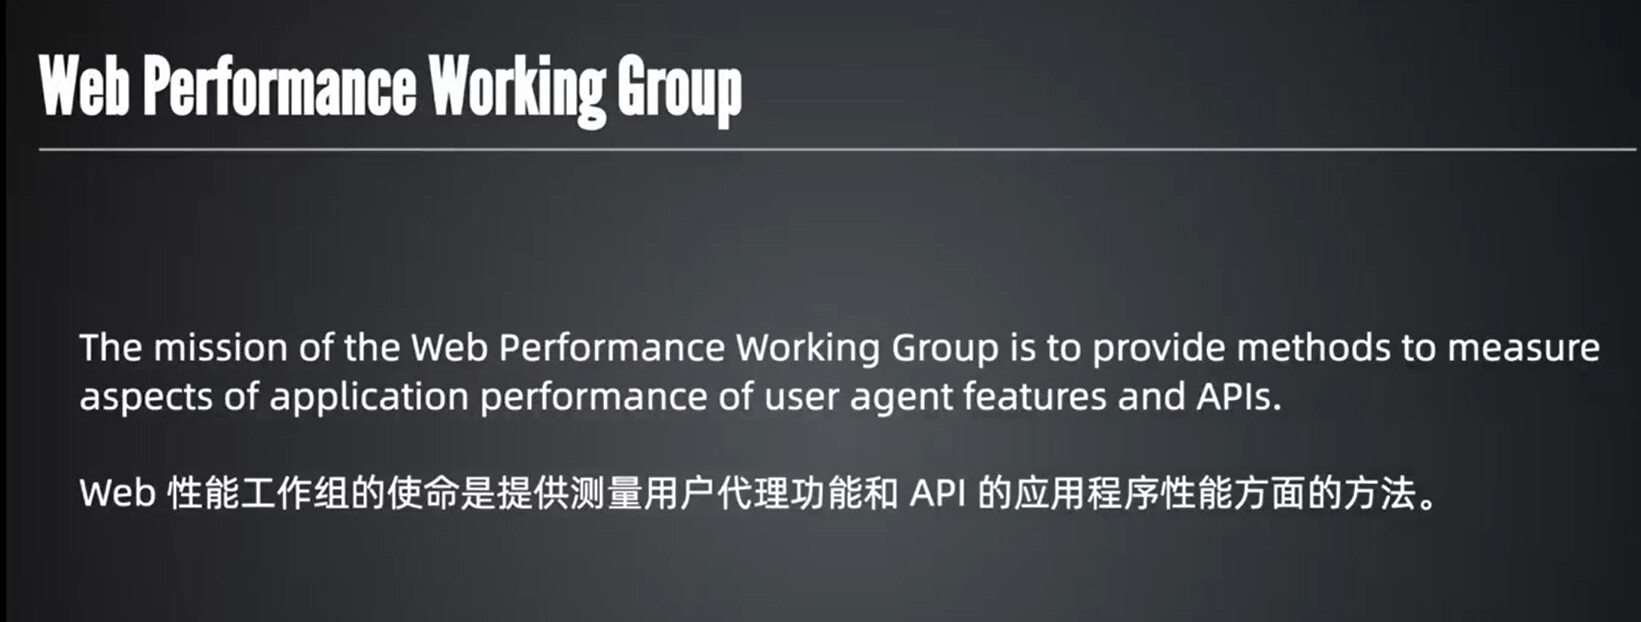
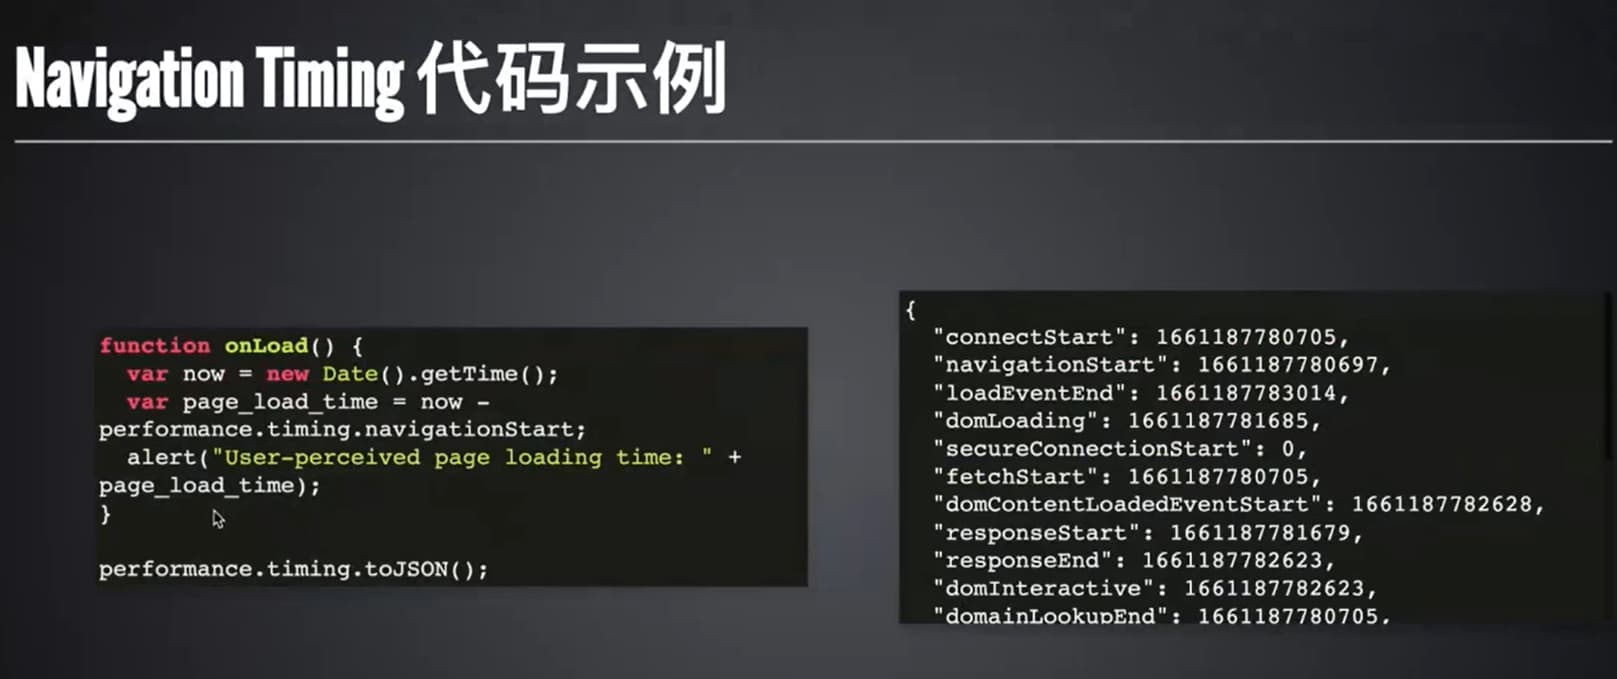
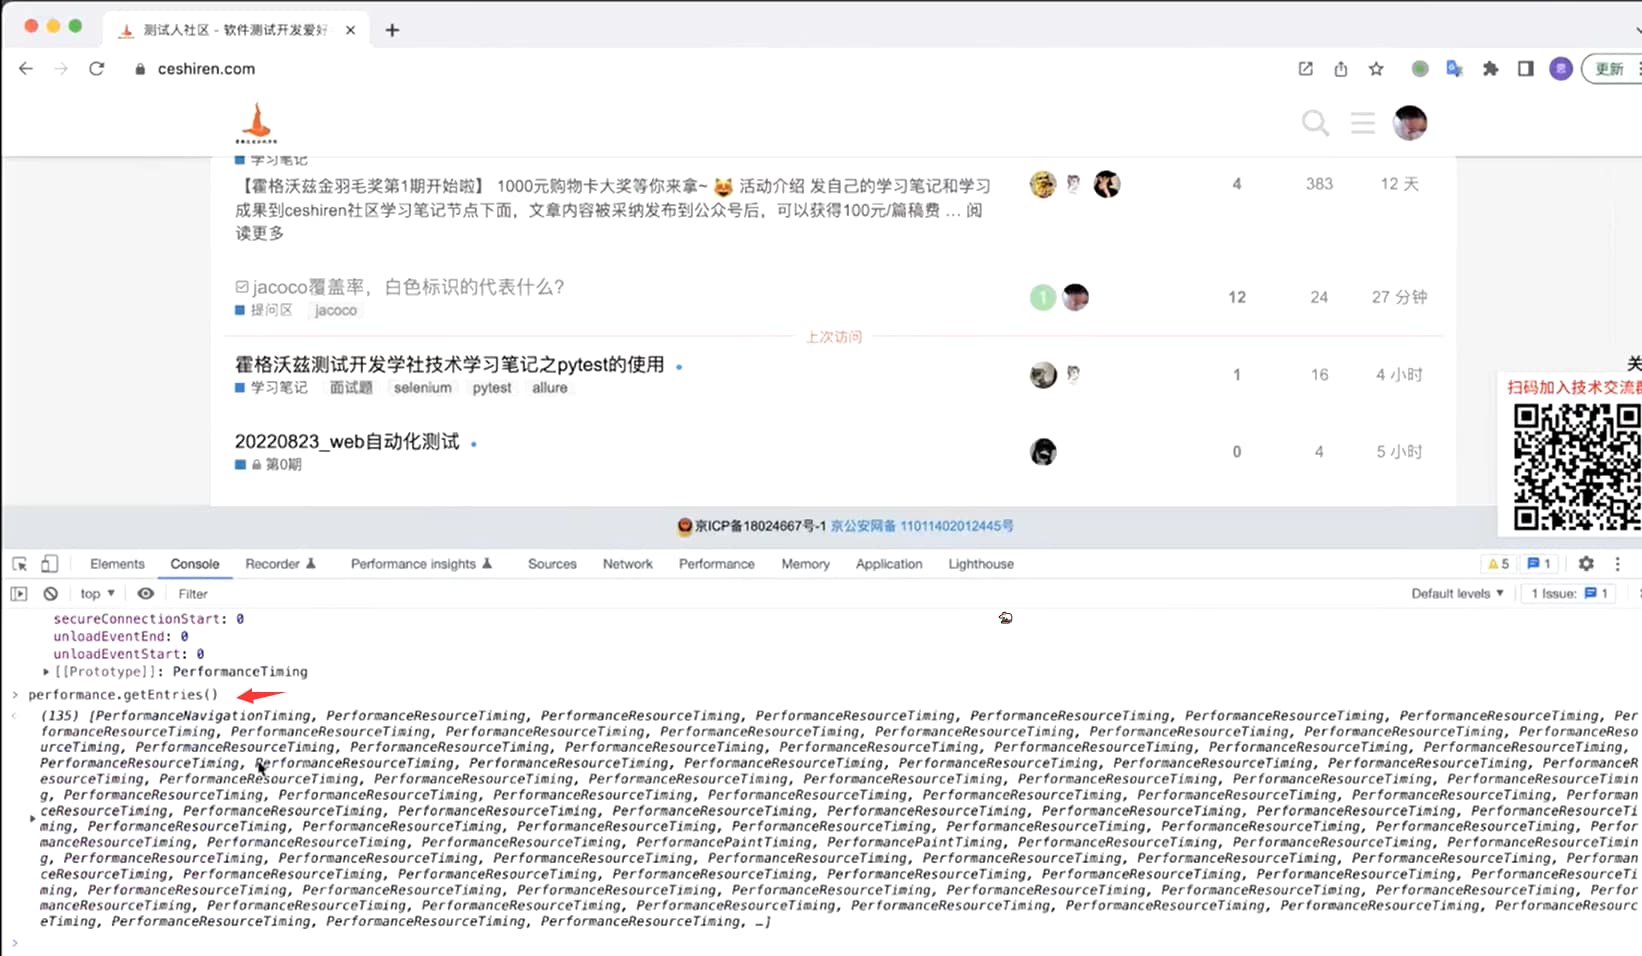
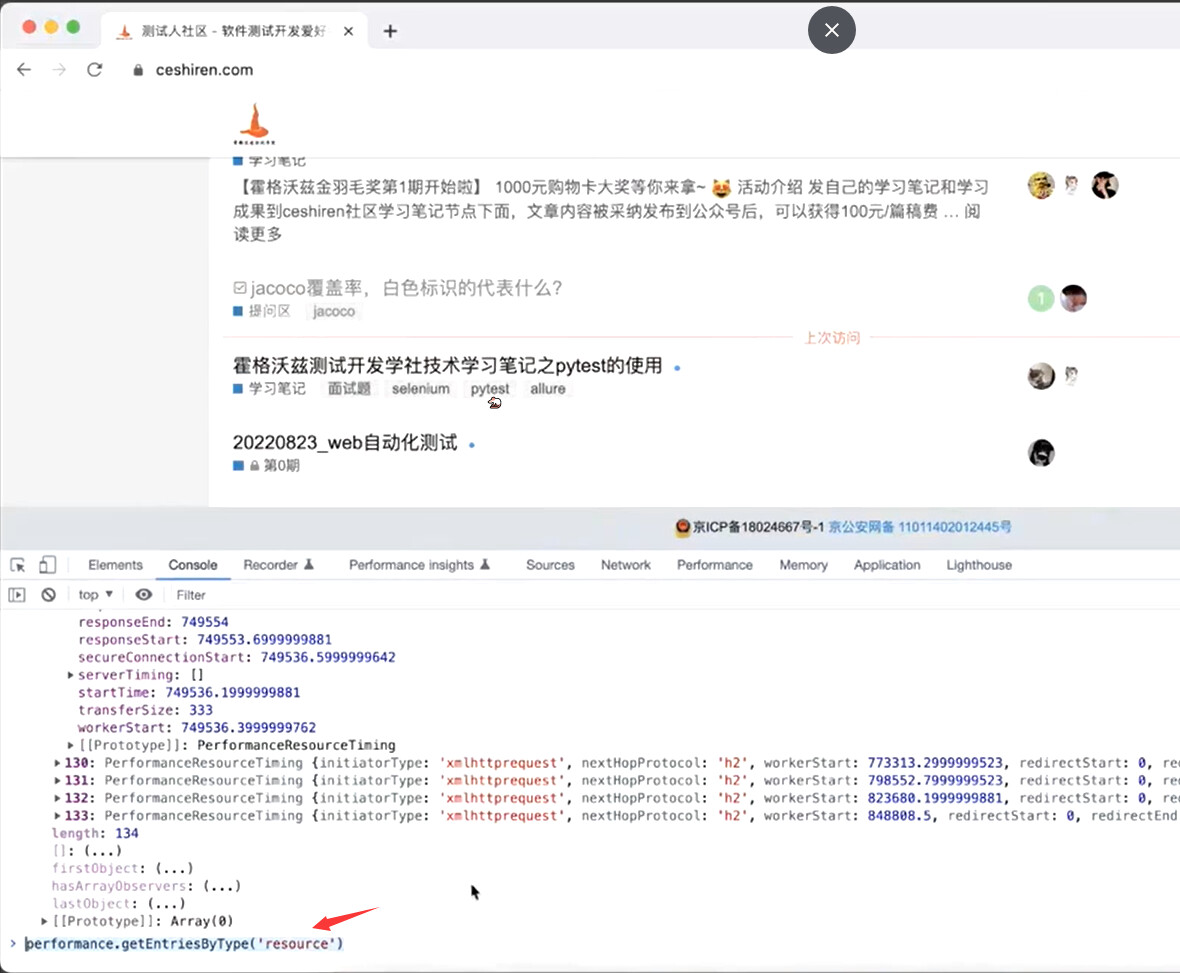
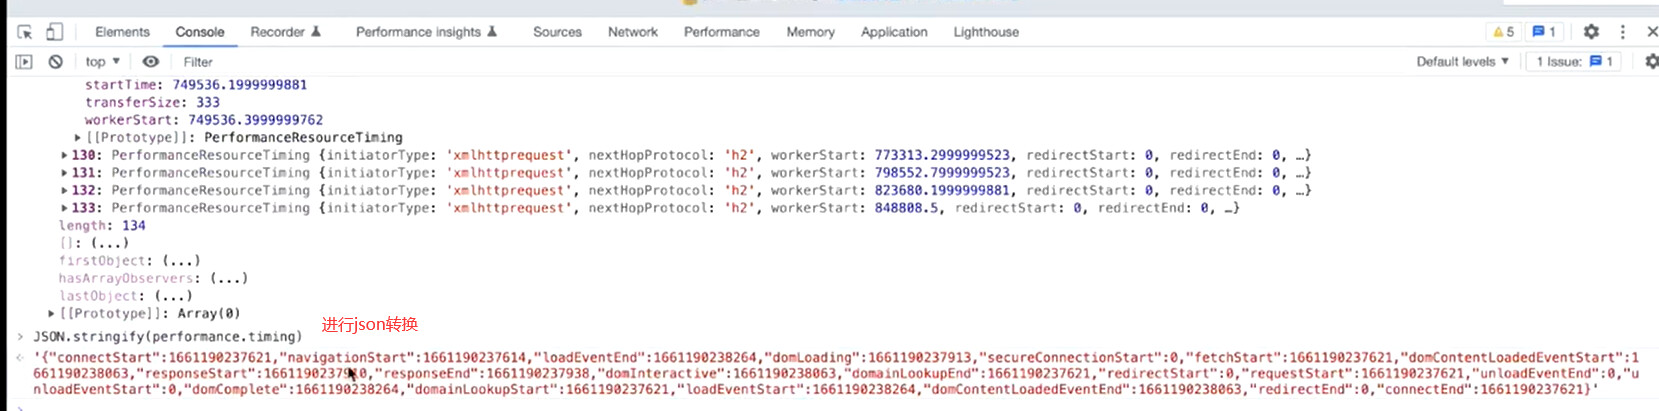
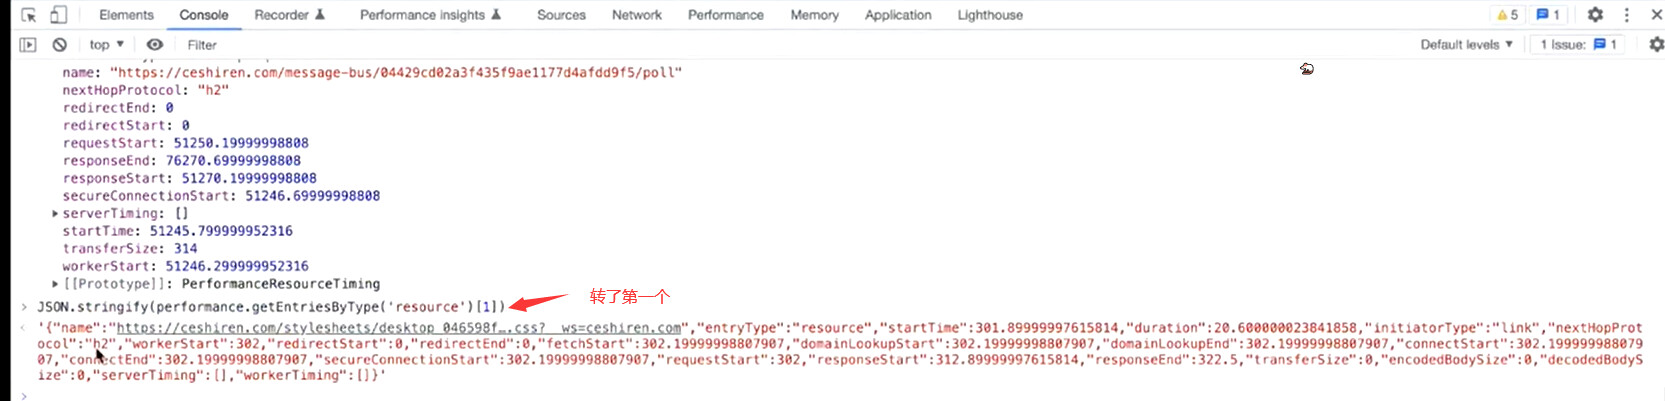
W3C performance api


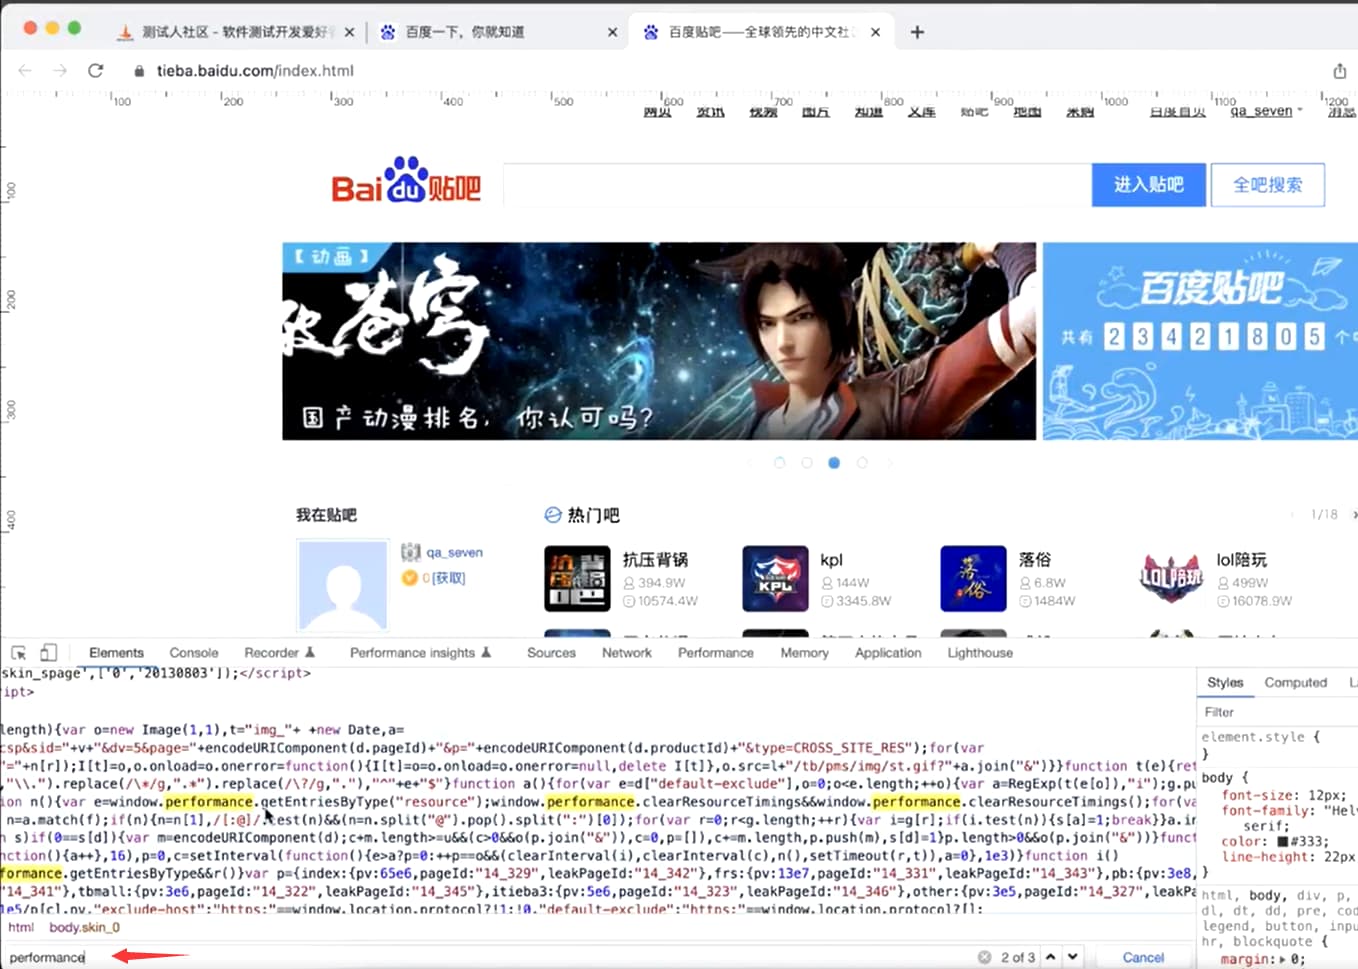

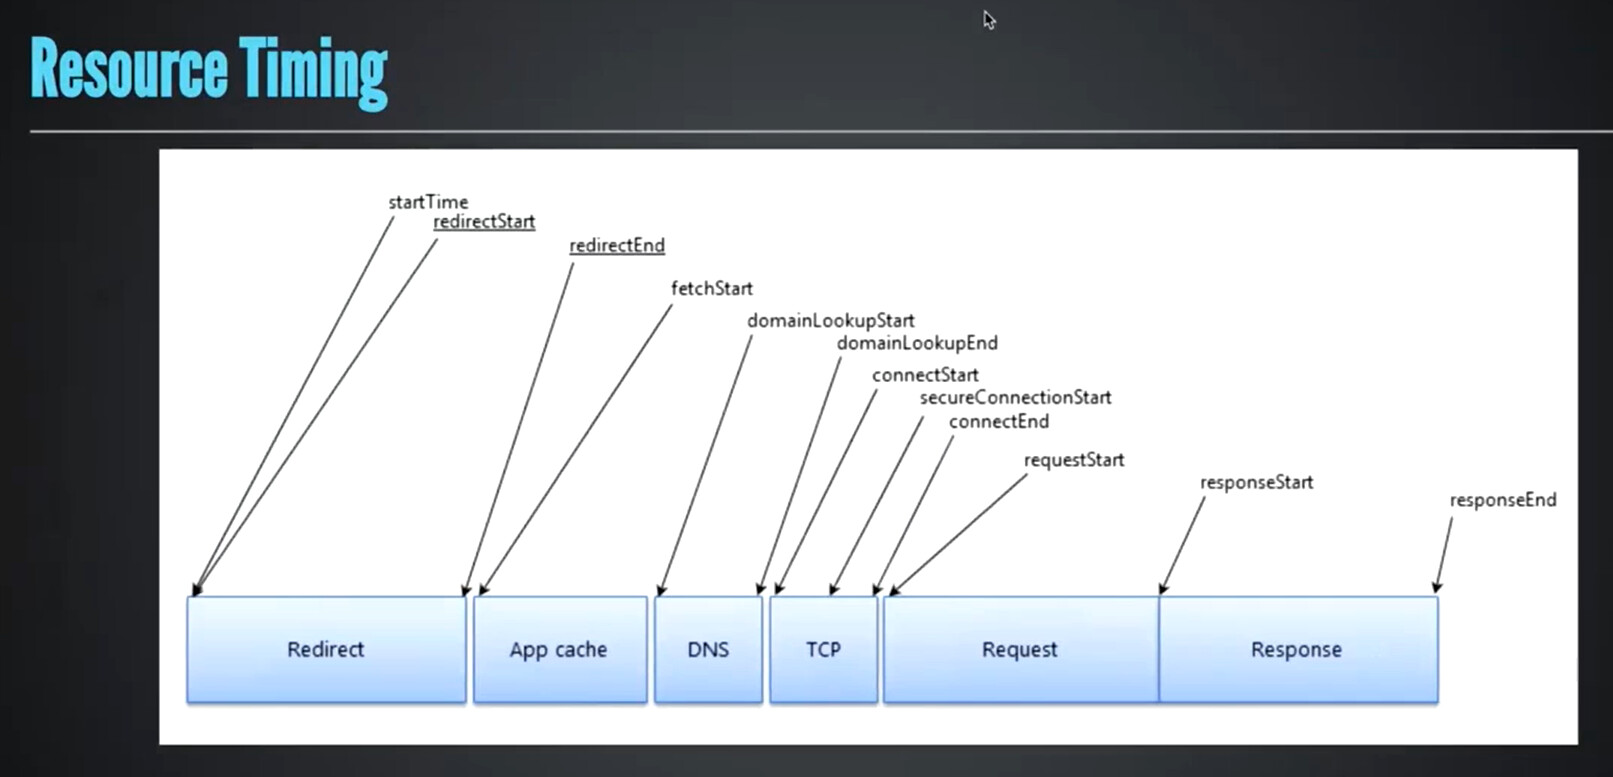

加载所有的资源:
去掉自己,加载其他所有的资源:可以算出每个关键点的时间


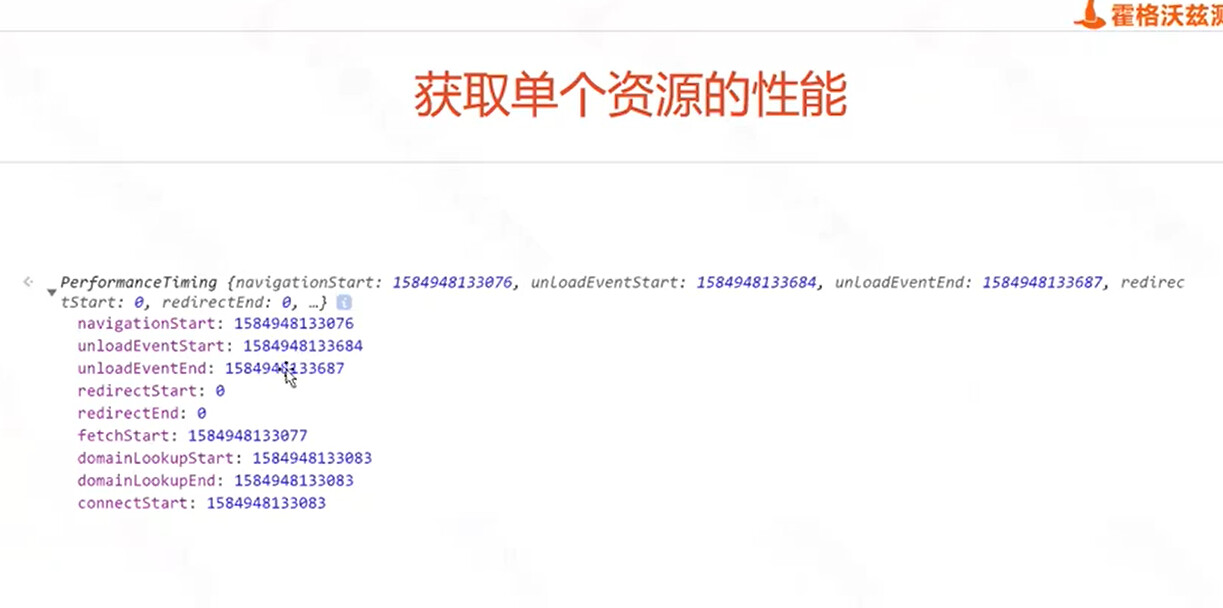
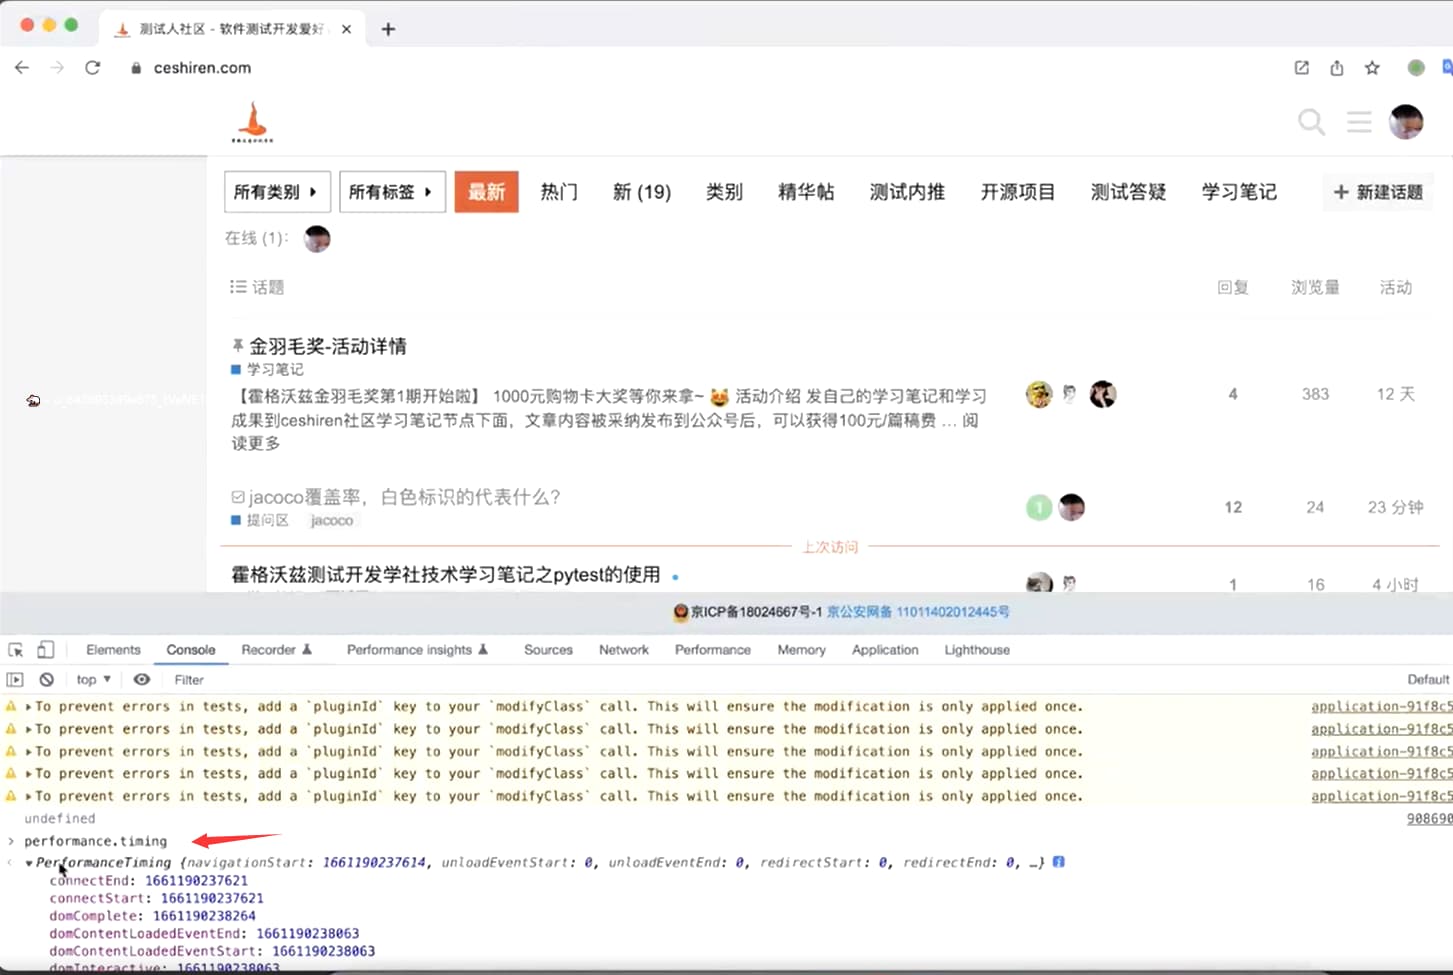
performance.timing 获取当前性能
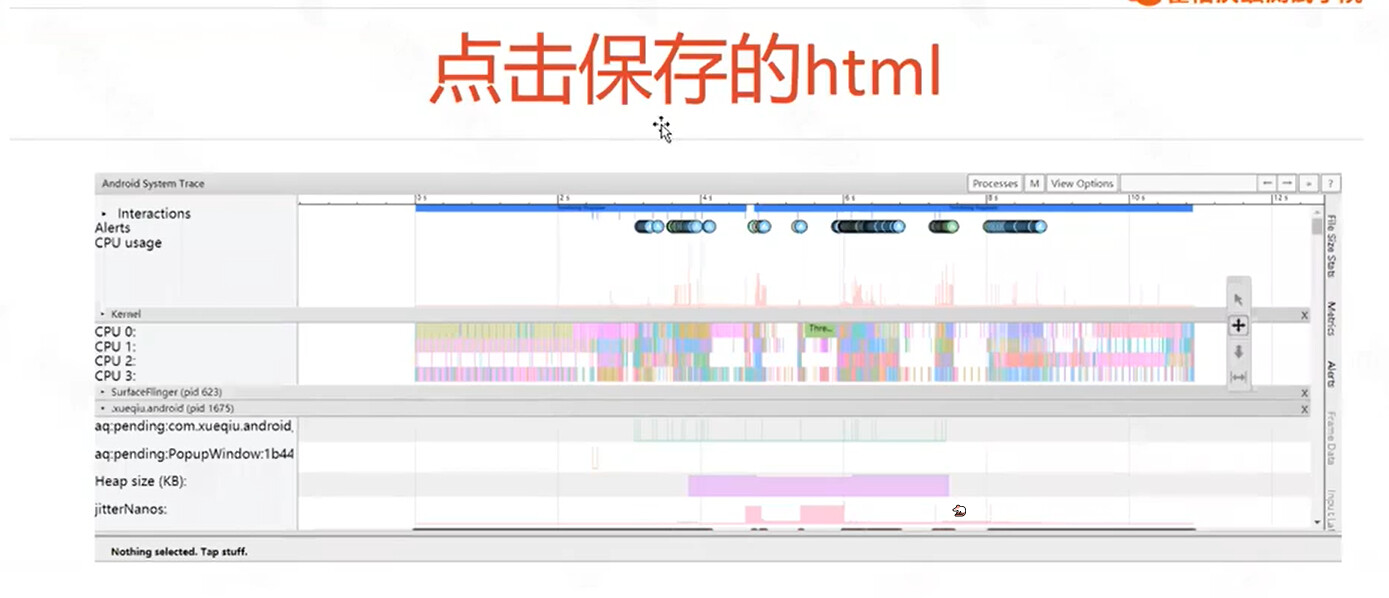
卡顿分析