{{% notice info %}}
Page being translated from
English to Chinese. Do you speak Chinese? Help us to translate
it by sending us pull requests!
{{% /notice %}}
Introduction
The Selenium-IDE (Integrated Development Environment) is the tool you use to
develop your Selenium test cases. It’s an easy-to-use Firefox plug-in and is
generally the most efficient way to develop test cases. It also contains a
context menu that allows you to first select a UI element from the browser’s
currently displayed page and then select from a list of Selenium commands with
parameters pre-defined according to the context of the selected UI element.
This is not only a time-saver, but also an excellent way of learning Selenium
script syntax.
This chapter is all about the Selenium IDE and how to use it effectively.
Installing the IDE
Using Firefox, first, download the IDE from the SeleniumHQ downloads page
Firefox will protect you from installing addons from unfamiliar locations, so
you will need to click ‘Allow’ to proceed with the installation, as shown in
the following screenshot.

When downloading from Firefox, you’ll be presented with the following window.
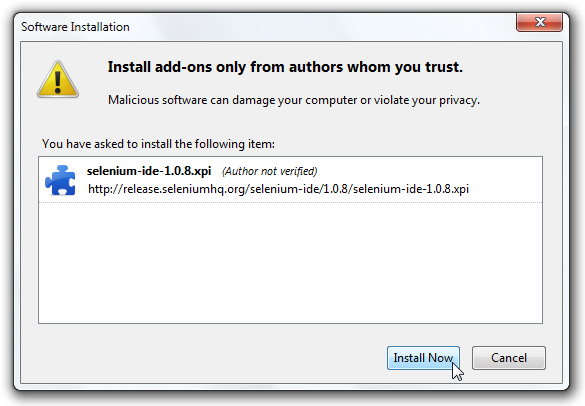
Select Install Now. The Firefox Add-ons window pops up, first showing a progress bar,
and when the download is complete, displays the following.
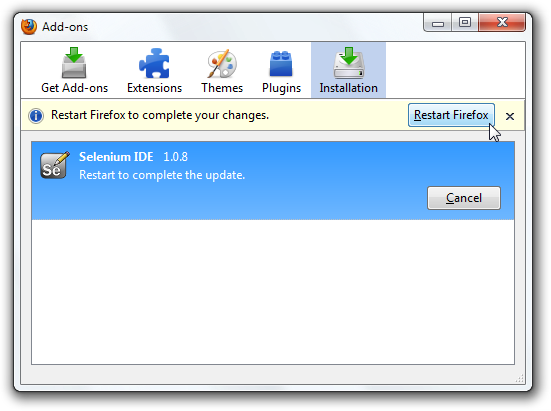
Restart Firefox. After Firefox reboots you will find the Selenium-IDE listed under
the Firefox Tools menu.
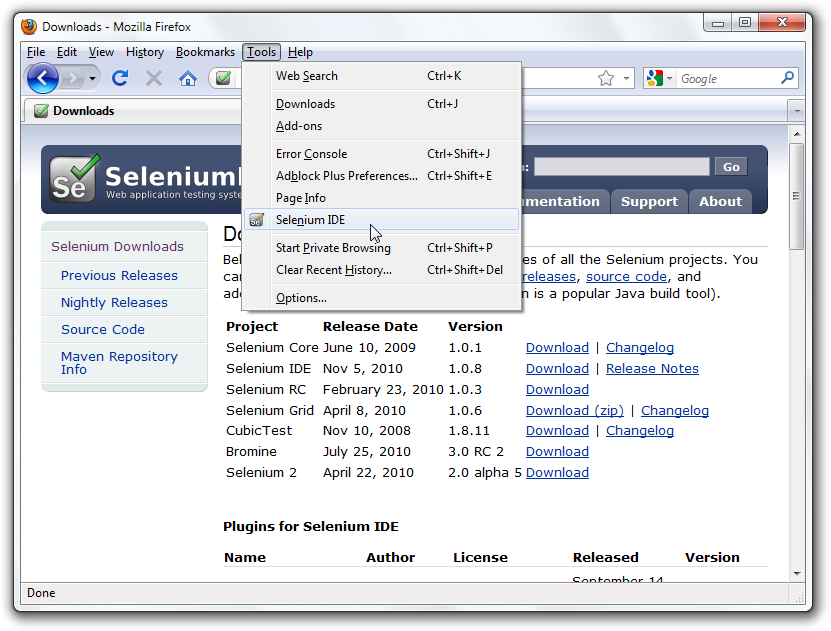
Opening the IDE
To run the Selenium-IDE, simply select it from the Firefox Tools menu. It opens
as follows with an empty script-editing window and a menu for loading, or
creating new test cases.
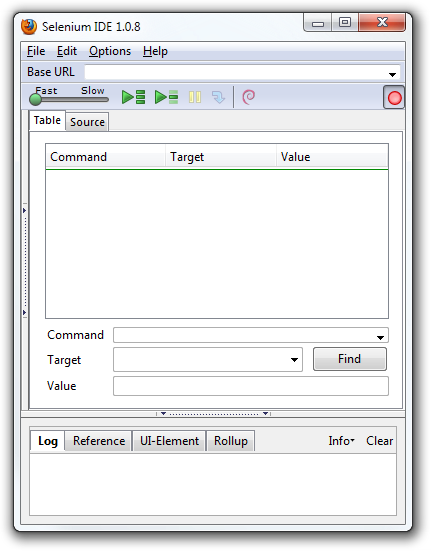
IDE Features
Menu Bar
The File menu has options for Test Case and Test Suite (suite of Test Cases).
Using these you can add a new Test Case, open a Test Case, save a Test Case,
export Test Case in a language of your choice. You can also open the recent
Test Case. All these options are also available for Test Suite.
The Edit menu allows copy, paste, delete, undo, and select all operations for
editing the commands in your test case. The Options menu allows the changing of
settings. You can set the timeout value for certain commands, add user-defined
user extensions to the base set of Selenium commands, and specify the format
(language) used when saving your test cases. The Help menu is the standard
Firefox Help menu; only one item on this menu–UI-Element Documentation–pertains
to Selenium-IDE.
Toolbar
The toolbar contains buttons for controlling the execution of your test cases,
including a step feature for debugging your test cases. The right-most button,
the one with the red-dot, is the record button.
![]()
![]()
Speed Control: controls how fast your test case runs.
![]()
Run All: Runs the entire test suite when a test suite with multiple test cases is loaded.
![]()
Run: Runs the currently selected test. When only a single test is loaded
this button and the Run All button have the same effect.
![]()
![]()
Pause/Resume: Allows stopping and re-starting of a running test case.
![]()
Step: Allows you to “step” through a test case by running it one command at a time.
Use for debugging test cases.
![]()
TestRunner Mode: Allows you to run the test case in a browser loaded with the
Selenium-Core TestRunner. The TestRunner is not commonly used now and is likely
to be deprecated. This button is for evaluating test cases for backwards
compatibility with the TestRunner. Most users will probably not need this
button.
![]()
Apply Rollup Rules: This advanced feature allows repetitive sequences of
Selenium commands to be grouped into a single action. Detailed documentation on
rollup rules can be found in the UI-Element Documentation on the Help menu.
![]()
Test Case Pane
Your script is displayed in the test case pane. It has two tabs, one for
displaying the command and their parameters in a readable “table” format.
The other tab - Source displays the test case in the native format in which the
file will be stored. By default, this is HTML although it can be changed to a
programming language such as Java or C#, or a scripting language like Python.
See the Options menu for details. The Source view also allows one to edit the
test case in its raw form, including copy, cut and paste operations.
The Command, Target, and Value entry fields display the currently selected
command along with its parameters. These are entry fields where you can modify
the currently selected command. The first parameter specified for a command in
the Reference tab of the bottom pane always goes in the Target field. If a
second parameter is specified by the Reference tab, it always goes in the Value
field.

If you start typing in the Command field, a drop-down list will be populated
based on the first characters you type; you can then select your desired
command from the drop-down.
Log/Reference/UI-Element/Rollup Pane
The bottom pane is used for four different functions–Log, Reference,
UI-Element, and Rollup–depending on which tab is selected.
Log
When you run your test case, error messages and information messages showing
the progress are displayed in this pane automatically, even if you do not first
select the Log tab. These messages are often useful for test case debugging.
Notice the Clear button for clearing the Log. Also notice the Info button is a
drop-down allowing selection of different levels of information to log.

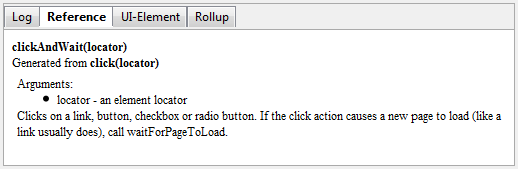
Reference
The Reference tab is the default selection whenever you are entering or
modifying Selenese commands and parameters in Table mode. In Table mode, the
Reference pane will display documentation on the current command. When entering
or modifying commands, whether from Table or Source mode, it is critically
important to ensure that the parameters specified in the Target and Value
fields match those specified in the parameter list in the Reference pane. The
number of parameters provided must match the number specified, the order of
parameters provided must match the order specified, and the type of parameters
provided must match the type specified. If there is a mismatch in any of these
three areas, the command will not run correctly.
While the Reference tab is invaluable as a quick reference, it is still often
necessary to consult the Selenium Reference document.
UI-Element and Rollup
Detailed information on these two panes (which cover advanced features) can be
found in the UI-Element Documentation on the Help menu of Selenium-IDE.
Building Test Cases
There are three primary methods for developing test cases. Frequently, a test
developer will require all three techniques.
Recording
Many first-time users begin by recording a test case from their interactions
with a website. When Selenium-IDE is first opened, the record button is ON by
default. If you do not want Selenium-IDE to begin recording automatically you
can turn this off by going under Options > Options… and deselecting “Start
recording immediately on open.”
During recording, Selenium-IDE will automatically insert commands into your
test case based on your actions. Typically, this will include:
- clicking a link - click or clickAndWait commands
- entering values - type command
- selecting options from a drop-down listbox - select command
- clicking checkboxes or radio buttons - click command
Here are some “gotchas” to be aware of:
- The type command may require clicking on some other area of the web page for it
to record. - Following a link usually records a click command. You will often need to change
this to clickAndWait to ensure your test case pauses until the new page is
completely loaded. Otherwise, your test case will continue running commands
before the page has loaded all its UI elements. This will cause unexpected test
case failures.
Adding Verifications and Asserts With the Context Menu
Your test cases will also need to check the properties of a web-page. This
requires assert and verify commands. We won’t describe the specifics of these
commands here; that is in the chapter on Selenium Commands – “Selenese”. Here
we’ll simply describe how to add them to your test case.
With Selenium-IDE recording, go to the browser displaying your test application
and right click anywhere on the page. You will see a context menu showing
verify and/or assert commands.
The first time you use Selenium, there may only be one Selenium command listed.
As you use the IDE however, you will find additional commands will quickly be
added to this menu. Selenium-IDE will attempt to predict what command, along
with the parameters, you will need for a selected UI element on the current
web-page.
Let’s see how this works. Open a web-page of your choosing and select a block
of text on the page. A paragraph or a heading will work fine. Now, right-click
the selected text. The context menu should give you a verifyTextPresent command
and the suggested parameter should be the text itself.
Also, notice the Show All Available Commands menu option. This shows many, many
more commands, again, along with suggested parameters, for testing your
currently selected UI element.
Try a few more UI elements. Try right-clicking an image, or a user control like
a button or a checkbox. You may need to use Show All Available Commands to see
options other than verifyTextPresent. Once you select these other options, the
more commonly used ones will show up on the primary context menu. For example,
selecting verifyElementPresent for an image should later cause that command to
be available on the primary context menu the next time you select an image and
right-click.
Again, these commands will be explained in detail in the chapter on Selenium
commands. For now though, feel free to use the IDE to record and select
commands into a test case and then run it. You can learn a lot about the
Selenium commands simply by experimenting with the IDE.
Editing
Insert Command
Table View
Select the point in your test case where you want to insert the command. To do
this, in the Test Case Pane, left-click on the line where you want to insert a
new command. Right-click and select Insert Command; the IDE will add a blank
line just ahead of the line you selected. Now use the command editing text
fields to enter your new command and its parameters.
Source View
Select the point in your test case where you want to insert the command. To do
this, in the Test Case Pane, left-click between the commands where you want to
insert a new command, and enter the HTML tags needed to create a 3-column row
containing the Command, first parameter (if one is required by the Command),
and second parameter (again, if one is required to locate an element) and third
parameter(again, if one is required to have a value). Example:
<tr>
    <td>Command</td>
    <td>target (locator)</td>
    <td>Value</td>
</tr>
Insert Comment
Comments may be added to make your test case more readable. These comments are
ignored when the test case is run.
Comments may also be used to add vertical white space (one or more blank lines)
in your tests; just create empty comments. An empty command will cause an error
during execution; an empty comment won’t.
Table View
Select the line in your test case where you want to insert the comment.
Right-click and select Insert Comment. Now use the Command field to enter the
comment. Your comment will appear in purple text.
Source View
Select the point in your test case where you want to insert the comment. Add an
HTML-style comment, i.e., <!-- your comment here -->.
Edit a Command or Comment
Table View
Simply select the line to be changed and edit it using the Command, Target,
and Value fields.
Source View
Since Source view provides the equivalent of a WYSIWYG (What You See is What
You Get) editor, simply modify which line you wish–command, parameter, or comment.
Opening and Saving a Test Case
Like most programs, there are Save and Open commands under the File menu.
However, Selenium distinguishes between test cases and test suites. To save
your Selenium-IDE tests for later use you can either save the individual test
cases, or save the test suite. If the test cases of your test suite have not
been saved, you’ll be prompted to save them before saving the test suite.
When you open an existing test case or suite, Selenium-IDE displays its
Selenium commands in the Test Case Pane.
Running Test Cases
The IDE allows many options for running your test case. You can run a test case
all at once, stop and start it, run it one line at a time, run a single command
you are currently developing, and you can do a batch run of an entire test
suite. Execution of test cases is very flexible in the IDE.
Run a Test Case
Click the Run button to run the currently displayed test case.
Run a Test Suite
Click the Run All button to run all the test cases in the currently loaded test
suite.
Stop and Start
The Pause button can be used to stop the test case while it is running. The
icon of this button then changes to indicate the Resume button. To continue
click Resume.
Stop in the Middle
You can set a breakpoint in the test case to cause it to stop on a particular
command. This is useful for debugging your test case. To set a breakpoint,
select a command, right-click, and from the context menu select Toggle
Breakpoint.
Start from the Middle
You can tell the IDE to begin running from a specific command in the middle of
the test case. This also is used for debugging. To set a startpoint, select a
command, right-click, and from the context menu select Set/Clear Start Point.
Run Any Single Command
Double-click any single command to run it by itself. This is useful when
writing a single command. It lets you immediately test a command you are
constructing, when you are not sure if it is correct. You can double-click it
to see if it runs correctly. This is also available from the context menu.
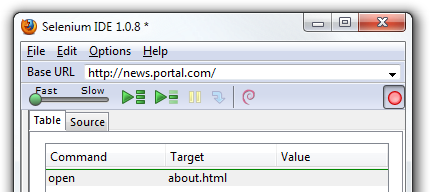
Using Base URL to Run Test Cases in Different Domains
The Base URL field at the top of the Selenium-IDE window is very useful for
allowing test cases to be run across different domains. Suppose that a site
named http://news.portal.com had an in-house beta site named
http://beta.news.portal.com. Any test cases for these sites that begin with an
open statement should specify a relative URL as the argument to open rather
than an absolute URL (one starting with a protocol such as http: or https:).
Selenium-IDE will then create an absolute URL by appending the open command’s
argument onto the end of the value of Base URL. For example, the test case
below would be run against http://news.portal.com/about.html:
This same test case with a modified Base URL setting would be run against
http://beta.news.portal.com/about.html:

Selenium Commands – “Selenese”
Selenium commands, often called selenese, are the set of commands that run your
tests. A sequence of these commands is a test script. Here we explain those
commands in detail, and we present the many choices you have in testing your
web application when using Selenium.
Selenium provides a rich set of commands for fully testing your web-app in
virtually any way you can imagine. The command set is often called selenese.
These commands essentially create a testing language.
In selenese, one can test the existence of UI elements based on their HTML
tags, test for specific content, test for broken links, input fields, selection
list options, submitting forms, and table data among other things. In addition
Selenium commands support testing of window size, mouse position, alerts, Ajax
functionality, pop up windows, event handling, and many other web-application
features. The Command Reference lists all the available commands.
A command tells Selenium what to do. Selenium commands come in three “flavors”:
Actions, Accessors, and Assertions.
-
Actions are commands that generally manipulate the state of the application.
They do things like “click this link” and “select that option”. If an Action
fails, or has an error, the execution of the current test is stopped.Many Actions can be called with the “AndWait” suffix, e.g. “clickAndWait”. This
suffix tells Selenium that the action will cause the browser to make a call to
the server, and that Selenium should wait for a new page to load. -
Accessors examine the state of the application and store the results in
variables, e.g. “storeTitle”. They are also used to automatically generate
Assertions. -
Assertions are like Accessors, but they verify that the state of the
application conforms to what is expected. Examples include “make sure the page
title is X” and “verify that this checkbox is checked”.
All Selenium Assertions can be used in 3 modes: “assert”, “verify”, and ”
waitFor”. For example, you can “assertText”, “verifyText” and “waitForText”.
When an “assert” fails, the test is aborted. When a “verify” fails, the test
will continue execution, logging the failure. This allows a single “assert” to
ensure that the application is on the correct page, followed by a bunch of
“verify” assertions to test form field values, labels, etc.
“waitFor” commands wait for some condition to become true (which can be useful
for testing Ajax applications). They will succeed immediately if the condition
is already true. However, they will fail and halt the test if the condition
does not become true within the current timeout setting (see the setTimeout
action below).
Script Syntax
Selenium commands are simple, they consist of the command and two parameters.
For example:
| verifyText | //div//a[2] | Login |
The parameters are not always required; it depends on the command. In some
cases both are required, in others one parameter is required, and in still
others the command may take no parameters at all. Here are a couple more
examples:
| goBackAndWait | ||
| verifyTextPresent | Welcome to My Home Page | |
| type | id=phone | (555) 666-7066 |
| type | id=address1 | ${myVariableAddress} |
The command reference describes the parameter requirements for each command.
Parameters vary, however they are typically:
- a locator for identifying a UI element within a page.
- a text pattern for verifying or asserting expected page content
- a text pattern or a Selenium variable for entering text in an input field or
for selecting an option from an option list.
Locators, text patterns, Selenium variables, and the commands themselves are
described in considerable detail in the section on Selenium Commands.
Selenium scripts that will be run from Selenium-IDE will be stored in an HTML
text file format. This consists of an HTML table with three columns. The first
column identifies the Selenium command, the second is a target, and the final
column contains a value. The second and third columns may not require values
depending on the chosen Selenium command, but they should be present. Each
table row represents a new Selenium command. Here is an example of a test that
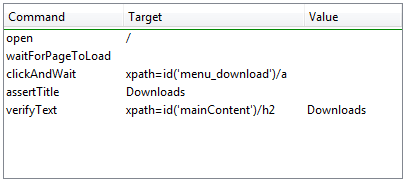
opens a page, asserts the page title and then verifies some content on the page:
<table>
    <tr><td>open</td><td>/download/</td><td></td></tr>
    <tr><td>assertTitle</td><td></td><td>Downloads</td></tr>
    <tr><td>verifyText</td><td>//h2</td><td>Downloads</td></tr>
</table>
Rendered as a table in a browser this would look like the following:
| open | /download/ | |
| assertTitle | Downloads | |
| verifyText | //h2 | Downloads |
The Selenese HTML syntax can be used to write and run tests without requiring
knowledge of a programming language. With a basic knowledge of selenese and
Selenium-IDE you can quickly produce and run testcases.
Test Suites
A test suite is a collection of tests. Often one will run all the tests in a
test suite as one continuous batch-job.
When using Selenium-IDE, test suites also can be defined using a simple HTML
file. The syntax again is simple. An HTML table defines a list of tests where
each row defines the filesystem path to each test. An example tells it all.
<html>
<head>
<title>Test Suite Function Tests - Priority 1</title>
</head>
<body>
<table>
  <tr><td><b>Suite Of Tests</b></td></tr>
  <tr><td><a href="./Login.html">Login</a></td></tr>
  <tr><td><a href="./SearchValues.html">Test Searching for Values</a></td></tr>
  <tr><td><a href="./SaveValues.html">Test Save</a></td></tr>
</table>
</body>
</html>
A file similar to this would allow running the tests all at once, one after
another, from the Selenium-IDE.
Test suites can also be maintained when using Selenium-RC. This is done via
programming and can be done a number of ways. Commonly Junit is used to
maintain a test suite if one is using Selenium-RC with Java. Additionally, if
C# is the chosen language, Nunit could be employed. If using an interpreted
language like Python with Selenium-RC then some simple programming would be
involved in setting up a test suite. Since the whole reason for using
Selenium-RC is to make use of programming logic for your testing this usually
isn’t a problem.
Commonly Used Selenium Commands
To conclude our introduction of Selenium, we’ll show you a few typical Selenium
commands. These are probably the most commonly used commands for building
tests.
open
opens a page using a URL.
click/clickAndWait
performs a click operation, and optionally waits for a new page to load.
verifyTitle/assertTitle
verifies an expected page title.
verifyTextPresent
verifies expected text is somewhere on the page.
verifyElementPresent
verifies an expected UI element, as defined by its HTML tag, is present on the
page.
verifyText
verifies expected text and its corresponding HTML tag are present on the page.
verifyTable
verifies a table’s expected contents.
waitForPageToLoad
pauses execution until an expected new page loads. Called automatically when
clickAndWait is used.
waitForElementPresent
pauses execution until an expected UI element, as defined by its HTML tag, is
present on the page.
Verifying Page Elements
Verifying UI elements on a web page is probably the most common feature of your
automated tests. Selenese allows multiple ways of checking for UI elements. It
is important that you understand these different methods because these methods
define what you are actually testing.
For example, will you test that…
- an element is present somewhere on the page?
- specific text is somewhere on the page?
- specific text is at a specific location on the page?
For example, if you are testing a text heading, the text and its position at
the top of the page are probably relevant for your test. If, however, you are
testing for the existence of an image on the home page, and the web designers
frequently change the specific image file along with its position on the page,
then you only want to test that an image (as opposed to the specific image
file) exists somewhere on the page.
Assertion or Verification?
Choosing between “assert” and “verify” comes down to convenience and management
of failures. There’s very little point checking that the first paragraph on the
page is the correct one if your test has already failed when checking that the
browser is displaying the expected page. If you’re not on the correct page,
you’ll probably want to abort your test case so that you can investigate the
cause and fix the issue(s) promptly. On the other hand, you may want to check
many attributes of a page without aborting the test case on the first failure
as this will allow you to review all failures on the page and take the
appropriate action. Effectively an “assert” will fail the test and abort the
current test case, whereas a “verify” will fail the test and continue to run
the test case.
The best use of this feature is to logically group your test commands, and
start each group with an “assert” followed by one or more “verify” test
commands. An example follows:
| Command | Target | Value |
|---|---|---|
| open | /download/ | |
| assertTitle | Downloads | |
| verifyText | //h2 | Downloads |
| assertTable | 1.2.1 | Selenium IDE |
| verifyTable | 1.2.2 | June 3, 2008 |
| verifyTable | 1.2.3 | 1.0 beta 2 |
The above example first opens a page and then “asserts” that the correct page
is loaded by comparing the title with the expected value. Only if this passes
will the following command run and “verify” that the text is present in the
expected location. The test case then “asserts” the first column in the second
row of the first table contains the expected value, and only if this passed
will the remaining cells in that row be “verified”.
verifyTextPresent
The command verifyTextPresent is used to verify specific text exists somewhere
on the page. It takes a single argument–the text pattern to be verified. For
example:
| Command | Target | Value |
|---|---|---|
| verifyTextPresent | Marketing Analysis |
This would cause Selenium to search for, and verify, that the text string
“Marketing Analysis” appears somewhere on the page currently being tested. Use
verifyTextPresent when you are interested in only the text itself being present
on the page. Do not use this when you also need to test where the text occurs
on the page.
verifyElementPresent
Use this command when you must test for the presence of a specific UI element,
rather than its content. This verification does not check the text, only the
HTML tag. One common use is to check for the presence of an image.
| Command | Target | Value |
|---|---|---|
| verifyElementPresent | //div/p/img |
This command verifies that an image, specified by the existence of an
HTML tag, is present on the page, and that it follows a
tag. The first (and only) parameter is a locator for telling the Selenese
command how to find the element. Locators are explained in the next section.
verifyElementPresent can be used to check the existence of any HTML tag within
the page. You can check the existence of links, paragraphs, divisions
etc. Here are a few more examples.
| Command | Target | Value |
|---|---|---|
| verifyElementPresent | //div/p | |
| verifyElementPresent | //div/a | |
| verifyElementPresent | id=Login | |
| verifyElementPresent | link=Go to Marketing Research | |
| verifyElementPresent | //a[2] | |
| verifyElementPresent | //head/title |
These examples illustrate the variety of ways a UI element may be tested. Again,
locators are explained in the next section.
verifyText
Use verifyText when both the text and its UI element must be tested. verifyText
must use a locator. If you choose an XPath or DOM locator, you can verify that
specific text appears at a specific location on the page relative to other UI
components on the page.
| Command | Target | Value |
|---|---|---|
| verifyText | //table/tr/td/div/p | This is my text and it occurs right after the div inside the table. |
Locating Elements
For many Selenium commands, a target is required. This target identifies an
element in the content of the web application, and consists of the location
strategy followed by the location in the format locatorType=location. The
locator type can be omitted in many cases. The various locator types are
explained below with examples for each.
Locating by Identifier
This is probably the most common method of locating elements and is the
catch-all default when no recognized locator type is used. With this strategy,
the first element with the id attribute value matching the location will be used. If
no element has a matching id attribute, then the first element with a name
attribute matching the location will be used.
For instance, your page source could have id and name attributes
as follows:
  <html>
   <body>
    <form id="loginForm">
     <input name="username" type="text" />
     <input name="password" type="password" />
     <input name="continue" type="submit" value="Login" />
    </form>
   </body>
  <html>
The following locator strategies would return the elements from the HTML
snippet above indicated by line number:
-
identifier=loginForm(3) -
identifier=password(5) -
identifier=continue(6) -
continue(6)
Since the identifier type of locator is the default, the identifier=
in the first three examples above is not necessary.
Locating by Id
This type of locator is more limited than the identifier locator type, but
also more explicit. Use this when you know an element’s id attribute.
   <html>
    <body>
     <form id="loginForm">
      <input name="username" type="text" />
      <input name="password" type="password" />
      <input name="continue" type="submit" value="Login" />
      <input name="continue" type="button" value="Clear" />
     </form>
    </body>
   <html>
-
id=loginForm(3)
Locating by Name
The name locator type will locate the first element with a matching name
attribute. If multiple elements have the same value for a name attribute, then
you can use filters to further refine your location strategy. The default
filter type is value (matching the value attribute).
   <html>
    <body>
     <form id="loginForm">
      <input name="username" type="text" />
      <input name="password" type="password" />
      <input name="continue" type="submit" value="Login" />
      <input name="continue" type="button" value="Clear" />
     </form>
   </body>
   <html>
-
name=username(4) -
name=continue value=Clear(7) -
name=continue Clear(7) -
name=continue type=button(7)
Note: Unlike some types of XPath and DOM locators, the three
types of locators above allow Selenium to test a UI element independent
of its location on
the page. So if the page structure and organization is altered, the test
will still pass. You may or may not want to also test whether the page
structure changes. In the case where web designers frequently alter the
page, but its functionality must be regression tested, testing via id and
name attributes, or really via any HTML property, becomes very important.
Locating by XPath
XPath is the language used for locating nodes in an XML document. As HTML can
be an implementation of XML (XHTML), Selenium users can leverage this powerful
language to target elements in their web applications. XPath extends beyond (as
well as supporting) the simple methods of locating by id or name
attributes, and opens up all sorts of new possibilities such as locating the
third checkbox on the page.
One of the main reasons for using XPath is when you don’t have a suitable id
or name attribute for the element you wish to locate. You can use XPath to
either locate the element in absolute terms (not advised), or relative to an
element that does have an id or name attribute. XPath locators can also be
used to specify elements via attributes other than id and name.
Absolute XPaths contain the location of all elements from the root (html) and
as a result are likely to fail with only the slightest adjustment to the
application. By finding a nearby element with an id or name attribute (ideally
a parent element) you can locate your target element based on the relationship.
This is much less likely to change and can make your tests more robust.
Since only xpath locators start with “//”, it is not necessary to include
the xpath= label when specifying an XPath locator.
   <html>
    <body>
     <form id="loginForm">
      <input name="username" type="text" />
      <input name="password" type="password" />
      <input name="continue" type="submit" value="Login" />
      <input name="continue" type="button" value="Clear" />
     </form>
   </body>
   <html>
-
xpath=/html/body/form[1](3) - Absolute path (would break if the HTML was
changed only slightly) -
//form[1](3) - First form element in the HTML -
xpath=//form[@id='loginForm'](3) - The form element with attribute named ‘id’ and the value ‘loginForm’ -
xpath=//form[input/@name='username'](3) - First form element with an input child
element with attribute named ‘name’ and the value ‘username’ -
//input[@name='username'](4) - First input element with attribute named ‘name’ and the value
‘username’ -
//form[@id='loginForm']/input[1](4) - First input child element of the
form element with attribute named ‘id’ and the value ‘loginForm’ -
//input[@name='continue'][@type='button'](7) - Input with attribute named ‘name’ and the value ‘continue’
and attribute named ‘type’ and the value ‘button’ -
//form[@id='loginForm']/input[4](7) - Fourth input child element of the
form element with attribute named ‘id’ and value ‘loginForm’
These examples cover some basics, but in order to learn more, the
following references are recommended:
There are also a couple of very useful Firefox Add-ons that can assist in
discovering the XPath of an element:
-
XPath Checker
XPath and can be used to test XPath results. - [Firebug](https://addons.mozilla.org/en-US/firefox/addon/1843 - XPath
suggestions are just one of the many powerful features of this very useful add-on.
Locating Hyperlinks by Link Text
This is a simple method of locating a hyperlink in your web page by using the
text of the link. If two links with the same text are present, then the first
match will be used.
  <html>
   <body>
    <p>Are you sure you want to do this?</p>
    <a href="continue.html">Continue</a>
    <a href="cancel.html">Cancel</a>
  </body>
  <html>
-
link=Continue(4) -
link=Cancel(5)
Locating by DOM
The Document Object Model represents an HTML document and can be accessed
using JavaScript. This location strategy takes JavaScript that evaluates to
an element on the page, which can be simply the element’s location using the
hierarchical dotted notation.
Since only dom locators start with “document”, it is not necessary to include
the dom= label when specifying a DOM locator.
   <html>
    <body>
     <form id="loginForm">
      <input name="username" type="text" />
      <input name="password" type="password" />
      <input name="continue" type="submit" value="Login" />
      <input name="continue" type="button" value="Clear" />
     </form>
   </body>
   <html>
-
dom=document.getElementById('loginForm')(3) -
dom=document.forms['loginForm'](3) -
dom=document.forms[0](3) -
document.forms[0].username(4) -
document.forms[0].elements['username'](4) -
document.forms[0].elements[0](4) -
document.forms[0].elements[3](7)
You can use Selenium itself as well as other sites and extensions to explore
the DOM of your web application. A good reference exists on W3Schools.
Locating by CSS
CSS (Cascading Style Sheets) is a language for describing the rendering of HTML
and XML documents. CSS uses Selectors for binding style properties to elements
in the document. These Selectors can be used by Selenium as another locating
strategy.
   <html>
    <body>
     <form id="loginForm">
      <input class="required" name="username" type="text" />
      <input class="required passfield" name="password" type="password" />
      <input name="continue" type="submit" value="Login" />
      <input name="continue" type="button" value="Clear" />
     </form>
   </body>
   <html>
-
css=form#loginForm(3) -
css=input[name="username"](4) -
css=input.required[type="text"](4) -
css=input.passfield(5) -
css=#loginForm input[type="button"](7) -
css=#loginForm input:nth-child(2)(5)
For more information about CSS Selectors, the best place to go is the W3C
publication. You’ll find additional
references there.
Implicit Locators
You can choose to omit the locator type in the following situations:
-
Locators without an explicitly defined locator strategy will default
to using the identifier locator strategy. SeeLocating by Identifier_. -
Locators starting with “//” will use the XPath locator strategy.
SeeLocating by XPath_. -
Locators starting with “document” will use the DOM locator strategy.
SeeLocating by DOM_
Matching Text Patterns
Like locators, patterns are a type of parameter frequently required by Selenese
commands. Examples of commands which require patterns are verifyTextPresent,
verifyTitle, verifyAlert, assertConfirmation, verifyText, and
verifyPrompt. And as has been mentioned above, link locators can utilize
a pattern. Patterns allow you to describe, via the use of special characters,
what text is expected rather than having to specify that text exactly.
There are three types of patterns: globbing, regular expressions, and exact.
Globbing Patterns
Most people are familiar with globbing as it is utilized in
filename expansion at a DOS or Unix/Linux command line such as ls *.c.
In this case, globbing is used to display all the files ending with a .c
extension that exist in the current directory. Globbing is fairly limited.
Only two special characters are supported in the Selenium implementation:
* which translates to “match anything,” i.e., nothing, a single character, or many characters.
[ ] (character class) which translates to “match any single character
found inside the square brackets.” A dash (hyphen) can be used as a shorthand
to specify a range of characters (which are contiguous in the ASCII character
set). A few examples will make the functionality of a character class clear:
[aeiou] matches any lowercase vowel
[0-9] matches any digit
[a-zA-Z0-9] matches any alphanumeric character
In most other contexts, globbing includes a third special character, the ?.
However, Selenium globbing patterns only support the asterisk and character
class.
To specify a globbing pattern parameter for a Selenese command, you can
prefix the pattern with a glob: label. However, because globbing
patterns are the default, you can also omit the label and specify just the
pattern itself.
Below is an example of two commands that use globbing patterns. The
actual link text on the page being tested
was “Film/Television Department”; by using a pattern
rather than the exact text, the click command will work even if the
link text is changed to “Film & Television Department” or “Film and Television
Department”. The glob pattern’s asterisk will match “anything or nothing”
between the word “Film” and the word “Television”.
| Command | Target | Value |
|---|---|---|
| click | link=glob:Film*Television Department | |
| verifyTitle | glob:*Film*Television* |
The actual title of the page reached by clicking on the link was “De Anza Film And
Television Department - Menu”. By using a pattern rather than the exact
text, the verifyTitle will pass as long as the two words “Film” and “Television” appear
(in that order) anywhere in the page’s title. For example, if
the page’s owner should shorten
the title to just “Film & Television Department,” the test would still pass.
Using a pattern for both a link and a simple test that the link worked (such as
the verifyTitle above does) can greatly reduce the maintenance for such
test cases.
Regular Expression Patterns
Regular expression patterns are the most powerful of the three types
of patterns that Selenese supports. Regular expressions
are also supported by most high-level programming languages, many text
editors, and a host of tools, including the Linux/Unix command-line
utilities grep, sed, and awk. In Selenese, regular
expression patterns allow a user to perform many tasks that would
be very difficult otherwise. For example, suppose your test needed
to ensure that a particular table cell contained nothing but a number.
regexp: [0-9]+ is a simple pattern that will match a decimal number of any length.
Whereas Selenese globbing patterns support only the *
and [ ] (character
class) features, Selenese regular expression patterns offer the same
wide array of special characters that exist in JavaScript. Below
are a subset of those special characters:
| PATTERN | MATCH |
|---|---|
| . | any single character |
| character class: any single character that appears inside the brackets | |
| * | quantifier: 0 or more of the preceding character (or group) |
| + | quantifier: 1 or more of the preceding character (or group) |
| ? | quantifier: 0 or 1 of the preceding character (or group) |
| {1,5} | quantifier: 1 through 5 of the preceding character (or group) |
| | | alternation: the character/group on the left or the character/group on the right |
| ( ) | grouping: often used with alternation and/or quantifier |
Regular expression patterns in Selenese need to be prefixed with
either regexp: or regexpi:. The former is case-sensitive; the
latter is case-insensitive.
A few examples will help clarify how regular expression patterns can
be used with Selenese commands. The first one uses what is probably
the most commonly used regular expression pattern–.* (“dot star”). This
two-character sequence can be translated as “0 or more occurrences of
any character” or more simply, “anything or nothing.” It is the
equivalent of the one-character globbing pattern * (a single asterisk).
| Command | Target | Value |
|---|---|---|
| click | link=glob:Film*Television Department | |
| verifyTitle | regexp:.*Film.*Television.* |
The example above is functionally equivalent to the earlier example
that used globbing patterns for this same test. The only differences
are the prefix (regexp: instead of glob:) and the “anything
or nothing” pattern (.* instead of just *).
The more complex example below tests that the Yahoo!
Weather page for Anchorage, Alaska contains info on the sunrise time:
| Command | Target | Value |
|---|---|---|
| open | http://weather.yahoo.com/forecast/USAK0012.html | |
| verifyTextPresent | regexp |
Let’s examine the regular expression above one part at a time:
Sunrise: * |
The string Sunrise: followed by 0 or more spaces |
[0-9]{1,2} |
1 or 2 digits (for the hour of the day) |
: |
The character : (no special characters involved) |
[0-9]{2} |
2 digits (for the minutes) followed by a space |
[ap]m |
“a” or “p” followed by “m” (am or pm) |
Exact Patterns
The exact type of Selenium pattern is of marginal usefulness.
It uses no special characters at all. So, if you needed to look for
an actual asterisk character (which is special for both globbing and
regular expression patterns), the exact pattern would be one way
to do that. For example, if you wanted to select an item labeled
“Real *” from a dropdown, the following code might work or it might not.
The asterisk in the glob:Real * pattern will match anything or nothing.
So, if there was an earlier select option labeled “Real Numbers,” it would
be the option selected rather than the “Real *” option.
| Command | Target | Value |
|---|---|---|
| select | //select | glob:Real * |
In order to ensure that the “Real *” item would be selected, the exact:
prefix could be used to create an exact pattern as shown below:
| Command | Target | Value |
|---|---|---|
| select | //select | exact:Real * |
But the same effect could be achieved via escaping the asterisk in a
regular expression pattern:
| Command | Target | Value |
|---|---|---|
| select | //select | regexp:Real \* |
It’s rather unlikely that most testers will ever need to look for
an asterisk or a set of square brackets with characters inside them (the
character class for globbing patterns). Thus, globbing patterns and
regular expression patterns are sufficient for the vast majority of us.
The “AndWait” Commands
The difference between a command and its AndWait
alternative is that the regular command (e.g. click) will do the action and
continue with the following command as fast as it can, while the AndWait
alternative (e.g. clickAndWait) tells Selenium to wait for the page to
load after the action has been done.
The AndWait alternative is always used when the action causes the browser to
navigate to another page or reload the present one.
Be aware, if you use an AndWait command for an action that
does not trigger a navigation/refresh, your test will fail. This happens
because Selenium will reach the AndWait’s timeout without seeing any
navigation or refresh being made, causing Selenium to raise a timeout
exception.
The waitFor Commands in AJAX applications
In AJAX driven web applications, data is retrieved from server without
refreshing the page. Using andWait commands will not work as the page is not
actually refreshed. Pausing the test execution for a certain period of time is
also not a good approach as web element might appear later or earlier than the
stipulated period depending on the system’s responsiveness, load or other
uncontrolled factors of the moment, leading to test failures. The best approach
would be to wait for the needed element in a dynamic period and then continue
the execution as soon as the element is found.
This is done using waitFor commands, as waitForElementPresent or
waitForVisible, which wait dynamically, checking for the desired condition
every second and continuing to the next command in the script as soon as the
condition is met.
Sequence of Evaluation and Flow Control
When a script runs, it simply runs in sequence, one command after another.
Selenese, by itself, does not support condition statements (if-else, etc.) or
iteration (for, while, etc.). Many useful tests can be conducted without flow
control. However, for a functional test of dynamic content, possibly involving
multiple pages, programming logic is often needed.
When flow control is needed, there are three options:
a) Run the script using Selenium-RC and a client library such as Java or
PHP to utilize the programming language’s flow control features.
b) Run a small JavaScript snippet from within the script using the storeEval command.
c) Install the goto_sel_ide.js extension.
Most testers will export the test script into a programming language file that uses the
Selenium-RC API (see the Selenium-IDE chapter). However, some organizations prefer
to run their scripts from Selenium-IDE whenever possible (for instance, when they have
many junior-level people running tests for them, or when programming skills are
lacking). If this is your case, consider a JavaScript snippet or the goto_sel_ide.js extension.
Store Commands and Selenium Variables
You can use Selenium variables to store constants at the
beginning of a script. Also, when combined with a data-driven test design
(discussed in a later section), Selenium variables can be used to store values
passed to your test program from the command-line, from another program, or from
a file.
The plain store command is the most basic of the many store commands and can be used
to simply store a constant value in a Selenium variable. It takes two
parameters, the text value to be stored and a Selenium variable. Use the
standard variable naming conventions of only alphanumeric characters when
choosing a name for your variable.
| Command | Target | Value |
|---|---|---|
| store | paul@mysite.org |
Later in your script, you’ll want to use the stored value of your
variable. To access the value of a variable, enclose the variable in
curly brackets ({}) and precede it with a dollar sign like this.
| Command | Target | Value |
|---|---|---|
| verifyText | //div/p | \${userName} |
A common use of variables is for storing input for an input field.
| Command | Target | Value |
|---|---|---|
| type | id=login | \${userName} |
Selenium variables can be used in either the first or second parameter and
are interpreted by Selenium prior to any other operations performed by the
command. A Selenium variable may also be used within a locator expression.
An equivalent store command exists for each verify and assert command. Here
are a couple more commonly used store commands.
storeElementPresent
This corresponds to verifyElementPresent. It simply stores a boolean value–“true”
or “false”–depending on whether the UI element is found.
storeText
StoreText corresponds to verifyText. It uses a locator to identify specific
page text. The text, if found, is stored in the variable. StoreText can be
used to extract text from the page being tested.
storeEval
This command takes a script as its
first parameter. Embedding JavaScript within Selenese is covered in the next section.
StoreEval allows the test to store the result of running the script in a variable.
JavaScript and Selenese Parameters
JavaScript can be used with two types of Selenese parameters: script
and non-script (usually expressions). In most cases, you’ll want to access
and/or manipulate a test case variable inside the JavaScript snippet used as
a Selenese parameter. All variables created in your test case are stored in
a JavaScript associative array. An associative array has string indexes
rather than sequential numeric indexes. The associative array containing
your test case’s variables is named storedVars. Whenever you wish to
access or manipulate a variable within a JavaScript snippet, you must refer
to it as storedVars[‘yourVariableName’].
JavaScript Usage with Script Parameters
Several Selenese commands specify a script parameter including
assertEval, verifyEval, storeEval, and waitForEval.
These parameters require no special syntax. A Selenium-IDE
user would simply place a snippet of JavaScript code into
the appropriate field, normally the Target field (because
a script parameter is normally the first or only parameter).
The example below illustrates how a JavaScript snippet
can be used to perform a simple numerical calculation:
| Command | Target | Value |
|---|---|---|
| store | 10 | hits |
| storeXpathCount | //blockquote | blockquotes |
| storeEval | storedVars[‘hits’].storedVars[‘blockquotes’] | paragraphs |
This next example illustrates how a JavaScript snippet can include calls to
methods, in this case the JavaScript String object’s toUpperCase method
and toLowerCase method.
| Command | Target | Value |
|---|---|---|
| store | Edith Wharton | name |
| storeEval | storedVars[‘name’].toUpperCase() | uc |
| storeEval | storedVars[‘name’].toUpperCase() | lc |
JavaScript Usage with Non-Script Parameters
JavaScript can also be used to help generate values for parameters, even
when the parameter is not specified to be of type script.
However, in this case, special syntax is required–the entire parameter
value must be prefixed by javascript{ with a trailing }, which encloses the JavaScript
snippet, as in javascript{*yourCodeHere*}.
Below is an example in which the type command’s second parameter
value is generated via JavaScript code using this special syntax:
| Command | Target | Value |
|---|---|---|
| store | league of nations | searchString |
| type | q | javascript{storedVars[‘searchString’].toUpperCase()} |
echo - The Selenese Print Command
Selenese has a simple command that allows you to print text to your test’s
output. This is useful for providing informational progress notes in your
test which display on the console as your test is running. These notes also can be
used to provide context within your test result reports, which can be useful
for finding where a defect exists on a page in the event your test finds a
problem. Finally, echo statements can be used to print the contents of
Selenium variables.
| Command | Target | Value |
|---|---|---|
| echo | Testing page footer now. | |
| echo | Username is \${userName} |
Alerts, Popups, and Multiple Windows
Suppose that you are testing a page that looks like this.
  <!DOCTYPE HTML>
  <html>
  <head>
    <script type="text/javascript">
      function output(resultText){
        document.getElementById('output').childNodes[0].nodeValue=resultText;
      }

      function show_confirm(){
        var confirmation=confirm("Chose an option.");
        if (confirmation==true){
          output("Confirmed.");
        }
        else{
          output("Rejected!");
        }
      }

      function show_alert(){
        alert("I'm blocking!");
        output("Alert is gone.");
      }
      function show_prompt(){
        var response = prompt("What's the best web QA tool?","Selenium");
        output(response);
      }
      function open_window(windowName){
        window.open("newWindow.html",windowName);
      }
      </script>
  </head>
  <body>

    <input type="button" id="btnConfirm" onclick="show_confirm()" value="Show confirm box" />
    <input type="button" id="btnAlert" onclick="show_alert()" value="Show alert" />
    <input type="button" id="btnPrompt" onclick="show_prompt()" value="Show prompt" />
    <a href="newWindow.html" id="lnkNewWindow" target="_blank">New Window Link</a>
    <input type="button" id="btnNewNamelessWindow" onclick="open_window()" value="Open Nameless Window" />
    <input type="button" id="btnNewNamedWindow" onclick="open_window('Mike')" value="Open Named Window" />

    <br />
    <span id="output">
    </span>
  </body>
  </html>
The user must respond to alert/confirm boxes, as well as moving focus to newly
opened popup windows. Fortunately, Selenium can cover JavaScript pop-ups.
But before we begin covering alerts/confirms/prompts in individual detail, it is
helpful to understand the commonality between them. Alerts, confirmation boxes
and prompts all have variations of the following
| Command | Description |
|---|---|
| assertFoo(pattern) | throws error if pattern doesn’t match the text of the pop-up |
| assertFooPresent | throws error if pop-up is not available |
| assertFooNotPresent | throws error if any pop-up is present |
| storeFoo(variable) | stores the text of the pop-up in a variable |
| storeFooPresent(variable) | stores the text of the pop-up in a variable and returns true or false |
When running under Selenium, JavaScript pop-ups will not appear. This is because
the function calls are actually being overridden at runtime by Selenium’s own
JavaScript. However, just because you cannot see the pop-up doesn’t mean you don’t
have to deal with it. To handle a pop-up, you must call its assertFoo(pattern)
function. If you fail to assert the presence of a pop-up your next command will be
blocked and you will get an error similar to the following [error] Error: There was an unexpected Confirmation! [Chose an option.]
Alerts
Let’s start with alerts because they are the simplest pop-up to handle. To begin,
open the HTML sample above in a browser and click on the “Show alert” button. You’ll
notice that after you close the alert the text “Alert is gone.” is displayed on the
page. Now run through the same steps with Selenium IDE recording, and verify
the text is added after you close the alert. Your test will look something like
this:
| Command | Target | Value |
|---|---|---|
| open | / | |
| click | btnAlert | |
| assertAlert | I’m blocking! | |
| verifyTextPresent | Alert is gone. |
You may be thinking “That’s odd, I never tried to assert that alert.” But this is
Selenium-IDE handling and closing the alert for you. If you remove that step and replay
the test you will get the following error [error] Error: There was an unexpected Alert! [I'm blocking!]. You must include an assertion of the alert to acknowledge
its presence.
If you just want to assert that an alert is present but either don’t know or don’t care
what text it contains, you can use assertAlertPresent. This will return true or false,
with false halting the test.
Confirmations
Confirmations behave in much the same way as alerts, with assertConfirmation and
assertConfirmationPresent offering the same characteristics as their alert counterparts.
However, by default Selenium will select OK when a confirmation pops up. Try recording
clicking on the “Show confirm box” button in the sample page, but click on the “Cancel” button
in the popup, then assert the output text. Your test may look something like this:
| Command | Target | Value |
|---|---|---|
| open | / | |
| click | btnConfirm | |
| chooseCancelOnNextConfirmation | ||
| assertConfirmation | Choose an option. | |
| verifyTextPresent | Rejected |
The chooseCancelOnNextConfirmation function tells Selenium that all following
confirmation should return false. It can be reset by calling chooseOkOnNextConfirmation.
You may notice that you cannot replay this test, because Selenium complains that there
is an unhandled confirmation. This is because the order of events Selenium-IDE records
causes the click and chooseCancelOnNextConfirmation to be put in the wrong order (it makes sense
if you think about it, Selenium can’t know that you’re cancelling before you open a confirmation)
Simply switch these two commands and your test will run fine.
Prompts
Prompts behave in much the same way as alerts, with assertPrompt and assertPromptPresent
offering the same characteristics as their alert counterparts. By default, Selenium will wait for
you to input data when the prompt pops up. Try recording clicking on the “Show prompt” button in
the sample page and enter “Selenium” into the prompt. Your test may look something like this:
| Command | Target | Value |
|---|---|---|
| open | / | |
| answerOnNextPrompt | Selenium! | |
| click | id=btnPrompt | |
| assertPrompt | What’s the best web QA tool? | |
| verifyTextPresent | Selenium! |
If you choose cancel on the prompt, you may notice that answerOnNextPrompt will simply show a
target of blank. Selenium treats cancel and a blank entry on the prompt basically as the same thing.
Debugging
Debugging means finding and fixing errors in your test case. This is a normal
part of test case development.
We won’t teach debugging here as most new users to Selenium will already have
some basic experience with debugging. If this is new to you, we recommend
you ask one of the developers in your organization.
Breakpoints and Startpoints
The Sel-IDE supports the setting of breakpoints and the ability to start and
stop the running of a test case, from any point within the test case. That is, one
can run up to a specific command in the middle of the test case and inspect how
the test case behaves at that point. To do this, set a breakpoint on the
command just before the one to be examined.
To set a breakpoint, select a command, right-click, and from the context menu
select Toggle Breakpoint. Then click the Run button to run your test case from
the beginning up to the breakpoint.
It is also sometimes useful to run a test case from somewhere in the middle to
the end of the test case or up to a breakpoint that follows the starting point.
For example, suppose your test case first logs into the website and then
performs a series of tests and you are trying to debug one of those tests.
However, you only need to login once, but you need to keep rerunning your
tests as you are developing them. You can login once, then run your test case
from a startpoint placed after the login portion of your test case. That will
prevent you from having to manually logout each time you rerun your test case.
To set a startpoint, select a command, right-click, and from the context
menu select Set/Clear Start Point. Then click the Run button to execute the
test case beginning at that startpoint.
Stepping Through a Testcase
To execute a test case one command at a time (“step through” it), follow these
steps:
-
Start the test case running with the Run button from the toolbar.
-
Immediately pause the executing test case with the Pause button.
-
Repeatedly select the Step button.
Find Button
The Find button is used to see which UI element on the currently displayed
webpage (in the browser) is used in the currently selected Selenium command.
This is useful when building a locator for a command’s first parameter (see the
section on :ref:locators <locators-section> in the Selenium Commands chapter).
It can be used with any command that identifies a UI element on a webpage,
i.e. click, clickAndWait, type, and certain assert and verify commands,
among others.
From Table view, select any command that has a locator parameter.
Click the Find button.
Now look on the webpage: There should be a bright green rectangle
enclosing the element specified by the locator parameter.
Page Source for Debugging
Often, when debugging a test case, you simply must look at the page source (the
HTML for the webpage you’re trying to test) to determine a problem. Firefox
makes this easy. Simply right-click the webpage and select 'View->Page Source.
The HTML opens in a separate window. Use its Search feature (Edit=>Find)
to search for a keyword to find the HTML for the UI element you’re trying
to test.
Alternatively, select just that portion of the webpage for which you want to
see the source. Then right-click the webpage and select View Selection
Source. In this case, the separate HTML window will contain just a small
amount of source, with highlighting on the portion representing your
selection.
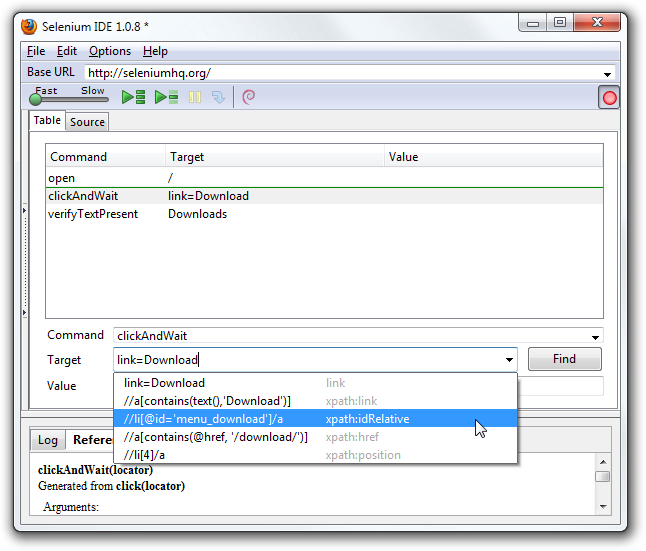
Locator Assistance
Whenever Selenium-IDE records a locator-type argument, it stores
additional information which allows the user to view other possible
locator-type arguments that could be used instead. This feature can be
very useful for learning more about locators, and is often needed to help
one build a different type of locator than the type that was recorded.
This locator assistance is presented on the Selenium-IDE window as a drop-down
list accessible at the right end of the Target field
(only when the Target field contains a recorded locator-type argument).
Below is a snapshot showing the
contents of this drop-down for one command. Note that the first column of
the drop-down provides alternative locators, whereas the second column
indicates the type of each alternative.
Writing a Test Suite
A test suite is a collection of test cases which is displayed in the leftmost
pane in the IDE.
The test suite pane can be manually opened or closed via selecting a small dot
halfway down the right edge of the pane (which is the left edge of the
entire Selenium-IDE window if the pane is closed).
The test suite pane will be automatically opened when an existing test suite
is opened or when the user selects the New Test Case item from the
File menu. In the latter case, the new test case will appear immediately
below the previous test case.
Selenium-IDE also supports loading pre-existing test cases by using the File
→ Add Test Case menu option. This allows you to add existing test cases to
a new test suite.
A test suite file is an HTML file containing a one-column table. Each
cell of each row in the section contains a link to a test case.
The example below is of a test suite containing four test cases:
<html>
    <head>
        <meta http-equiv="Content-Type" content="text/html; charset=UTF-8">
        <title>Sample Selenium Test Suite</title>
    </head>
    <body>
        <table cellpadding="1" cellspacing="1" border="1">
            <thead>
                <tr><td>Test Cases for De Anza A-Z Directory Links</td></tr>
            </thead>
        <tbody>
            <tr><td><a href="./a.html">A Links</a></td></tr>
            <tr><td><a href="./b.html">B Links</a></td></tr>
            <tr><td><a href="./c.html">C Links</a></td></tr>
            <tr><td><a href="./d.html">D Links</a></td></tr>
        </tbody>
        </table>
    </body>
</html>
Note: Test case files should not have to be co-located with the test suite file
that invokes them. And on Mac OS and Linux systems, that is indeed the
case. However, at the time of this writing, a bug prevents Windows users
from being able to place the test cases elsewhere than with the test suite
that invokes them.
User Extensions
User extensions are JavaScript files that allow one to create his or her own
customizations and features to add additional functionality. Often this is in
the form of customized commands although this extensibility is not limited to
additional commands.
There are a number of useful extensions_ created by users.
IMPORTANT: THIS SECTION IS OUT OF DATE–WE WILL BE REVISING THIS SOON.
Perhaps the most popular of all Selenium-IDE extensions
is one which provides flow control in the form of while loops and primitive
conditionals. This extension is the goto_sel_ide.js_. For an example
of how to use the functionality provided by this extension, look at the
page_ created by its author.
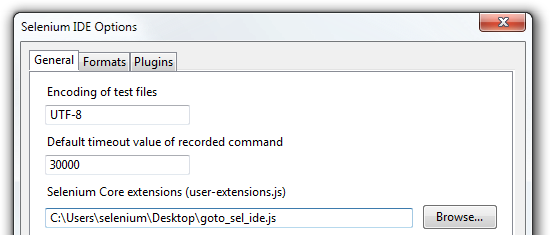
To install this extension, put the pathname to its location on your
computer in the Selenium Core extensions field of Selenium-IDE’s
Options=>Options=>General tab.
After selecting the OK button, you must close and reopen Selenium-IDE
in order for the extensions file to be read. Any change you make to an
extension will also require you to close and reopen Selenium-IDE.
Information on writing your own extensions can be found near the
bottom of the Selenium Reference_ document.
Sometimes it can prove very useful to debug step by step Selenium IDE and your
User Extension. The only debugger that appears able to debug
XUL/Chrome based extensions is Venkman which is supported in Firefox until version 32 included.
The step by step debug has been verified to work with Firefox 32 and Selenium IDE 2.9.0.
Format
Format, under the Options menu, allows you to select a language for saving
and displaying the test case. The default is HTML.
If you will be using Selenium-RC to run your test cases, this feature is used
to translate your test case into a programming language. Select the
language, e.g. Java, PHP, you will be using with Selenium-RC for developing
your test programs. Then simply save the test case using File=>Export Test Case As.
Your test case will be translated into a series of functions in the language you
choose. Essentially, program code supporting your test is generated for you
by Selenium-IDE.
Also, note that if the generated code does not suit your needs, you can alter
it by editing a configuration file which defines the generation process.
Each supported language has configuration settings which are editable. This
is under the Options=>Options=>Formats tab.
Executing Selenium-IDE Tests on Different Browsers
While Selenium-IDE can only run tests against Firefox, tests
developed with Selenium-IDE can be run against other browsers, using a
simple command-line interface that invokes the Selenium-RC server. This topic
is covered in the :ref:Run Selenese tests <html-suite> section on Selenium-RC
chapter. The -htmlSuite command-line option is the particular feature of interest.
Troubleshooting
Below is a list of image/explanation pairs which describe frequent
sources of problems with Selenium-IDE:
Table view is not available with this format.
This message can be occasionally displayed in the Table tab when Selenium IDE is
launched. The workaround is to close and reopen Selenium IDE. See
issue 1008.
for more information. If you are able to reproduce this reliably then please
provide details so that we can work on a fix.
error loading test case: no command found
You’ve used File=>Open to try to open a test suite file. Use File=>Open
Test Suite instead.
An enhancement request has been raised to improve this error message. See
issue 1010.
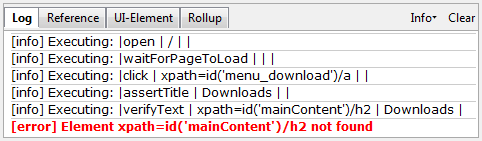
This type of error may indicate a timing problem, i.e., the element
specified by a locator in your command wasn’t fully loaded when the command
was executed. Try putting a pause 5000 before the command to determine
whether the problem is indeed related to timing. If so, investigate using an
appropriate waitFor* or *AndWait command before the failing command.
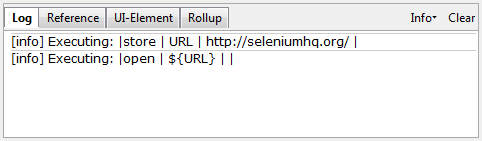
Whenever your attempt to use variable substitution fails as is the
case for the open command above, it indicates
that you haven’t actually created the variable whose value you’re
trying to access. This is
sometimes due to putting the variable in the Value field when it
should be in the Target field or vice versa. In the example above,
the two parameters for the store command have been erroneously
placed in the reverse order of what is required.
For any Selenese command, the first required parameter must go
in the Target field, and the second required parameter (if one exists)
must go in the Value field.
error loading test case: [Exception… “Component returned failure code:
0x80520012 (NS_ERROR_FILE_NOT_FOUND) [nsIFileInputStream.init]” nresult:
“0x80520012 (NS_ERROR_FILE_NOT_FOUND)” location: “JS frame ::
chrome://selenium-ide/content/file-utils.js :: anonymous :: line 48” data: no]
One of the test cases in your test suite cannot be found. Make sure that the
test case is indeed located where the test suite indicates it is located. Also,
make sure that your actual test case files have the .html extension both in
their filenames, and in the test suite file where they are referenced.
An enhancement request has been raised to improve this error message. See
issue 1011.

Your extension file’s contents have not been read by Selenium-IDE. Be
sure you have specified the proper pathname to the extensions file via
Options=>Options=>General in the Selenium Core extensions field.
Also, Selenium-IDE must be restarted after any change to either an
extensions file or to the contents of the Selenium Core extensions
field.
官方链接为:https://www.selenium.dev/documentation/zh-cn/legacy_docs/selenium_ide
